
Introduction
This week we learnt about the possibilities of networking and communications between different computers, or boards that are commanded by autonomous microchips. The advantages of communicating between devices is crucial to some activities where objects work in a network or as part of a system.
An example of this use would be the one I have thought for my final project: since I want to make a set of self-playing drums, they all should be able to talk to each other in order to synchronize over a common rhythm.
Assignment
This week's assignment is to make at least two microchips communicate via wire or wireless.
I decided I was going to try a very simple way of this because it is somehow difficult to understand. What I want to do is to set a board with a blinking light to communicate with another one that also has a blinking light in order for them to be synchronized. I used serial communications and the SoftwareSerial library in order to explore around my goals. What I have so far is this idea working, but with some defects:
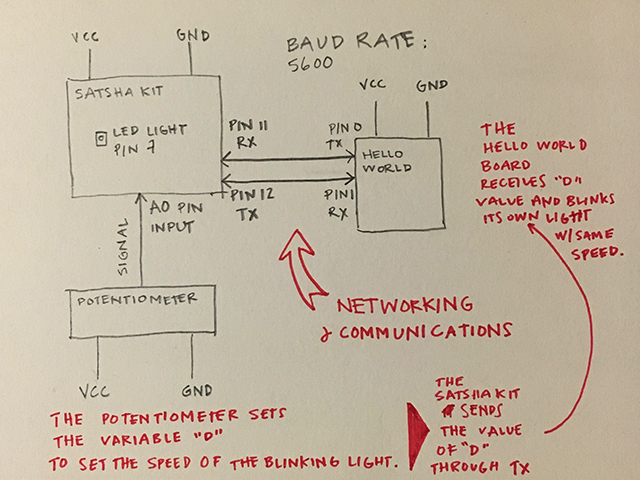
You can see this very simple block diagram to understand the boards I have used and how I connected them together:
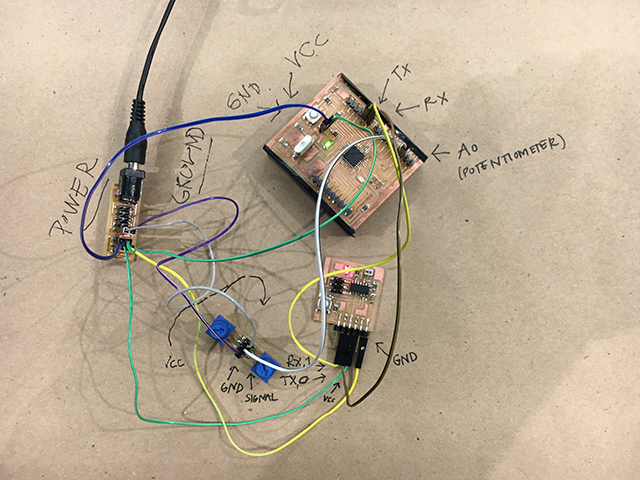
Also, this picture makes it clear in terms of what boards I'm using and what connections are being done. See the pen written detail for a connection between the diagram above and the picture!
To do this I programmed with arduino my SatshaKit board for it to blink and to write over the serial port the mapped value of the blinking delay. This variable is declared as D.

I programmed the Hello World board to also to a similar thing, but receiving the information from the other one and then turning it into the delay for the blinking light of its own.

So far I'd say this exploration is working to a certain degree, but it hasn't reached the level of clearness that I need in order to be happy with it. For now I'm going to leave it as it is and I hope I can come back to a similar excercise where I have to deal with Networking and Communications again.
Files
File 1: Arduino for SatshaKit board here.
File 2: Arduino for Hello World board here.
To make and produce the SatshaKit board, access their deveolpment page.
To make the Hello World board access instructions here.
To make the potentiometer board access instructions here.
To make the power board access instructions here.