What is Embedded Systems ?
An embedded system is a computer system with a dedicated function within a larger mechanical or electrical system, often with real-time computing constraints. It is embedded as part of a complete device often including hardware and mechanical parts. Embedded systems control many devices in common use today.Ninety-eight percent of all microprocessors are manufactured as components of embedded systems.
Examples of properties of typically embedded computers when compared with general-purpose counterparts are low power consumption, small size, rugged operating ranges, and low per-unit cost. This comes at the price of limited processing resources, which make them significantly more difficult to program and to interact with. However, by building intelligence mechanisms on top of the hardware, taking advantage of possible existing sensors and the existence of a network of embedded units, one can both optimally manage available resources at the unit and network levels as well as provide augmented functions, well beyond those available. For example, intelligent techniques can be designed to manage power consumption of embedded systems Read More
What is Embedded Programming ?
Embedded programming is a specific type of programming that supports the creation of consumer facing or business facing devices that don't operate on traditional operating systems the way that full-scale laptop computers and mobile devices do. The idea of embedded programming is part of what drives the evolution of the digital appliances and equipment in today's IT markets.Embedded programming is also known as embedded software development or embedded systems programming.
Some experts define embedded programming as the dominant methodology for microcontroller programming. Essentially, embedded programming involves programming small computers that drive devices. In terms of its practical implementation, embedded programming is useful in the design of software for automotive features, small facilities-handling devices like thermostats, handheld games or other small devices. Read More
Microcontroller vs Microprocessor: Primary Differences
Typically an MCU uses on-chip embedded Flash memory in which to store and execute its program. Storing the program this way means the MCU having a shorter start-up period and executing code quickly. The only practical limitation to using embedded memory is that the total available memory space is finite. Most Flash MCU devices available on the market have a maximum of 2 Mbytes of Program memory. This may prove to be a limiting factor, depending on the application.
MPUs do not have memory constraints in the same way. They use external memory to provide program and data storage. The program is typically stored in non-volatile memory, such as NAND or serial Flash. At start-up, this is loaded into an external DRAM and execution commences. This means the MPU will not be up and running as quickly as an MCU but the amount of DRAM and NVM you can connect to the processor is in the range of hundreds of Mbytes and even Gbytes for NAND.
Another difference is power. By embedding its own power supply, an MCU needs just one single voltage power rail. By comparison, an MPU requires several difference voltage rails for core, DDR etc. The developer needs to cater for this with additional power ICs / converters on- board.
Explained below is table for the difference between microprocessor and microcontroller.
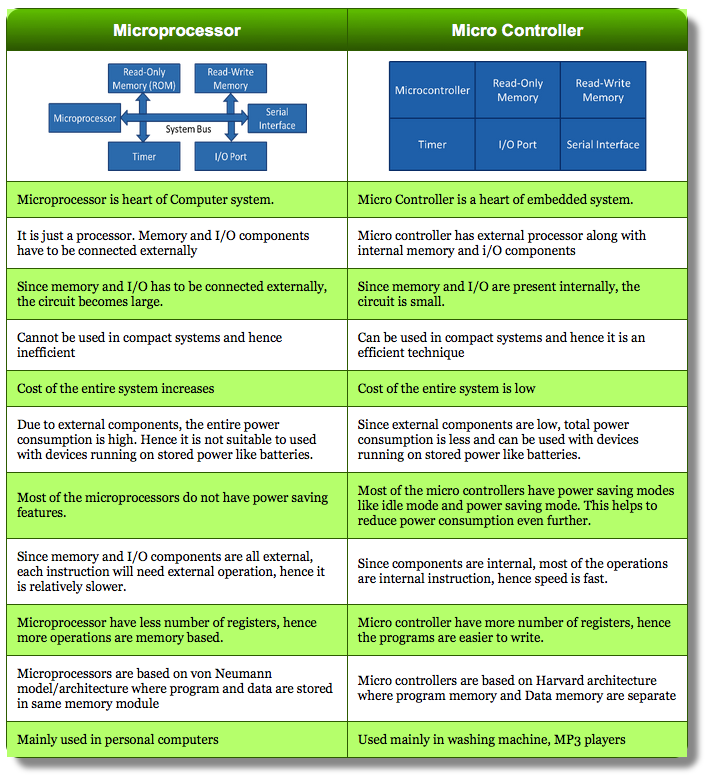
mP Vs mC illusrated
Let's go to understanding the syntax and Data Sheet
Programming syntax and Data sheet
Neils Lecture summary !
Our assignment for the week to understand and Read a microcontroller data sheet.Program your board to do something, with as many different programming languages and programming environments as possible.
Embedded C Programming is the soul of the processor functioning inside each and every embedded system we come across in our daily life, such as mobile phone, washing machine, and digital camera.
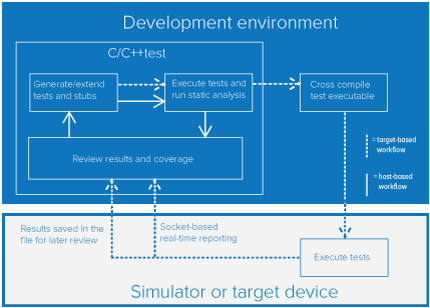
illusrated about the workflow
Each processor is associated with an embedded software. The first and foremost thing is the embedded software that decides functioning of the embedded system. Embedded C language is most frequently used to program the microcontroller.
Earlier, many embedded applications were developed using assembly level programming. However, they did not provide portability. This disadvantage was overcome by the advent of various high level languages like C, Pascal, and COBOL. However, it was the C language that got extensive acceptance for embedded systems, and it continues to do so. The C code written is more reliable, scalable, and portable; and in fact, much easier to understand.
About C Language
C language was developed by Dennis Ritchie in 1969. It is a collection of one or more functions, and every function is a collection of statements performing a specific task.
C language is a middle-level language as it supports high-level applications and low-level applications. Before going into the details of embedded C programming, we should know about RAM memory organization.
Salient features of the language
The embedded system designers must know about the hardware architecture to write programs. These programs play prominent role in monitoring and controlling external devices. They also directly operate and use the internal architecture of the microcontroller, such as interrupt handling, timers, serial communication and other available features.
Differences between C and Embedded C
| C Programming | Embedded C Programming |
|---|---|
| Possesses native development in nature. | Possesses cross development in nature. |
| Independent of hardware architecture. | Dependent of hardware architecture.(i.e; microcontroller or other devices) |
| Used for Desktop applications,OS and PC memories. | Used for limited resources like RAM,ROM and I/O peripherals on embedded controller. |
The basic additional features of the embedded software
Data types
The data type refers to an extensive system for declaring variables of different types like integer, character, float, etc. The embedded C software uses four data types that are used to store data in the memory.
The ‘char’ is used to store any single character; ‘int’ is used to store integer value, and ‘float’ is used to store any precision floating point value.
The size and range of different data types on a 32-bit machine is given in the following table. The size and range may vary on machines with different word sizes.
| Data Type | SizeRange | |
|---|---|---|
| Char or singed char | 1 byte | -128 to +128 |
| Unsigned char | 1 byte | 0 to 255 |
| int or signed int | 2 byte | -32768 to 32767 |
| Unsigned int | 2 byte | 0 to 65535 |
Keywords
There are certain words that are reserved for doing specific tasks. These words are known as keywords. They are standard and predefined in the Embedded C.
Keywords are always written in lowercase. These keywords must be defined before writing the main program. The basic keywords of an embedded software are given below:
| Name | Function |
|---|---|
| sbit | Accessing of single bit |
| bit | Accessing of bit addressable memory of RAM |
| sfr | Acessing of sfr register by another name |
sbit: This data type is used in case of accessing a single bit of SFR register.
Bit: This data type is used for accessing the bit addressable memory of RAM (20h-2fh).
SFR: This data type is used for accessing a SFR register by another name. All the SFR registers must be declared with capital letters.
SFR Register: The SFR stands for ‘Special Function Register’. Microcontroller 8051 has 256 bytes of RAM memory. This RAM is divided into two parts: the first part of 128 bytes is used for data storage, and the other of 128 bytes is used for SFR registers. All peripheral devices like I/O ports, timers and counters are stored in the SFR register, and each element has a unique address.
The Structure of an Embedded C Program
…………..
}
…………..
}
Comments: In embedded C programming language, we can place comments in our code which helps the reader to understand the code easily.
C=a+b; /* add two variables whose value is stored in another variable C*/
Preprocessor directives: All the functions of the embedded C software are included in the preprocessor library like “#includes
Global variable
A global variable is a variable that is declared before the main function, and can be accessed on any function in the program.
    #include < reg51.h >
    sbit a=p1^5; /* global declaration*/
    void main()
    {
Local variable
A local variable is a variable declared within a function, and it is valid only to be used within that function.
    #include < reg51.h >
    void main()
    unsigned int k; /* local declaration*/
    a=0x00;
    while(1)
    {
Main () function
The execution of a program starts with the main function. Every program uses only one main () function.
Advantages of embedded C program
Now let's understand the Data Sheet
i have gone through the datasheet of the ATTiny44
undersatnd the programming pinouts from the data sheet
the data sheet can be obtained here
Softwares used to program
i have learned the Embeded C Programming first and i know the arduino programming language i have used it for programming the board
Blink Programming Using AVR C
#include < avr/io.h >       // Importing the avr/io library (as stdio.h in the normal C)
#define F_CPU 20000000      //telling the frequency, here the 20Mhz of the Resonator
#include < util/delay.h >       // Importing library for  delay (For blinking LEDs we need delay)

int main(void)
{
	DDRA = 0b00000100;       //Set Pin PA2 on PORT A as output

    while(1)
    {
		PORTA = PORTA | (0b00000100); //PA2 is 3 from left

		_delay_ms(1000);          // delay of 1 second

		PORTA=(0x00);            // Make all pins in port A low

		_delay_ms(1000);         // delay of 1 second
	}
}
i have used the yadu (our instructors ) ComflashComflash Utility
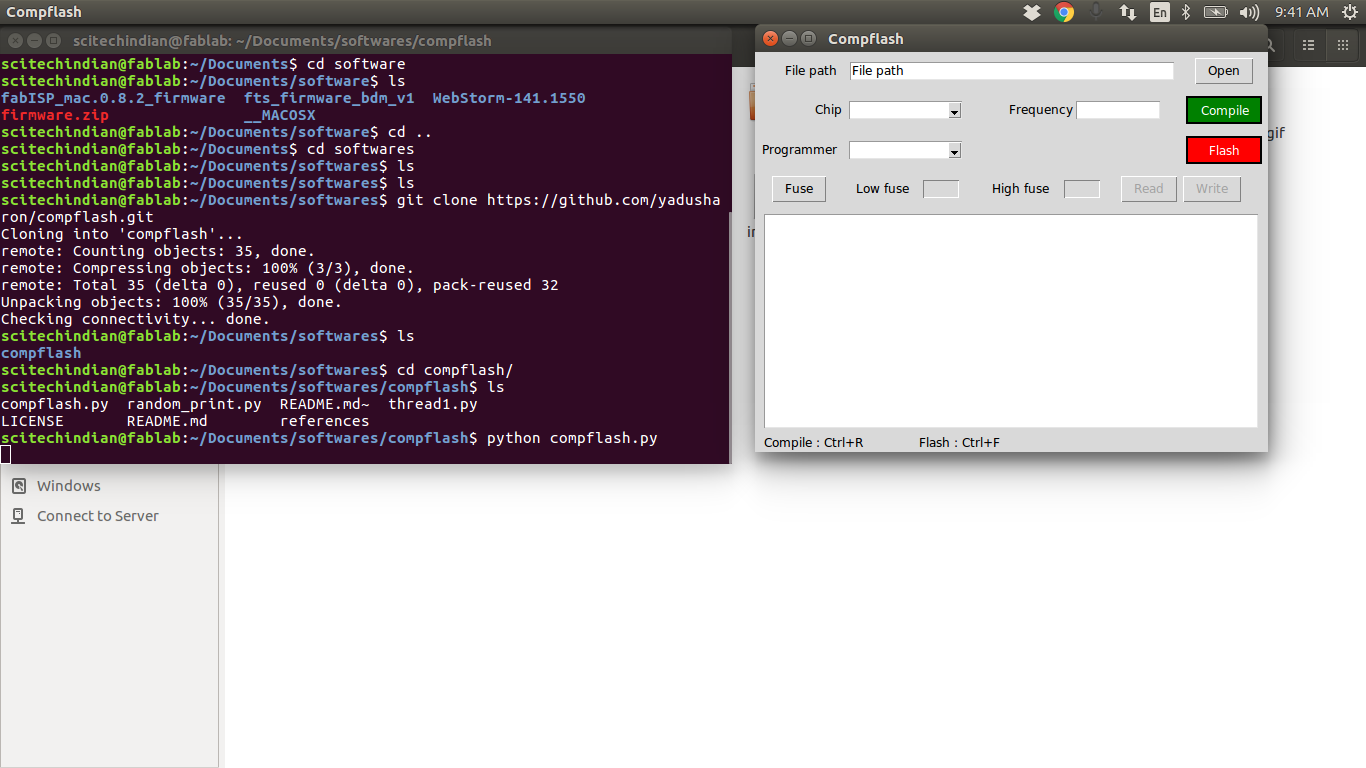
installed the compflash
Inorder to compile in avr-gcc and flash the program on attiny44, we may need to run certain commands from the terminal. One of our instructor, Mr.Yadu has developed one User Interface in python language for easy compiling and flashing, it's called Compflash. Its available in the githublink, Compflash. I just cloned it in my PC. It requires certain dependancies, you can install it in your PC using commands. Once cloned,open terminal from the cloned directory, then type python compfalsh.py. It will open the GUI of comp flash like this.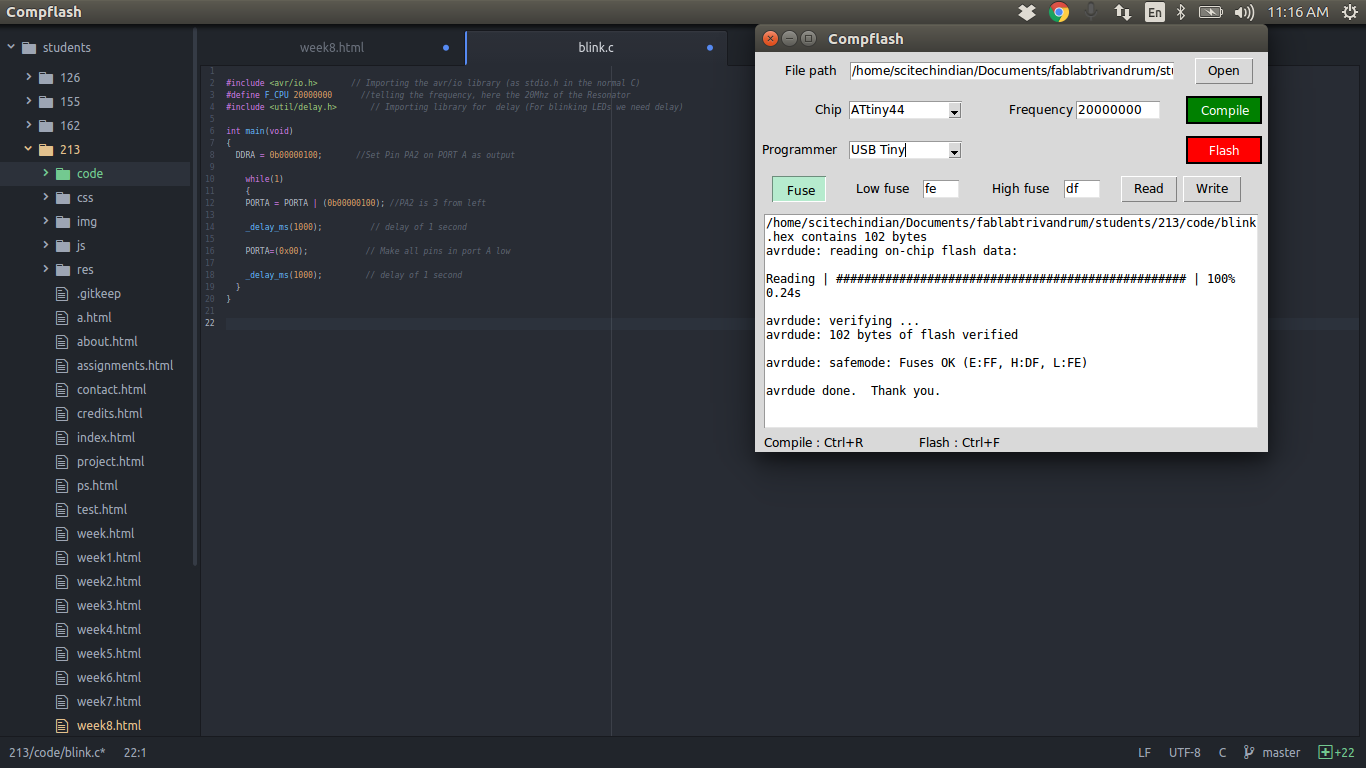
while using the comflash
Programming using Arduino IDE
Arduino is an open-source platform used for building electronics projects. Arduino consists of both a physical programmable circuit board (often referred to as a microcontroller) and a piece of software, or IDE (Integrated Development Environment) that runs on your computer, used to write and upload computer code to the physical board. There are a large collection of tutorials are available on Arduino, out of which ,I found the following tutorial is good to know more about Arduino.
Ardunio is basically AVR C with an extra layer on top of it. For beginners like me Arduino is relatively easier to learn than AVR C. This is because in the Arudino IDE most of the common tasks we have to do are written as functions and stored in the Arduino library. This makes it easier for beginners as all we have to is call the right functions and the program will work accordingly. But a downside of this is that, the chip will work much slower than if it was programmed with AVR C the reason is that Arduino loads a lot of unused libraries into the chip which will waste many clock cycles. Another problem is the size of the program itself, this will be much larger in comparison with AVR C program.
After Installing Arduino in Linux, I plan to program my board using Fab ISP through arduino IDE. Arduino IDE supports all default Arduino boards, but in order to work with external boards, we have to first add the boards through the board manager.
You can follow this tutorial to add the Attiny44 board to the Arduino IDE.
Here are the steps,
https://raw.githubusercontent.com/damellis/attiny/ide-1.6.x-boards-manager/package_damellis_attiny_index.json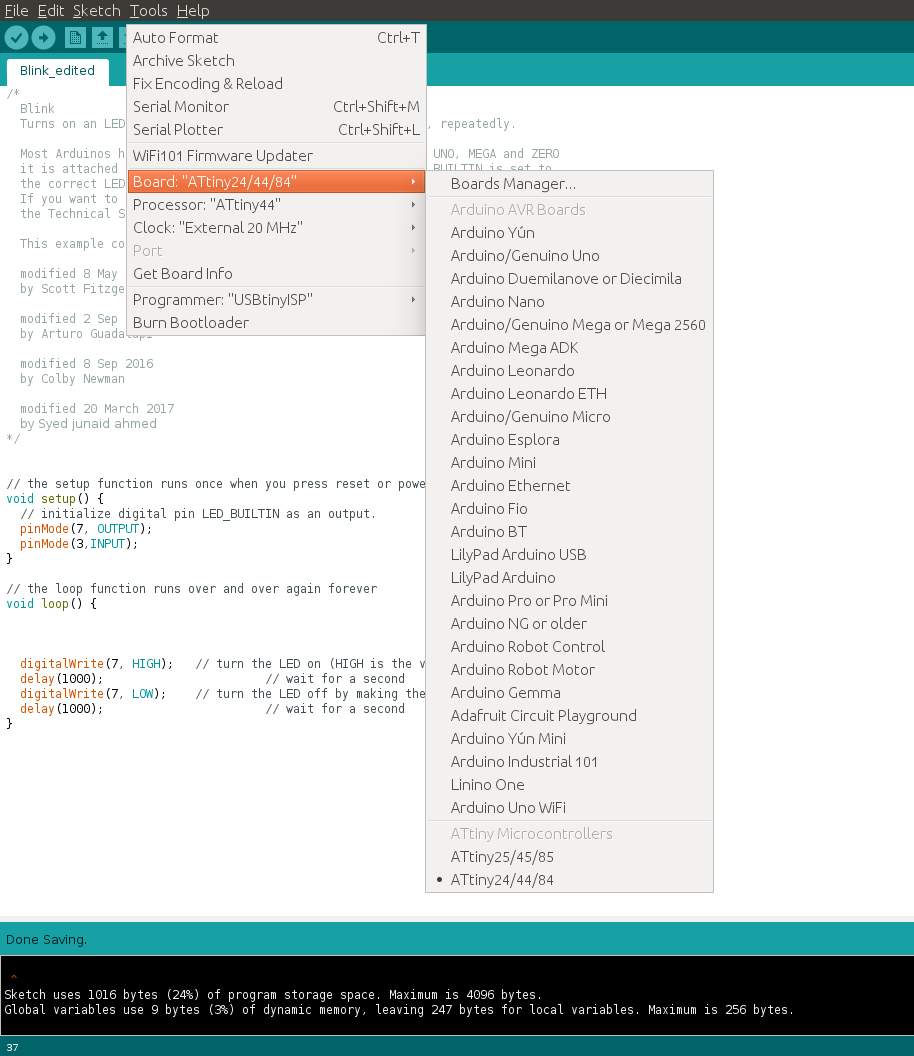
Now you have successfully added the board, you can begin programming.
Arduino has some example programs to get you started. I went through the LED blink program and edited the source code. I changed the pins of the program to correspond to the pins on my board after referring the Arduino pin out diagram of ATtiny. The program was flashed successfully after burning the Arduino bootloader.
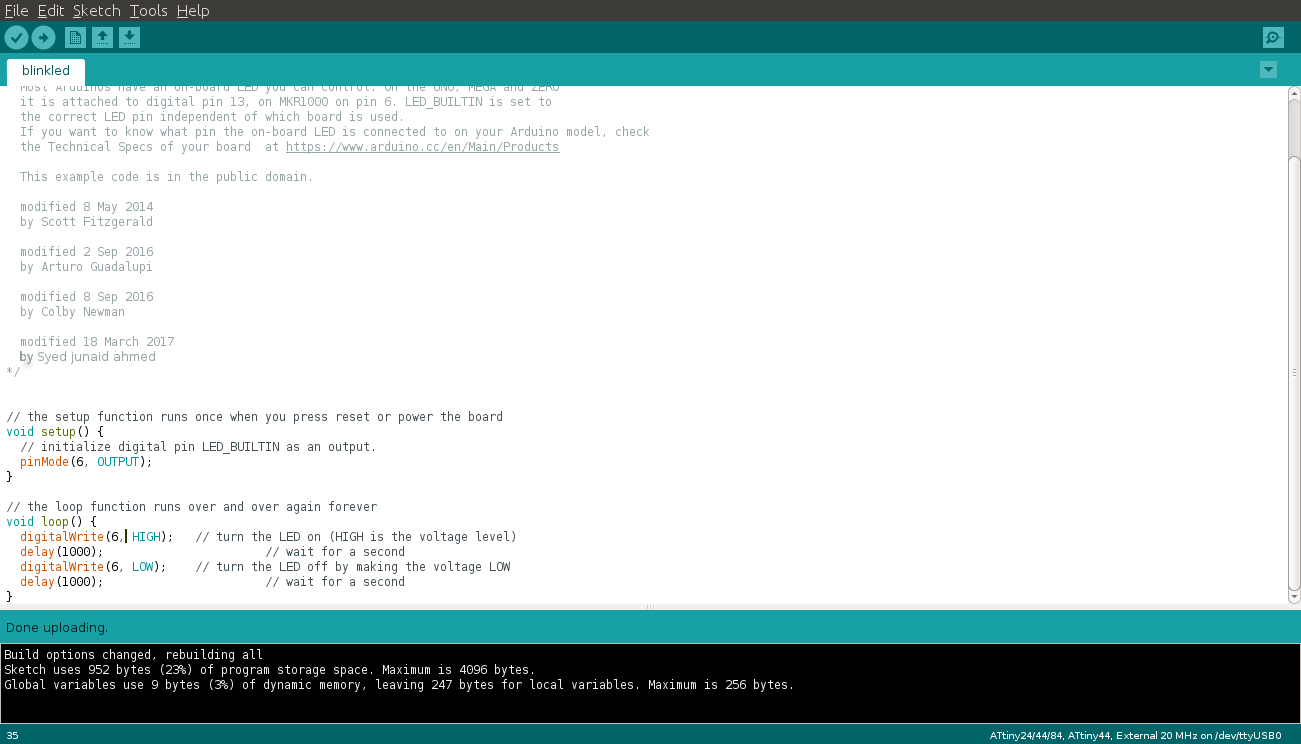
The program size was 952 bytes, When compared to the same program written in AVR C (457 bytes), is almost double. This is the extra overhead I talked about when using Arduino. Its useful for prototyping quick projects but not suitable for running finished products.
