
Until 15 Feb 2017
Playing with Computer-Controlled Cutting
Contents
- Lesson on Laser Cutting
- Playing with Laser Cutting
- Testing with Laser Cut Press Fit
- Design + Print Parametric Toy
- Designing for Vinylcutter
- 3D Printed Screen Print Kit
- 3rd The Fab Academy meeting
Note from Lesson on Laser Cutting by Rodrigo Diaz(FabLab Seoul Manager/ Fab academy student 2017)
- Digital device > saved file(.ai, .dxf) > output device(laser cutter)> physical output
- For laser cutting we need computer, Laser cutting machine, smoke extraction, and compressed air supply(without= FIRE)
**Cutting Kerf = 0.02mm laser size
(if we are printing 3mm design, cutout should be 3.2mm)
Laser cutting = simply to cut (up to about 7mm)
Laser engraving(scan) = Drawing + painting with laser(takes long time)
Materials for laser machine (according to Seoul Fab Lab rule)
Yes = natural materials, wood, paper, acrylics, PETG, ABS, *fabric,
No = Glass(only engrave), PVC, non-organic PC(polycarbonate)
Not recommended = Foam(deforms+smell), woodlark, styrofoam, melting material
Rule for laser cutter
- Don’t leave
- Turn on the compressor
- Don’t open right away, open after 10 min.
- Don’t touch it, tap it!(if you have to cut again, it might shift and unable to cut again)
Useful source with parametric design: Sketch Chair , 123D make
Preparing to CUT! (with Illustrator)
- After creating a file, you may change your line to 0.25 or thinner to check you lines.(useful illustrator tool: pathfinder/to combine objects or delete parts)
- Create outline(ex. letters. *alphabet like i = ungroup again to separate top and bottom.)
- Ungroup it
- Export to .dxf > 2000/LT2000(mm) > OK
(I’ve used laser cut program HSG) label where you want to cut first with different colors and setting
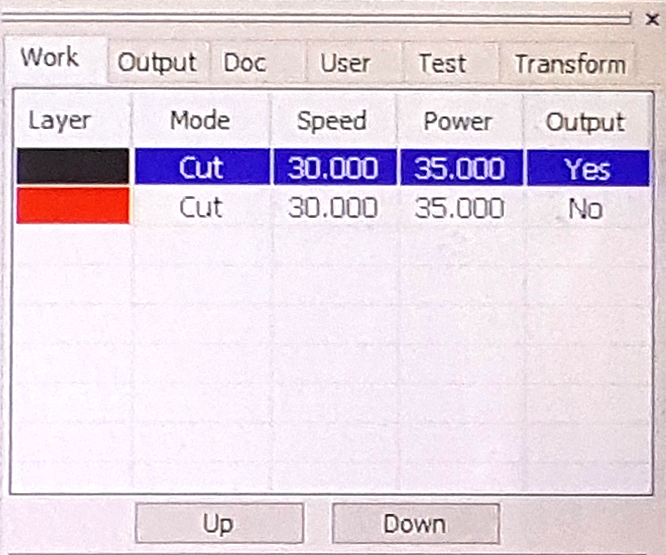
* With laser cutting, we could only control speed and power.
* Better to cut from the inside to outside or the small holes first.
Playing with Laser Cutting
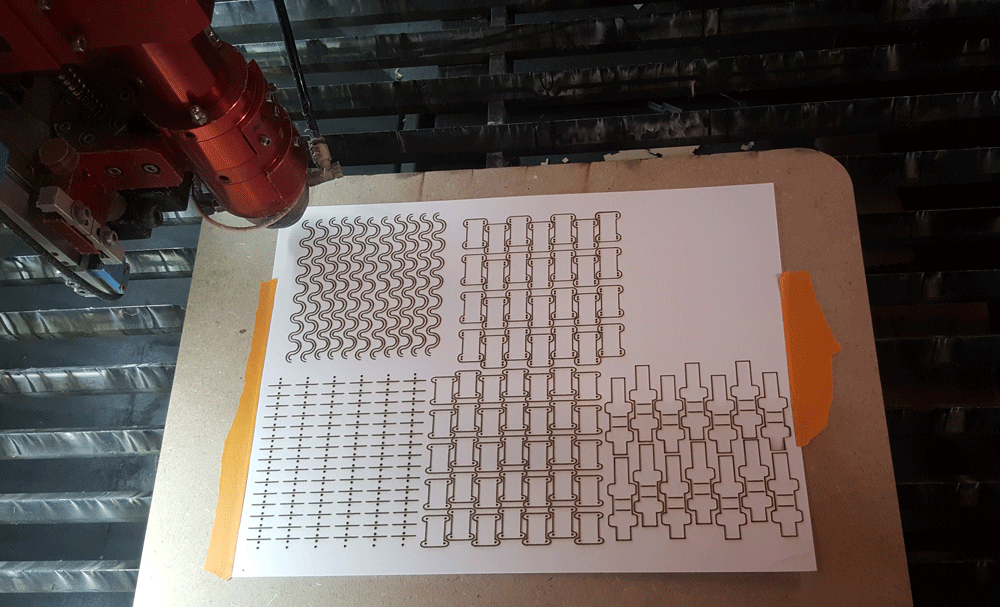
I used textile structure inspired design from week 2: computer-aided design.

Link to download .ai Illustrator file
Using Laser Cutter
1 : Save image into .dxf, .jpg, and etc
2 : Open LaserWork and load the file
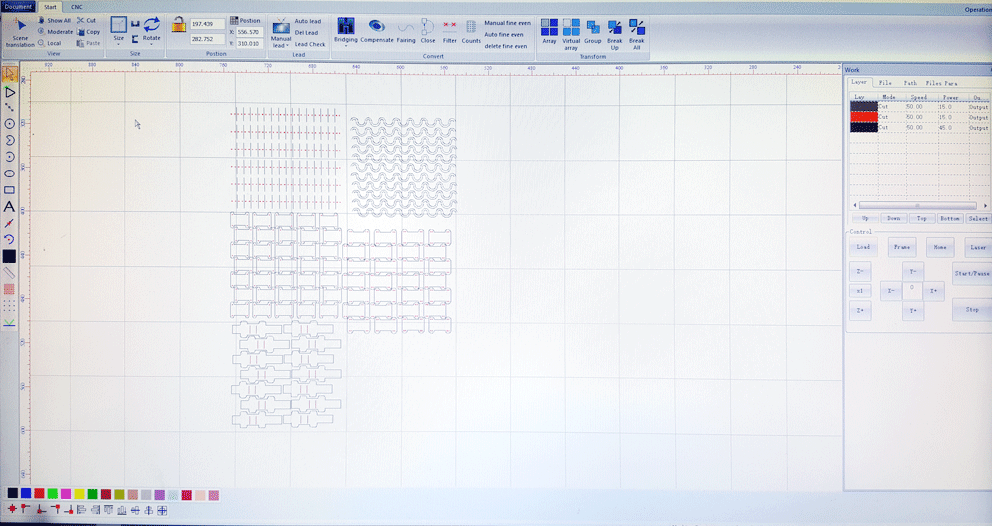
3 : For Bristol paper(smooth) 100 lb.(270 g/m²)
I’ve printed twice with 50 speed, 15 power.
(different from the photo)
4 : Download to the laser cutter machine, check the frame on the machine, and start cutting
5 : Done! (Because in Seoul Fablab, we have laser cutter in the making room, so we have to open the hood after 10 mins.)
Playing with Laser Cutting Machine


Testing with Laser Cut Press Fit
Testing with 3mm acrylic to press fit. First I've used Inkscape then I used Illustrator.


Finally! 3mm = 2.52mm

Design + Print Parametric Toy
Reference:
Shino Onodera's website taught me about parametric using Rhino.
Rhinoceros's command "block" is similar to Inkscape's "clone"
1: Command "block" and select a reference object.
2: Copy and paste the object
3: Select a reference object and command "explode", then make changes.
4: Command "block" and select the task. All copied object changes!
I've sketched with Rhino, but I wanted to use Fusion360.


Fusion 360. Link to download .dxf file


Finished Laser-Cutted Parametric Toy


Playing with Vinylcutter
I took the most simple design from week 2. Silhouette program and Silhouette Cameo 3. I've used original design file made in Adobe Illustrator.

Vinylcutter Procedure
1 : Open your file,
2 : Object/trace,
3 : Select the area,
4 : Test the values in cut settings by cutting triangle,
5 : For cut settings in Silhouette Program, printing grey vinyl in Ratchet Blade level 1, speed 5 cm/s, and thickness 9.

6 : Load the materials in the vinylcutter,
Other examples in using vinylcutter: Flexible PCB

I've used masking tape for transfering image onto my mac computer.


Finished!

3d Printed Screen Print Kit
I’m use to traditional silk screen-printing. I had college level classes and apprenticeship in the Fabric Workshop and Museum in Philadelphia. I’ll try simplified version using vinyl cutter and 3d printing.
How to make the frame and squeegee?

3D Printed Screen Printing Kit by Cam Watt. He 3D print press-fit frame and 3D printed the image on the screen fabric. I use his concept with press-fit 3D frame, but Instead of directly printing on the screen, I will use vinylcutter cut out and paste on screen.

Link to download Screen-print kit .3dm Rhino file

Materials
Screen fabric, 3D printed frame, squeegee, ink(dye?), tape and test materials(fabric, paper, etc).
Printing! Yay!

Place vinylcut on screen fabric

Join the frame together with screen and tape the edges

Clamp the screen to the flat table

Print! Finished! But I don't really like the result. Better luck next time.

Errors!

First time printing 3d printer = I broke 3d printer twice. It took way longer than I expected. First two frames werped(I guess it happens offen). I guess it could be the bed/head temperature, raft/brim, or the design.
Side Notes: Halftone screen-printing using Photoshop
Halftone
1. Make your image into Image > Mode > grayscale

2. Select Image > Mode > Bitmap.

3. Resoluction= 72 pixels/inch, Output= 72 pixels/inch.

4. Method= Halftone Screen, click OK.
5. Frequency select 10~45. Play around with the frequency, angle, and shape.
*I liked 10 frequency 45 degree and round shape.

3rd Meeting:
Computer-Controlled Cutting February 8, 2017 11pm~2am(Seoul)
Feb 13 Recitation: Global Humanitarian Lab (David Ott, Olivier Delarue)
Homework
o- Explained how you drew your laser cut files
o- Shown how you made your press-fit kit
o- Included your laser cut design files and photos of your finished project
o- Explained how you drew your vinyle design files
o- Shown how you made your vinyl project
o- Included your vinyle design files and photos of your finished project