Brandi Dixon
Education Program Manager
Hardesty Center for Fab Lab Tulsa
|
Brandi Dixon Education Program Manager Hardesty Center for Fab Lab Tulsa
|
|
|
| Final Project | Weekly Projects | ||
| 3D Scanning and Printing I have done lots of 3D design, scanning, and printing before starting Fab Academy so I thought I would do something different for this project. I've explored taking CT and MRI scan data and converting it into a 3D printable object. This is particularly fascinating for me because a 3D printed cranium can be cut in half and show interior surfaces and sinuses. We can do this without cutting into a person or destroying a priceless specimen. In the future I would like to get CT scans of some endangered species and 3D print display models that could be touched and handled without concern that they would be damaged or broken. For this week I was able to download and anonymous human CT scan and prepared just the cranium for 3D printing. Links to tutorials and websites that helped me: http://svn.softwarepublico.gov.br/trac/invesalius/wiki/downloads/3.0-beta-5#WindowsInstaller (software download) http://www.osirix-viewer.com/datasets/ (anonymous DICOM files. Many to choose from) https://www.youtube.com/watch?v=_rvK36Aab6U Video tutorial for the CT to 3D stl conversion process in the invesalius software http://www.meshmixer.com/download.html (software download. Used to clean up the stl exported from invesalius) I started off choosing a scan for my attempt at printing. The skull is the most interesting piece of the human body to look at so I chose the MANIX model. After downloading my scan and the invesalius software I followed the video tutorial linked about.
|
|||
I chose to highlight the bone in the model. After making sure the bone was clearly highlighted in green I created a surface based on that selection the model in the bottom left quadrant was generated. This was exported from invesalius as an stl and brought into Meshmixer for cleanup. The models that come from invesalius are not optimized for 3D printing and this highlighting process picks up a lot of *blips* the need to be cleaned out before it is sent to a printer.

The skull stl is brought into mesh mixer. You can see there are lots of hanging pieces that need to be deleted. The easiest way to do this is by going to Edit > Split shells. That process breaks apart all unattached pieced and displays them in object browser shown above. There were at least a thousand objects split apart and identified by this process. They are organized from largest to smallest. Object 1 is the only one we actually need, any object after 25 is too small to be missed. I deleted all objects past object 25.

I only want to print the skull for this project so I don't need any of the spine, collar, or rib cage included in this model. To cut it down I used Edit > Plane cut. My settings are set to discard the half of the model I don't need.
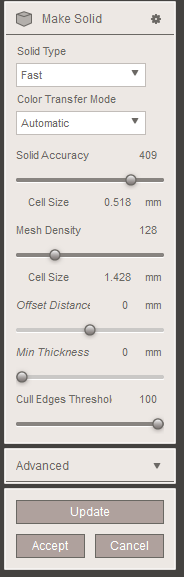 Once the
model is cut it has some open edges. Edit > Make solid will close those up
creating a truly 3D printable file.
Once the
model is cut it has some open edges. Edit > Make solid will close those up
creating a truly 3D printable file.
Now we can export this skull as an OBJ and prepare for 3D printing.
We have Makerbot 3D printer in the lab so I will be using Makerbot Desktop for my slicing software.
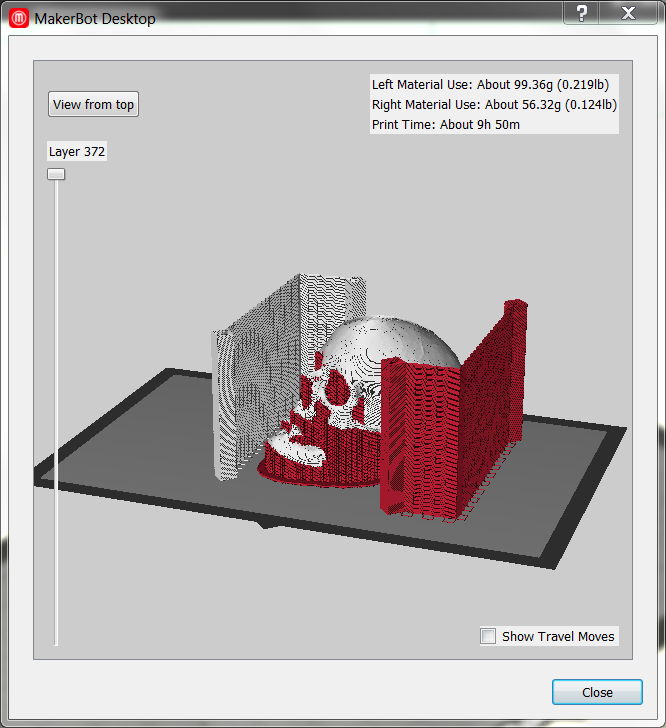
Here is the print preview. The skull will be printed using dual extrusion with dissolvable supports. The preview shows me that the model is exporting correctly and the interior features of he skull are intact. The model is heavily scaled down to make printing faster. I did test a print preview with the skull as large as I could print it and the estimated time was 25 hours.
