My Final Project: Arduino-based Arcade Video Game System
As I like Arcade games a lot and was born in the 70s, I am used to fast 2D games and broken Joysticks. Remember Summer Games, Winter Games and Decathlon on the Commodore 64? Apart from these mainstream approaches to electronical amusement, I am open also for more unusual things. I am planning to build a microcontroller-aided electromechanical game that showcases the possibilities of a FabLab.
Motivation and description
Some years ago I came across a 32x32 LED RGB matrix on the Adafruit website. Together with a friend, I made a real project with it, LEDmePlay, and exhibited that at several Maker Faires in Germany. The LEDmePlay is built around an Arduino Mega 2560 and the Adafruit LED RGB matrix. The housing consists of two IKEA Ribba frames. One can attach classic joysticks with a Sub-D plug to the console. So far, we have programmed several games for our video game system. In general, it met with great enthusiasm. Young people like it for its Arcade style games, older people appreciate the classic joysticks, and women in particular have stressed the living-room-ready look of the IKEA frames. Many regard it a design piece.
However, the LEDmePlay in its current state has some shortcomings, some of which I would like to tackle in my final project:
- Every time you want to play another game, you need to attach the device to a computer and use the Arduino IDE. I want to read games from a SD card instead.
- While the IKEA frames are cool (no, not really, they are magnificent!), I want to try a console-like design with built-in joystick(s) and buttons.
- For sound output, the device uses a small loudspeaker and the Arduino's built in
sound capabilitiesbeeper. This is fine, but PCM sound would be better. - I want PC based playfield editors for some of the games.
For the final project, I want to do the following:
- Design a new case with the laser cutter
- Cast and mold something for the joysticks, i. e. a socket cover, the control rod)
- 3D-print adaptors and yoke plates
- Make a Satshakit with a port extender chip to replace the Arduino Mega 2560 in our LEDmePlay design, attach joysticks, buttons, switches and rotary knobs to it
- Add a second Satshakit with an SD card reader and a LED display. This Satshakit will communicate with the other Satshakit over Serial Peripheral Interface (SPI). It will load a hex file of a game from SD card and burn it onto the other Satshakit.
- If time allows, I will try to add PCM sound to the project. In its current state, the PCM library and the libraries for the LED RGB matrix use the same hardware ressources and cannot be used simultaneously.
Early Hand Drawings for my Arcade Machine
This paragraph uses content that appeared in my assignment on Computer-aided design.
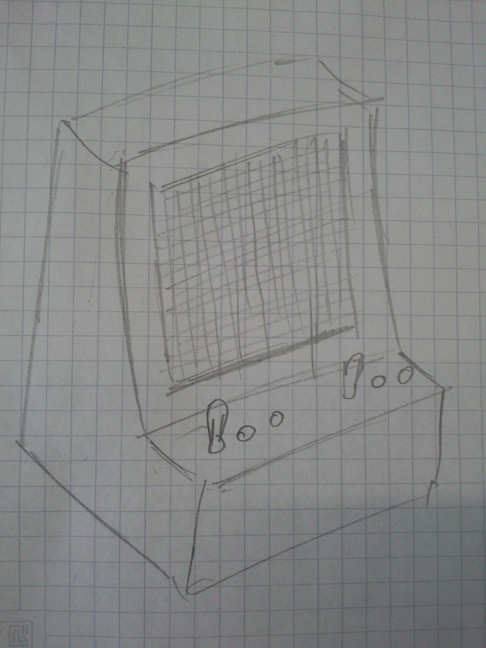
I was thinking about different designs for my video game system. One was a design that is a cross between that of the Atari VCS and a Korg MS-20 synthesizer, both from the Seventies. The other is a handheld. I have drawn these pictures:

The components of my Video Game System
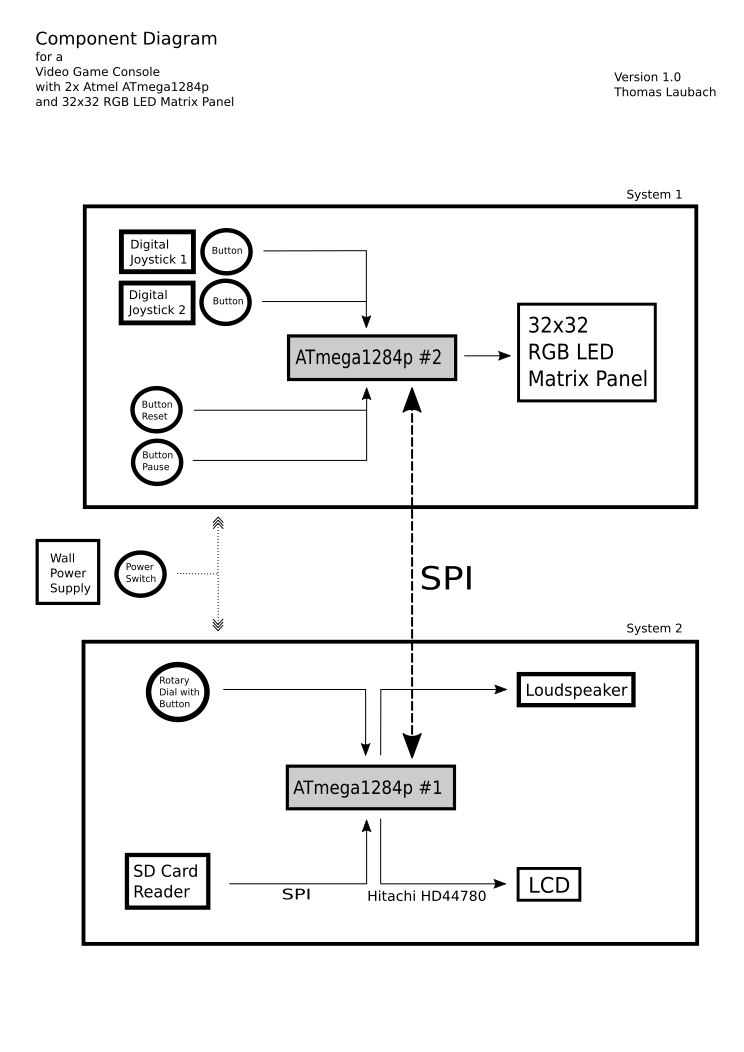
The electronics for my final project shall consist of two systems, each with its own microcontroller board. Both are based on the Atmel ATmega1284p. In the diagram, I wanted to visualize the flow of information with arrows, i.e., input devices produce data that go into the device, output devices produce output that is built from data that the device sends to them.
In Inkscape, I drew the foundation for my diagram, see file "VGS_functionDiagram.svg" at the end of the page. I used the succession of steps "Draw straight (poly)line, finish line with Enter, open "Filling and Contour", select the type of line ending. Here, it confuses me that, when I select an arrow that points in the right direction, it is always added at the opposite end of the line than what I expected. Since then, I drew my lines in the opposite direction. Finally I found out that in the "Filling and Contour" menu there are pull-down menus for patterns for the start and for the end of a line. All's right with the world.
When I had finished the arrows in the upper part of the diagram, I copied one arrow to the lower part. It was copied correctly but distorted. I deleted the lower arrow and drew it by hand.
For the arrows to be straight, I pressed down the Control key.
June 9th.: The concept has evolved over time. For instance, I will buy joysticks instead of casting their parts. I will not add PCM sound now, and I have failed to program one Arduino with another one, but not ultimately so. This is something worthwile for the time after FabAcademy.
Older concepts that would also qualify as final projects
At the beginning of the FabAcademy 2016, I had described three possible final projects. I am determined to realize them all eventually. Why not realize one of them as the final project? Due to time constraints, I have decided to build upon something that I have already done.
Final Project 1: Making electronic music at a campfire
The Scenario
Imagine you and your friends sit comfortably at the campfire. One pulls out his handy music controller with a small keyboard and intones a beautiful melody.
The second joins in and taps the time on the pads of his small controller. The third friend issues an arpeggio by holding down a chord on her controller.
All those MIDI controllers' tempi are controlled by the second controller, if desired. Neither of the MIDI controllers produces audio. Conversely,
their sensors effectuate a stream of MIDI messages that are fed into a Base Unit. This contains a music synthesizer that produces the actual sound.
The battery-powered controllers use a custom protocol to talk wirelessly to a microcontroller that pools the incoming sensor data from the
controllers and converts them into a stream of MIDI messages for the attached MIDI sound module. Before entering the sound module, the MIDI data is filtered,
modified and merged as required.
Although it is highly desirable to have a radio mesh (wireless!) of MIDI controllers and the Base Unit, I will be sensible and start with MIDI cables and plugs.
Prelude
The project idea is not too fresh. It occurred to me when I caught a glimpse of some students on the university campus in Duesseldorf. Relaxing on the grass in the sunlight, they had a good
time. Although no musical instrument was involved, I somehow associated the scene with folks sitting around a fireplace and music. I thought "Wouldn't it be cool to
improvise electronic music with the same effortlessness as other people play acoustic music with their guitars and their mouth organs"?
What is needed to facilitate this, but with electronic musical instruments?
As I have been using MIDI in my home recording studio for a long time, I know the pros and cons of it. All my hardware and software instruments can communicate via MIDI,
therefore it would be a no-brainer to use it in a project. What has always bothered me is that I cannot play my instruments wherever I want, and my friends bring their
instruments and play away with me. There is always too much planning and cabling involved. Once all audio and MIDI cables are in place, the mixing console is there, the amplifier is ready, ...,
our motivation is almost always gone. A jam session requires the ability to be ready at short notice.
This is where my project idea comes into play. I need MIDI controllers that are communicating wirelessly and battery-operated. As their name implies, they would not produce sound themselves but control a sound module. All devices are battery-driven and have a small form factor. This will allow you to carry them around and spontaneously play them.
Why would you want a central sound-producing unit instead of autonomous, distributed synthesizers? With a central unit, you have more control over the overall sound characteristics. You would route the incoming
MIDI messages to the 16 MIDI channels of the synth and assign a global effect and several channel effects to the mix. Ultimately, I focus on the quality of the gig, not on that of the mix. Moreover,
this approach simplifies cabling and the distribution of the MIDI data. Finally, for obvious reasons, I want the central unit and the auxiliary MIDI controllers to be as small as possible.
The striking drawback of this approach is that you cannot practice your MIDI controller, in fact your musical instrument.
Description of the devices
As I have already gained experience in AVR programming, I plan to use Arduino microcontrollers and ZigBee compatible devices
for wireless communication.
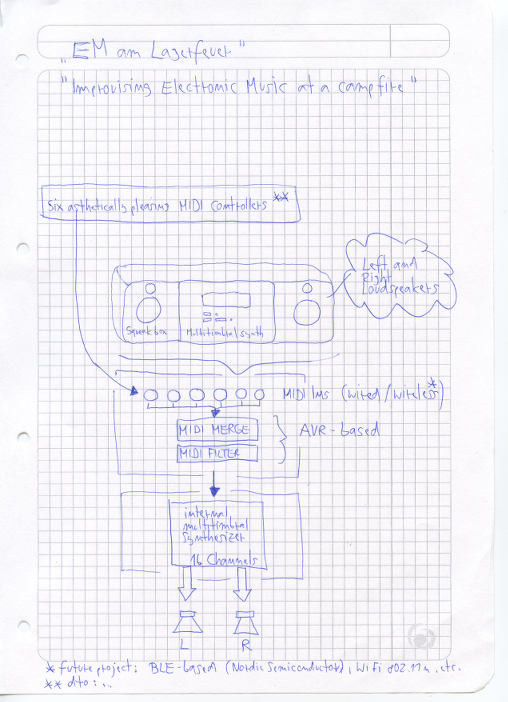
The Base Unit will be a physical cross between a musical keyboard (usually with loudspeakers) and a portable radio (usually with a compact form factor). It will feature three MIDI In plugs that receive MIDI messages from attached MIDI controllers. The MIDI In plugs are tied to three of the hardware serial ports of a higher Atmel AVR microcontroller. On the microcontroller,
a program merges and filters the incoming MIDI messages and transmits the resulting MIDI stream over a MIDI Out port to the MIDI In port of a
multitimbral sound module. The latter will be acquired elsewhere. Eventually, I will use the Fluxamasynth Arduino Shield. The sound module emits audio to an amplifier that is attached to a pair of loudspeakers. I have a pair of JBL Control 1 monitor boxes lying around that I plan to use. I will fit them in the Base Unit held in place by a scaffold that is coated with foam.
Week 8: I have had a fresh look at the specs for the Fluxamasynth instrument. It turned out that it is merely a wavetable synthesizer. As such, it does not allow to
influence the sound forming parameters from outside, in particular not by MIDI Control Changes. At least for me, this renders the instrument unusable.
Outstanding choices to be made for the Base Unit: AVR microcontroller, LCD, amplifier, sound module
The MIDI Controllers may, but need not resemble acoustic musical instruments. However, I want their cases to look nifty the same way a guitar or a
violin do. For sensors, I can imagine to use an Inertial Measurement Unit (IMU), an ordinary keyboard, knobs, round and linear potentiometers, a Theremin-like apparatus,
a touch pad, and others. A small AVR microcontroller will read the sensors and provide a hardware serial MIDI Out port.
Some ideas for the software and the user interface of the Base Unit: The software that runs on the AVR microcontroller will be operated via an LCD and a rotary encoder. It will allow the user to direct the incoming MIDI data from the MIDI In ports to the sixteen MIDI channels. Additionally, it could allow for filtering the MIDI data. Finally, it lets the user assign different sound programs on the attached synthesizer via MIDI Program Change/Bank Change. There will be a toggle switch to cut the power and a LED which indicates that the unit is turned on.
Things to do within Fab Academy
- Make the concept
- Implement the wire-based protocol (Easy if we are talking about MIDI: see Arduino MIDI Library)
- Build a pretty base unit with synthesizer, multiple-MIDI In functionality, amplifier, and loudspeakers
(Various challenges: choice of materials, electronics design and electronics production, laser cutting, AVR programming, energy-saving measures...)
Things to do subsequent to Fab Academy
- Build MIDI controllers in pretty cabinets
- Link them via Bluetooth Low Energy or IEEE 802.11
Rough Concept Sketch
Final Project 2: MIDI Recorder that records automatically
Occasionally, I find a synthesizer somewhere and improvise away spontaneously. If my friends are hearing what I am playing, they often want me to repeat a musical phrase or to record
it. Most of the time I can do neither. They would tell me that the particular melody I was playing is directly suited for a track, and worth recording instantaneously.
I want a MIDI Recorder "stick" that I plug in the instrument's MIDI OUT port. It would record as soon as you play something on the keyboard. Also, it makes up a name for a recording automatically,
say, constructed from current time and date. It will store the file on an attached SD card ten seconds after you have stopped playing. Finally, it informs you when it is low on battery, and when the SD card needs to be exchanged.
For convenience, it will use an Atmel AVR that runs a modified version of the MIDI library that is available from the Arduino website.
Final Project 3: A small audio drama player
Our family loves audio dramas. We have a large assortment of them for small kids, teenagers and adults. Some are on tape, some on CD, most as MP3 files.
I wished I had a small, portable MP3 player that carried all our audio dramas. I am too lazy to turn on the PC. What's more, I want no PC in a bedroom.
For the FabAcademy, I could easily build a player that is Atmel AVR-based and that I could feed an SD card with all our audio dramas. It would feature an
LCD and some controls for selecting the drama I want. Of course it would have a loudspeaker.