
2016
Rudrapalsinh Solanki
Week-1
Principles and practices, Project management
Assignment
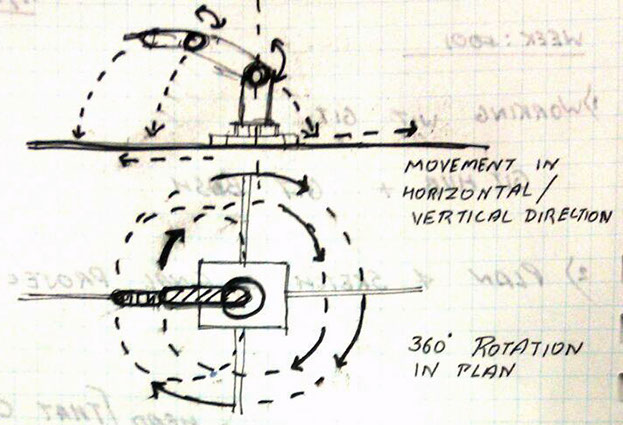
1. Plan and sketch a potential final project
2. Create a website for your work and upload it through git hub in the class archive
Final Project:
The final project is a Super arm. It is similar to a robotic arm that works mechanically and also automates . Super arm works/moves like a human arm. The super arm will be able to move in all 6 axis and also moves in X/Y plane on the surface. The arm will be fixed on the deployable table base.
Tools/techniques to be used for making super arm:
1. 3D Printing
2. Milling (CNC)
3. Casting
4. Electronics
5. Sensors

Installing git:
I had never worked on any of such platform as GIT . It was alien word to me. As I started reading through it I came to know about it better and better in detail.
The software was installed git bash from the website. Link
git bash - got install in the windows system within a very short time.
I was unknown to this process of data uploading and working. When I opened it first It looked similar to some programming/coding platform.
I stated git bash and created an account in the git with the user name and a password
As I was new to GIT, I stared making notes for the reference so I can work on step by step for my assignment and also I makes me more comfortable to work with any platform if I can understand the logic and the stages behind it .
Here are some of my working notes that I followed while working with the git initially.
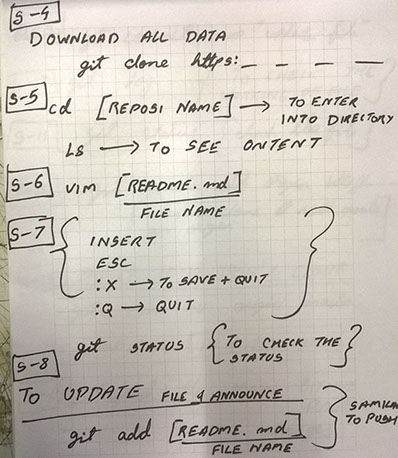
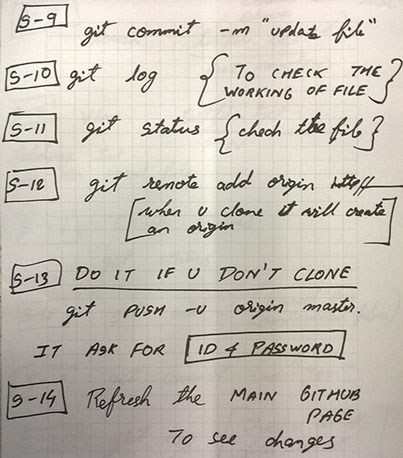
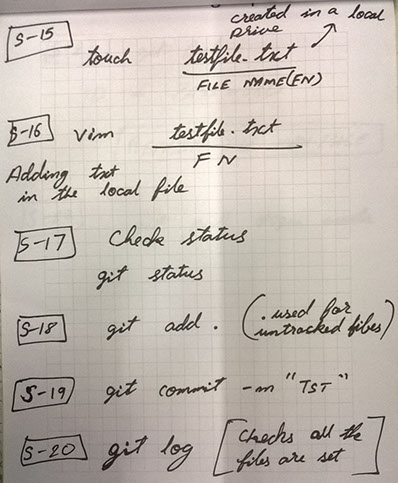
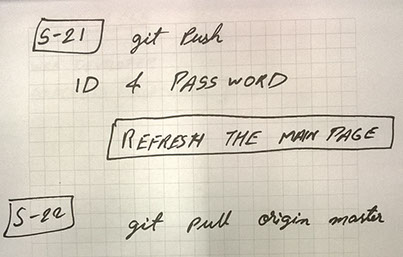
All the Steps as described helped me detailing out the work and clearing the doubts layer by layer as all the steps performed.
Worked in step by step I was able to successfully able to create my GIT repository.
Created a folder in my system where I wanted to clone the repository
The important commands that are used for creating/ uploading/ working on the GIT repository are shown with their individual functions.
For coping the repository: command used was
git clone git@git.fabacademy.org:fabacademy2016/fablabcept.git
The basic config to access the git bash and the local repository with the username and email address.
git config --global user.name "name"
git config --global user.email "email"
For uploading all the changed to the repository, the basic steps that has to be followed in order:
git pull
git add --all
git commit -m "message"
git push origin master
And all the changes made in the local repository will be changed and will be uploaded on the main archive of the individual.
Once The changes that I did were uploaded in my page gave me confidence that It easy to start working things that you had never worked with. The system of the GIT impressed me and pulled me into it as I had an idea that something like this can be done but I can do it that was the most amazing part of the work.
Creating Website:
Looking at the web pages I used to imagine that it is too difficult to design /make websites and web pages. I had never used or worked on the website making or designing part.
Firstly I started looking at the tutorials from Internet for making website through HTML platform. Looking at the HTML part of designing I came through a software known for designing websites through HTML scripts.
So I decided to try upon the software and so downloaded the software Brackets Link

The software had a platform that you can write the HTML scripts like notepad and in parallel you can also see the output that scripts will perform.
I started working on the website and created a script that can show and gives my name and the image of the lab i am working with and the university where I was currently working.
BRACKETS is a open software that allows you to write a html scrift for any software and also displays a real time image / demo version of the the file.
I started working on it and tried making a html script for showing my name and logo of the fab academy.
This is the first trial of the html version that i worked on:
<html>
<head>
<p> <title>TITLE</title></head></p>
<h2>RUDRAPALSINH SOLANKI</h2>
<div></div>
<img src="fablab.png" alt="View" style="width:90px;height:70px;"></p>
<p><strong>FabLab CEPT</strong></p>
<img src="fab-academy2.jpg" alt="View" style="width:500px;height:70px;"></p>
</body>
</html>
.jpg)
I tried working on Brackets but didn't succeed to complete it as it needs more understanding on the HTML language. So I switched to Adobe Muse software for the website designing.

Adobe muse is a easy to use software platform that is similar to any other software like InDesign or Photoshop. Adobe Muse is not a open platform but can be downloaded from the Internet. LINK
I installed the software and started experimenting with the adobe muse.
I opened Adobe Muse CC and started working. It opened with the very basic idea of an empty canvas/ workspace. The first open tab in Muse asked for the canvas size and the offset boundary that was required for the website
.jpg)
Started working with Muse I developed my initial website template and uploaded through git.
I started working on adobe as if I am working on InDesign and created a master slide which is previewed on every pages of my website.
It was similar to the paint/ or other vector based graphic designing software. The template allowed to add or subtract any kind of a image or any other form that is drawn in the software.
.jpg)
I sketched my initial idea of the web page and started structuring it and developed. My first page should have all the details of my introduction and than I can go the weekly/ Final assignments.
Once the sketch and formation of the structure is done. Formation of website is started with the master slide that will remain as it is on each of the page whenever someone opens it. Master slide works as the header/ footer for the web page that helps viewer to see and go back to all the pages in the website
.jpg)
Once the main Page is done with all the Hyper-links (These are the tabs/ buttons that helps to link all the pages and references from any page). Once the hyper links are defined the next step is to make the structure of the website.
The next step is to make other structured pages that has to be linked to the main page and start making them individual pages that can be issued through the main page or from any page.
.jpg)
The structure of the website is a major part of the web page, so the structure was made to take all the content in the website. All the individual pages are made accordingly to the structure and a specific formate and design.
.jpg)
Once the Structure of the website it is now ready to upload in the fab academy students archive. File is saved in the system and now there is an option in File-Export as HTML.... click to the option it will open a new tab.
.jpg)
Once the export option is selected, now we have to select a folder to save all the html files converted from the adobe Muse file. Select a folder from your computer to save the files and select it in the option.
.jpg)
After selecting the folder press ok button and it will start converting the file in HTML.
.jpg)
After exporting the file it will directly open a web browser showing the result of the website. We can check it that our all the web pages are okay and all the files are visible prior uploading to the archive. The best part is even if you don't have Internet still it works till you have all your data in your system.
.jpg)
Once the folder is ready with all the files . Now open the folder where the repo is created .
For me Fablabcept -- Students-- 472__Paste all the files from the exported folder.
.jpg)
.jpg)
.jpg)
.jpg)
.jpg)
After pasting the files in the folder open git bash and do the process explained earlier.
git pull (If some other user has push the data)
git add --all
git commit -m "message of what is updated"
git push origin master
.jpg)
Once the push is done through git open your page from the archive and check all the files that are uploaded and now Its ready .
I can upload any changes on the archive directly through Adobe muse
Week 01 Files