Principles and Practices, Project Management
Assignment
- Build a personal site describing you and your final project.
- Plan and sketch a potential semester project and add it to your website.
- Upload it to the class archive. Work through a git tutorial.
Learning outcomes
- Explore and use website development tools.
- Formulate a final project proposal.
Have you
- Described and made a sketch of your final project.
Hardware

Computer
Mobile

Files

buttons board 1 kiCAD files
buttons board 2 kiCAD files
CRduino board kiCAD files
Small button openSCAD file
Large button openSCAD file
Box model openSCAD file
Box model openSCAD file for SVG export
Box svg model makercase.com file for laser cut
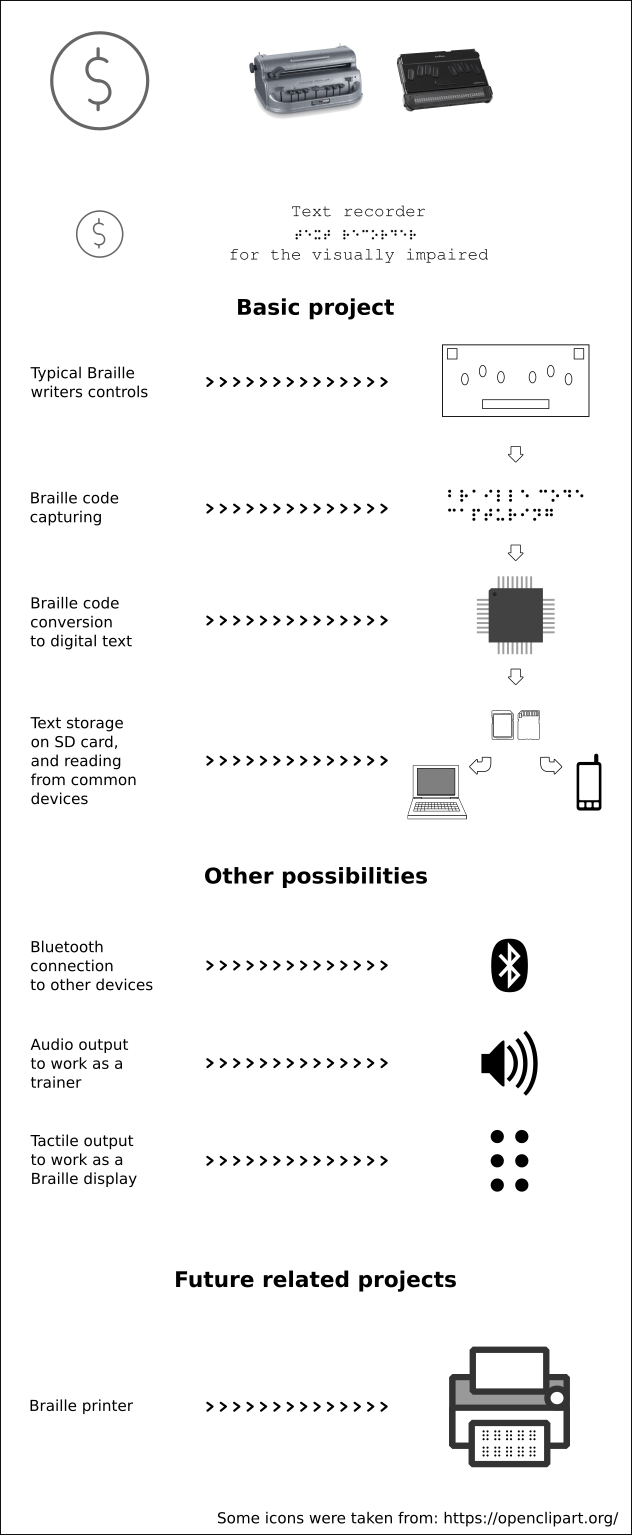
Braille text recorder
- (First thoughts)
The problem:
commercial options for Braille Writers are very expensive. They are in the $700 and above price range. 'Braille Kindle' developed for the blind.The solution:
a cheap digital Braille text recorder that allows to capture text from a Braille-type keyboard, and saves it for later reading from a common electronic device like an smarthphone or a personal computer.- I have discussed this idea with a friend of mine, who has a visual impairment and is a teacher for the visually impaired, and he estimates that this would be a significant help for people who cannot afford a common Braille writer (Braille and cognitive development).
- Also, contrary to my initial thought that new electronic devices have diminished the need for Braille writers and Braille printings, my friend says that they are very much needed by the visually impaired (Is braille still relevant in a high-tech world?).
Design prototype

First CAD model of the top panel for the Braille text recorder, with the holes for key buttons and possible real dimensions (made with openSCAD).

Investigation process
Update
Through the initial process I used an arduino to make the prototype:
- I set up a circuit to read when a button is pressed.
- Can an Arduino receive the input from a keyboard and translate it to characters? An Arduino can receive an input, store it, and process it.
- Can an Arduino receive several inputs at once? The arduino reads one input after the other, it doesn't do parallel reading of inputs.
- Digital pins can be used as inputs for buttons of a keyboard, but the Braille characters are created by combinations of keys and the Arduino cannot handle multiple inputs at once.
Update
-
PISO: parallel-in serial-out
parallel-in serial-out is a way to read several simultaneous inputs and convert them to a serial signal. This is done with an IC specifically built to capture multiple inputs and generate a signal transmitted trough an individual pin. A clock is used to synchronize the elements of the serial signal and the reader of the signal (in this case the Arduino). For example, if there are six inputs (i0, i1... i6), and at one time i2, i3 and i5 are activated, the IC converts the inputs to "0 0 1 1 0 1" meaning i0 = 0, i1 = 0, i2 = 1, i3 = 1, i4 = 0, i5 = 1.
- Parallel to Serial Shifting-In with a CD4021BE.
- 8-bit parallel-load SN74HC165N.
-
I did several tests with the IC NTE4014B for parallel reading of six buttons were unsuccesful. For the output devices assignment I set up an Arduino, an LCD and six buttons and was able to read the input from all six buttons and display it on the LCD. To acheve this, I used a for loop that constantly reads all the buttons, but this method probably won't work for the actual keyboard. For future tests I will:
- port this circuit to a microcontroller designed by me.
- change the code to read all the buttons only when any of the buttons is pressed, and detect when all the buttons are released
Update
-
Visit to Hellen Keller Institute
Hellen Keller Institute is a public school for students with visual impairments. It is located in San José, Costa Rica.
I visited the school to talk about this project. Professor Enrique Quirós recived me and we had a conversation about the school, Braille code for students, Perkins machines, resources for the visually impaired and the project.
From that conversation, this are the main ideas:
Braille is an essential tool for people with visual impairments.
Perkins machines are expensive for most students, they are alse heavy and noisy.
The paper for the Perkins machines is expensive.
Access to Braille printed material is limited.
Printers, engravers, materials, and most accesories for the visually impaired are expensive.
A digital Braille keyboard would be good replacement for the Perkins machine. It has the disadvantage of not having a way to display the text, but for students without acces to any other Braille machine, it would be a good opprtunity.
The school offered the space for testing the keyboard, so, in a future visit, some students and teachers will test it.
Update
-
Programming the keyboard
After creating the crduino and the testing keyboard, I started programming the keyboard.
- First, recognize a button push: button example for arduino.
- From that example; I created the other buttons and made sure the code could read wich one was pressed. I used an Integer array to hold the values of the buttons' pins, and a "for" statement to declare and setup the buttons.
int buttonArray[] = {2,3,4,7,8,9,10,11,12};
// this array will hold the pin value for each button
for (int thisPin = 0; thisPin < 9; thisPin++)
{
pinMode(buttonArray[thisPin], INPUT);
} -
Then, I needed the code to stop and wait for an input from the keyboard. And since Braille code is created by combinations of keys, whenever and while a button or buttons were pressed, the code should keep reading all the inputs to change the state of the pressed keys. Finally, a character would be registered when all the keys went back to released state, meaning a character was input, and a new one may be input next. For those two tasks I used "while" loops in combination with AND and OR conditions.
while ( digitalRead(buttonArray[0]) == HIGH &&
digitalRead(buttonArray[1]) == HIGH &&
digitalRead(buttonArray[2]) == HIGH &&
digitalRead(buttonArray[3]) == HIGH &&
digitalRead(buttonArray[4]) == HIGH &&
digitalRead(buttonArray[5]) == HIGH &&
digitalRead(buttonArray[6]) == HIGH &&
digitalRead(buttonArray[7]) == HIGH &&
digitalRead(buttonArray[8]) == HIGH )
{
//while all the buttons are released, wait
}while ( digitalRead(buttonArray[0]) == LOW ||
| digitalRead(buttonArray[1]) == LOW ||
digitalRead(buttonArray[2]) == LOW ||
digitalRead(buttonArray[3]) == LOW ||
digitalRead(buttonArray[4]) == LOW ||
digitalRead(buttonArray[5]) == LOW ||
digitalRead(buttonArray[6]) == LOW ||
digitalRead(buttonArray[7]) == LOW ||
digitalRead(buttonArray[8]) == LOW )
{
if(digitalRead(buttonArray[0]) == LOW) {stringArray[0] = digitalRead(buttonArray[0]);}
if(digitalRead(buttonArray[1]) == LOW) {stringArray[1] = digitalRead(buttonArray[1]);}
if(digitalRead(buttonArray[2]) == LOW) {stringArray[2] = digitalRead(buttonArray[2]);}
if(digitalRead(buttonArray[3]) == LOW) {stringArray[3] = digitalRead(buttonArray[3]);}
if(digitalRead(buttonArray[4]) == LOW) {stringArray[4] = digitalRead(buttonArray[4]);}
if(digitalRead(buttonArray[5]) == LOW) {stringArray[5] = digitalRead(buttonArray[5]);}
if(digitalRead(buttonArray[6]) == LOW) {stringArray[6] = digitalRead(buttonArray[6]);}
if(digitalRead(buttonArray[7]) == LOW) {stringArray[7] = digitalRead(buttonArray[7]);}
if(digitalRead(buttonArray[8]) == LOW) {stringArray[8] = digitalRead(buttonArray[8]);}
}This code reads the buttons and shows the reading using serial monitor of the arduino ide. It can read one or several buttons. So far, the test has 9 buttons, and all 9 are read correctly. Also, the debounce circuit of the keyboard seems to be working well for the project. These are examples of the serial readings (the asterisks line separates each reading, the ones represent pressed buttons):
**********
100000000
**********
001000000
**********
000100000
**********
000000100
**********
001000100
**********
000101000
**********
011100000
**********
110100110
**********
Update
-
The six Braille dots
With a working prototype, the next step is to learn how to convert keys combinatios to characters. I found a very good video explanation about Perkins Braillers and Braille code on the Statewide Vision Resource Centre website:
-
Also, a brief and very clear video about the basics of Braille code:
Update
-
Mapping the Braille code
I changed the code to use six buttons, in order to start interpreting combinations of keys as characters.

-
Then, I changed the programming code to use six buttons, and to display the input reading in an arrange resembling the Braille cell. The next images shows a screenshot of the serial monitor with the corresponding Braille code and letter added:


-
Next step will be to translate each combination to its corresponding alphabet letter.
Update
-
The first ten letters
After getting the machine to assign each button to its corresponding dot in the Braille cell, I needed to translate different combinations to letters.
Using an "if" statement to evaluate an array of Strings (this will be changed to an array of chars), and according to the activated positions, a letter is displayed.
This is the code to translate the array into the letter "f":
if( stringArray[0] == "1" &&
stringArray[1] == "1" &&
stringArray[2] == "0" &&
stringArray[3] == "1" &&
stringArray[4] == "0" &&
stringArray[5] == "0" )
Serial.println("f");And this is the serial output and Braille cell for letter "f":


Back