


13. INPUT DEVICES
INTRODUCTION
The goal of this assignment is design and program an input device to a microcontroller board.
Students should have:
Described your design and fabrication process using words/images/screenshots
Explained the programming process/es you used and how the microcontroller datasheet helped you
Outlined problems and how you fixed them
Included original design files and code
Electronics design
In this assigment I try to program the sensor DHT22, which I will use in my final project. I chose it because it has a good precission, it is cheap and easy to find it.
First of all, I need to do the board, in the week 06: electroncis design I explained how to use the Eagle. For this board I used the Attiny85, I selected the Attiny85 because it has more memory and I need to put the liraries to use this sensor, and to control 1 or 2 sensor I will have enought pins; a regulator to 3.3V which can be useful because in my final project I will have a sensor which need this supply.Also I put the connector for the communication (TX and RX) and two headers, one to program the microcontroller (VCC, GND, MOSI MISO, SCK, RST) and another one which has some pins in common, in this way, I can connect two sensor in this board. Moreoveer I put the header for the FTDI.
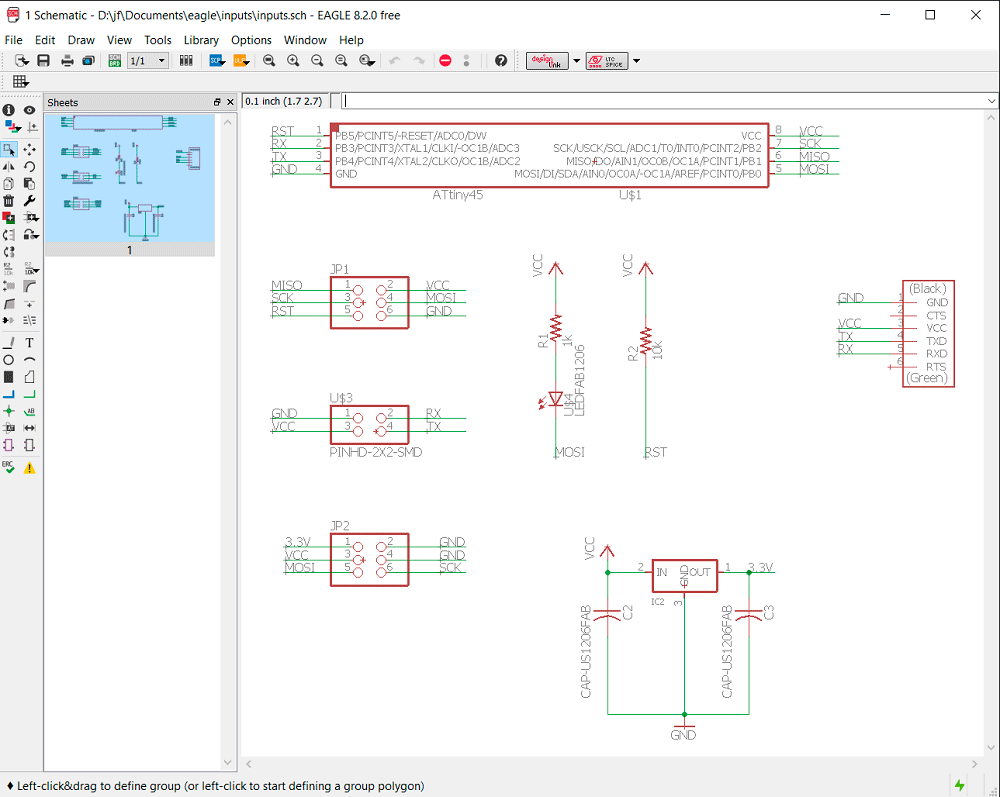
After the schematic, I did the board.

I did the 'CAM Processor...' and I saved the board as a 'eps' (only the 'Top', 'Vias' adn 'Pad'), and with photoshop I generated the 'png' files. With them I generated the two 'rml' files with the FabModules (as the week 04: electroncis production) and I did the board with the milling machine. When it finished, I weld the different components.
Program
First I tried to program this sensor with arduino, there was any problem, but with the attiny everything changed.
To upload the program I used the FabISP that I made on week 04: electronics production, I connected it with the inputs board, and with Arduino, where I chosen, the Board: Attiny, Processor: Attiny85, Clock: 1 MHz (later I changed to 8MHz) and Programmer: USBtinyISP.

Like that I tried to upload the same program as Arduino, but unfortunately it doesn't work. After that I search on Internet about it, and after look some pages and try a lot of thing I obtained somethig good, I download the librraries to use DHT22 with the attiny and I tried with the Clock: 8 Mhz, but I couldn't read anything in the Serial, it was for that reason that I changed the Clock to 1 Mhz, and in this case I could read something.

When I did the final project I search more information about DHT22 with Attiny and fornutantely I took with the solution, I changed the Clock: 8 Mhz, and I add:
On the top of the program:
#ifdef __AVR__
#include <avr/power.h>
#endif
And on the void(setup) I add:
#if defined (__AVR_ATtiny85__)
if (F_CPU == 8000000) clock_prescale_set(clock_div_1);
# endif
After that I look that all the results were ok, it is for that reason that I modify a little bit the program to show only the results when they are good.

DOWNLOAD FILE:
week 13 (RAR)