Wk3: 2016/02/10
COMPUTER-CONTROLLED CUTTING
0. Assignments for week3
The assignments for week3 were as below;
- Design and make a corrugated cardboard press-fit construction kit.
- Make something using Vinyl Cutter
1. laser Cutter & Vinyl Cutter
This week, Professor Niel introduced us Computer-controlled cutting, and two tools for that; laser Cutter and Vinyl Cutter.
laser Cutter
A laser cutter was typically used for industrial manufacturing applications, but is also starting to be used by schools, small businesses, and hobbyists. Laser cutting works by directing the output of a high-power laser most commonly through optics. The laser optics and CNC (computer numerical control) are used to direct the material or the laser beam generated.
THere are wide range of ways of its use, as below;
- marking, engraving
- screen printing
- press-fit construction
- flexures, living hinges, mechanisms

Laser Cutter
Vinyl Cutter
A vinyl cutter is a type of computer controlled machine. The computer controls the movement of a sharp blade. This blade is used to cut out shapes and letters from sheets of thin self-adhesive plastic (vinyl).
There are a range of ways of Vinyl Cutter, which can make;
- stickers
- flexible circuit boards
- a textured surface/relief pattern
- screenprint resists/stencils

Vinyl Cutter
2. Practice(1) - Cardboard Pen Stand -
I wanted to make something, which I needed and could use as usual, because I did not want to make just a trash. I decided to make "Pen Stand" since I have just moved to Amsterdam and there are few facilities in my flat.
Making 3D model
First, I made 3D model of Pen Stand, using Fusion 360. Due to the learning last week, making model itself was very easy and took me only 10 minutes.

Model Pen Stand by Fusion 360
"Pen Stand" modelled by Fusion 360
Download STL file
Making Cutting Blueprint
Next, I had to make blueprint to cut cardboards, and used Autodesk 123D Make, which can turn 3D models into 2D build plans with animated assembly instructions. Thanks to it, I was able to make 2D build plan within only 10-20 minutes, and the preparation for cutting was finished with modification on Inkscape.

Autodesk 123D Make
Machine set up of laser cutter
Below is the set up process of laser cutter:
- Prepare the sutting file as above, and read them by PC of laser cutter
- Select each paths as
CutorEngrave. - Set the parameter of the each path:
power,speedandcorner power. You must test cutting and check if the parameter is appropriate or NOT. Be careful not to make the material burnt. - Cut the material with correct setting. Don't forget ventilate by fun during the job.
Cutting... and Mistake!
Though I thougt what waited for me next was only cutting, I made several mistakes as below...;
- Incorrect setting on laser power/speed
Before using laser cutter, we have to set laser
speed,powerandcorner power, and the parameters are different from material to material. It is neccesary for me to set appropriate parameters forCardboard 3mm, which is the material assigned this week.
Speedindicates how fast the extruder moves. If speed is too fast, the material cannot be cut enough, and if too slow, it takes too much time.
Powerandcorner powerindicates the strongness of laser. If power is too strong, the material might be fired and melted, and if too weak, they cannot be cut neetly.
Weak power made inadequate cut
In my first trial, I set wrong parameter to laser cutter, so the cardboards could not be cut clearly, and I had to examine several parameter. As a result of these trial, I fuond the moderate parameter for cardboards 3mm as table below.
speedpowercorner powercut 100 70 40 engrave 200 20 10
However, the parameter changes due to the cleanliness of laser extruder or other emviroments, so it is vital to test the parameter before cutting production output.
- Wrong thickness of joint parts
Second problem was wrong thickness of joint points. In my first trial, I set the thickness of joint points 3mm, however, it made the model too looth to make up. Sadly, I could not make up them at all...

Too looth to joint and construct....
Then I made test joint parts, and tried width of joint points: 2.6mm~3.0mm as pictures below. and found that appropriate width of joint points in 2D model plan is 2.6-2.7mm for cardboard 3mm.
Joint parts made by parametric modeling on Inkscape
Download DXF file
Verifing the fastness on each case
Cutting and construction
After several trial and error, I was successfully able to make 2D cutting buleprint as below;

2D build blueprint by 123D Make
Download PDF file
Then finally, I cut the cardboard successfully, and comlete making up the cardboard pen stand. Though it is simple one, I have done trials and errors, and struggling, so I felt really happy to make my first "real" production.

Construction process of pen stand
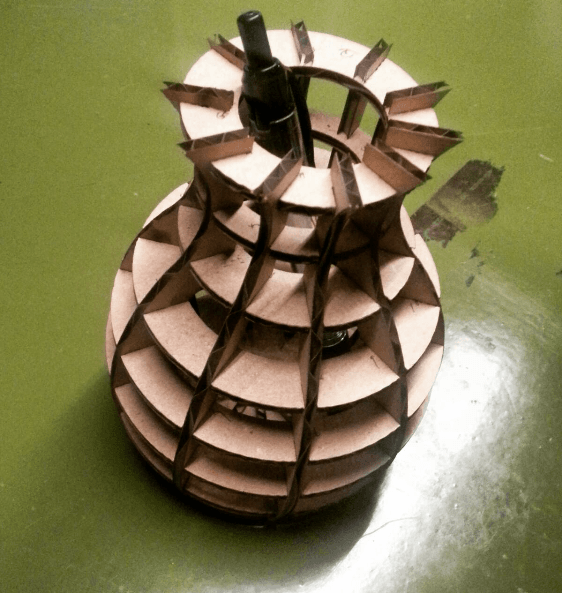
Cardboard Pen Stand
3. Practice(2) - Handmade Sticker -
Next assignments for this week is using vinyl cutter, and I decided to make sticker for my notebook, which was unfashionable one with only logo of Salesforce Ltd.
Making 2D cuttng plan
I used simply Inkscape to draw the plan. First, I convert image which was logo of Waag Society (Fablab Amsterdam) from Raster to Vector, and added some scriptions.

Sticker Design
Also, there are several points which we have to pay attention to on this process as below;
1. Convert Strokes to Paths
After finishied drawing, Strokes have to be converted to Paths, so that we can prevent the outlines of output objects being double lines. If Strokes are left as it is, the outlines of sticker will be duoble lines after cutting by Vinyl Cutter.
2. Joint Paths
Don't forget joint paths with each otehr. Vinyl Cutter traces not Strokes but Paths of Raster Image, so if paths are not jointed, the outline of sticker will be not straight and consecutive but apart with each other, which cannot be used as sticker...

2D Cutting Plan of Sticker by Inkscape
Download PDF file
Machine set up of vinyl cutter
Below is the set up process of vinyl cutter:
- Prepare the file as above. Don't forget integrate the path and transform fill to path.
- Insert material to the vinyl cutter, and measure its size by machine. In case of machine in Fablab Amsterdam, select
pieceandenter. - From 2D design software on laptop, select
printand vinyl cutter. - From
setup, 'get the parameter of the material from machine' - Conduct cutting. I used the setting with
speed 20cm/sandforce 80gf.
Cutting by vinyl cutter
After several trials and errors, I could successfully cut the sheet, then use transparent sticker to paste it on my notebook. Making process itself was really simple and easy if people pay attention to several important points as above, and it was exciting experience.
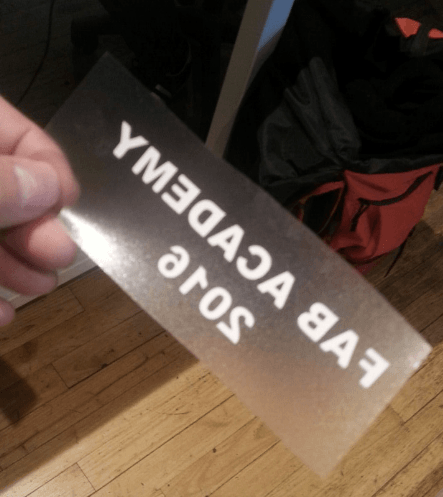
Transparent sheet for pasting sticker
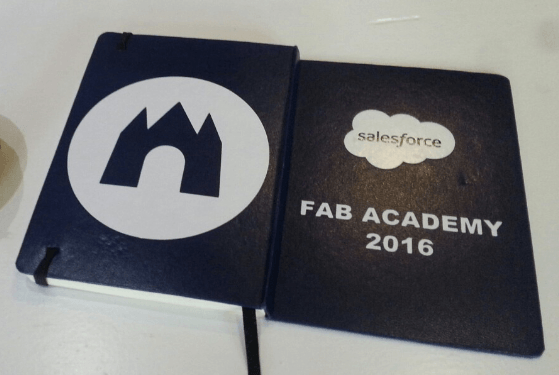
Handmade Sticker on my notebook
Outline of this page
1. laser Cutter & Vinyl Cutter
2. Practice(1) - Cardboard Pen Stand -
3. Practice(2) - Handmade Sticker -
Download output of Wk3
Here are my output files for week3:
Lecture Material for Wk3
Lecture Note
Tools
Learning Support
- Vinyl Cutter
- Laser Cutter
- Corel Draw and the Laser
- Press-Fit Construction Tips
- Laser Cutting lecture
Videos of Wk3
Here you can find this weeks's lectures on VIMEO:
(2016.02.10)
(2016.02.17)
Checklist for Wk3
(Computer-Controlled Cutting)
Assignments:
- Design and make a corrugated cardboard press-fit construction kit
Learning outcomes:
- Demonstrate and describe parametric 2D modelling processes
- Identify and explain processes involved in using the laser cutter.
- Develop, evaluate and construct the final prototype
Have you:
- Explained how you drew your files
- Shown how you made your press-fit kit
- Included your design files and photos of your finished project
(Vinyl Cutting)
Assignments:
- Ensure that you have used Cinyl Cutter in some way.
Learning outcomes:
- Identify and explain processes involved in using this machine.
- Design and create the final object
Have you:
- Explained how you drew your files
- Shown how you made your vinyl project
- Included your design files and photos of your finished project