Project development
Complete your final project, tracking your progress:
- What tasks have been completed, and what tasks remain?
Completed:
- Figure out what to make (first)
- Got needed material:
- (1) Sheet of 3mm Birch wood (E19,95, from Houthander Schmidt, Amsterdam) for laser cutting
- (2) Female headers (from Radio rotor, Amsterdam)
- (3) (Fe)male jumpers (from Radio rotor, Amsterdam)
- For economic, quality and sustainability reasons, I mostly used material already in my posession, particularly:
- From the lab, I got (1) electronic components (such as LEDs, resistors and ATTiny44) for the Charlieplexing board (See BOM list in 'Files'), (2) a hc sr04 ultrasonic ditance sensor (±E2,-) and (3) LiPo battery (±E15,-)
- To experiment at later stage and be generally prepared, I got
- (1) Paverpol and Crackfree for hardening material
- (2) Sudoku like Protoplast material for shaping and molding
- (3) Electronics, particularly the Adafruit mp3 sound shield (E30,-) from Kiwitronics online as potential back up for the mp3 Touch board
- The most expensive material was the filament for the Dimension 3D printer which at my university is more expensive than the Ultimaker filament, but you also save waisting material due to its robustness (model material: 0.25 per cm2, Supportive material: 0.25 cm2 - Ultimaker 0.08 cm2). Discussed potential of recycling this plastic to save costs.
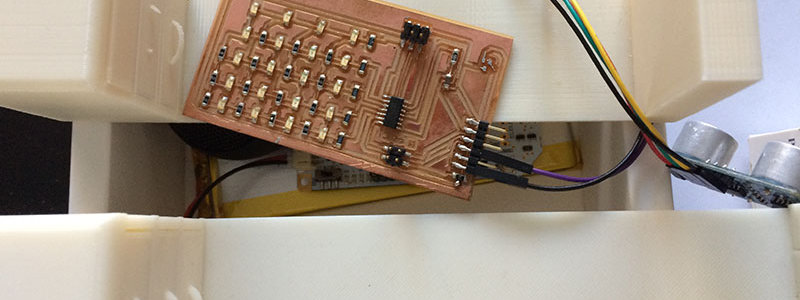
- Figured out what kind of electronics to use (LiPo battery and HC sr04 ultrasonic distance sensor connected to touch board and my Charlieplexing board)
- How to connect the board components together
- How to make the boards run stand alone (using single cell LiPo battery with 2 way JST PH connector for touch board)
- Figure out how the individual boards work (Installed necessary driver, female pins, etc)
- Created code to play audio files using Arduino
- Connected distance sensor
- Got code running for distance sensor and improved code
- Solved the Charlieplex complexity
- Made LED animations
- Refined concept
- Caught up on lectures
- Made first presentation video
- Etc...
To be completed:
- 2.5D design: (improve) technical drawings
- Laser cut 2.5D design and assemble it
- 3D design (wash it, make it fit and work with other design)
- Write code for mapping distance to LED
- Improve charlieplex animation
- Make window for LED visual
- Reflect/ reconceptualize
- Remake broken wall from molding/ casting week
- Experiment with extras
- Make slide
- Document final project
- Convince museum to show work /fund research...
- Decide what to do more and what not
- Work. Get a social life.
- Sleep.
- What will happen when?
- Likely to happen in order of listed
- What has worked? what hasn't?
- Fusion 360 crashed again resulting in corrupted file...
- Explored other tools, for more stabile and easy laser cut design, such as Maker case and Illustrator. Maker case was a nice easy tool, that run a little bit more stable in the Chrome browser, than in Firefox (Tip: save your models -a lot), but did not really 'cut' it if you want to think outside the box. Illustrator was a bit of fresh air in terms of stability, but for a process that needs lots of iterations > parametric 2/3D design (such as in my case) it was lacking a bit.
- Lots of code for distant sensing did not work really well in terms of accurate sensor reading -the one that worked can be found under 'Files'.
- What questions need to be resolved?
- How to unscrew my multimeter to replace its batteries
- When will I sleep?
- What is most important for the project advancement?
- Time!
- What have you learned?
- About the complexity of charlieplexing
- You can prevent burn marks from laser cutting using gaffer tape
- Digital fabrication: When to use it, how to use it and when not to use it
Relax it is just Charlieplex: tips
- LEDs only work in ONE direction
- More about the workings of LED’s
- You can test diodes with most multimeters (diode setting and touching the anode (+) and cathode (-) of the LED so for it to light up)
- The point about Charlieplexing is that you can only light one LED up at a time. If you want more you then multiplex them; flash them on and off rapidly so it looks like there is more than one on at once.
- What more?
- Much more.
- I learned to make something.
Files
Make your own Bureau crazy award!
- Bill Of Materials for Charlieplex LED board (BOM .txt)
- Charlieplex LED board with Eagle (needs connecting line for last row, .brd | .sch)
- Cabinet -kastje (.stl for 3D printing )
- Casing distance sensor (.stl for 3D printing | .ai for laser cutting -do not forget engraving if desired)
- Casing board electronics (.ai includes different ways for enclosure)
- Bureau crazy award extra elements (.ai includes cabinet (pillar/post) inlays and base tray for laser cutting)
- Code for LED animating Charlieplex LED board (.ino - Arduino IDE)
- Code for distance sensing and sound output (.ino -Arduino IDE)
- Sound fragments ("ga naar het kastje"-go to the cabinet .mp3 | "ga naar de muur"-go to the wall .mp3)
Final presentation
")


")


")


