6. 3D Scanning and printing
| This weeks design | |
|---|---|
| Future curious george | f3d fusion |
| futuremonkey | [stl]https://a360.co/2EhjLx8 |
Design rules Printrbot Metal plus
For the group assigment we spliited the class in three groups. I worked together with anne to test the printrbot metal plus. This is a older generation 3d printer which works with the older cura versions with pronterface UI. Other then the other machines in the fablab you have to plug in you laptop to the machine using usb. The machine works with 1.75 mm pla filament and has a 0.4mm nozzle.
We tested the design rules by printing a object that checks many faccets of the machine. The test we use to challange the 3d printer we found on thingyverse. It looks as a good test case for the 3d printer. https://www.thingiverse.com/thing:1363023 To be able to compare the different machines in the lab all groups used the same test. The two other machines tested were Ultimake 2+ and prusa i3 mk3. The printer we used is the oldest of the machines and my expectations of the outcome of the test were low.
To set the printer to work we had to use the cura version 15.04.06 which have the option to enable the pronterface UI. Here you can control the machine. You can set the temperature of the nozzle and also the bed temperature. Futher you can move the nozzle to home and control the z axis of the machine. On the right side you can see the generated g code which the machine uses to print.
 Cura pronterface UI
The test we found enables you to check 21 points in one single print. We uploaded the stl file in cura 15.04.06 and set the printingtemperature on 208 and a layerheight of 0.15mm. We did not use any support for the print. The fill density was set on 20%
 settings cura 15.04.06 for test print
When all was set up we started printing and to our suprise it went really smooth. I was expecting first some failures, That the object did not stick to the heatingbed and would come loose. but the machine suprised us with it good performance. The printing took around a hour to finish. The only thing we had to check in the meantime if the filament was still loading.
 machine printing the test
When the print was ready we waited for a short while to cool down the print. We gently made the object loose form the bed. The print looked succesfull. Supriced it came out so nice.
Now the print was done we could check the quality of the print by the 21 points indicated on the checklist.
01 Nut, Size M4 Nut should fit perfectly
    Good result
02 Wave, rounded print
    good result
03 Star, Sharp Edges
    Star is visible but not perfect
04 Name, Complex Shapes
    Indication of text had a poor result
05 Holes, Size 3, 4, 5 mm
    All the holes were 1 mm smaller then intended
06 minimal Distance: 0.1, 0.2, 0.3, 0.4, 0.5, 0.6, 0.7 mm
    The minimal distance of the print started at 0.3, the lower results were not well visible
07 Z height: 0.1, 0.2, 0.3, 0.4, 0.5, 0.6, 0.7, 0.8, 0.9, 1.0, 1.1 mm
    The minimal height that was printed was 0.3 thick
08 Wall Thickness: 0.1, 0.2, 0.3, 0.4, 0.5, 0.6, 0.7 mm
    The walls printed started from 0.5 mm
09 Bridge Print: 2, 4, 8, 16 mm
al bridges were intact, only the bridge of 16 mm had a overhang and was not printed perfect. It did connect the bridge though.
10 Sphere, Rounded Print 4.8mm height
check
11 Sphere Mix, 7 mm height
Hight was 0.1 mm higher
12 Pyramide, 7 mm height
check
13 Overhang: 25, 30, 35, 40, 45, 50, 55, 60, 65, 70°
    All the overhang parts came out perfect
14 Warp, does it bend?
    The object is straight and did not bend in the proces
15 3D Print Font, optimized for 3D printing
    Not good result. Is readable but quality is poor
16 Surface, Flatness
    The surface quality is good
17 Size, 100 x 100mm x 23.83 (10mm width)
    Weirdly enough the dimensions were of. 92/93/10.6
18 Spike, minimum Layer Time, 21 mm height from Bottom (include Baseplate)
    Poor result. the max height was 17.1 mm
19 Hole in Wall, 4 mm diameter, check for proper print
    Hole in the wall came out nice with correct dimensions
20 Raft Test, raft should be just under the model
    We haven't used a raft to support the model
21 Retract Travel, check retract settings for longer travel
    we did not change the settings.
 reult of the printing test
Conclusion
Printing this test with a 0.15 mm layer height showed the cons and pro’s of this particular 3d printer. I was positively surprised with the result in overhang and bridges. The results were very good and intact. further did the object not warp and the surface was smooth. Text came out very poorly and was hardly readable. Also the dimensions of the holes were of by a mm. When using this printer the absolute minimum thickness is 0.3 mm, lower then this won’t be printed. Even though this machine won’t be my first choice of 3d printer in this test it came out reliable in printing. No issues in setup or failed prints. A reliable machine when you want to print something quickly without to much detail.
3d scanning
3d scanning is perfect to create meshes out of real life object. At the Waag fablab we have access to a sense hand scanner. It comes with a simple program which enables you to make a 3d scan. This scanner is intended for small environment use. It is connected to a a computer with a usb cable. That give you limited space to scan. the software we use for the scanner is 3d system Sense which is installed on one of the computers at the fablab Amsterdam. The moment the 3d scanner is attached to the software you are able to make a scan. After the scan is complete you stop the scan on the software. After that you can change a few things about the mesh, like crop,trim, erase, solidify and adjust color.
 a tutorial of the sense handscanner
I used the handscanner to make a digital version of my first and last remaining toy. A monkey called curious George. I did a few tries before the result was good enough for me. In my first attempt i tried to lay the toy flat on the table and while i was scanning turn it around the moment one side was done. Did not gave the result i was hoping for. My next attempt was hanging the toy on a string and try to scan around the object. The toy kept spinning and the results were not so good. My best afford was to hold the toy at the bottom and turned the toy around in front of the scanner. This gave a nice result in scanning.
 Scanning the toy
I did had to remove my hand from the design with the use of the erase tool in the software. It was very easy to remove most of the hand. When i was ready i used the solidify option to make the object solid. After which i exported the file as a obj and a stl file.
 Sense software
3d print a object
For this weeks assignment we had to design something that could only be made using a 3d printer. I wanted to use the toy in my design and alter it with the use of fusion 360. For this assignment it was not necessary to make a parametric design with constraint so i like to play around with the different design modes in fusion. First i had to import the design in fusion 360. In the menu you select: insert - insert mesh. The design appears on the workflow. Fusion 360 does not like imported meshes and to be able to make a solid i had to select the do not capture function. This you do by right click on document settings in the browser and selcet do not capture history.
 by selecting do not capture you can convert your mesh to a solid
Fusion only allows you to convert when the amount of faces is not to large. Till around 50.000 faces fusion 360 allows you to convert but will result i slow performance. Till 20.000 faces fusion can handle the covert well with resulting in slow performance. I reduced the face count of the mesh in the mesh menu under modify-reduce mesh. The reduced target i changed to face count and decreased the faces to under 10.000. This way fusion can operate with the mesh without slowing down to much.
 reducing the facecount of the mesh
Next step is to convert the mesh to a solid. This you can do by right clicking in the browser on the the object. There you can selcet mesh to brep. After doing this it makes a solid object out of the mesh.
In the same way as before you select now capture history. This gives you a timeline for the next part of the design. First i made the object smaller in the menu modify -scale. I made the object ten times smaller. Then i used the move tool (quick key m) to navigate the object to the origin. This i did to modify the design in a more effective way. When the object was in place i navigated to the sculpt environment to start molding around it.
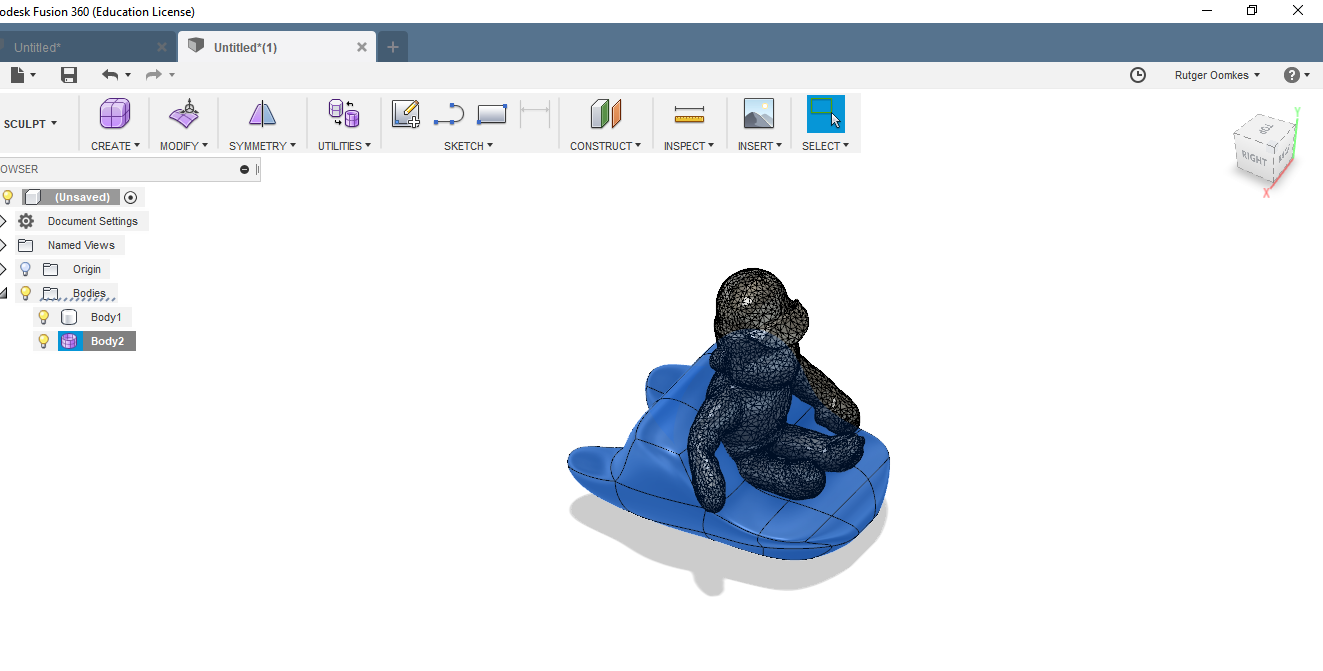
I began by creating a box in the create menu. I place the box under curious george and choose for a box 3 by 3. With right clicking on the box you can select edit form. I thought to prepare my childhood friend for the near future and made a hover kind of design. When editing the form you can make nice organic kind of shapes. When pressing alt you can exstrude the shape. This i used for the exhausts in the back. When i made a shape i liked a a hover i made the model solid. Sculptmode is perfect of creating nice organic shapes but the structure need to be intact to be ableto make it a solid. No constrainming errors in the design. Since this was a failry simple design i made in sculpt i had no issue in turning the object into a solid. By pressing finish form you go back to the model environment.
Here i made the last few design adjustment. I gave curious george a controlstick by drawing a line from the hand to the hoover. Then i turned the line into a pipe. In the sketch menu you have the option to draw 3d. This option allows you to draw to points and lines in the design and not to work on a plane. For the goggles he is wearing i made a ofset plane in front of the monkey face. I drew two circles and stopped the sketch. The i extruded the circles by pressing the quick key E. Which you also can find in the create menu.
 extrude
I did not pay to much eye for detail since the print will be very small and details will be lost. When i was ready i safed the file.
Cura
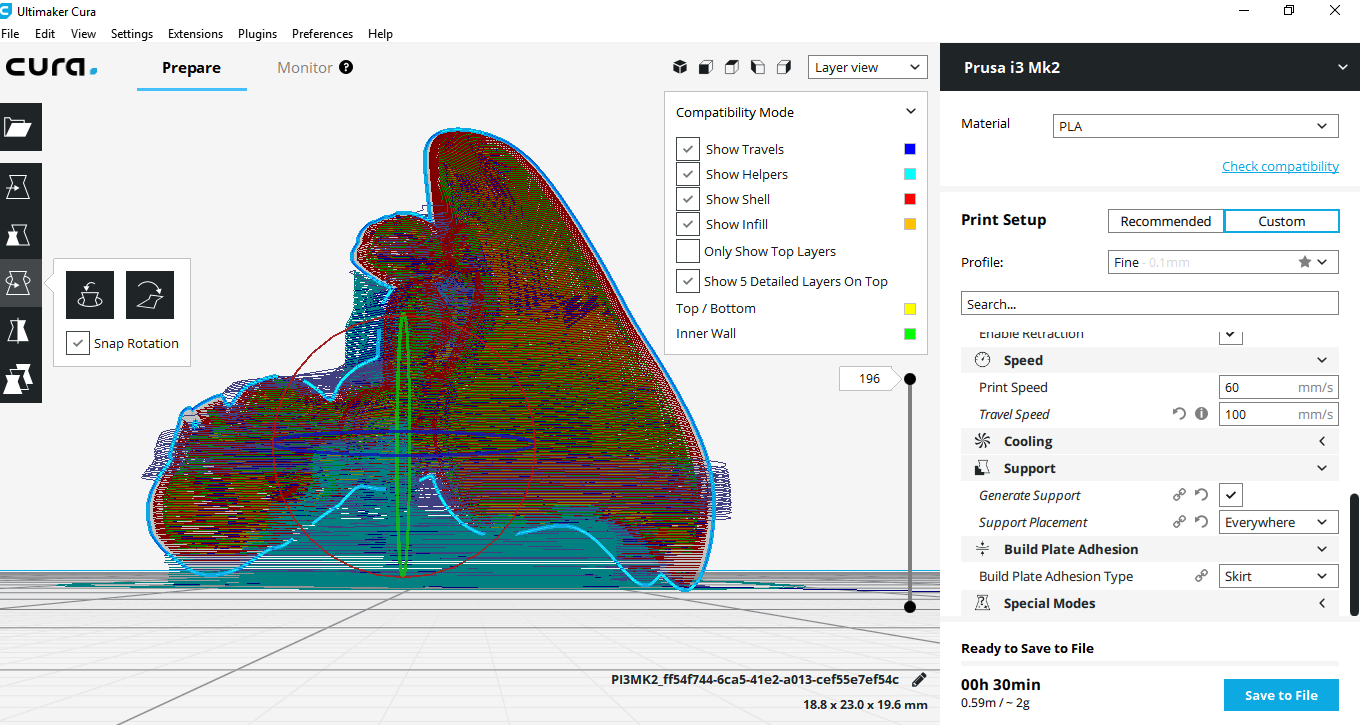
In the make menu you can select print. By doing the design appeared in Ultimaker Cura 3.2.1. Cura is a program developed by ultimake to make your design ready to 3d print. Then it will convert the file in to a gcode path which the 3d printer will use to decide its path. The interface of cura is very user friendly. You can resize and rotate your model and it show further with red indication what could be problametic parts in the design.
On the right side you can configure the print set up. How refined you want your print to be. The speed of the print, different types of support, etc.
First thing i noticed that my figure was indicated with red around the hat its is wearing. To solve this issue i rotated the model in such a way that the hat could come out good. To be able to do this i had to create a support underneath the model. To loose at least detail possible i decided to put the support on the back of the figure so it would not affect the face. I double checked if everything was set up for a print by selecting the layerview. With this view you can check all parts of the design and see if it is support material, infill or shell.
With everything setup i safed the file on the sd device of the printer of choice. The prusa i3 mk 3.
Printing with Prusa i3 mk3
This is a low priced open sourced device with good quality prints. This is the newest version of prusa printers and is very affordable for good quality results. So far the machine does not much knowledge to operate it. The set up of the printer was already good to start printing. The interface of prusa is slightly primitive but effective. There are just two bottoms to control the 3d printer. Using the slide you can go through the menu and find all the options. From maintenance, temperature, selecting print, reloading filament, etc.

Before starting i cleaned the bed with some glass cleaner spray and wiped the bed clean to make sure the first layers of the print will be proper attached to the bed.When i entered the sd device and selected my file to print you can see on the display the temperature of the nozzle and of the heated bed. When all is set the machine configure the heating bed to make sure it is straight. It always start a print with putting a line on the front side of the bed, this ensures that the nozzle is clean and that there is no rest material on the nozzle. after this it will start with the actual print which took in my case 30 minutes to finish. after the print was ready i let the bed cool down before removing the object.
 machine at work
The support i removed with help of a tweezer. It was fairly easy to remove the support from the object.
 before
 after
after
 a render of future curious george
What i learned and what went wrong.
I found the test to see the quality of print very useful. We could compare different machines using the same design and settings. This test enable you to reconfigure the printer to see if you can get better results. Also i put some focus on support material when printing, in how you turn the object to get enough support and good results without loss of detail. What went wrong was not the topic of this week but my upload to the repository. My git size was way to big because mismanagement in the git server. I explain the steps i took in week 2.