Computer-Controlled-Machining
  • make something big
FabLab Expension computer table
fablab table workspace

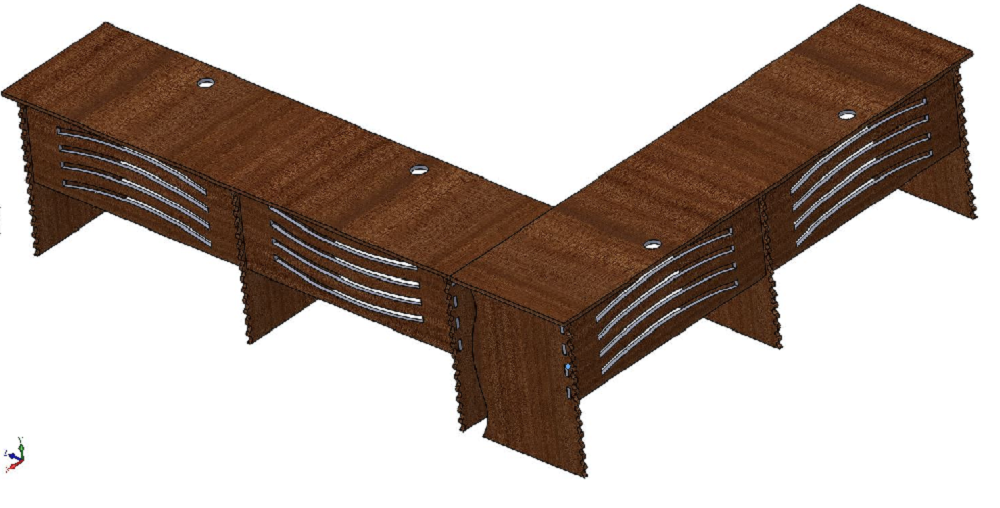
In our lab we have few tables that were placed in their place at the setting up of the lab and nowly many people want to join fablab Rwanda and we still have same space that looks like empty space so i decide to build a large table that can be used as workspace for our young innovators

so in this week I made a mistake of start designing in CAD without any shetch but i like he way i did but it take an experience that if you start your CAD(COMPUTER AIDED DRAWING) before making Freedrawing of what you want, you will spend much time on your Drawing because of generating many ideas at some times and it is difficult to implement them because you try one and after a given progress you fund that it is muching with what you want so that sometimes you required to start again that is a challenge on time management and work management too let me start the process i used in this week assignment.
COMPUTER AIDED DESIGN
As I said above i directly used CAD(SOLIDWORKS2016) or my designing process so first of all i started by desing each part that build my table up and after that i give them apperiance and assymble so i can make a preview of how my table will be looks like
EXPORTING VECTOR OF TABLE(*.DWG OR *.DXF)

let me explain a little bit on how i explain on how i made this process of saving vector files. so after desining my table i and make assembly i came back to each file o my desin and save it again but now i have to choose file type as DWG instead sldprt, rename my file and save. After the save there is another popup menu called(DXF/DWG OUTPUT) and I choose face to make sure that i have my face related vectors and I clicked on the face of model i want to save its vectors related then okay. Then confirm.

After that there is another popup menu that show me a preview of my vectors.

GENERATING TOOLPATH
At this time I use Vcarve pro software in order to create tools path of my machine first of all i setup my material properties (length,width,thicknes) that corresponds with X,Y,Z plane for mashine after that i imported vectors and place them using move object tool until i fullfill the material surface, after importing and placing vector file in appropriate location i joined all vector to make sure that all vector are closed vector(if the vector are not closed you will find same part of vector which haven't cutter by mashine so that why is better to make closed vectors), now its time to make profiles i used the right panel for completing this profile making process one profile by one because they have different properties that why and another important thing to care is the tool and tool steps you selected on my self i used lat ended 1/8" tool for all my profile and for pochet profile i used 2 steps and for profile(cutting) i used 4 steps this can varies with the material thickness and hardness. and save the toolpaths and ready to start mashining process. below there is the image that explain the process i said above.
material properties setting importing vector right side pannel contain tools and editing for design inner profiles outer profiles preview toolpath and save them Editing tool steps
CUTTING PROCESS AND ASSEMBLY
this time I have to be carefull other wise I may break the tools or get injure no thing special for this step just follow the steps let go for this process after saving toolpath the shopbot GUI software lunch itself automaticaly and open the file but before start cutting you have to set origin point on my self X and Y origin i used axis navigation controll on computer interefence and for z is some how automatic because i used zeroing plate for this setting and now i can start cutting process
inner profiles outer profiles preview toolpath and save them Workmate: she is removing the tool she used before in order to put the one i want and she helped me in assembling after that she made a Spraying of the table in order to impove the outlook she is so amazing girl. after removing part form mashine ready for assembly in Assymbly progress After assembly
TABLE IN USE NOW
Editing tool steps
Download files
ZIPED FILES INCLUDES STL,DWG FOR THIS TABLE