This week we are going to atomate the mechanism that we made 2 weeks ago.
Softwares
Arduino IDE
Materials
2x Wantai 42BYGHM809 Step motors
2x Pololu DRV8834 driver carrier
Arduino UNO
Power supply
Jumpers and cables
MTM 2: ‘Maggie’ CNC Drawing Machine
This is a groupal activity, so we devided all the activities, I will document what I've done but you can find the whole project here
Programming the machine
As we said before, we use an Arduino Uno and Pololu Driver to move a stepper motor. Before begin programming there are three things that we need to understand:
Knowing this, to make the program practically we need to tell Arduino: “We need you to give 1000 steps on this direction, and for every step you have to put on 5V the step pin, wait, put on 0V, wait and repeat”
On C++, it would be this:
for (int p=0; p<1000; p++) {
digitalWrite(pinStep, HIGH);
delayMicroseconds(time);
digitalWrite(pinStep, LOW);
delayMicroseconds(timel);
}
This code lines will make that one motor give 1,000 steps. But we design our machine to move on 2 axis, so if we want to move both motors at the same time we have to tell the same to each motor, like this.
for (int p=0; p<1000; p++) {
digitalWrite(pinStepX, HIGH);
digitalWrite(pinStepY, HIGH);
delayMicroseconds(time);
digitalWrite(pinStepX, LOW);
digitalWrite(pinStepY, LOW);
delayMicroseconds(timel);
}
This would do that both motors turn at the same time with the same speed, the direction is independent for each one.
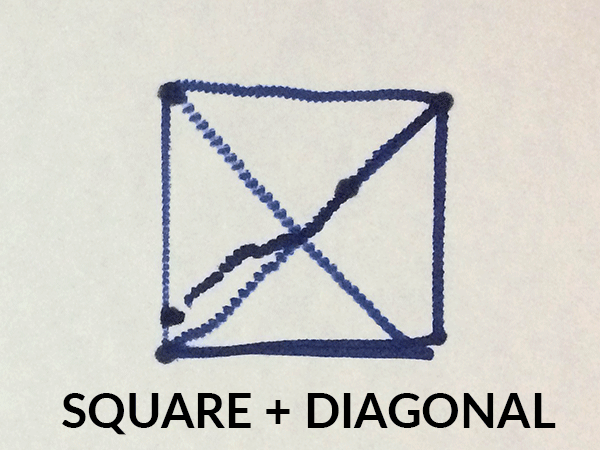
If we want a complete a program we need to set the IOs and the directions of movement, this code was our first sketch to test our machine and it will make a box with a diagonal in a very long method.
//Variables and Pin Declaration
int pinStepx = 11;
int pinDirx = 12;
int pinDiry = 10;
int pinStepy = 9;
int pinAdelante = 2;
int pinAtras = 3;
const int ledPin = LED_BUILTIN;
void setup() {
//Set IO
pinMode(pinStepx, OUTPUT);
pinMode(pinDirx, OUTPUT);
pinMode(pinStepy, OUTPUT);
pinMode(pinDiry, OUTPUT);
pinMode(pinAdelante, INPUT_PULLUP);
pinMode(pinAtras, INPUT_PULLUP);
pinMode(ledPin, OUTPUT);
//Initializing
digitalWrite(pinStepx, LOW);
digitalWrite(pinDirx, LOW); //Low get closer to motor, High get farther
digitalWrite(pinStepy, LOW);
digitalWrite(pinDiry, HIGH); //Low get farther from the motor, High get closer
digitalWrite(ledPin,LOW);
delayMicroseconds(500);
//Setting Delay
int vel = 500;
for(int p=0;p<10000;p++){ //Right
digitalWrite(pinStepy, HIGH);
delayMicroseconds(vel);
digitalWrite(pinStepy, LOW);
delayMicroseconds(vel);
}
for(int p=0;p<10000;p++){ //Down
digitalWrite(pinStepx, HIGH);
delayMicroseconds(vel);
digitalWrite(pinStepx, LOW)
; delayMicroseconds(vel);
}
digitalWrite(pinDirx, HIGH);
digitalWrite(pinDiry, LOW);
for(int p=0;p<10000;p++){ //Left
digitalWrite(pinStepy, HIGH);
delayMicroseconds(vel);
digitalWrite(pinStepy, LOW);
delayMicroseconds(vel);
}
for(int p=0;p<10000;p++){ //Arriba
digitalWrite(pinStepx, HIGH);
delayMicroseconds(vel);
digitalWrite(pinStepx, LOW);
delayMicroseconds(vel);
}
digitalWrite(pinDirx, LOW); //Down-Left
digitalWrite(pinDiry, HIGH);
for(int p=0;p<10000;p++){
digitalWrite(pinStepx, HIGH);
digitalWrite(pinStepy, HIGH);
delayMicroseconds(vel);
digitalWrite(pinStepx, LOW);
digitalWrite(pinStepy, LOW);
delayMicroseconds(vel);
}
digitalWrite(pinDirx, HIGH);
for(int p=0;p<10000;p++){ //Up
digitalWrite(pinStepx, HIGH);
delayMicroseconds(vel);
digitalWrite(pinStepx, LOW);
delayMicroseconds(vel);
}
digitalWrite(pinDirx, LOW); //Down-Right
digitalWrite(pinDiry, LOW);
for(int p=0;p<10000;p++){
digitalWrite(pinStepx, HIGH);
digitalWrite(pinStepy, HIGH);
delayMicroseconds(vel);
digitalWrite(pinStepx, LOW);
digitalWrite(pinStepy, LOW);
delayMicroseconds(vel);
}
digitalWrite(ledPin, HIGH); //Turn on LED when finish
}
A very large code, and it will be larger if we want the machine to execute more movements, so we realized that we can sintetize it by making a function with the code that is repetitive, and this is the "for cycle".
Determining Ratios
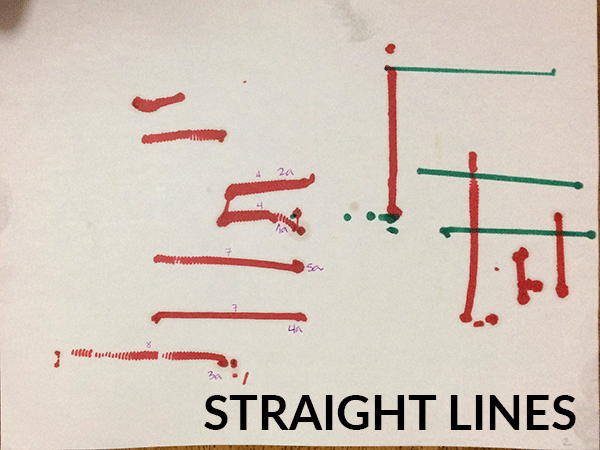
But first we need to measure some parameters, like the relation of the rotation and the straight line distance, and the relation of the delay with the speed.
Once we had the X and Y axis assembled and the motors connected, we made the program to draw horizontal and vertical lines using first milliseconds and measuring how many centimeters the motors ran in that specific time. Using that information, we were able to define a formula to make the motors run changing the distance instead of changing the time.
Thanks to this calculation we could define that the amount of steps it will be equal to the stright line distance we want to draw on milimeters multiplied by 250
steps = distance * 250
And the delay will be a factor of 15,000,000/(1200*6.25) divided by the linear speed on milimeters per seconds
delay = 15000000/(1200 * 6.25 * linearSpeed)
Code synthesis
//Declaration
int pinStepx = 11;
int pinDirx = 12;
int pinDiry = 10;
int pinStepy = 9;
const int ledPin = LED_BUILTIN;
void setup() {
//Set IO
pinMode(pinStepx, OUTPUT);
pinMode(pinDirx, OUTPUT);
pinMode(pinStepy, OUTPUT);
pinMode(pinDiry, OUTPUT);
pinMode(ledPin, OUTPUT);
//Initialize
digitalWrite(pinStepx, LOW);
digitalWrite(pinDirx, LOW); //Low hacia el motor, High fuera del motor
digitalWrite(pinStepy, LOW);
digitalWrite(pinDiry, HIGH); //Low fuera del motor, High hacia el motor
digitalWrite(ledPin,LOW);
delayMicroseconds(500);
//Instructions
line(40, String('l'), 4.5);
line(20, String('d'), 4.5);
line(40, String('r'), 4.5);
line(20, String('d'), 4.5);
line(40, String('l'), 4.5);
diag(40, 40, String("ul"), 4.5);
diag(40, 40, String("dl"), 4.5);
}
void loop(){
}
//Functions
void line(int dist, String dir, int velmot){
//10,000 steps are 25 turns and 4cm
int vel = 15000000/(1200*6.25*velmot);
int steps = dist*250;
int pin;
if (dir == "u"){
digitalWrite(pinDirx, HIGH); //Up
pin = pinStepx;
} else if (dir == "d"){
digitalWrite(pinDirx, LOW); //Down
pin = pinStepx;
} else if (dir == "r"){
digitalWrite(pinDiry, HIGH); //Right
pin = pinStepy;
} else if (dir == "l"){
digitalWrite(pinDiry, LOW); //Left
pin = pinStepy;
}
for(int p=0;p
delayMicroseconds(vel);
digitalWrite(pin, LOW);
delayMicroseconds(vel); }
digitalWrite(ledPin, HIGH);
delay(500);
digitalWrite(ledPin, LOW);
}
void diag(int distx, int disty, String dir, int velmot){
//10,000 steps son 25 vueltas son 4cm
//int teta = atan(disty/distx);
//int velmotx = cos(teta)*velmot;
int velx = 15000000/(1200*6.25*velmot);
//int velmoty = cos(teta)*velmot;
//int vely = 150000000/(1200*6.25*velmoty);
int stepsx = distx*250;
int stepsy = disty*250;
int pin;
if (dir == "ur"){
digitalWrite(pinDirx, HIGH); //Up
digitalWrite(pinDiry, HIGH); //Right
} else if (dir == "ul"){
digitalWrite(pinDirx, HIGH); //Up
digitalWrite(pinDiry, LOW); //Left
} else if (dir == "dr"){
digitalWrite(pinDirx, LOW); //Down
digitalWrite(pinDiry, HIGH); //Right
} else if (dir == "dl"){
digitalWrite(pinDirx, LOW); //Down
digitalWrite(pinDiry, LOW); //Left
}
for(int p=0;p
digitalWrite(pinStepy, HIGH);
delayMicroseconds(velx);
digitalWrite(pinStepx, LOW);
digitalWrite(pinStepy, LOW);
delayMicroseconds(velx);
}
digitalWrite(ledPin, HIGH);
delay(500);
digitalWrite(ledPin, LOW);
}
This code works as a "Baby G-Code" because we only need to specify, for example, in the command line(distance, direction, speed) and in the command diag(distance X, distance Y, direction, speed). It still has some delimitation, it can't draw diagonals lines with an angle different from 45°, and can't draw curves.
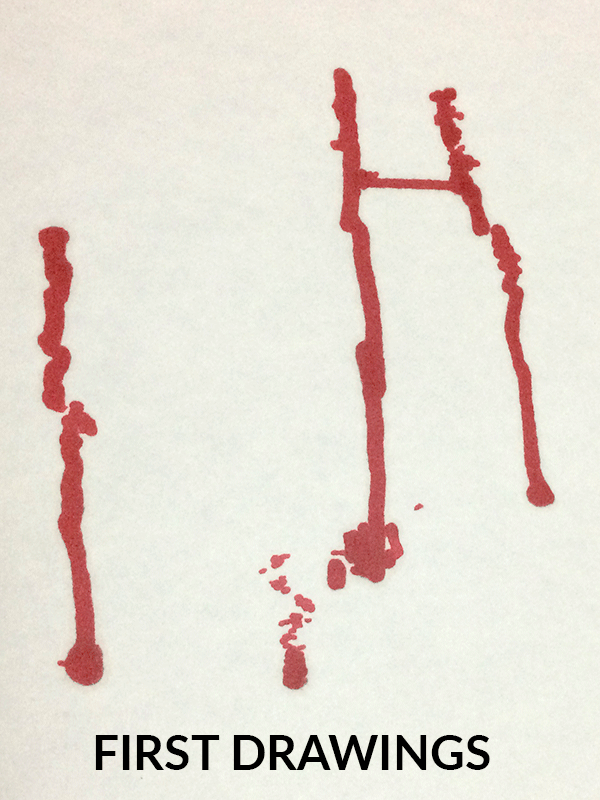
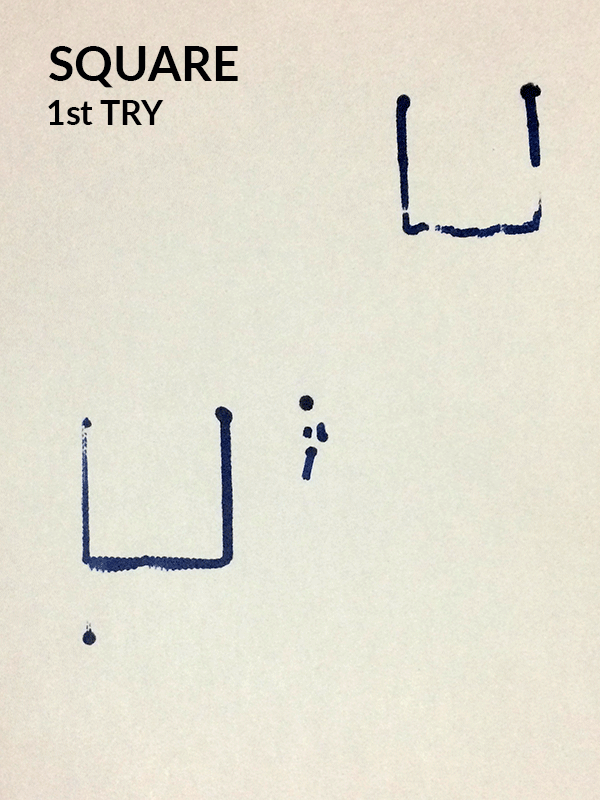
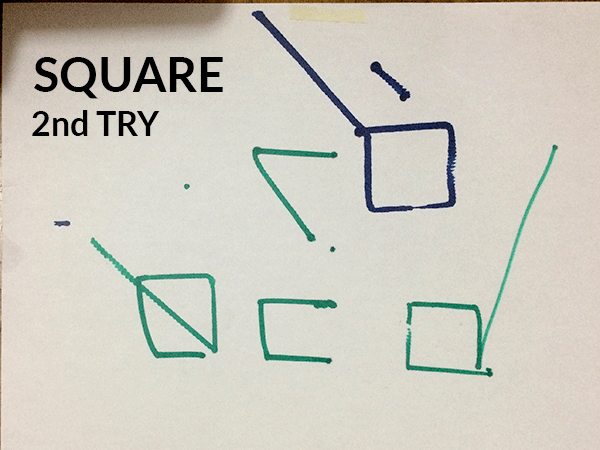
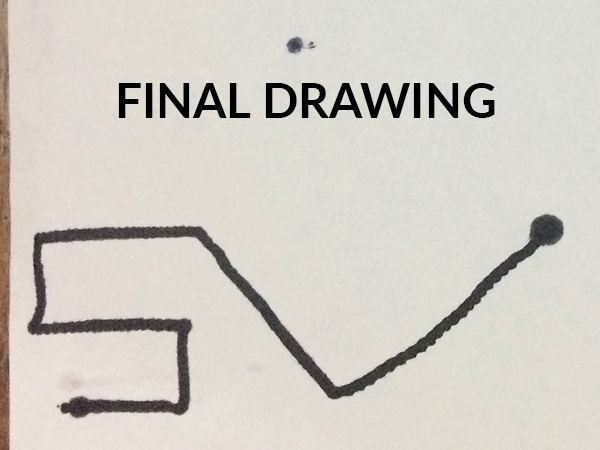
Results
Here is the sequence of the test that we made
Here is a video of what does the last program that we made!!!
Week 11 - Machine Design from Ivan Lopez on Vimeo.
Sponsors