3D Scanning and Printing
Goals
- Test the design rules for your printer(s) (group project)
- Design and 3D print an object (small, few cm) that could not be made subtractively
- 3D scan an object (and optionally print it)
3D printing
Our lab is equipped with a Ultimaker 2, so the decision to use Cura (the proprietary slicing software by Ultimake BV company) was a no brainer. What ensued was a tale of madness and misery.
The Cura case
Cura 2.4.0 (the latest stable release at the time of writing) is readily avaible from the official site as a AppImage files (more on AppImage here): just dowload the file, make it executable and run it (if you encounter any error about fusemount being unable to mount the image make sure you have "fuse" installed on your system).
Now I know how straightforward installing Cura could be, but before addressing the problem in the right way I took a couple "detours".
At first I tried to "play it by ear": I remembered that Cura2 used python3.4 and this was quite problematic under GNU/Linux, since most distributions nowadays ship only with python2.7 and 3.5; to address the problem an unofficial PPA has been made avaible for Ubuntu and Ubuntu derivates.
In order to take advantage of that with my Debian I planned to build a .deb package from the PPA source, following this guide.
I added the deb-src line in a file inside the "/etc/apt/sources.list.d" directory and tried to build the package with a "apt-get source --build cura"; this was the output:
sgrc@t420:~/.debs_scaricati$ apt-get source --build cura
Reading package lists... Done
NOTICE: 'cura' packaging is maintained in the 'Git' version control system at:
https://github.com/Ultimaker/Cura.git
Please use:
git clone https://github.com/Ultimaker/Cura.git
to retrieve the latest (possibly unreleased) updates to the package.
Need to get 5,306 kB of source archives.
Get:1 http://ppa.launchpad.net/thopiekar/cura/ubuntu yakkety/main cura 1:2.4.0~201702101832~rev1665~pkg131~ubuntu16.10.1 (tar) [5,305 kB]
Get:2 http://ppa.launchpad.net/thopiekar/cura/ubuntu yakkety/main cura 1:2.4.0~201702101832~rev1665~pkg131~ubuntu16.10.1 (dsc) [1,354 B]
Fetched 5,306 kB in 6s (877 kB/s)
dpkg-source: info: extracting cura in cura-2.4.0~201702101832~rev1665~pkg131~ubuntu16.10.1
dpkg-source: info: unpacking cura_2.4.0~201702101832~rev1665~pkg131~ubuntu16.10.1.tar.xz
dpkg-buildpackage: info: source package cura
dpkg-buildpackage: info: source version 1:2.4.0~201702101832~rev1665~pkg131~ubuntu16.10.1
dpkg-buildpackage: info: source distribution yakkety
dpkg-buildpackage: info: source changed by Thomas Karl Pietrowski
dpkg-buildpackage: info: host architecture amd64
 dpkg-source --before-build cura-2.4.0~201702101832~rev1665~pkg131~ubuntu16.10.1
dpkg-checkbuilddeps: error: Unmet build dependencies: python3-uranium uranium-tools qttools5-dev qttools5-dev-tools python3-pytest pylint3
dpkg-buildpackage: warning: build dependencies/conflicts unsatisfied; aborting
dpkg-buildpackage: warning: (Use -d flag to override.)
N: Ignoring file '#cura.list#' in directory '/etc/apt/sources.list.d/' as it has an invalid filename extension
E: Build command 'cd cura-2.4.0~201702101832~rev1665~pkg131~ubuntu16.10.1 && dpkg-buildpackage -b -uc' failed.
Faced with the necessity of installing all those missing dependencies by hand I lost my spirit and begun looking for an alternative way
I tried then to use Docker, a tool I have been interested in for a long time now; a pre-built container was already avaible (1), so I installed the docker-engine following this guide. Done this I created a startup script in my PATH (I usually use ~/bin/ for these).
#!/bin/sh
XSOCK=/tmp/.X11-unix
XAUTH=/tmp/.docker.xauth
xauth nlist :0 | sed -e 's/^..../ffff/' | xauth -f $XAUTH nmerge -
docker run -ti -v /etc/passwd:/etc/passwd:ro -v /etc/group:/etc/group:ro -v $HOME:$HOME -v $XSOCK:$XSOCK -v $XAUTH:$XAUTH -e XAUTHORITY=$XAUTH -e DISPLAY --user $UID:$GROUPS stevebake/cura-docker
With this I thought I had a working copy of Cura 2.4.0, but the script had to be invoked with sudo, therefore the software could not see my normal user folder and files.
In order to solve this you should make docker availble to normal users, following this other guide.
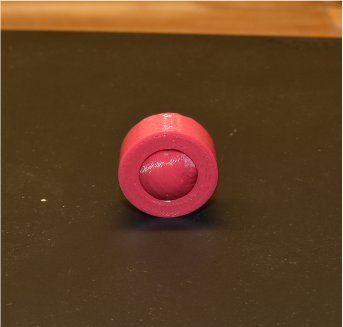
The actual printing
I decided to adapt a little section of the thrust bearing I was designing for the 3D scanner in order to print something for the assignment; the inside ball actually rolls, but not smoothly enough to be of any use in a practical scenario:
3d Scanning
At first I tried to use osm-bundler, but the original archive was dead. I found a copy here but I didn't manage to make it work; at first it gave me an error concerning a not found working directory:
Cannot create output directory at
Working directory created:
BundlerMatching executable path: /home/sgrc/fabacademy2017/fotogrammetria/osm/software/bundler/KeyMatchFull
Sift executable path: /home/sgrc/fabacademy2017/fotogrammetria/osm/software/sift-lowe/sift

Processing photo '_DSC4524.JPG':
        Entry for the camera 'NIKON CORPORATION', 'NIKON D7200' does not exist in the camera database
        Can't estimate focal length in pixels for the photo 'photos/_DSC4524.JPG'
        Copy of the photo has been scaled down to 1200x800
Traceback (most recent call last):
  File "RunBundler.py", line 9, in
    manager.preparePhotos()
  File "/home/sgrc/fabacademy2017/fotogrammetria/osm/osmbundler/__init__.py", line 167, in preparePhotos
    self._preparePhoto(photoInfo)
  File "/home/sgrc/fabacademy2017/fotogrammetria/osm/osmbundler/__init__.py", line 277, in _preparePhoto
    self.extractFeatures(photo)
  File "/home/sgrc/fabacademy2017/fotogrammetria/osm/osmbundler/__init__.py", line 343, in extractFeatures
    os.chdir(self.workDir)
OSError: [Errno 2] No such file or directory: ''
A quick fix to the code allowed me to go a step further, before another error got me stuck:
Working directory created: /home/sgrc/fabacademy2017/fotogrammetria/osm
BundlerMatching executable path: /home/sgrc/fabacademy2017/fotogrammetria/osm/software/bundler/KeyMatchFull
Sift executable path: /home/sgrc/fabacademy2017/fotogrammetria/osm/software/sift-lowe/sift

Processing photo '_DSC4524.JPG':
        Entry for the camera 'NIKON CORPORATION', 'NIKON D7200' does not exist in the camera database
        Can't estimate focal length in pixels for the photo 'foto/_DSC4524.JPG'
        Copy of the photo has been scaled down to 1200x800
Traceback (most recent call last):
  File "./RunBundler.py", line 9, in
    manager.preparePhotos()
  File "/home/sgrc/fabacademy2017/fotogrammetria/osm/osmbundler/__init__.py", line 167, in preparePhotos
    self._preparePhoto(photoInfo)
  File "/home/sgrc/fabacademy2017/fotogrammetria/osm/osmbundler/__init__.py", line 277, in _preparePhoto
    self.extractFeatures(photo)
  File "/home/sgrc/fabacademy2017/fotogrammetria/osm/osmbundler/__init__.py", line 344, in extractFeatures
    self.featureExtractor.extract(photo, self.photoDict[photo])
  File "/home/sgrc/fabacademy2017/fotogrammetria/osm/osmbundler/features/siftlowe.py", line 17, in extract
    subprocess.call(self.executable, **dict(stdin=photoFile, stdout=siftTextFile))
  File "/usr/lib/python2.7/subprocess.py", line 168, in call
    return Popen(*popenargs, **kwargs).wait()
  File "/usr/lib/python2.7/subprocess.py", line 390, in __init__
    errread, errwrite)
  File "/usr/lib/python2.7/subprocess.py", line 1024, in _execute_child
    raise child_exception
OSError: [Errno 2] No such file or directory
After googling a bit for a solution I threw the towel in and applied for a 30 day free license for PhotoScan Pro; I count this as a loss, for I wanted to use osm-bundler as part of the tech stack powering my 3d scanner (more on this later). PhotoScan, in its Pro version, is scriptable in python as well, but, given the price, it is not as accessible as a free and open alternative.
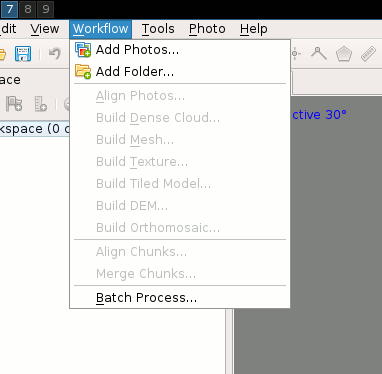
Using PhotoScan, after a quick glance at the manual, was a breeze: just follow this generic workflow:
- load photo set
- align images
- build dense point cloud
- edit the aforementioned cloud
- build and export mesh
There's really no way to get it wrong, for the process is laid out in the "workflow" menu of photscan and each step is accessible only after completing the previous one:
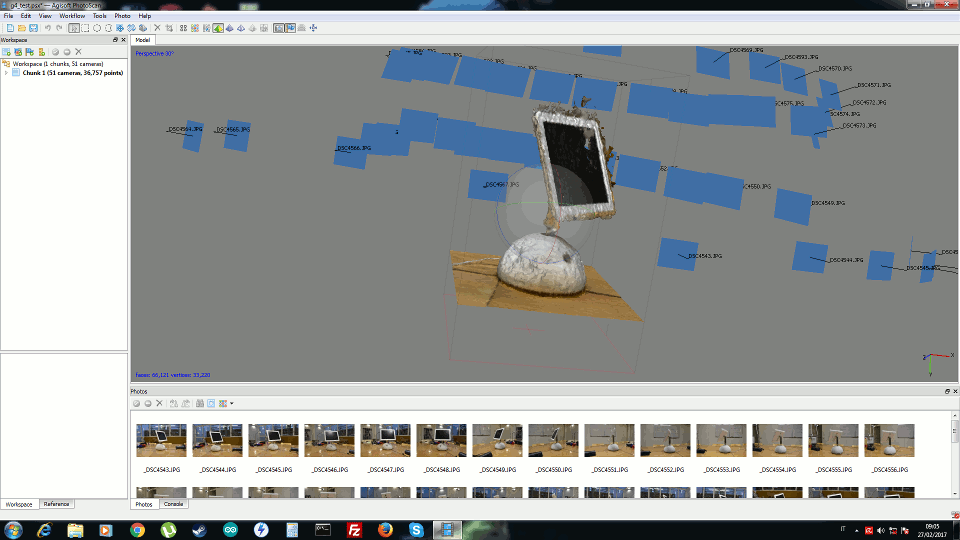
As a model I used an old G4 mac that we managed to salvage from the university trash deposit, put it on a table in a well lit room (probably there was even too much neon light) and took 51 shots, circling it 3 times at different heights, as shown in Photoscan's interface after aligning the photos:
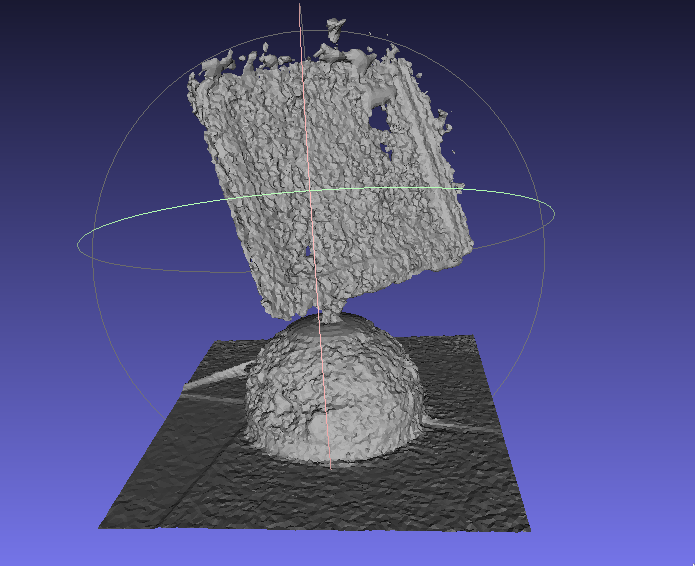
After exporting the mesh as a .stl I opened it in Meshlab to check the result; as you can see the mesh is far from perfect, having a substantial hole in the middle of the screen and some "noise" along its borders:
3d Scanner
Out of sheer curiosity I decided to tackle the optional assignment: build a 3d scanner. I already knew I was out of my depth here, so I started researching the pre-made solutions: the FabScan and the Ciclop 3D Scanner. I soon realized that both projects were out of my reach for lack of materials: no usb cameras nor lasers modules were avaible in my lab at the time of writing. After a quick reassessment I decided to use my laptop's built-in webcam: all I had to do was assembling a revolving platform, connect it to my pc and write a little python script which would operate both the base and the webcam.
My crude BOM included:
- Stepper motor x 1
- Arduino board x 1
- CNC shield and stepper motor driver x 1 (I have to thank my instructor for introducing these fun little boards to me)
- Power supply x 1
Wiring a motor
First of all I had to discover how to wire a 6-wired motor to the 4-pin connector on my CNC shield; this link proved to be quite useful but, instead of testing the resistances with a multimeter, I downloaded the data sheet of my motor (a Jameco Reliapro 12VDC 0.4A motor).
Once I singled out my wires I solderd them on a female 4 pin connector (alas, too late I discovered the existance of heat-shrink tubing)
I then plugged in the stepper driver, keeping in mind the alingment of the "Enable" pin.
Installing and setting Grbl
I tried to flash Grbl on my Arduino Uno board with the Arduino IDE, following the instruction on the official wiki, but I got this error:
Binary sketch size: 31,200 bytes (of a 32,256 byte maximum)
avrdude: verification error, first mismatch at byte 0x7800
         0xff != 0x93
avrdude: verification error; content mismatch
After a bit of googling around I found out that my Arduino is not an original one (the dark blue color of the board is a sure giveaway), therefore I had not enough memory to properly install Grbl. My only chance was to free some space deleting the Bootloader and using a FabISP to flash the Arduino: to do this be sure to change the following settings inside the Arduino IDE:
Tools > Board > Arduino Uno
Tools > Serial Port > the serial port as given by dmesg
Tools > Bootloader > USBtinyISP
After this be sure to use File > Upload using programmer
To check your new Grbl installation open the serial console from the Arduino IDE, set "Newline" as endline, 115200 as baurate and give a "$", you should see the following output:
[HLP:$$ $# $G $I $N $x=val $Nx=line $J=line $SLP $C $X $H ~ ! ? ctrl-x]
ok
Configuration time! For a full list of Grbl configuration options you can refer to the official wiki, suffice to say we need to change $101, Y steps/mm, and set it to 39.37 in order to simplify our math. That number comes from the math found in this site: $$ \frac{\#\ of\ steps\ per\ rev}{lead\ screw\ pitch} = \frac{200}{0.200} = 1000 \frac{steps}{inch} $$ $$ \frac{1000\ steps}{inch} * \frac{1\ inch}{25.4\ mm} = 39.37\ \frac{steps}{mm} $$
Python script
I threw together a simple script that turns my scanner base for 15 degrees and captures a shot with the webcam, thus obtaining 24 shots in total
#!/usr/bin/env python3

import serial
import time
import pygame.camera
import pygame.image

serial_port = '/dev/ttyACM3'
baudrate = 115200

pygame.camera.init()
cameras = pygame.camera.list_cameras()
webcam = pygame.camera.Camera(cameras[0])
webcam.start()
time.sleep(5)

ser = serial.Serial(serial_port, baudrate)
print(ser.name)
ser.write(b'G91')
count = 0
for x in range(24):
    img = webcam.get_image()
    pygame.image.save(img, 'image{0:0>3}.jpg'.format(count))
    ser.write(b'y0.212\n')
    count += 1
    time.sleep(1)
ser.close()
webcam.stop()
print('done')
Design and assembly parts
Files
- Stepper motor transmission - OnShape working file
- Single bearing - OnShape working file
- Thrust bearing ring - OnShape working file
- w05-files.tar.gz - working files archive (PhotoScan working file, stl models, gcode files)