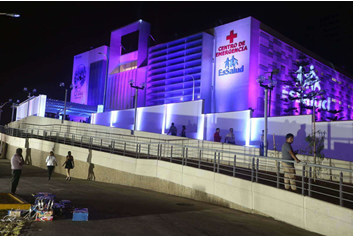
Location: Emergency center of the "Eduardo Rebagliati Martins" - Lima - Peru
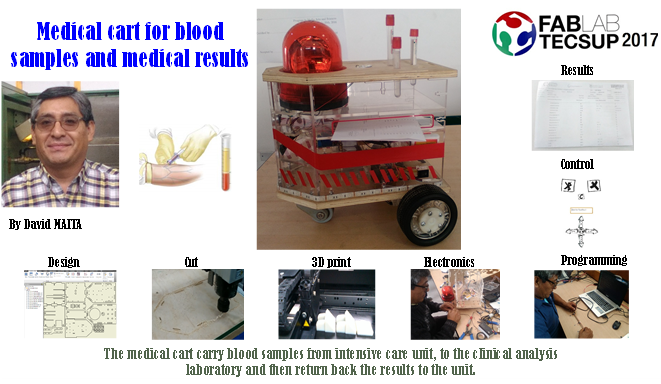
Objective of the final project
- Make a medical cart to transport the blood samples and collect the
- Use and application of Fab lab equipment - Tecsup
"Eduardo Rebagliati Martins" - Lima - Peru
Project development:
After selecting one of several ideas, I chose this idea of the medical transporter blood sample truck and collect the results for my final project, I decided to carry out the project that I can start from scratch and making use of all the available equipment of the Fab Lab - TECSUP .
In January of this year, my wife was hospitalized at the Edgardo Rebagliati emergency center in Essalud, watching patients in the intensive care unit take blood samples.
Nurses can not go out into the passageway to avoid contamination of the unit and the blood samples are left in the fence to the door on a table until the laboratory staff can pick it up and transport it to the laboratory for analysis and at the same time Wait and return with the result for proper treatment.
Important: Blood should not rest more than 30 minutes to avoid abnormal results
It motivates me to manufacture this carriage of samples to improve the care in this service so that the doctors do not have altered results for the delay, to have the result in the established time.
Unlike other types medical carts only serves to rest the blood, my medical transporter car would serve to transport small amounts of 6 samples at most.
There are also other robot cars for other activities but not for carrying blood samples.
I have planned to manufacture this project including the following manufacturing processes:
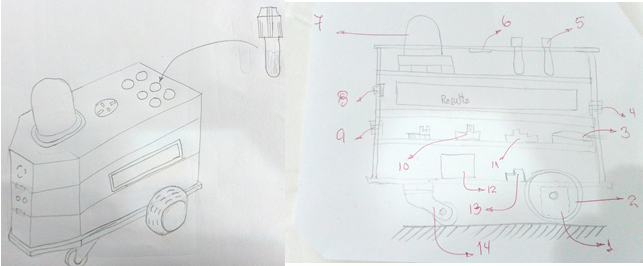
Initial sketch
I drew my idea about a sketch for its manufacture
Also make the list of components of the car what is possible to buy or manufacture
List of components to be used:
A list of components to buy and another list of parts to be manufactured and installed
(6-9) Ultrasonic Sensor (Buy), (5) Blood Reducer (Buy), (2) Wheels (Manufacture), (3) Led (buy), (7) Lights (Buy),
(10) Fab Duino (Manufacture), (12) (13), (14) Wheels guides (Manufacture)
Lateral structure (Fabricate), Upper and upper base (Fabricate), Stove bots (buy), Bearings (Buy)
Extract the dimensions of the components purchased, there are differences between them being of the same manufacturer.
2 DRAWING AND DESIGN OF CAR MEDICAL
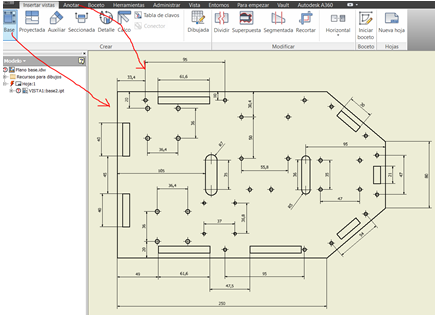
Then draw all the parts and divisions with the help of the inventor software also helped with the working procedures of week 2
Generate the manufacturing drawings to verify the positioning of the holes and size to achieve proportionality of the medical cart.
Observe the video of the drawings and design of the transporter medical cart:
Then a new drawing sheet optimizes all the sides of the transparent acrylic glass structure to observe the electrical connections.
Also this drawing sheet with all the lateral structures I converted to the extension (.dxf)
I again opened a new assembly sheet to simulate its location of structures and components, and then generate manufacturing drawings.
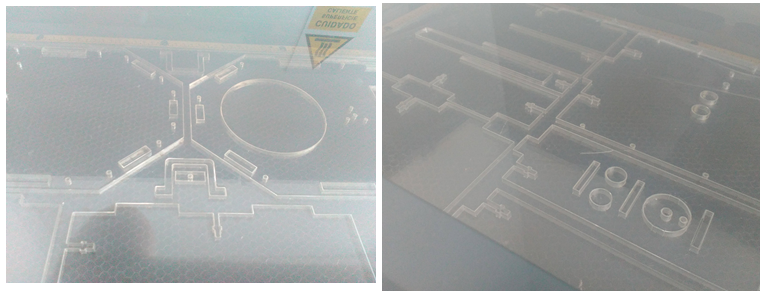
3 LASER CUTTER AND CNC MILLING
With the file extension (.dxf), configure the laser cutter with the help of the procedures of week 4 obtaining the first model
Problem presented:
The acrylic glass of 5 mm of thickness does not have a uniformity has much difference between 0.2 to 0.7 of difference, after cutting it difficult in the assembly that some holes are loose or others with tightening.
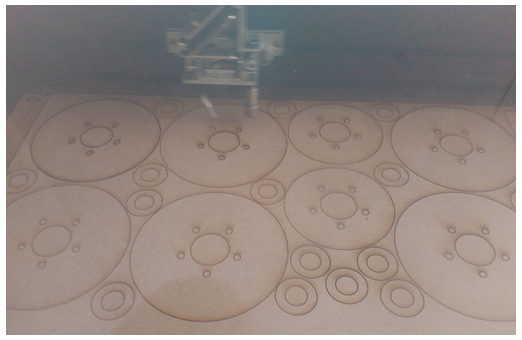
Then also take advantage of the cut of the MDF me that served for the filling of the wheels in
Time to realize molding of the wheel.
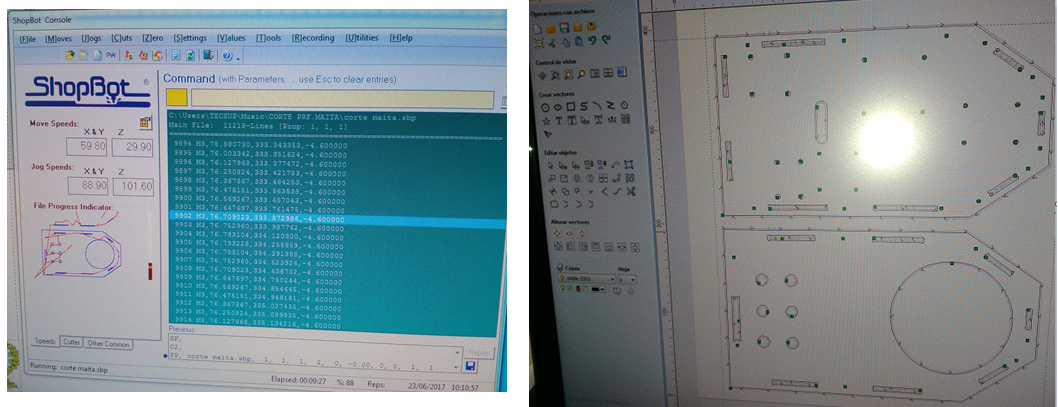
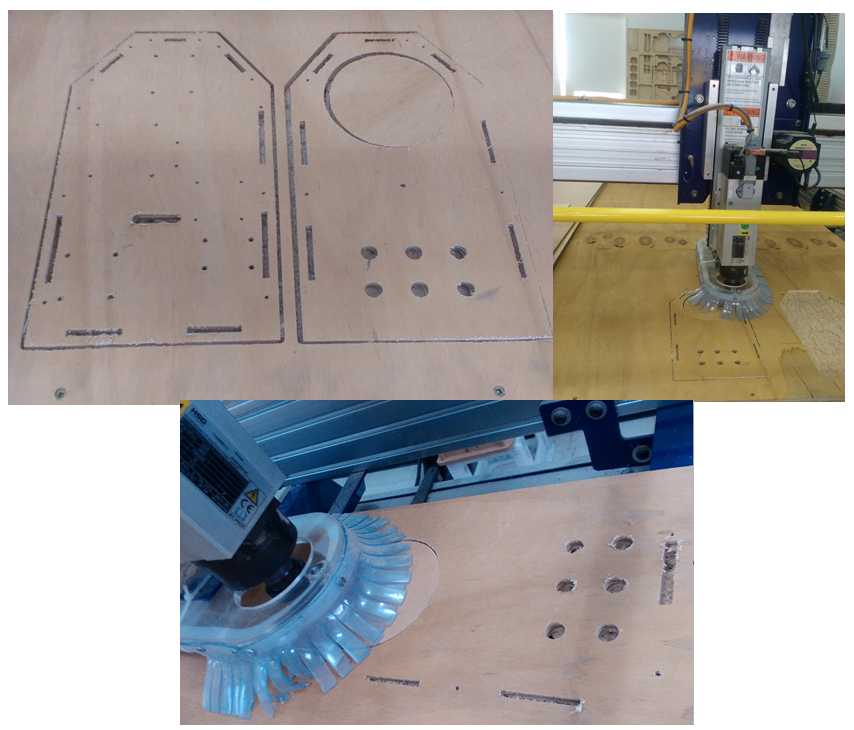
Then to perform the milling of the base and the top of the medical cart conveyor was necessary the use of machines milling Shopbot. It is necessary to use the file with the extension (.dxf).
Set the material to the working table of the machine, set the machining parameters, milling cutter diameter 1/8 ", speed 8000 rpm, tool advance 100 mm / sec reinforced with the cutting procedures of week 7
Then check the zero point between the cutting tool with the material the triplay
Start the cut and immediately the chip extractor was turned on to avoid the agglomeration and
Create difficulty or label at the time of movement of the cutting tool
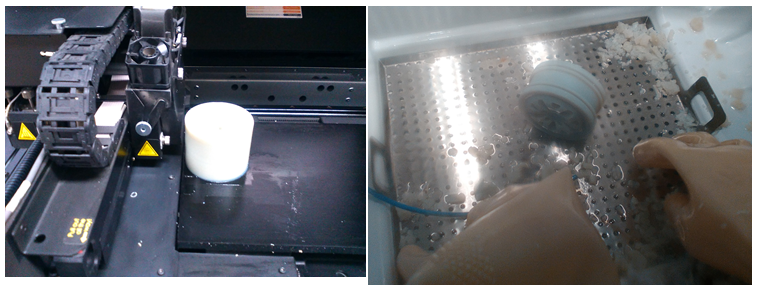
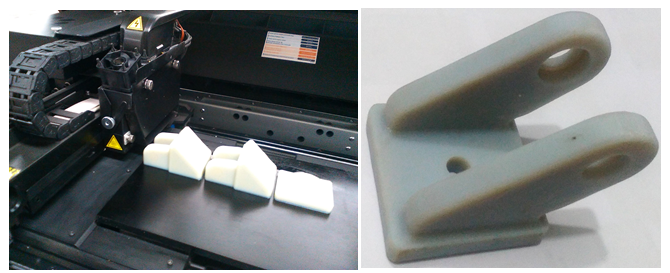
4 3D PRINTING
After drawing it is necessary to save the file with the extension (.STL)
Then send to the printer Stratsys Objet 30, with its material additive Vero Blue and its support
After printing in about 5 or 6 hours, it is necessary to remove the media from the material.
This time use the laundry of the manufacturer Stratasys that has 2 hoses of medium and high pressure of water.
Important: this support is compatible with water does not generate any environmental pollution.
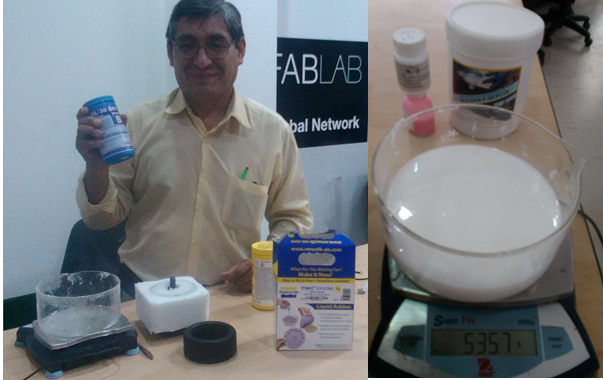
5 MOLDING AND CASTING
Start with the preparation of the job, and follow the safety standards suggested by the resin manufacturer.
Have all materials such as resins, release agent, brushes and mixing containers, balance to extract approximately the volume that is required for the wheels.
Prepare the area where to pour the silicone, after a certain time you have the mold of the wheels.
Then assemble the filling of the wheels and correctly insert and position their position inside the mold
Put the resin in mold, reinforced the outside to avoid leakage of the resin. And wait for the drying time, then remove the urethane wheel. And repeat the same procedure for the next wheel.
Problem presented:
Use Silicone F-20 for the wheels, but as shown in the photo did not work for flexible not maintaining a stiffness like urethane.
6 ELECTRONICS
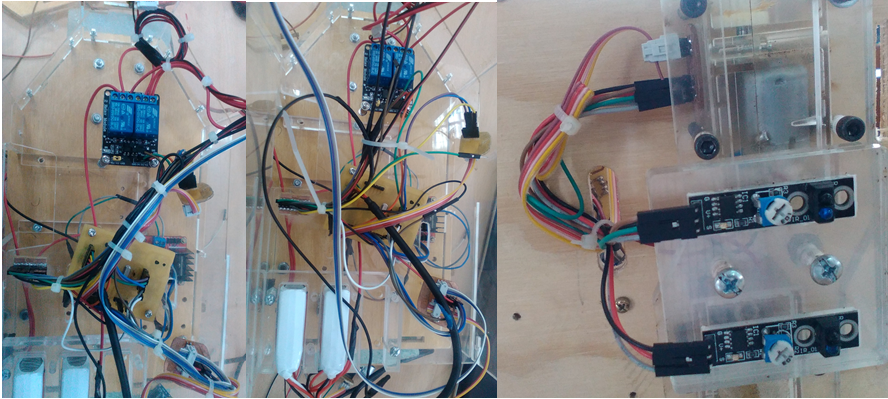
These weeks were more work to design, select components, position, join and minimize cables to avoid clutter when you observe the project.
First perform the design of electronic cards with their routes for components, connectors,
Fab Duino, etc. Continue to carry out the milling of these electronic cards, taking into account the
Depth of cut to avoid damage to the routes.
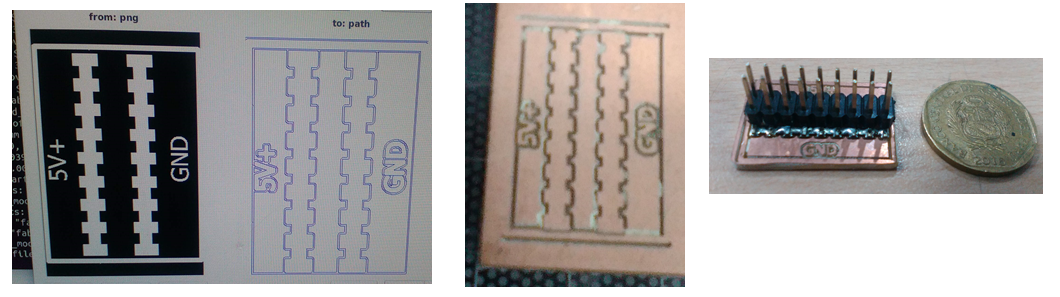
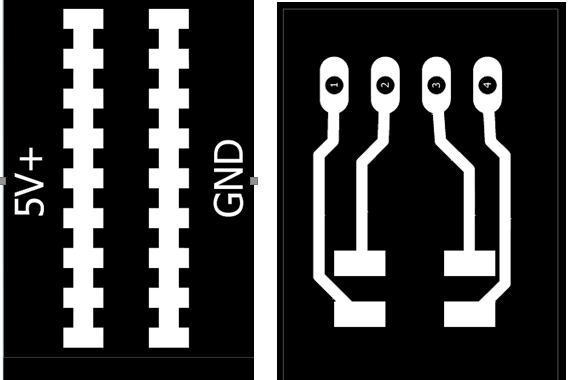
Make the connections of the components in the schematic plane
Generate a Board to be able to order the components and make the design of our Fabduino board.
Once ordered the components we can perform the Routing of our tracks.
Then go to visualize the Layer TOP and PADS
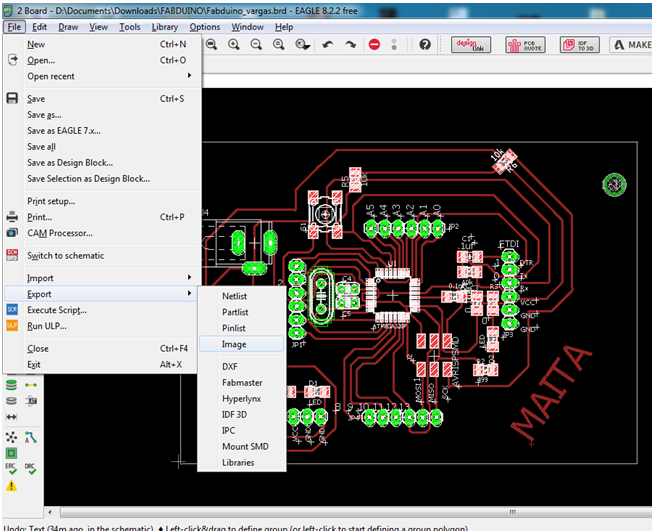
Then export the layout of my circuit to a PNG file
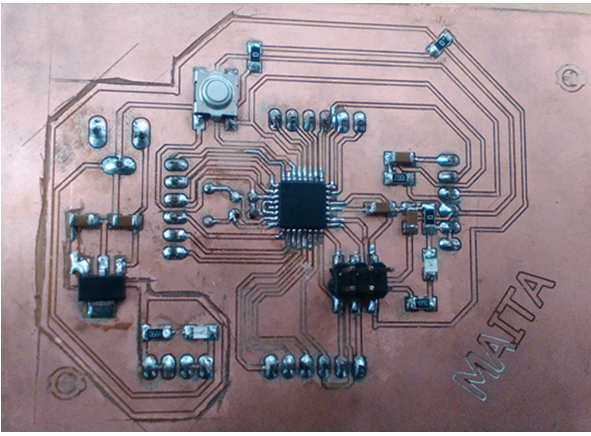
Weld the microcontroller components
Perform programming in ARDUINO IDE This programming uses bluotooth module to communicate with APP Inventor application.
Then make the connections of the electronic components, as always the cables are not ordered
But it should be better.
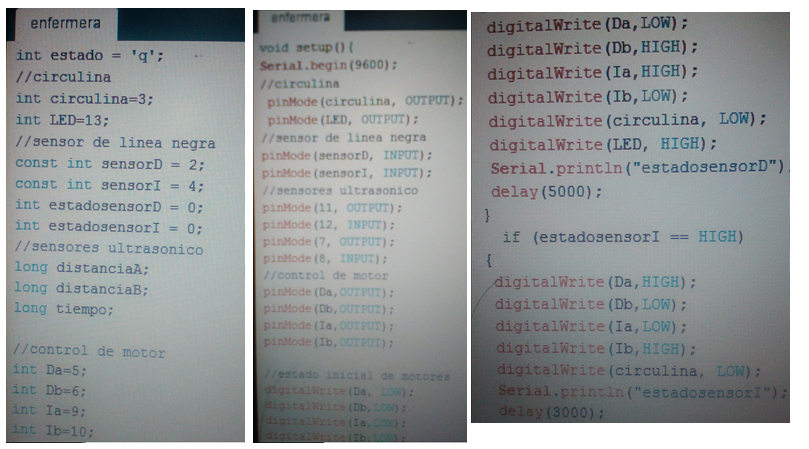
7 MEDICAL CAR PROGRAMMING
To perform the programming use the Fabduino as follows:
The circulin must be kept on constantly, must follow the route established by line.
Must move forward and backward if an object is crossed within 100 mm must be stopped
After 5 seconds, removed the continue object.
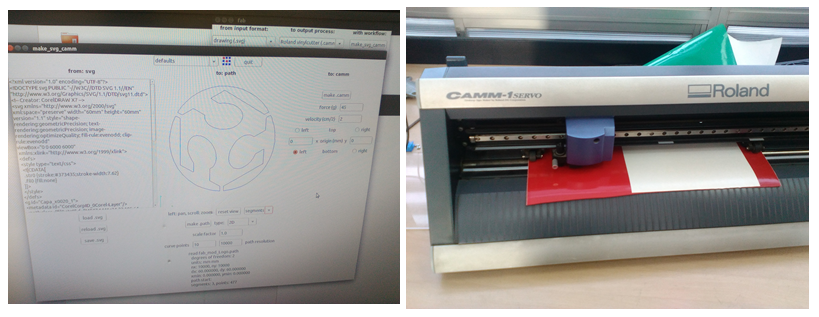
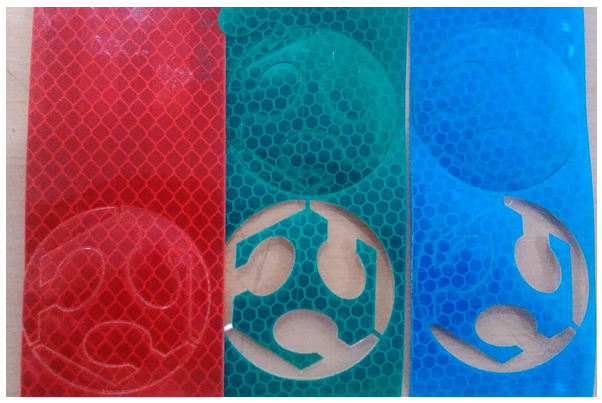
8 VINYL CUTTER
Make the assembly and according to space designed the size and position of the logos required for the presentation and use the vynil cutter
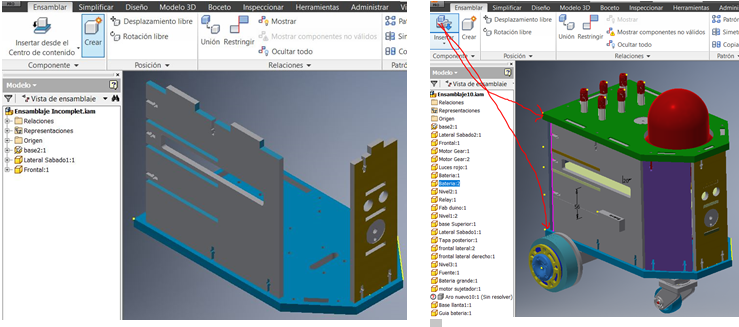
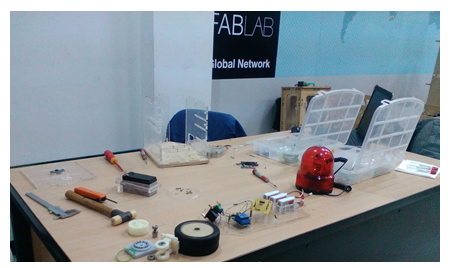
9 THE WEEK OF ASSEMBLY
This week was hard so some components have a certain size when changing the
Component by another brand since there was in the market the same brand changes in size and
Position of these components.
First, have your job order with the necessary tools
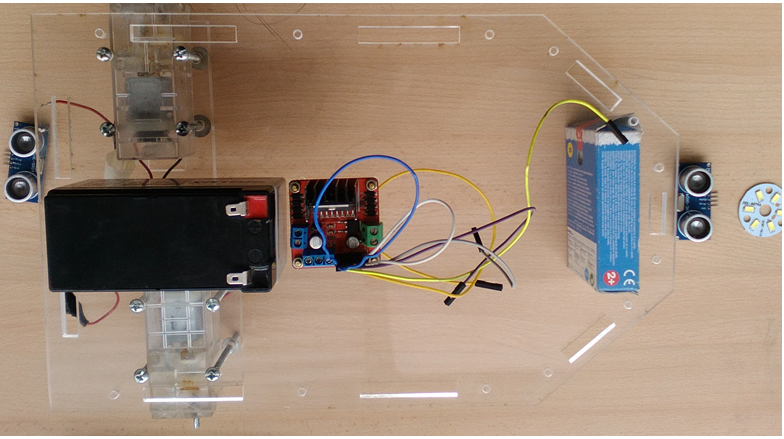
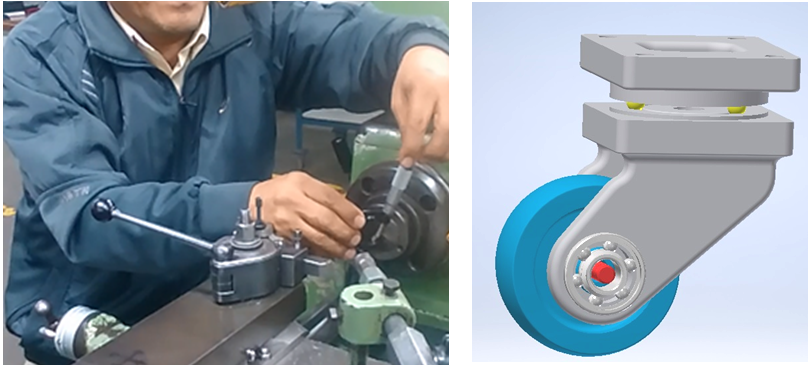
Second part partial assembly of the other mechanical components, shaft was machined with its required adjustments for correct rotation.
Third part installs partial structures and electronic components.
Fourth part make some corrections according to your new location of components
FINALLY THE LAST WEEK CONTROL
This week use the Inventor App is prepared for the motion control of the medical cart.
Making the forward, back and avoid movements here, the ultrasonic sensors work to avoid collision with an object and then advance after 5 seconds, make a right and left turn, then it can also be used in case of blackouts like Flashlight That's why the LEDs are on the top and the other on the front of the car.
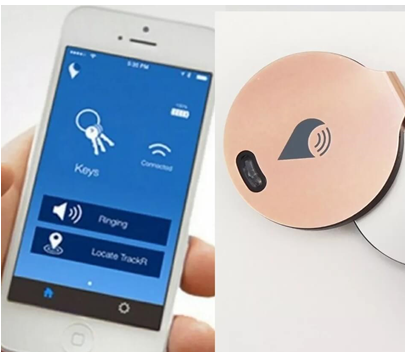
Also locate the locator (GPS) to know where you are at this time or during your journey.
I want to thank the instructors for support, advices and corrections: Francisco Camacho, Roberto Delgado. Also to some Tecsup students: Sergio Vargas, Eduardo Yallico, Isai Huanaco and Jordy Asto


 List of components to be used:
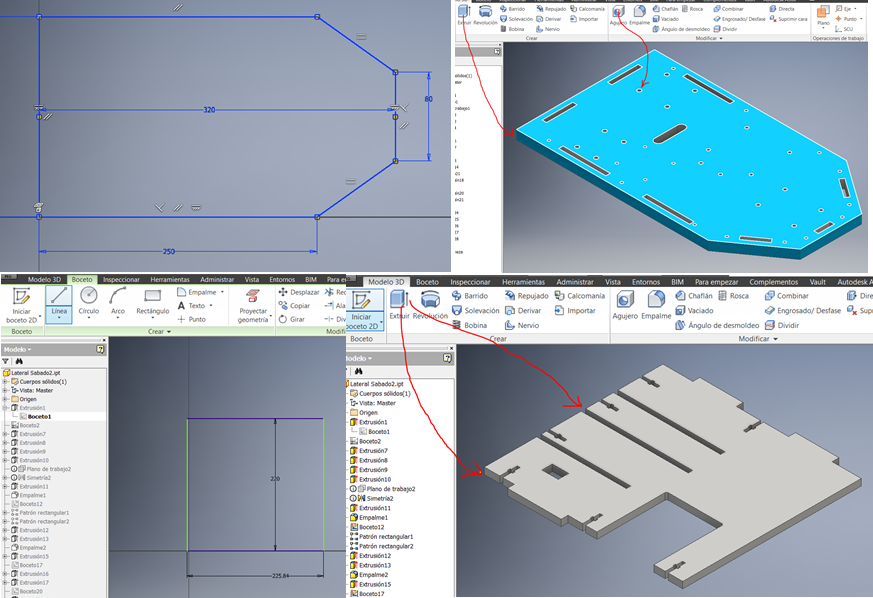
 Observe the video of the drawings and design of the transporter medical cart:
 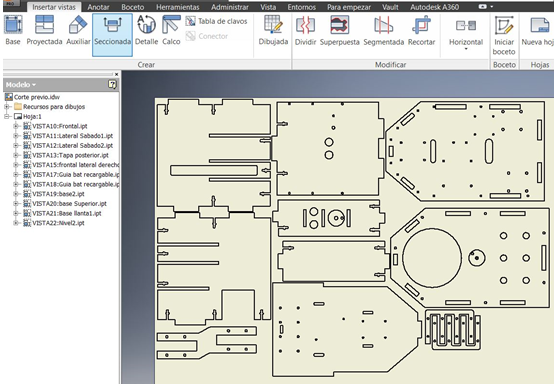 I again opened a new assembly sheet to simulate its location of structures and components, and then generate manufacturing drawings.
 Then to perform the milling of the base and the top of the medical cart conveyor was necessary the use of machines milling Shopbot. It is necessary to use the file with the extension (.dxf).
Set the material to the working table of the machine, set the machining parameters, milling cutter diameter 1/8 ", speed 8000 rpm, tool advance 100 mm / sec reinforced with the cutting procedures of week 7
Then to perform the milling of the base and the top of the medical cart conveyor was necessary the use of machines milling Shopbot. It is necessary to use the file with the extension (.dxf).
Set the material to the working table of the machine, set the machining parameters, milling cutter diameter 1/8 ", speed 8000 rpm, tool advance 100 mm / sec reinforced with the cutting procedures of week 7
 Then check the zero point between the cutting tool with the material the triplay
Start the cut and immediately the chip extractor was turned on to avoid the agglomeration and
Create difficulty or label at the time of movement of the cutting tool
Then check the zero point between the cutting tool with the material the triplay
Start the cut and immediately the chip extractor was turned on to avoid the agglomeration and
Create difficulty or label at the time of movement of the cutting tool
 After printing in about 5 or 6 hours, it is necessary to remove the media from the material.
This time use the laundry of the manufacturer Stratasys that has 2 hoses of medium and high pressure of water.
After printing in about 5 or 6 hours, it is necessary to remove the media from the material.
This time use the laundry of the manufacturer Stratasys that has 2 hoses of medium and high pressure of water.
 Important: this support is compatible with water does not generate any environmental pollution.
 Prepare the area where to pour the silicone, after a certain time you have the mold of the wheels.
 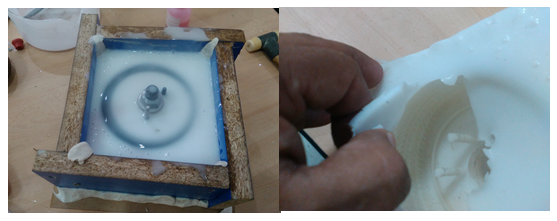 Then assemble the filling of the wheels and correctly insert and position their position inside the mold
 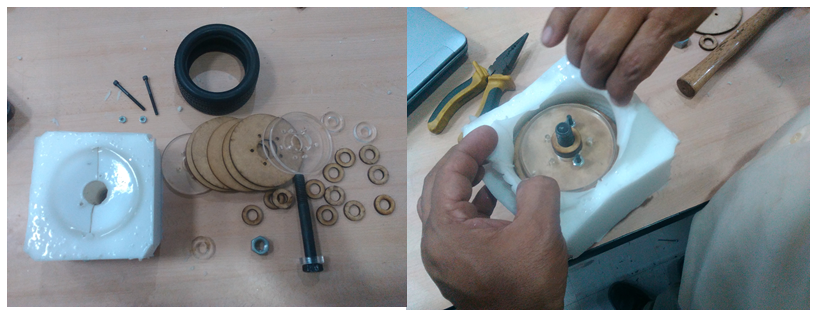 Put the resin in mold, reinforced the outside to avoid leakage of the resin. And wait for the drying time, then remove the urethane wheel. And repeat the same procedure for the next wheel.
 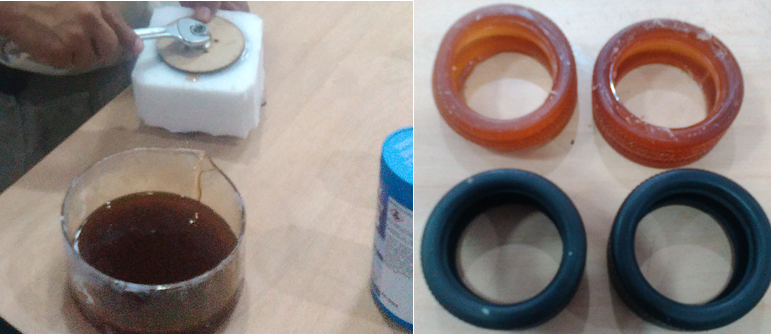 Problem presented:
Use Silicone F-20 for the wheels, but as shown in the photo did not work for flexible not maintaining a stiffness like urethane.
Problem presented:
Use Silicone F-20 for the wheels, but as shown in the photo did not work for flexible not maintaining a stiffness like urethane.
 First perform the design of electronic cards with their routes for components, connectors,
Fab Duino, etc. Continue to carry out the milling of these electronic cards, taking into account the
Depth of cut to avoid damage to the routes.
First perform the design of electronic cards with their routes for components, connectors,
Fab Duino, etc. Continue to carry out the milling of these electronic cards, taking into account the
Depth of cut to avoid damage to the routes. 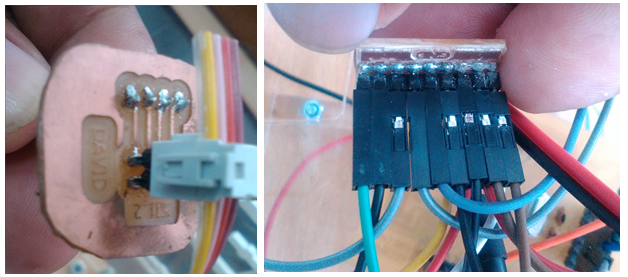
 Make the connections of the components in the schematic plane
 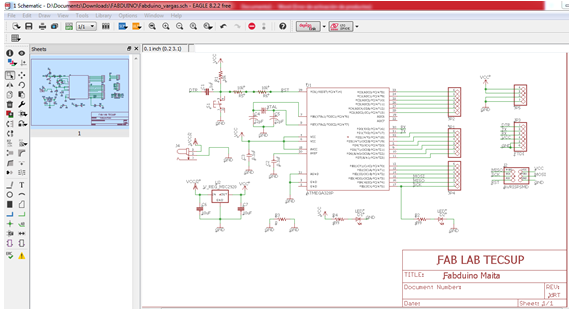 Generate a Board to be able to order the components and make the design of our Fabduino board.
 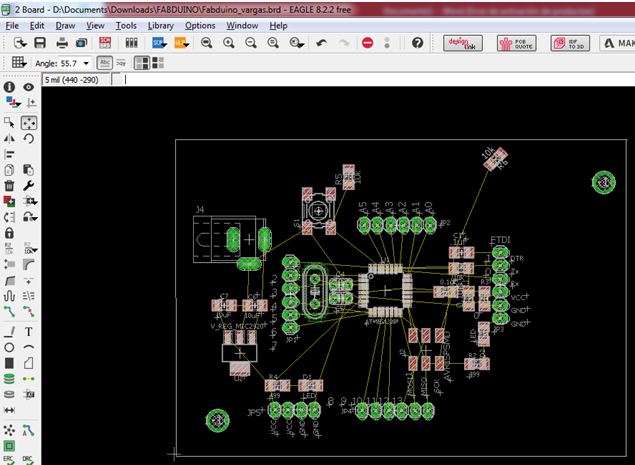 Once ordered the components we can perform the Routing of our tracks.
 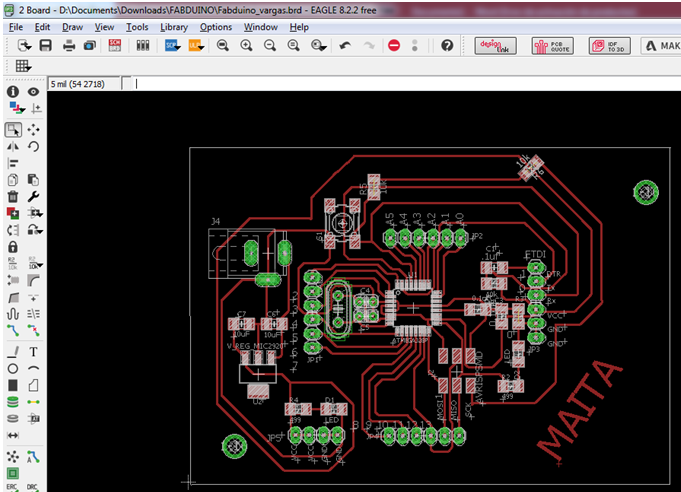 Then go to visualize the Layer TOP and PADS
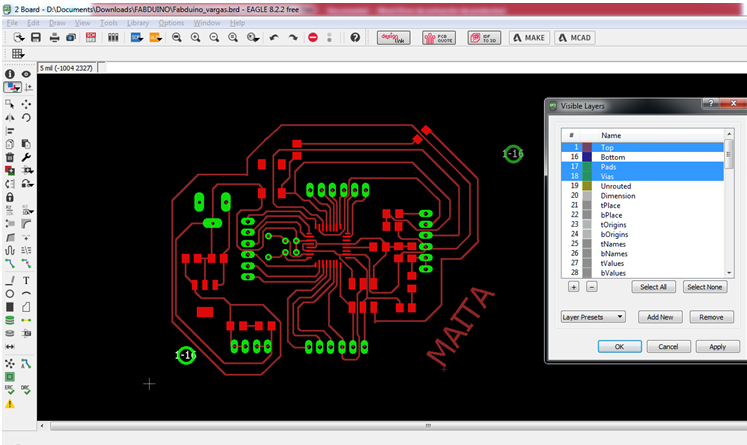
 Then export the layout of my circuit to a PNG file
 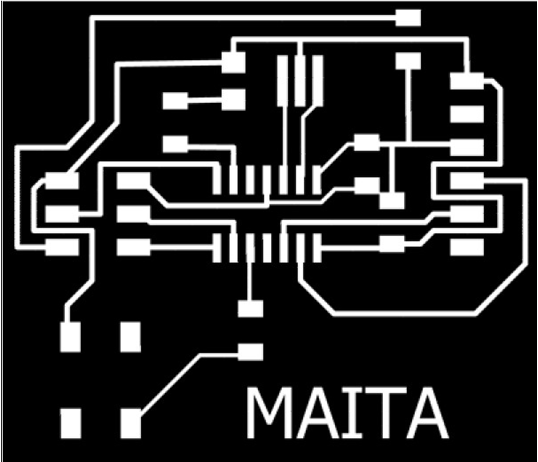 Weld the microcontroller components
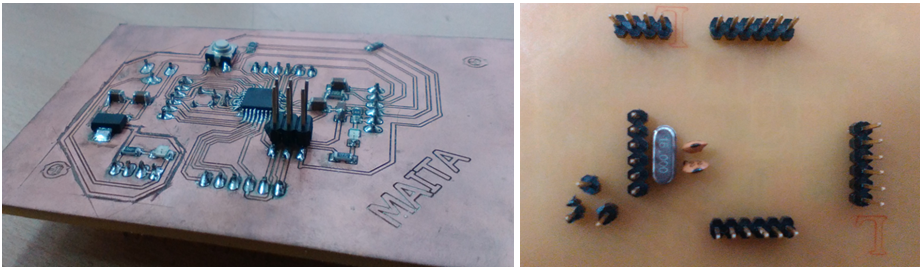
 Perform programming in ARDUINO IDE This programming uses bluotooth module to communicate with APP Inventor application.
 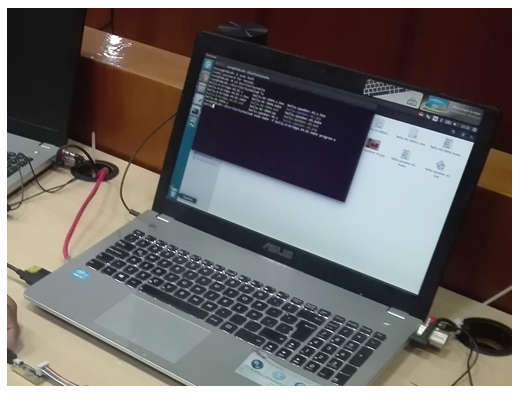 Then make the connections of the electronic components, as always the cables are not ordered
But it should be better.
Then make the connections of the electronic components, as always the cables are not ordered
But it should be better.
 Second part partial assembly of the other mechanical components, shaft was machined with its required adjustments for correct rotation.
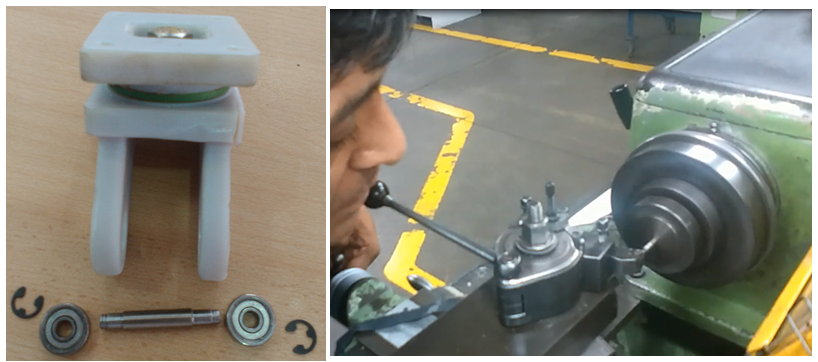
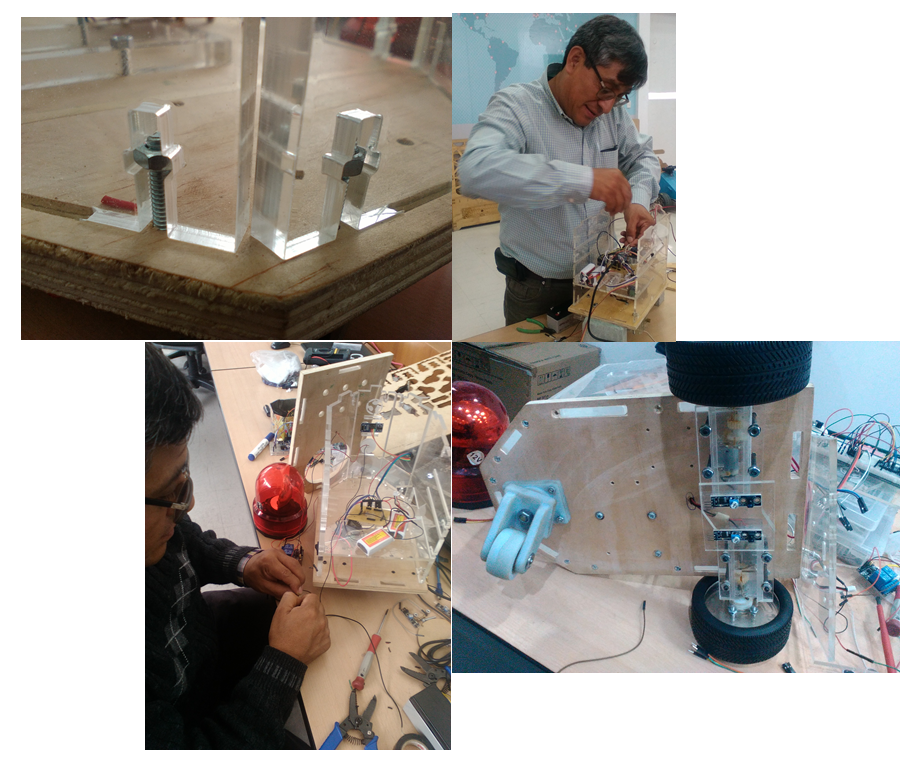 Fourth part make some corrections according to your new location of components
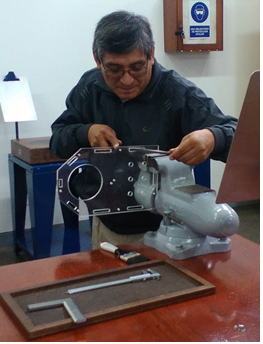
 Making the forward, back and avoid movements here, the ultrasonic sensors work to avoid collision with an object and then advance after 5 seconds, make a right and left turn, then it can also be used in case of blackouts like Flashlight That's why the LEDs are on the top and the other on the front of the car.
  Also locate the locator (GPS) to know where you are at this time or during your journey.
 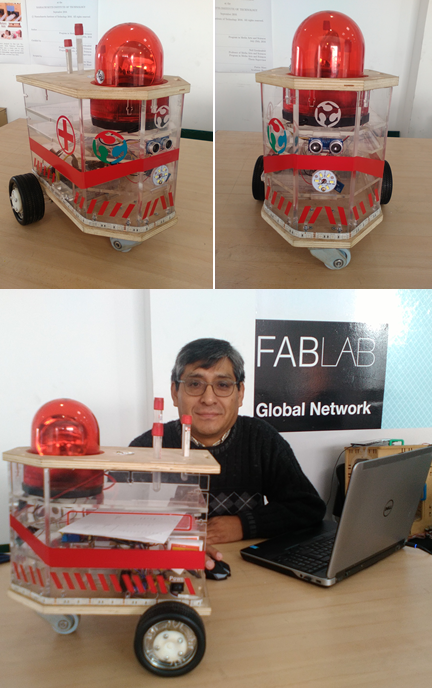 Presentation