Exercise 16 - Interface and Application Programming
Menu
This week is an interesting week as Neil want us to develop an application to "talk" to our devices that we made. Even when Neil has uploaded his version of sample Python code which runs very well with C code, I am not confident with C programming and Python, even though I understood the logic behind it.
This week, I decided to give my Input Devices a try, I am using Thermmistor (temperature sensor) and making it interface with my PC.
I've also decided to use back my Code (Arduino Code) from Input devices to make it talk to my upcoming application.
As for the hero shots below,I am in a very cold (air conditioned room) the temperature fluctuation is slow. And I am using my Laptop's fan exhaust to simulate temperature change.
Processing
When Neil mention the simplicity of Processing in the lecture, I decided to give it a try and see what can I acheive.
When I first use Processing, it feels very natural as is similar to Arduino IDE! I began to dive into the sample code and see how to achieve serial port communication.
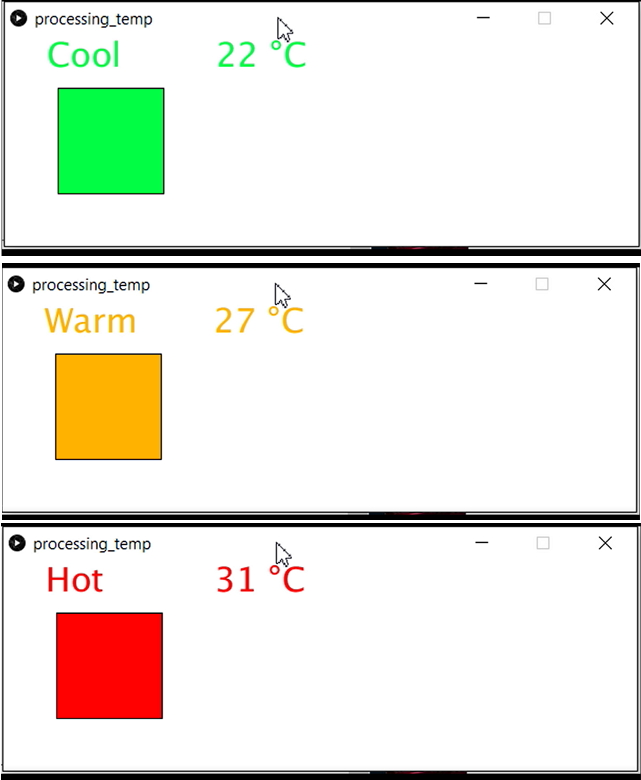
I decided to design and make something very simple, an app to show the temperature (real-time), a graphical indicator to show the colour when it reaches a certain temperature and a text to show is it Cool, Warm or Hot.
Here is the Code:
		import processing.serial.*;

Serial myPort;  // Create object from Serial class
String val;     // Data received from the serial port
int temp;
String textMsg="Please Wait";

void setup()
{
  // I know that the first port in the serial list on my mac
  // is Serial.list()[0].
  // On Windows machines, this generally opens COM1.
  // Open whatever port is the one you're using.
    size(600, 200);
  String portName = Serial.list()[0]; //change the 0 to a 1 or 2 etc. to match your port
  myPort = new Serial(this, portName, 9600);
}

void draw()
{

  if ( myPort.available() > 0)
  {  // If data is available,
  val = myPort.readString();         // read it and store it in val
  }
    background(255);
//println(val); //print it out in the console

if (val != null) {

    textSize(32);
  temp = int(val);
  //text(temp,30,30);
       text(val,200,30);

}
       text(textMsg,40,30);

println(val+" °C");
//println(temp);

if (temp>20 && temp <=25)
{
     fill(0, 255, 68);
     textMsg = "Cool";


}
if (temp>25 && temp <=30){
   fill(255,179,0);
     textMsg = "Warm";


}
if (temp>30){
   fill(255,0,0);
     textMsg = "Hot";


}
  rect(50, 50, 100, 100);

}
How does the code work?
		import processing.serial.*;

		Serial myPort;  // Create object from Serial class
		String val;     // Data received from the serial port
		int temp;
		String textMsg="Please Wait";

		void setup()
		{
		  // I know that the first port in the serial list on my mac
		  // is Serial.list()[0].
		  // On Windows machines, this generally opens COM1.
		  // Open whatever port is the one you're using.
		    size(600, 200);
		  String portName = Serial.list()[0]; //change the 0 to a 1 or 2 etc. to match your port
		  myPort = new Serial(this, portName, 9600);
		}
As it is using the software "PROCESSING" they have their own libraries. I used their sample library and modify it from there, the setup is simple. It declars a series of variables to be used and in the serial, it generates a canvas size of 600 x 200. Then it detects the port either a Mac or Windows, then it writes the port number into 'myPort' variable. I also added a String textMsg to show the user that it is setting up and prompt the user to wait.
				void draw()
		{

		  if ( myPort.available() > 0)
		  {  // If data is available,
		  val = myPort.readString();         // read it and store it in val
		  }
		    background(255);
		//println(val); //print it out in the console

		if (val != null) {

		    textSize(32);
		  temp = int(val);
		  //text(temp,30,30);
		       text(val,200,30);

		}
		       text(textMsg,40,30);

		println(val+" °C");
		//println(temp);

		if (temp>20 && temp <=25)
		{
		     fill(0, 255, 68);
		     textMsg = "Cool";


		}
		if (temp>25 && temp <=30){
		   fill(255,179,0);
		     textMsg = "Warm";


		}
		if (temp>30){
		   fill(255,0,0);
		     textMsg = "Hot";


		}
		  rect(50, 50, 100, 100);

		}
Next instead of using loop(), it uses draw() as it is a GUI creator in Arduino IDE environment. It first detects if the port is present, and if so, it will read the value from the serial and put it into a variable.
I also setup the font Size (32) and the 2 text positioning within the Canvas (val & textMsg).
Next with the data, it will print the data number and if it matches some condition that I created (temp>20 && temp <=25, temp>25 && temp <=30 and temp>30). Each condition will then draw the fill the box (rect(50, 50, 100, 100)) to the colour I've indicated (green, orange and red). It also replaces the place holder of the "val" text with the current Temperature and "textMsg" with "Cool", "Warm", "Hot". when it is
Process conclusion
This is a very simple design, but I am glad that it works quite well and did what I want! Overall, Processing is quite a friendly tool to design application that works with my input devices.Hero shot
Python
Remember I mention above when I said, I wasn't confident with C and Python? I still do not have the confidence, it was a struggle for me. But after a few times of understanding the logic, the code and how it works, it was an eye opener. I get to see that Python is a very literal and logical code that works line by line, meaning to say, it literally reads line by line from the top.
I may not do what Neil has done by making the configuration pins in C and graph calculations in Python. I am going to make a Python code solely on GUI, similar as what I've created in Processing.
		# -*- coding: utf-8 -*-
		from serial import *
		from Tkinter import *
		WINDOW = 500 # window size
		BG='white' #Default BG color
		serialPort = "COM7" #my PC is using COM7
		baudRate = 9600
		ser = Serial(serialPort , baudRate, timeout=0, writeTimeout=0) #ensure non-blocking

		#make a TkInter Window
		root = Tk()
		root.wm_title("Reading Temperature")
		##
		### make a scrollbar
		##scrollbar = Scrollbar(root)
		##scrollbar.pack(side=RIGHT, fill=Y)
		##
		### make a text box to put the serial output
		##log = Text ( root, width=30, height=30, takefocus=0)
		##log.pack()


		canvas =Canvas(root, width=WINDOW, height=.25*WINDOW, background=BG) #Set the Canvas
		canvas.create_text(.1*WINDOW,.05*WINDOW,text="Cool ",font=("Helvetica", 24),tags="status",fill="#0000b0") #Set the Status Temperature
		canvas.create_text(.1*WINDOW,.125*WINDOW,text="Temp: ",font=("Helvetica", 24),tags="temp",fill="#0000b0") #Set the Temperature Label
		canvas.create_text(.3*WINDOW,.155*WINDOW,text=".33",font=("Helvetica", 24),tags="text",fill="#0000b0") #Set the Temperature number
		canvas.create_text(.4*WINDOW,.125*WINDOW,text="°C",font=("Helvetica", 24),tags="DC",fill="#0000b0") #Set the °C
		canvas.create_oval(220, 50,270, 100, width=2, fill='white', tags="oval")

		#canvas.create_rectangle(.2*WINDOW,.05*WINDOW,.3*WINDOW,.2*WINDOW, tags='rect1', fill='#b00000')
		#canvas.create_rectangle(.3*WINDOW,.05*WINDOW,.9*WINDOW,.2*WINDOW, tags='rect2', fill='#0000b0')
		canvas.pack()


		### attach text box to scrollbar
		##log.config(yscrollcommand=scrollbar.set)
		##scrollbar.config(command=log.yview)


		#make our own buffer
		#useful for parsing commands
		#Serial.readline seems unreliable at times too
		serBuffer = ""

		def readSerial():
		    while True:
		        c = ser.read() # attempt to read a character from Serial

		        #was anything read?
		        if len(c) == 0:
		            break

		        # get the buffer from outside of this function
		        global serBuffer

		        # check if character is a delimeter
		        if c == '\r':
		            c = '' # don't want returns. chuck it

		        if c == '\n':
		            serBuffer += "\n" # add the newline to the buffer

		            #add the line to the TOP of the log
		            #log.insert('0.0', serBuffer)
		            #print serBuffer
		            canvas.itemconfigure("text",text=serBuffer)
		            if serBuffer <= '25':
		                canvas.itemconfig("status", text="Cool") # change text
		                canvas.itemconfig("oval", fill="green") # change color

		            elif serBuffer > '25' and serBuffer <= '30':
		                canvas.itemconfig("status", text="Warm") # change text
		                canvas.itemconfig("oval", fill="orange") # change color
		            else:
		                canvas.itemconfig("status", text="Hot!") # change text
		                canvas.itemconfig("oval", fill="red") # change color

		            serBuffer = "" # empty the buffer
		        else:
		            serBuffer += c # add to the buffer

		    root.after(10, readSerial) # check serial again soon


		# after initializing serial, an arduino may need a bit of time to reset
		root.after(100, readSerial)

		root.mainloop();
How does the code work?
		from serial import *
		from Tkinter import *
		WINDOW = 500 # window size
		BG='white' #Default BG color
		serialPort = "COM7" #my PC is using COM7
		baudRate = 9600
		ser = Serial(serialPort , baudRate, timeout=0, writeTimeout=0) #ensure non-blocking


		#make a TkInter Window
		root = Tk()
		root.wm_title("Reading Temperature")
This is similar to Arduino IDE's setup(), it is to import serial and Tkinter library, declaring the window size, making it white in colour, applying the serial port of my PC, setting the baudRate and applying the variable with the Serial.For TK, it is to activate the window that holds the canvas and titled it 'Reading Temperature'.
		canvas =Canvas(root, width=WINDOW, height=.25*WINDOW, background=BG) #Set the Canvas
		canvas.create_text(.1*WINDOW,.05*WINDOW,text="Cool ",font=("Helvetica", 24),tags="status",fill="#0000b0") #Set the Status Temperature
		canvas.create_text(.1*WINDOW,.125*WINDOW,text="Temp: ",font=("Helvetica", 24),tags="temp",fill="#0000b0") #Set the Temperature Label
		canvas.create_text(.3*WINDOW,.155*WINDOW,text=".33",font=("Helvetica", 24),tags="text",fill="#0000b0") #Set the Temperature number
		canvas.create_text(.4*WINDOW,.125*WINDOW,text="°C",font=("Helvetica", 24),tags="DC",fill="#0000b0") #Set the °C
		canvas.create_oval(220, 50,270, 100, width=2, fill='white', tags="oval")

		#canvas.create_rectangle(.2*WINDOW,.05*WINDOW,.3*WINDOW,.2*WINDOW, tags='rect1', fill='#b00000')
		#canvas.create_rectangle(.3*WINDOW,.05*WINDOW,.9*WINDOW,.2*WINDOW, tags='rect2', fill='#0000b0')
		canvas.pack()
This is to set a preset of the canvas and window. the first line is to create the canvas size and set the background colour. Next, it set the default text font for the status, lable, temperature and the symbol.I've also created a shape, circle and a rectangle. Then I 'packed' the canvas as a set.
#Serial.readline seems unreliable at times too
		serBuffer = ""

		def readSerial():
		    while True:
		        c = ser.read() # attempt to read a character from Serial

		        #was anything read?
		        if len(c) == 0:
		            break

		        # get the buffer from outside of this function
		        global serBuffer

		        # check if character is a delimeter
		        if c == '\r':
		            c = '' # don't want returns. chuck it

		        if c == '\n':
		            serBuffer += "\n" # add the newline to the buffer

		            #add the line to the TOP of the log
		            #log.insert('0.0', serBuffer)
		            #print serBuffer
		            canvas.itemconfigure("text",text=serBuffer)
		            if serBuffer <= '25':
		                canvas.itemconfig("status", text="Cool") # change text
		                canvas.itemconfig("oval", fill="green") # change color

		            elif serBuffer > '25' and serBuffer <= '30':
		                canvas.itemconfig("status", text="Warm") # change text
		                canvas.itemconfig("oval", fill="orange") # change color
		            else:
		                canvas.itemconfig("status", text="Hot!") # change text
		                canvas.itemconfig("oval", fill="red") # change color

		            serBuffer = "" # empty the buffer
		        else:
		            serBuffer += c # add to the buffer

		    root.after(10, readSerial) # check serial again soon


		# after initializing serial, an arduino may need a bit of time to reset
		root.after(100, readSerial)

		root.mainloop();
What this part of the code does is to read the serial input, then I made a comparative check of <= '25', > '25', <= '30' and anything beyond. I any of the condition met, it will chang eth oval color, and the text. after all these are done, it will do a loop back for the next serial read.
Hero shot

Downloads: