Exercise 2 - Computer Aided Design
Requirement
- Explore a few 2D and 3D software and document your evaluations.
- Model (draw, render, animate, simulate, ...) a possible final project and post it on your class page with original 2D and 3D files.
2D software (Raster and Vector)
2D computer graphics is the computer-based generation of digital images—mostly from two-dimensional models (such as 2D geometric models, text, and digital images) and by techniques specific to them.
This week, we were introduced to so many useful free softwares which I must said it is very impressive. Furthermore, most are open source softwares, free to use and can work on multiple platform.
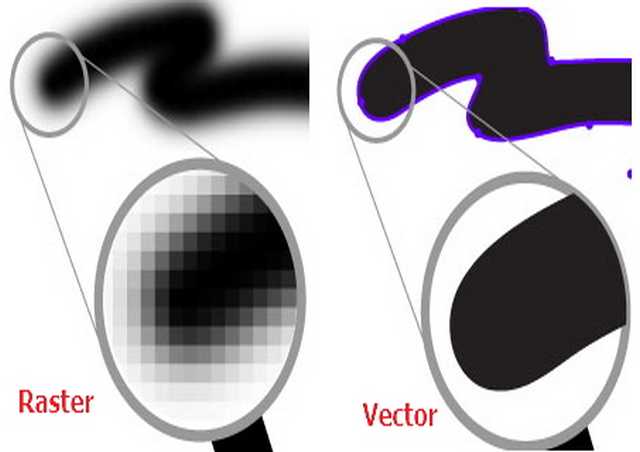
A raster image is made up of pixels, each a different colour, arranged to display an image.
A vector imaged is made up of paths, each with a mathematical formula, telling the path how to shape and what colour to be filled.
Difference between Raster and Vector image.
The main difference to tell the difference between both Raster and Vector is when zoom-in to both the images. Raster image outline will become blur and pixelated, while Vector image outline still remains clear and sharp.
GIMP
Gimp, which stands for GNU Image Manipulation Program, is a free and open-source raster graphics editor used for image retouching and editing, free-form drawing, resizing, cropping, photo-montages, converting between different image formats, and more specialized tasks.
After exploring around with Gimp, I am very impressed by Gimp. For a basic user, I am surprised by the amount of features and plug-ins it offers. To me, it is as good as Adobe Photoshop and I am able to replicate an artwork from youtube meant for Photoshop. Follow the step by step tutorial using Gimp with all the working files provided, and I am able to archive almost 90% of the final result.
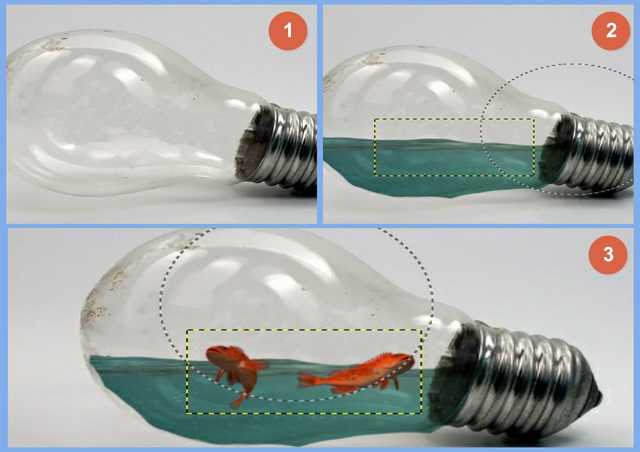
- Download all the require files from the tutorial: bulb, fish, water and splash.
- Open the bulb file, using the clone tool (alt click and paint) to remove the inside of the bulb.
- Next go to file-->open as layers, select the water file and place water over the bulb.
- Add a layer mask to the bulb layer by right click on the layer. By using the brush with black, paint to remove the unwanted water (make sure the layer mask is selected and not the picture).
- Now add the fishes in.
- By using the same mention above, we can remove the unwanted fishes and add in the slash too.
- Resize the images to fit into the bulb and adjusting the colour tone and hue, can archive better result.
- Done, you have yourself fishes in a bulb.

Points to take note:
- In the video, Edit-->Fill-->Content Aware this command is not found in Gimp, so in Gimp use the clone tool instead to complete the step.
Overall Gimp as compared to Photoshop, tools offer in Gimp still have more rooms for improvement. For example: the move, scale and rotate tools are all separated instead of all in one. User need to switch around to archive a single job.
Inkscape
Inkscape is a free and open-source vector graphics editor; it can be used to create or edit vector graphics such as illustrations, diagrams, line arts, charts, logos and complex paintings. Inkscape's primary vector graphics format is Scalable Vector Graphics (SVG). It also offers many extensions developed by developer which can be downloaded to enhance the work flow of Inkscape.
User who are familiar or have been using Adobe Illustrator will need sometime to get used to Inkscape UI and short-cut keys.
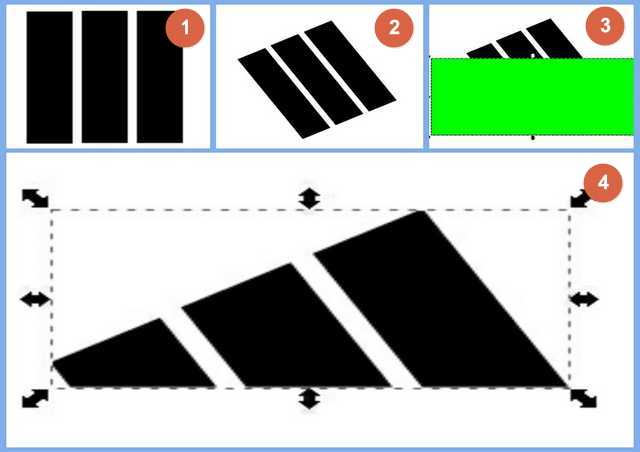
There are lots of useful online tutorial to learn about Inkscape, and I am able to create the following using simple shapes and text.

Points to take note:
- In Inkscape, selecting object either click on object or using the selection tool and box the whole object, partial selecting does not work.
- Inkscape can only image trace BMP file.
3D software
3D modeling (or three-dimensional modeling) is the process of developing a mathematical representation of any three-dimensional surface of an object (either inanimate or living) via specialized software.
The model can also be physically created using 3D printing devices or Computer Numerical Control router (CNC router).
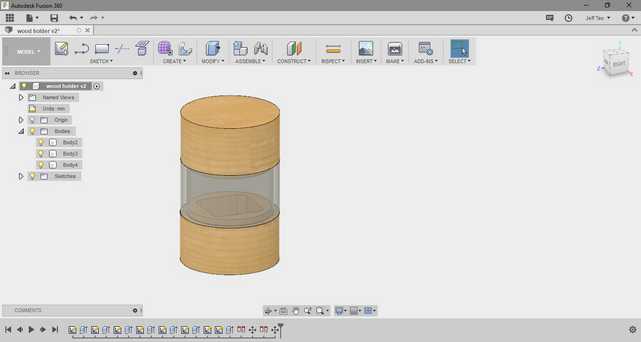
Autodesk Fusion 360
Fusion 360 is the first 3D CAD, CAM, and CAE tool of its kind. It connects your entire product development process in a single cloud-based platform that works on both Mac and PC.
Fusion 360 is Free for students, enthusiasts, hobbyists, and startups. I personality find fusion 360 user interface (UI) easy to navigate and understand. And there are lots of useful tutorial and guides on the Internet. Follow this youtube video tutorial, I am able to visualize and understand the work flow of Fusion 360.
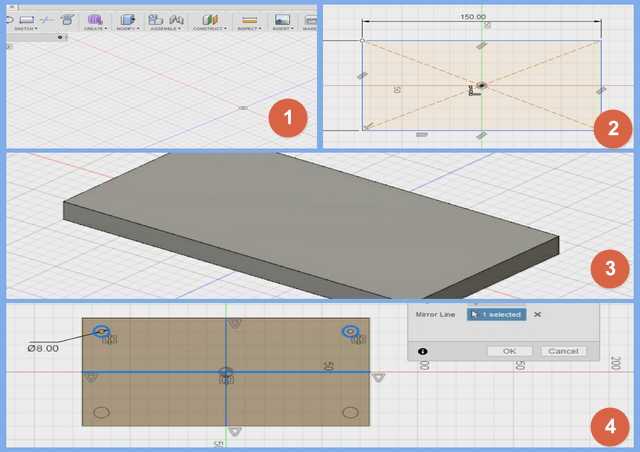
In Fusion 360, start off working in 2D sketches of your artwork, and using the 2D image to extrude to form the 3D model. Fusion 360 also provide useful tools to combine pieces together, cut joints, trim unwanted pieces, create holes for screws and etc. The final model can be then export to either a 3D printer to be printed or Computer Numerical Control router (CNC router) to cut.
Points to take Note:
- Click and drag middle mouse button to pan.
- Shift + middle mouse button to rotate.
- Scrolling the middle mouse to zoom in and out.
- The home button near the axis at the top right corner bring the view back to default.
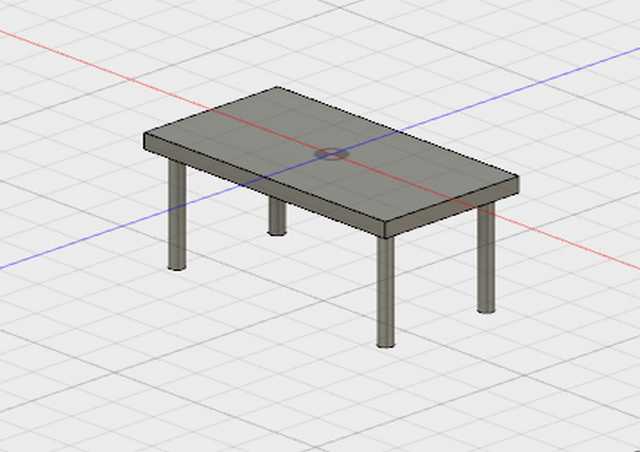
I have also drafted a possible model for my final project.
Download
Learning points
I am surprised that open source softwares like Inkscape & Gimp have features that are comparable to commercial softwares like Adobe Photoshop & Illustrator. Instead of using illegal software, open source software should be the way forward cos it is as powerful as the commercial software but and most importantly it is free to use.
Return to top