Exercise 02 Computer-aided design
Requirement
- Explore a few 2D and 3D software and document your evaluations.
- Model (draw, render, animate, simulate, ...) a possible final project , and post it on your page with original 2D and 3D files.
2D software
Because of ours' Educational Instituition setup at Singapore Polytechnic, most software we have in campus are coming with common Educational licences- under the bundle License agreement with Adobe (for Adobe suite - Photoshop, Illustrator, Indesign, Premiere Pro, Audition) with Autodesk (for AutoCad) and so on. Million of dollars have been spent for the availability of these softwares. So never across my mind to utilize free open source software (as traditionally, free software usally does not come with support readily available) as compare the Educational packages we are using. Only from this course and recent development, whereby Autodesk and Adobe starting to give out educational softwares "as students and educator licenses"; then I realized this. For the reason of similarities between photoshop and GIMP, illustrator and Inkscape I have choosen these two software to explore.
GIMP- The Free and Open Source Image Editor
GIMP, GNU Image Manipulation Program, is a free and open-source raster graphics editor used for image retouching and editing, free-form drawing, resizing, cropping, photo-montages, converting between different image formats, and more specialized tasks. GIMP is a cross-platform image editor available for GNU/Linux, OS X, Windows and more operating systems.
As the functions available are quite similar to Adobe Photoshop, I was able to explore the various icons and menu selections at ease. Nowsaday it is almost like a norm to refer to youtube to learn a new piece of software. It is no different for me to emabark my short learning of GIMP. For a start, I watched a 10:56 mins recording from GIMP Basics to learn and get a feel of where are all the tool options available in the toolbox.
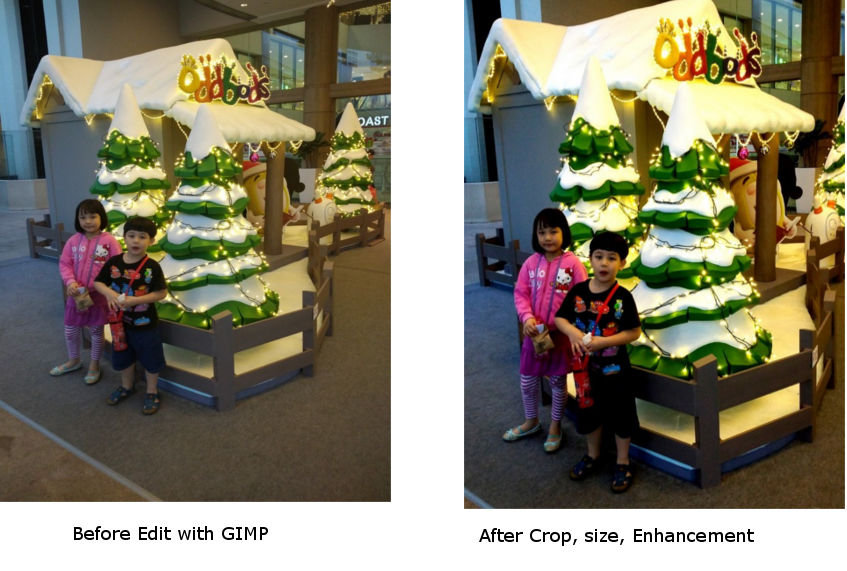
Immediately after that, I proceed to have some fun on how to improve my kids' photo from using the technic learnt from this 1:53mins short and sweet video on How to improve your photos?
Figure below showing the before and after of using the technic illustrated in the short video clip.
On seperate note, I created another potrait kind of image crop and resized from my daughther's photo using GIMP. First up, I removed the image back ground by going through theRemoveBackGround tutorial
The result is to obtain this picture for usage in Inkscape for vectorization:
This raster image when zoom in further, the image started to be pixelated as illustrated![]()
Inkscape
Inkscape is a free and open-source vector graphics editor; it can be used to create or edit vector graphics such as illustrations, diagrams, line arts, charts, logos and complex paintings. Inkscape's primary vector graphics format is Scalable Vector Graphics (SVG).
With Raster graphic image created in GIMP, I proceed to learnt to vectorize the image in inkscape through this 6:18 mins videoRaster2Vector tutorial. One of the important step is as shown in: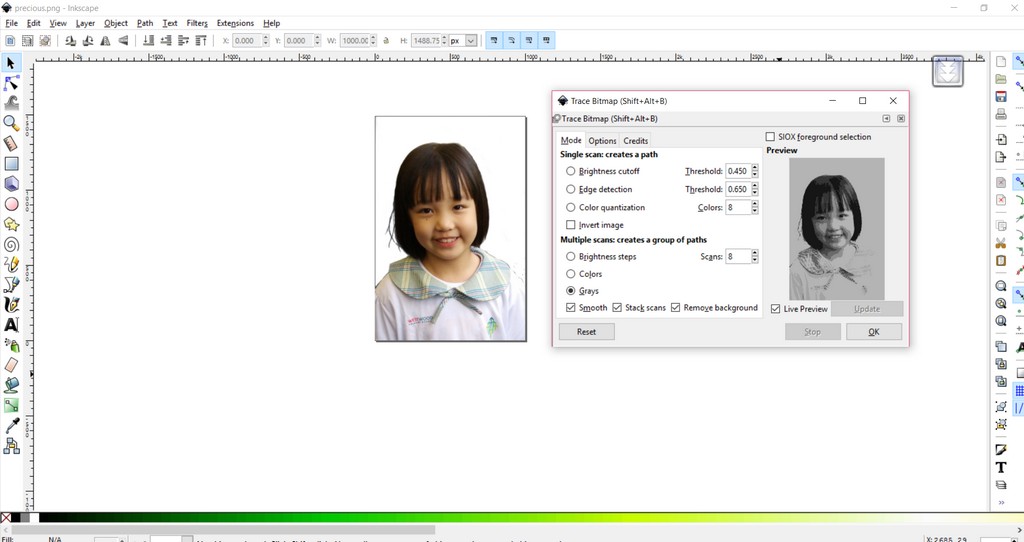
The result is as shown in: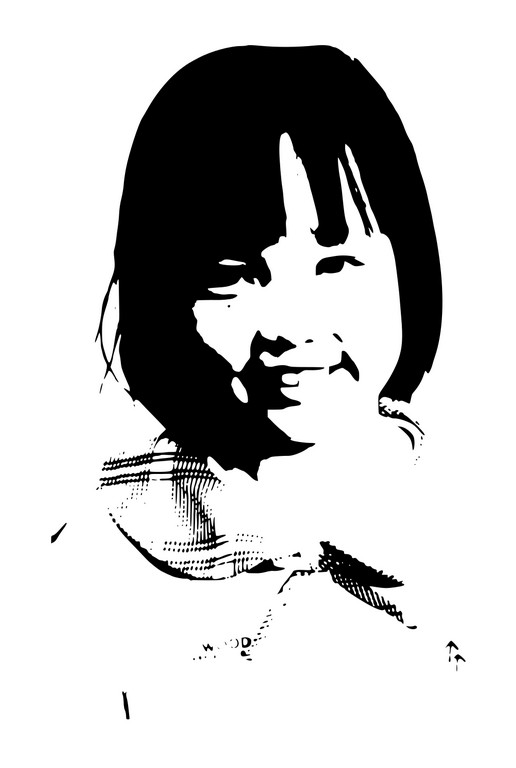
Using this SVP image, I then proceed to save the file as dxf format- Desktop Cutting Plotter (AutoCAD DXF R14)(*.dxf) type; amd generated the cut out lines as illustrated in

3D software
As I am not directly involved in teaching students on any CAD software usage currently, it has been almost two decades since my last CAD usage. Students usually just came to us with their STL files for 3D printing, or CNC model cutting. Those were pretty much all my short experiences with 2D/3D CAD software. From past experience of following paper step by step instructions of learning a new CAD software the learning curve could easily took me three to six months. Thus, I told myself that I got to be selective in exploring only a few 3D CADs softwares- Autodesk Fusion 360 is one of them; if time permitted then I will learn some others. While using Fusion 360, I straight away got hook and love all its ease to use features.
Autodesk Tinkercad
Tinkercad is a browser-based 3D modelling software that uses constructive solid geometry (CSG) applied to a series of 3D primitive objects to create the 3D model. Tinkercad is very simple in operation and has a very short learning curve.
You can sign up for a free account at www.tinkercad.com or simply just to sign in using your Autodesk Account. After sign in you can navigate to the features tab to explore what can tinkerCAD do for you. Also there is the Learn Tab which showing all the basic about tinkerCAD just for beginer to start learning. Alternatively, the author also is kind enough to provide some video on how to use tinkerCAD when you scroll down the middle section of the learning page.
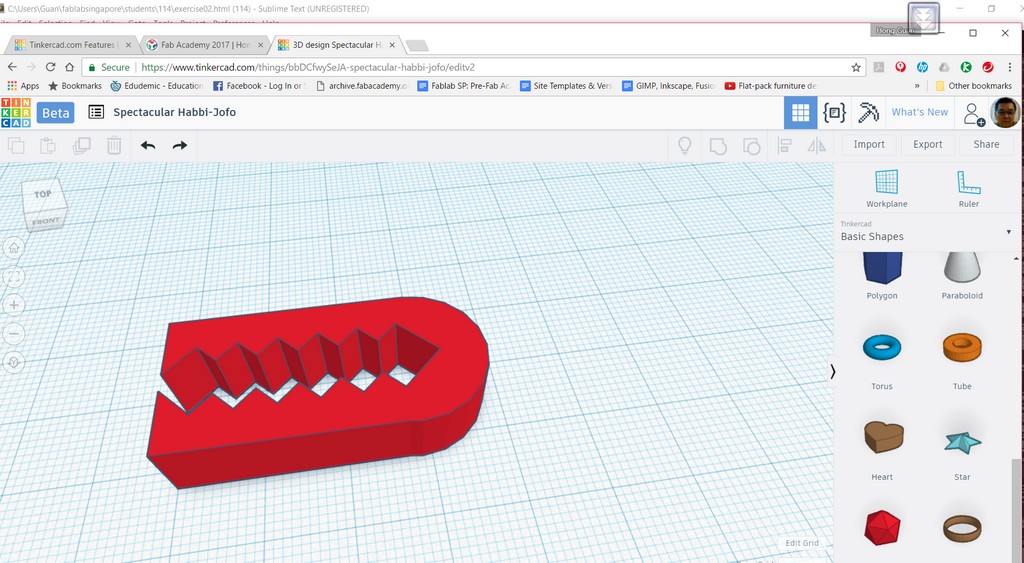
By going one of the video tutorial in the features page, I have learnt to create a simple clip as shown in Figure 7.
After going through a couple of bite size tutorials, I found it could be some what troublesome to creating more complex 3D models. As the nature of the software of using simple solid shapes/geometries for part building, it could easily run into limitation for complex curve and shape. Let us explore a total different approach in yet another 3D CAD software from Autodesk - Fusio 360. Which I found it more intuitive for defining the curve in a sketch and then extrude it as a 3d solid.
Autodesk Fusion 360
Autodesk Fusion 360 is a complex piece of software for modeling both onscreen assets (3D renders and animation) and offscreen physically manufactured elements. It provides parametric tools that allow a designer to edit components as specs change—without starting over from scratch. What's more, projects can be shared among a group of designers using 360's cloud-based design management system. It is available to educators and students, in the form of free download with licence that last 3 years for two installations.
Autodesk Fusion 360 is also available as free 1-year start up license for hobbyists, enthusiats, makers, and emerging businesses that make less than USD$100,000 in revenue per year. At the end of 1 year, one can reselect the startup entitlement or transition to a commercial entitlement.
Final Project Model
Using Autodesk Fusion 360 , I parametrically created the 3D model of my proposed final project listed in my final project proposal.
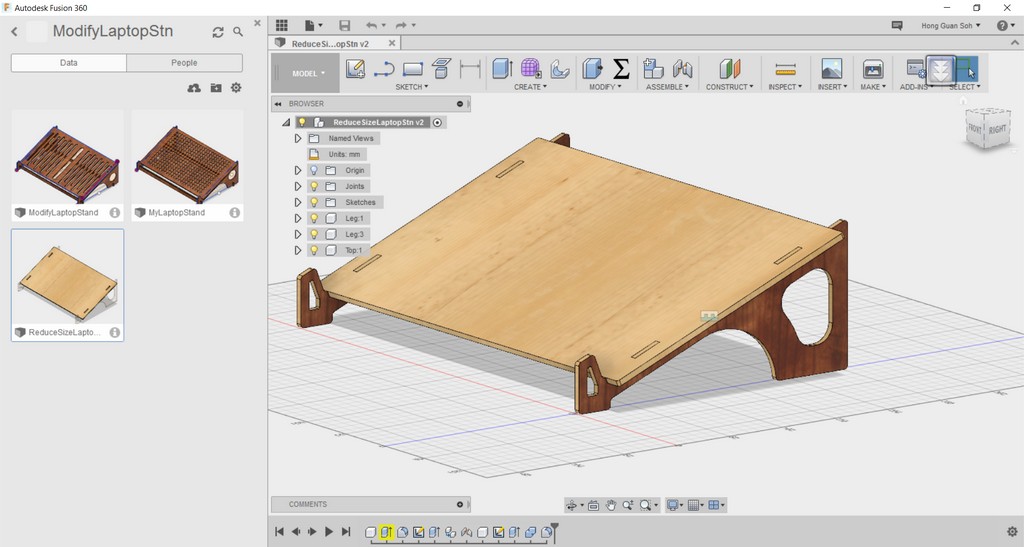
First up, I created the leg of the laptop stand as in (1) in Figure 9. Then I follow by extruding the leg into a 3D model from the sketch I created as shown in (2) and copy the leg with a manually defined parametric input of legwidth for the distance between the two leg. Then in Step (3), I move on to define the textual/ appearance of the two legs. After that I proceed to create the table top and the two supporting bars in Step(4). In order to improve airflow, I then proceed to create vents on the tables top as in step (5) (Stategically make reference to the edges of the top), so that when I varies the two parameters as in step (6) in Figure 9; the number of slot would not be affected.
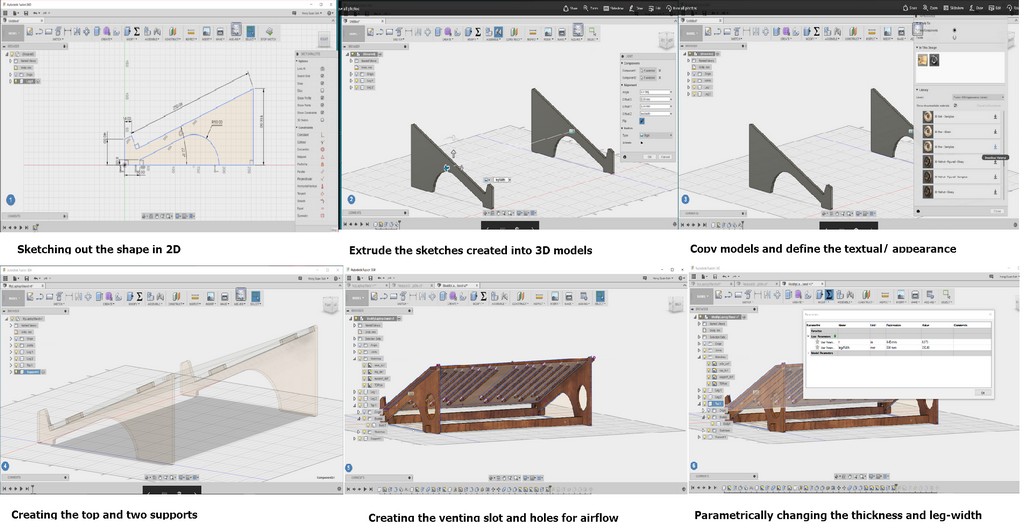
From this 3D model then I exported the vector graphic drawing as individual DXF file for cutting in laser machine.
Preparation to install Antimony (Side track a bit)
My preparation to use anitimony on windows 10 platform by means of direct installation was without luck. After consulted our local instructors, I turned to install VMwareplayer on top of my windows 10 OS laptop. During the 1st attempt to install VMware player version 12.5.1-4542065 the system prompted that the Intel virtual machine in Bios VT-x need to be activated. Resolved the issue by rebooting into bios to enable VT-x. I went on to install my Ubuntu version 16.04.1, after seeking our instructors advice on which linux variant to use. At the first attempt with default virtual memory set to 1GB on VMware player, Ubuntu can be completed successfully but not the installation of Antinomy. Whereby, system prompted that the installation can't continue for it is runing out of virtual memory. Reverted back to vmware player setting to increace the virtual memory to 50% of laptop physical memory size - 8GB.
Antimony has several dependencies:
- Qt open source
- libpng-dev
- python3-dev
- liboost-all-dev
- libgl1-mesa-dev-lts-utopic
- git
# Install dependencies
sudo apt install git build-essential libpng-dev python3-dev libboost-all-dev libgl1-mesa-dev lemon flex qt5-default ninja-build cmake
# Clone the repo Antimony from GitHub:
git clone https://github.com/mkeeter/antimony
cd antimony
# Make a build folder and
mkdir build
cd build
# Build Antimony and launch the application:
cmake -GNinja ..
ninja
./app/antimony
# To put Antimony on your path,
sudo ninja install
./app/antimony
This does two things:
The antimony executable is copied to /usr/local/bin
Antimony's Python libraries are copied to /usr/local/share/
The exact same steps can be found at the link Linux installation Requirements I was able to install all the dependencies and run antimony. I went on to continue my learning of antimony over the Ubuntu setting.
Antimony
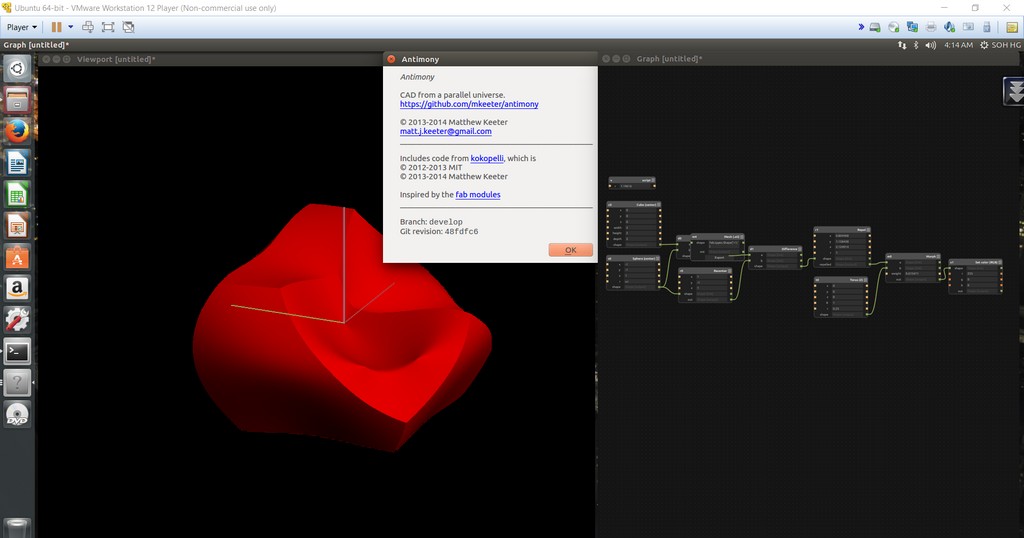
Antimony was developed by Matt Keeter at MIT and released into the public domain. Antimony basically
- teaches the user to think and organize his ideas better
- lets the user automate routine jobs, saving time
- fun to play with - user see the effect of their code immediately
Antimony is a 3D CAD software, where the user programs his 3D model using constructive solid geometry(CSG). Antimony has a rather straight forward graphical user interface where user can work directly on the 3D model generated with a series of mouse clicks on the popup menu within the workspace/window- call Viewport. At the same time user can even manipulate shape through some alteration of the basic parameters of the shape/s created to even by means of programming script to construct the outcome of the model on another window- call Graph.
The reason of choosing to learn antimony is because I remembered in Prof Neil lecture, there is a video link Antimony demonstraton video under this week software listing. Through this mp4 video recording (eventhough without voice narattion), I am able achieved some degree of understanding at my own pace.
Going through the recording enable me to create a distorted shape in Antimony as illustrated in Figure 10.
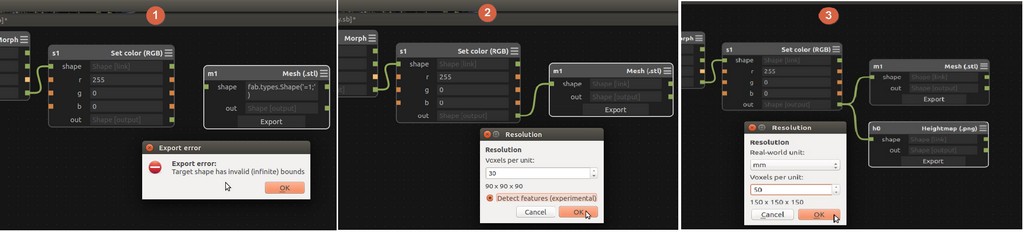
After that, I moved on to export the mesh.STL for and heightmap.png file as illustrated in Figure 11: Exporting of Distorted Shape as STL mesh and Heightmap.png. At first as shown in (1), antimony prompted that Export Error. Resolving that by clicking the output to the export function and was able to export successfully - as shown in (2). Following that for (3) able to export the heightmap-PNG successfully by defining the boundary.
Download Week 2 work files
- The Antimony file for the distorted shape found here! I would not attach the STL file here as the file size is quite huge. You can easily follow the steps as mention, using the above file to export the STL file on your own.
- You can download my Fusion created prototype laptop stand here!