Week 10
Output devices
In this week i have to add an output device to a board. I used the existing design available in the fab academy website here
I want to drive a dc motor using this design.for that i need to go through following steps,
1- PCB designing
2- PCB milling
3- Soldering the components.
4- Programming
5-checking the output
PCB designing
I referred neil's DC motor driver board(http://academy.cba.mit.edu/classes/output_devices/H-bridge/hello.H-bridge.44.png
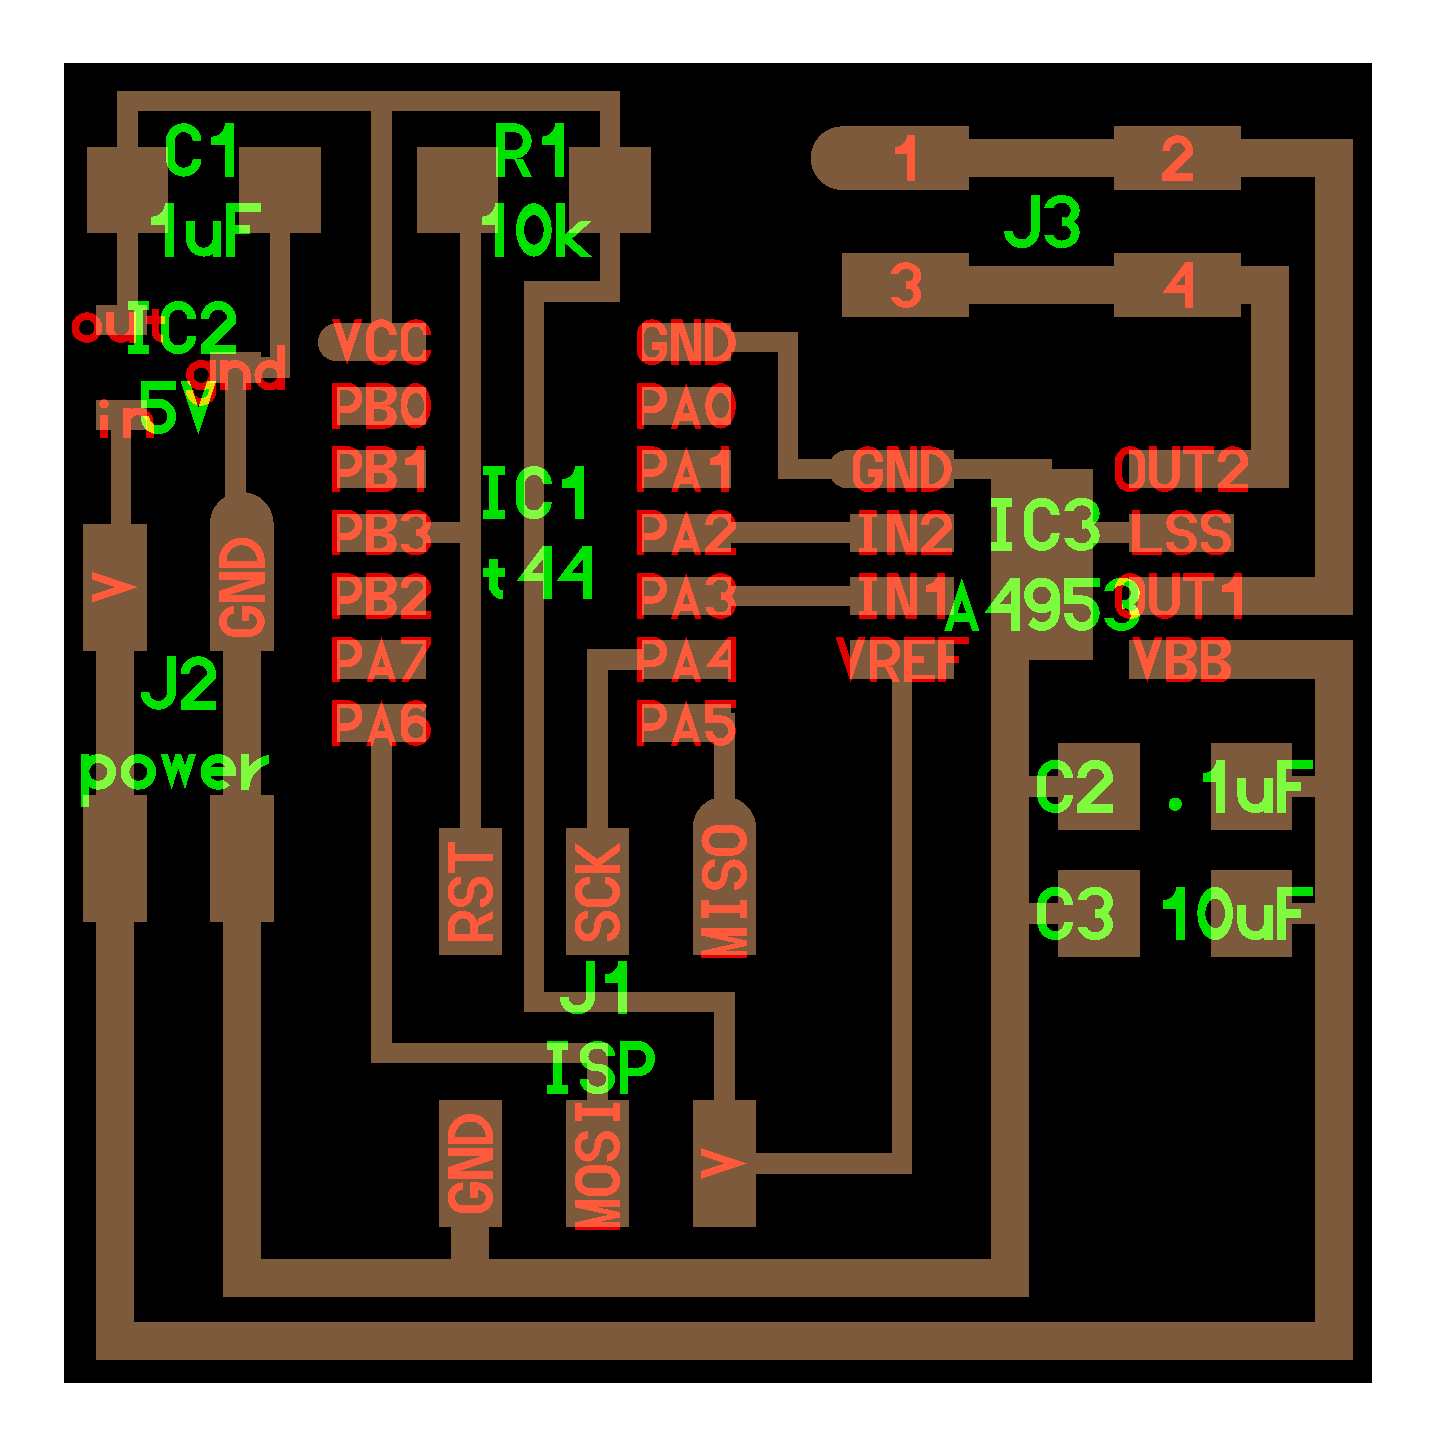
) i used the same components and the circuit design is done in eagle as follows.
_files/image002.jpg)
The components used are : ATtiny44 , A4953 motor driver IC,2 X 2 header, 2X3 header,Capacitors(0.1,1 and 10mF),regulator IC (5V) and 10k ohm resistor.
Then i converted my design into board file and manually routed.
_files/image004.jpg)
PCB milling
Then i generated .cmp after CAM processing and using cirQwizard,I converted my design into machine code and milled the board.
_files/image006.jpg)
_files/image008.jpg)
After that i cleaned
the board and checked the continuity in order to check whether there is any
traces which are not cut deeply.
Soldering the components.
I removed unwanted traces near each component's base Then i soldered the components on the board one by one with the help of magnifier and other instruments.Then i checked the continuity of the connections. It was fine.
_files/image010.jpg)
_files/image012.jpg)
Programming
For programming the board, there was no at tiny library in my arduino IDE. Firstly i need to install the library for AT tiny .
Installing the At
tiny library
In file > preferences , Additional Boards Manager URLs bow, i pasted the link
After clicking Ok. then i go to tools > board> board manager.
In the dialog box, in search box i searched At tiny and installed at tiny by David A .mellis
_files/image014.gif)
I checked and verified the board is included in library.
_files/image016.jpg)
After this. I checked vcc and reset pins in ISP programming header of my board.I connected corresponding pins.
Bootloader burning:
Before programming the board, I need to burn the bootloader(Fusing).Selection of board,processor and programmer are selected as ATtiny24/44/84 , ATtiny44 and USBTinyISP respectively.
Then in tools menu> burn bootloader.
After burning the bootloader i need to check whether a sample program of “blink” will work or not.
I referred the pin out of ATtiny 44
_files/image018.gif)
I understood the pinout configuration and other operating characteristics from its data sheet from this link
checking the output
I gave pin 1 for the blinking program output.the program is coded as :
_files/image020.gif)
I checked the output in pin 1 using multimeter and got the output correctly.
_files/image022.jpg)
Output voltage got is 5.04v. Hence the half of my assignment,s aim is done.
_files/image024.gif)
I coded a simple program for driving the motor. Pin 2 and pin 3 are used for the output.
i uploaded and connected motor to the output pin in the design. But the motor was not working.
I checked the data sheet of motor driver IC A4953 from the link here
In that the Load Supply Voltage is VBB 8.
So i connected 9v battery to the header pin of motor driver IC. and then i got the output.
_files/image026.jpg)
I checked the output of motor driver pin with multimeter. The output voltage got is -7.7 to 7.7.
Then connected motor and motor rotates forward and backward well.
Files
My design files in eagle are given below
1- Board file:Eagle board
2- schematic file:Eagle schematic design
3- .cmp file for cirqoid machine:Cirqoid .cmp file
4-The code for my assignment(done using arduino IDE is :Arduino code
Videos:
Video links for final output of my assignment are given below:
video1
_files/image028.jpg)
video2
_files/image030.jpg)