
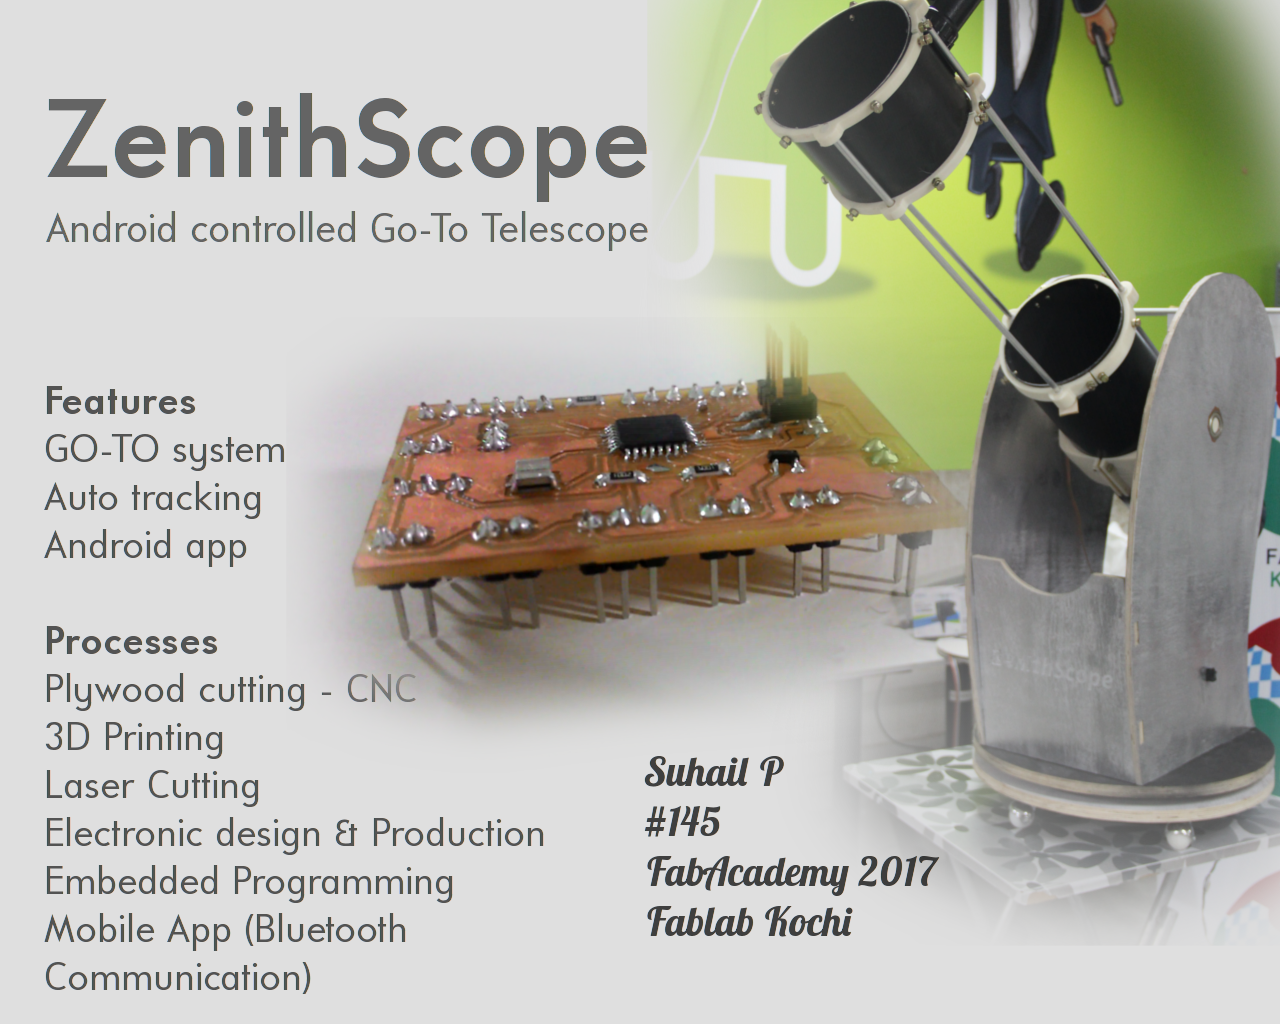
Project Concept
ZenithScope is a collaborative go-to telescope system. A go-to telescope system can point telescope to astronomical objects that the user selects. My initial project proposal was a BCI device. After doing our group project in machine design week, we decided to develop it into a more advanced form as a group project. In group project, we had used arduino board and required data were hardcoded in the program. In this project, data will be provided through a mobile application via bluetooth. The coordinates of the major celestail bodies will be pre recoreded in a mobile application. There will be additional columns in app to input custom coordinates. Once a user click on a button corresponding to a particular celestial body or provide a custom coordinate, the microcontroller will calculate the azimuth angle and altitude angle of given body and it will move itself at these angles. Also we plan to build whole telescope system too.
Features
- Goto system
- Mobile app
- Celestial tracking system
- Remotely access any given telescope and video stream
Weeks Covered
By completing this project we will be using skill sets gained from almost all the weeks :)
- Week 2: 3D designing - Primary mirror mounts, Secondary mirror mounts, Laser holder, Tube clamps.
- Week 3: Computer controlled cutting - laser cutting gear system and build box for holding electronic items.
- Week 4: Electronic Production - Milling main board and a motor controller board
- Week 5: 3D printing - Printing 3D designed files above
- Week 6: Electronic Design - Designing main board and motor controller board
- Week 7: Computer controlled machining - Plywood cutting side arms and base plates for telescope.
- Week 8: Embedded Programing - Programing the boards
- Week 9&11: Mechanical & machine Design - Developing the mechanical structure & automating
- Week 10: Output devices - Displaying in LCD
- Week 15: Networking - Serial communication between two boards and bluetooth communication between app and board
- Week 16: Interface and application programing - Developing mobile app
Processes Covered by both
- 3D Design & Printing:
- Me - Secondary mirror cell, secondary mirror mount
- Tanvir - Primary Mirror Mounts, guide rings, laser holder, Tube clamps
- PCB Milling:
- Me - main board
- Tanvir - secondary board
- Embedded Programing: Me and Tanvir
- Me - main board
- Tanvir - secondary board
- CNC Machine: Me and Tanvir
- Me - Side arms, front plate
- Tanvir - base plates
- Laser Cut:
- Me - box for electronic components
- Tanvir - gear system
My works
My contributions to the project are explained below.
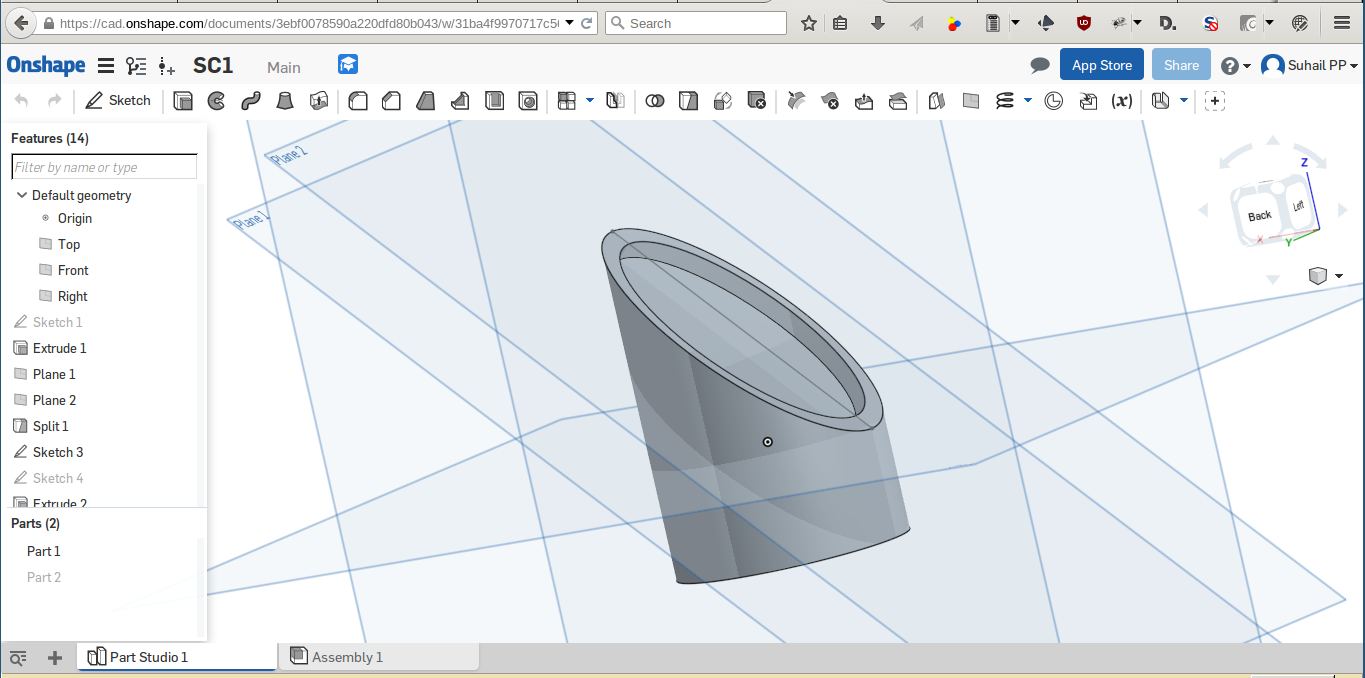
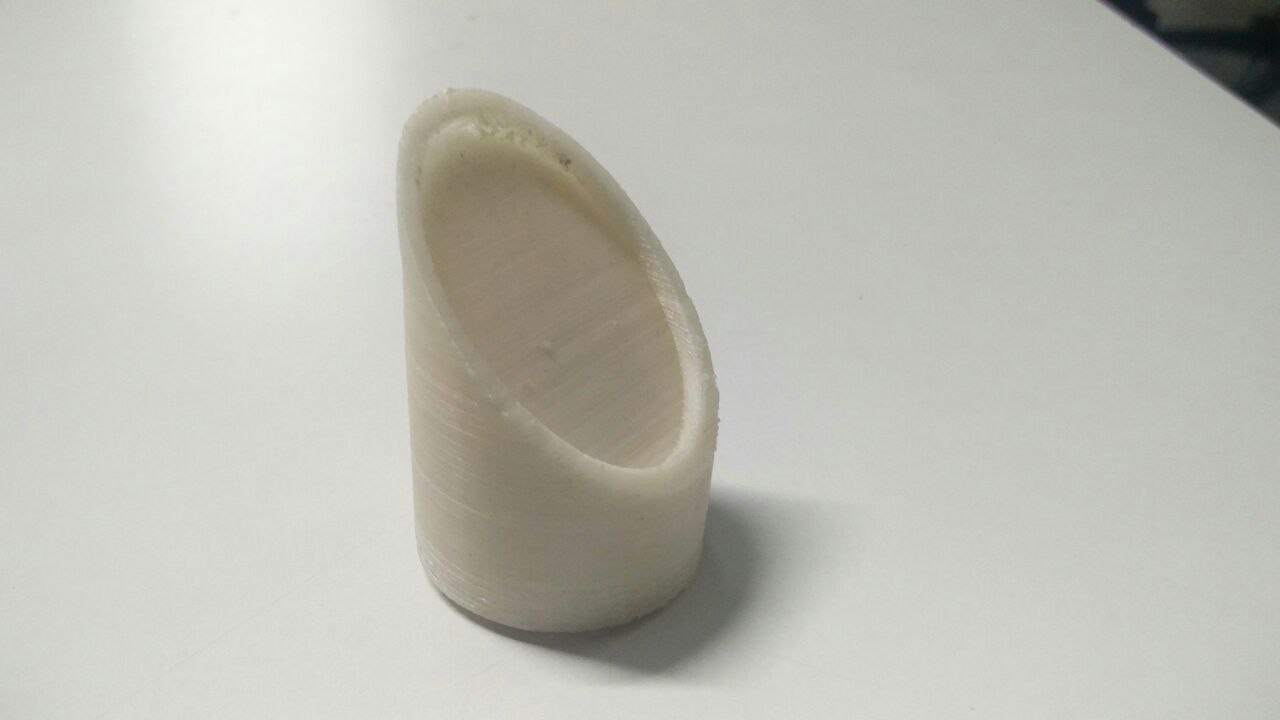
1. 3D designing and printing: Secondary Mirror cell
Light falls on secondary mirror and reflects towards eyepiece which is at 90 degree with it. This secondary mirror is fit on this 3D printed stand. Whole system is holded on secondary mirror mount. Design part is done in onshape. Downloadable files are available at the bottom of page.
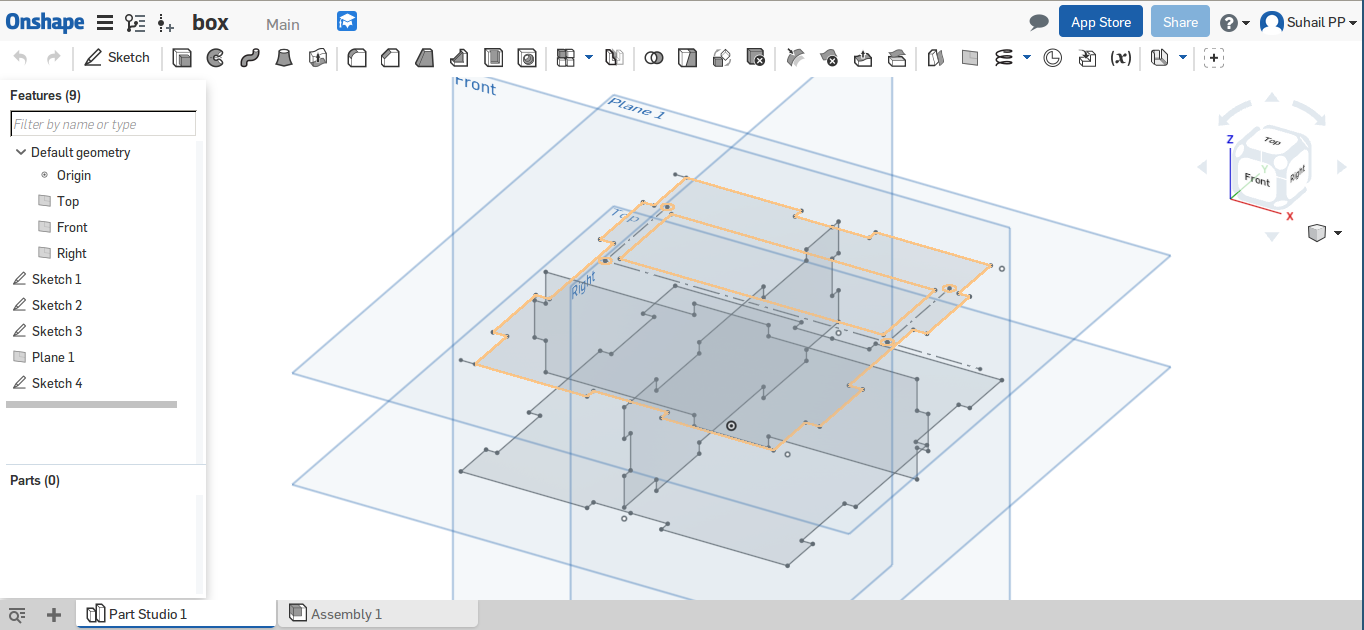
2. 3D designing and printing: Secondary mirror mount
Secondary mirror cell is mounted over this mirror mount. Position of mirror can be tuned by adjusting 3 screws below the mount, which are connected to secondary mirror cell. Onshape design screenshot is below.


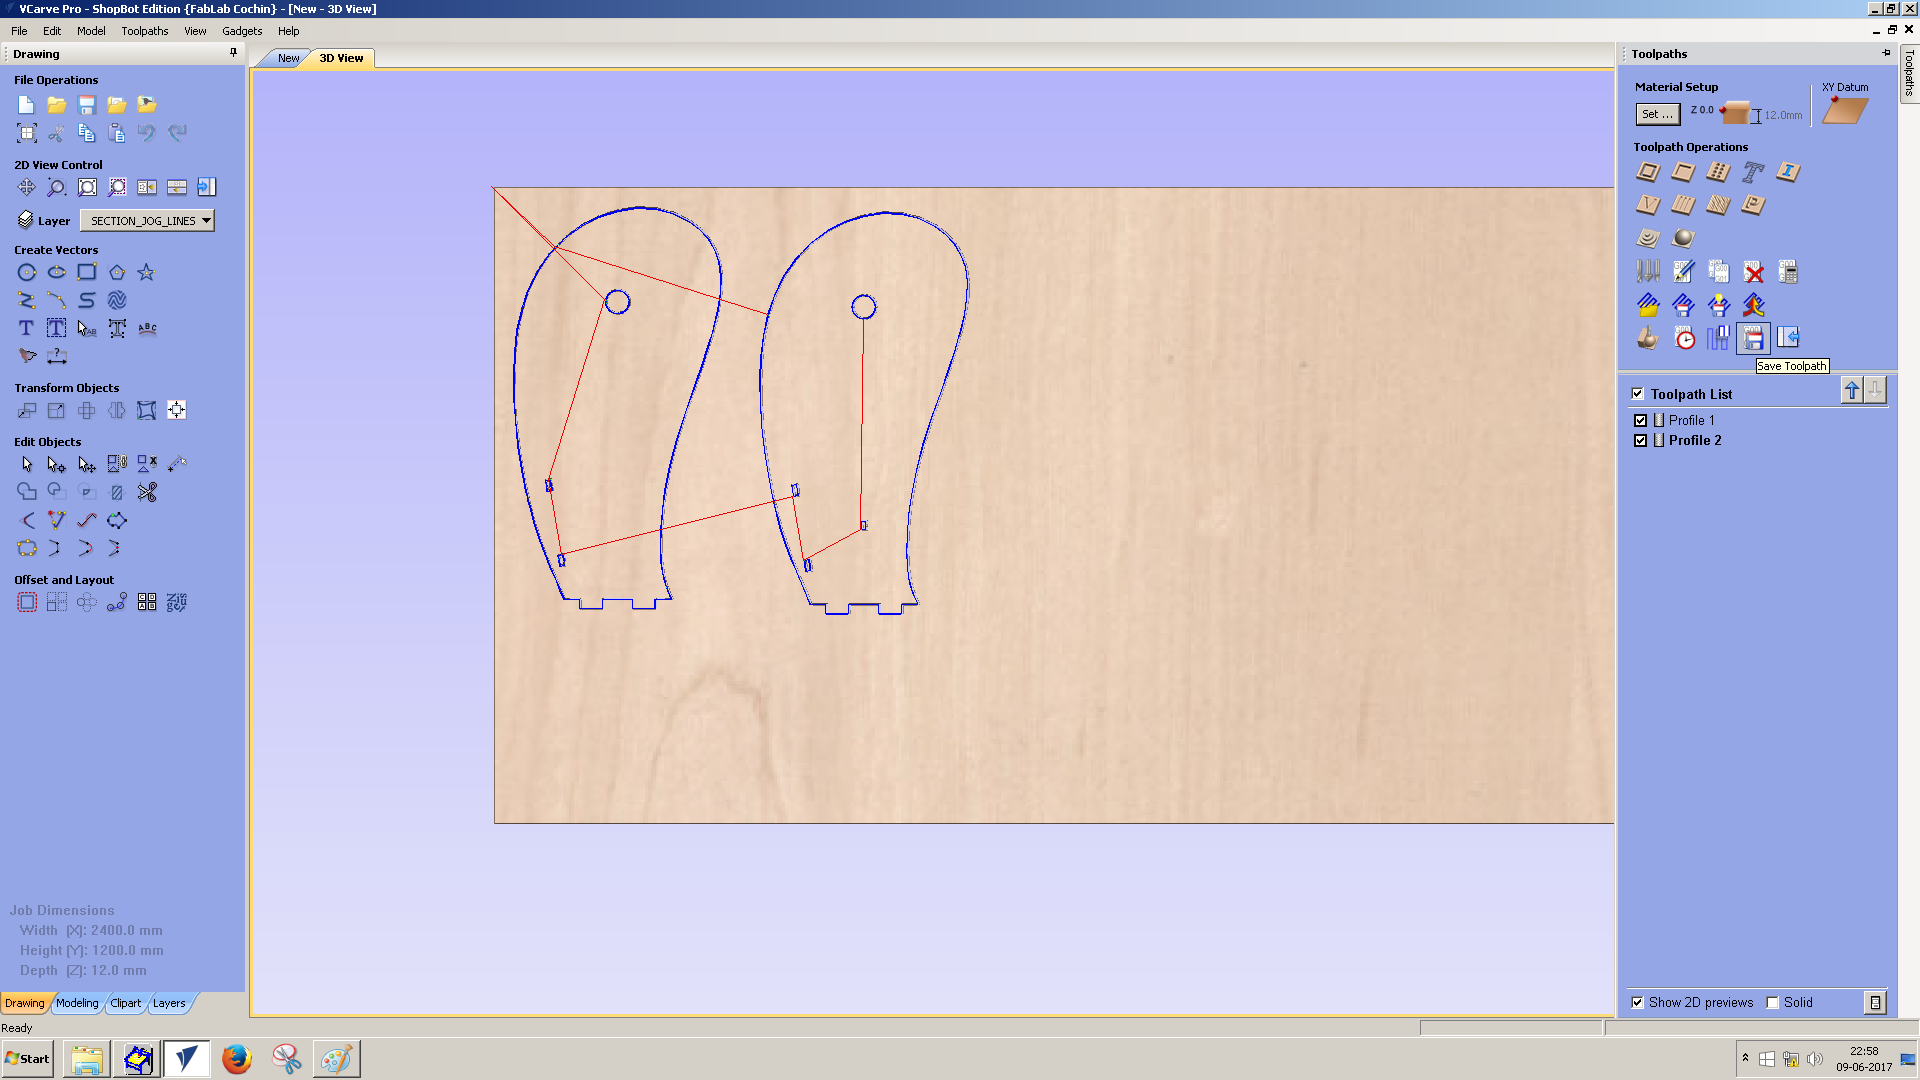
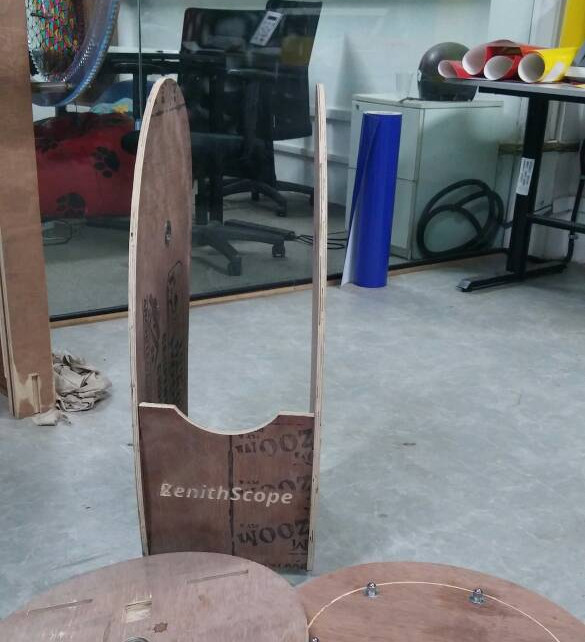
3. Designing and cutting side arms
The whole telescope system is mounted between these arms using a tube holder. Telescope should be free to rotate here. Onshape design file is below.

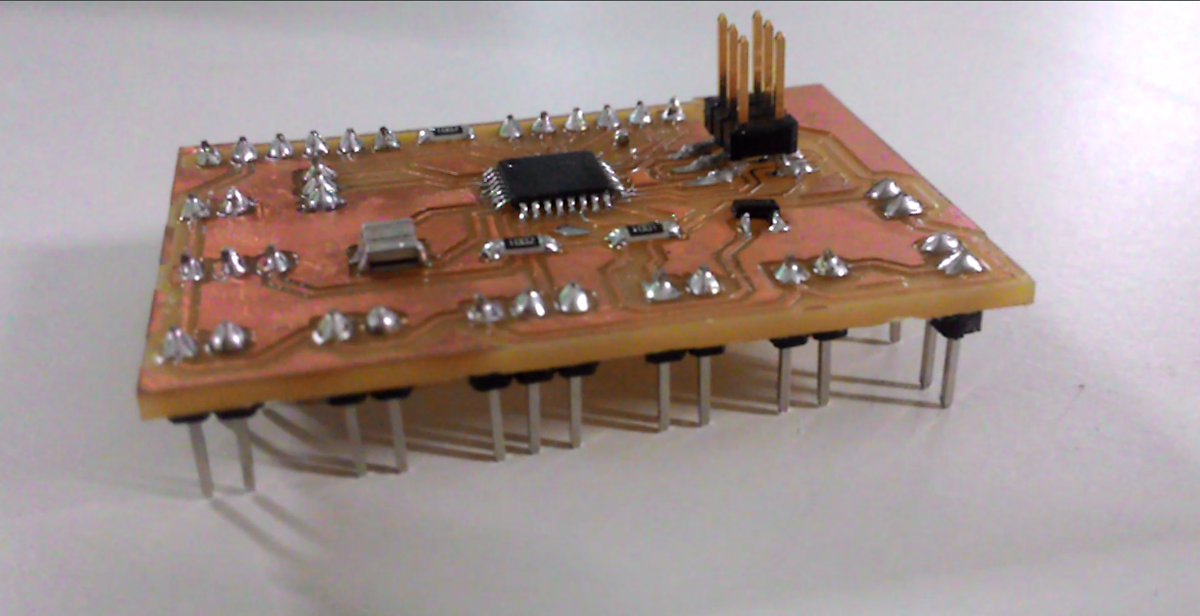
4. Designing & Developing main board
Main board is designed and developed for networking week. All details are available in corresponding page.
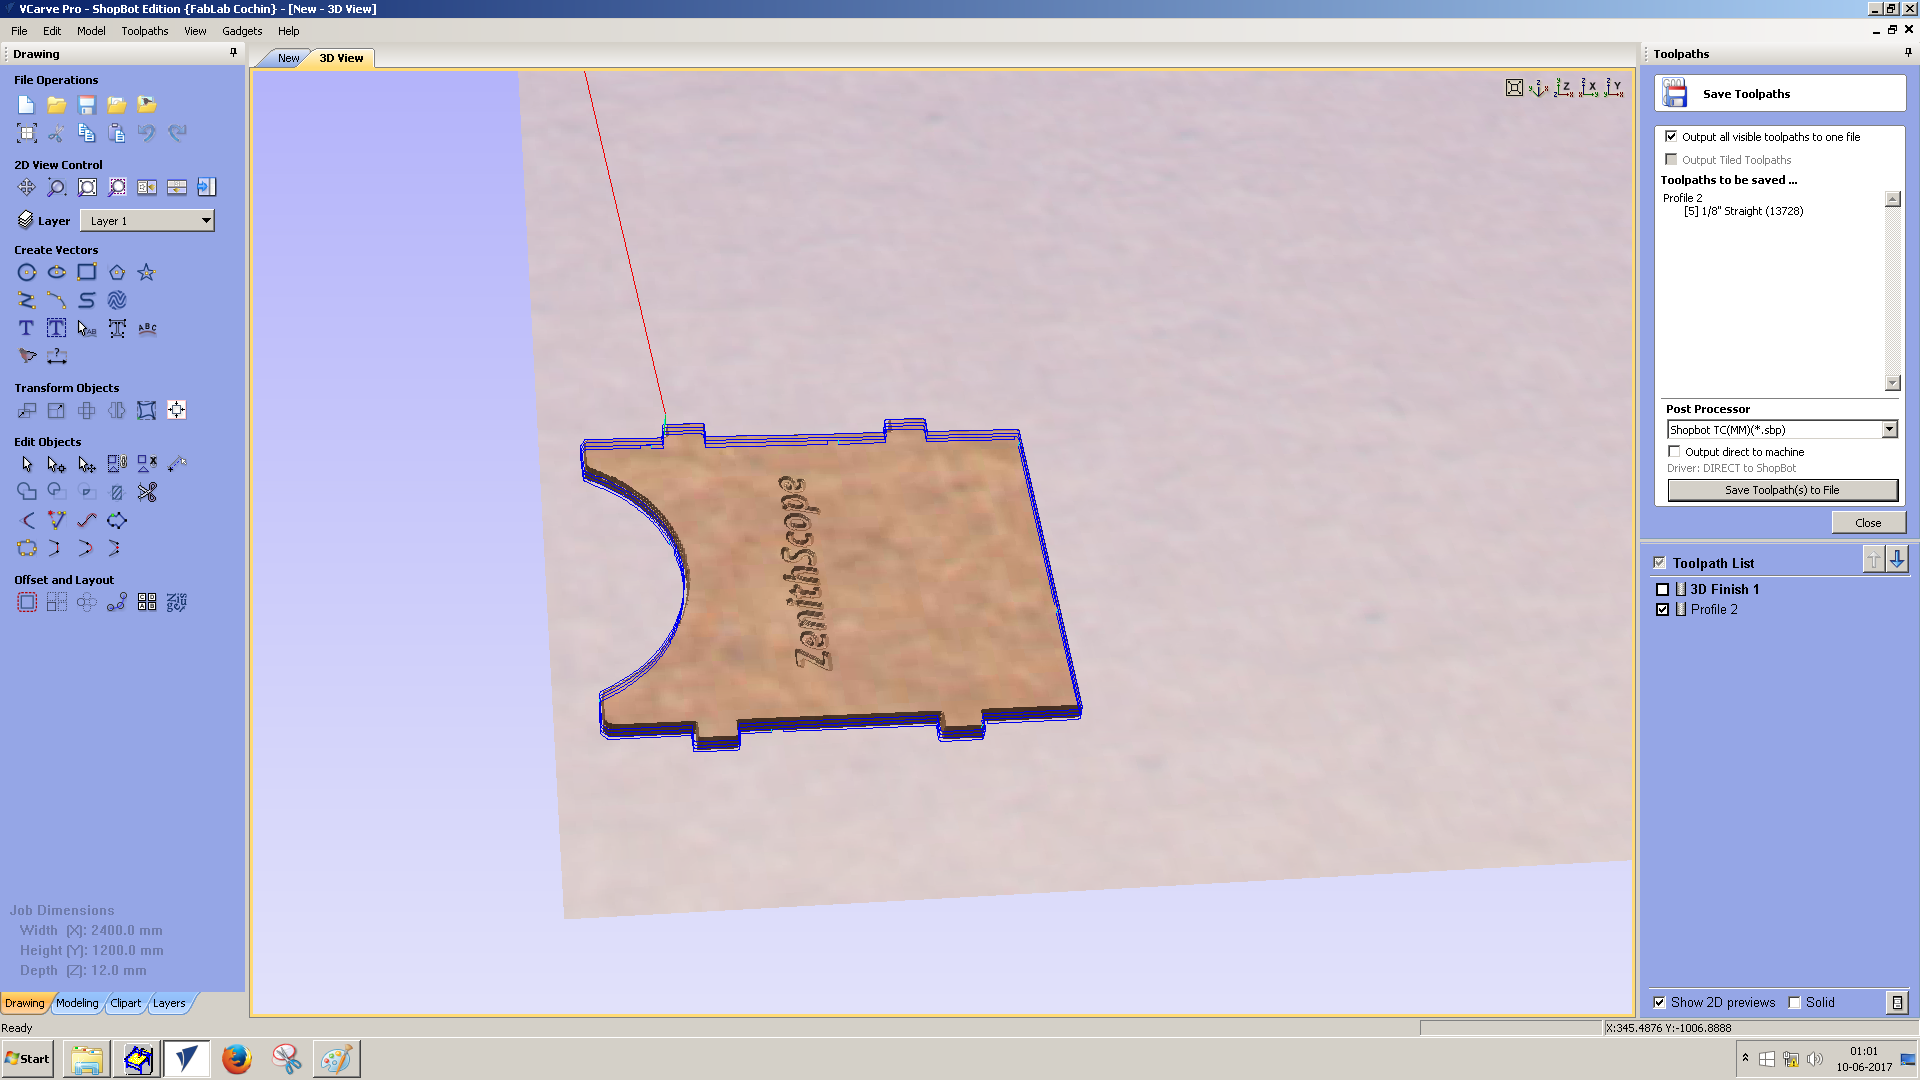
5. Laser cutting box
There are two PCB, a bluetooth module, an LCD display in this system. To cover the whole system neatly, a small box is used. Box contain a rectangular cut for fitting LCD. Design is done in onshape. Box is cut in 3mm acrylic sheet.
After laser cut

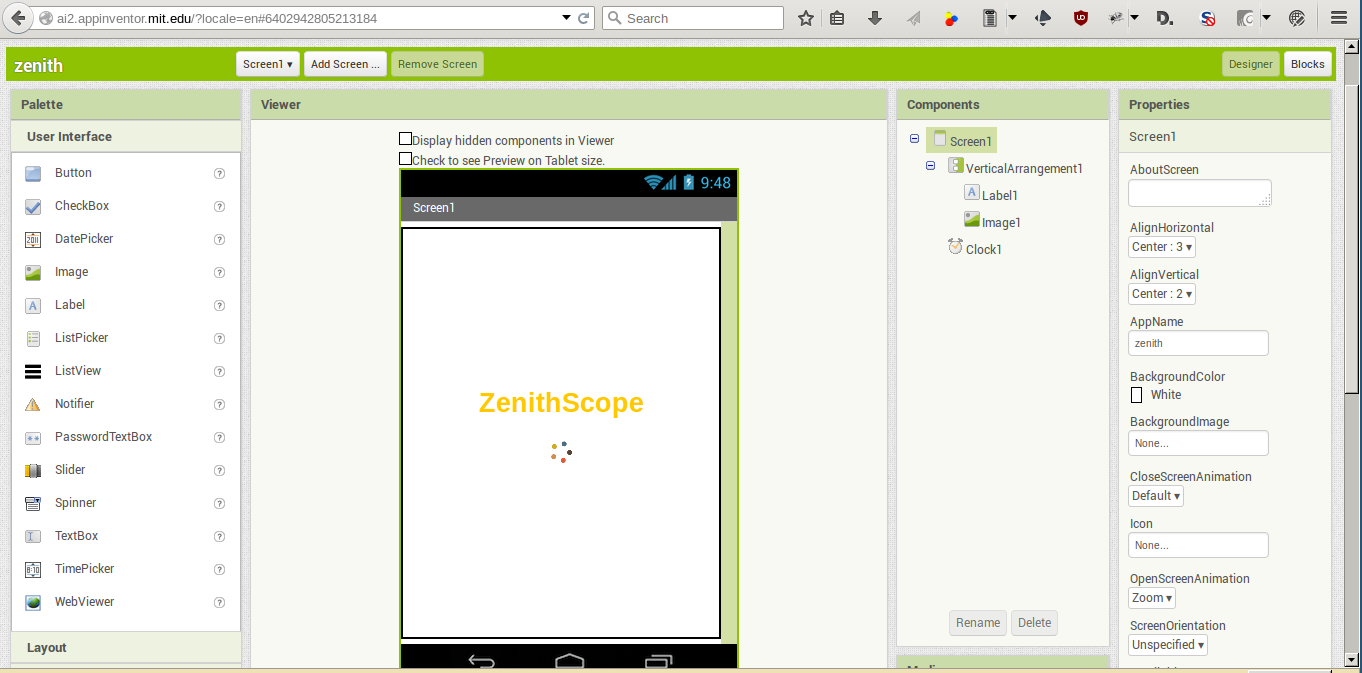
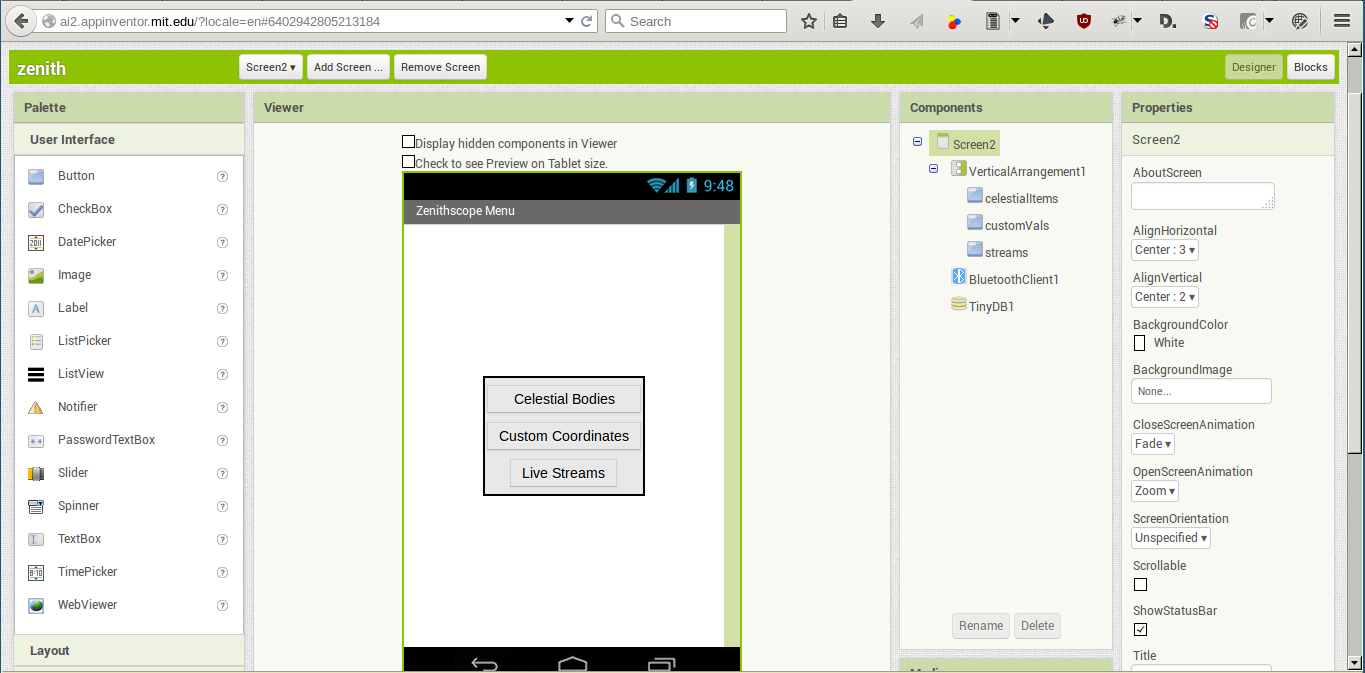
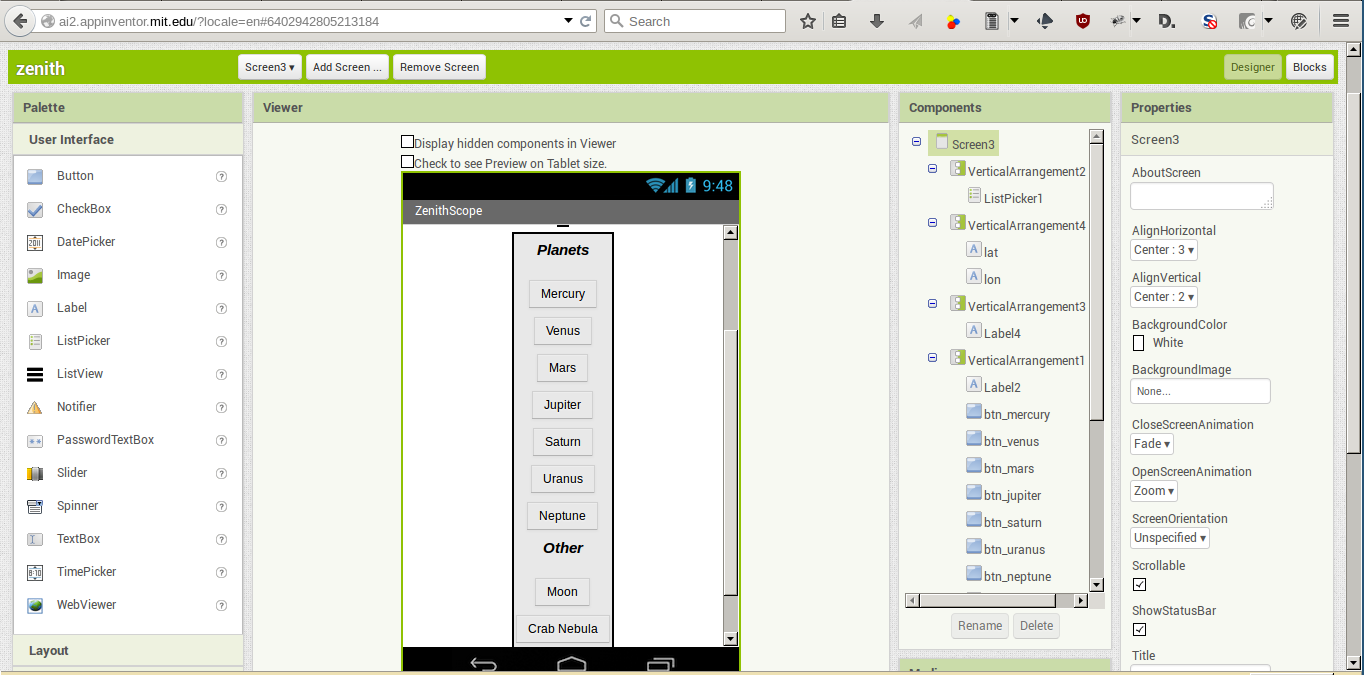
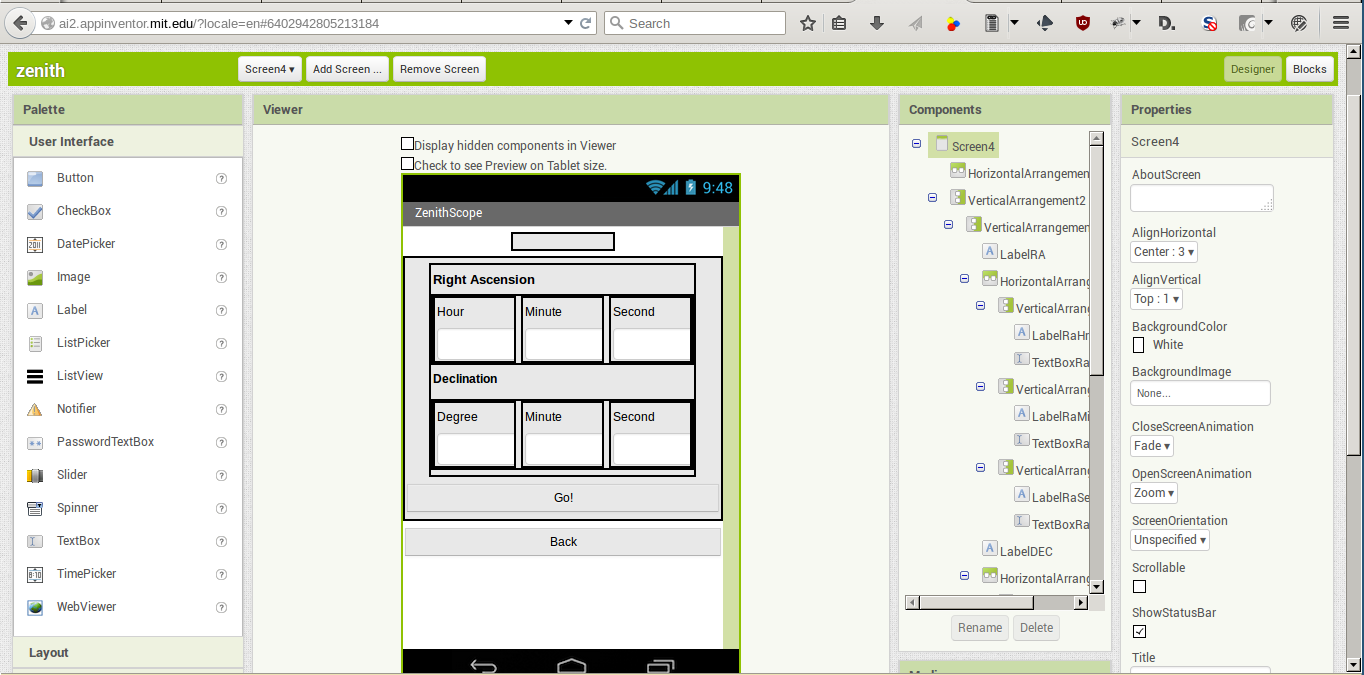
6. Developing application
Application was developed in MIT app inventor. A screen contains list of some celestial coordinates. Other screen contains form for sending custom coordinates. App sends current date, time, latitude, longitude also with this data. Some screenshots are below.

7. Programing the board
My board is programmed as below
#include <SoftwareSerial.h>
SoftwareSerial softserial(3, 4); // RX, TX

int leap_year = 0;
//no.of days from beginning of year(normal)
//jan-0, feb-31 etc
int days[] = {0,31,59,90,120,151,181,212,243,273,304,334};
//no.of days from beginning of year(leapyear)
int days_leap[] = {0,31,60,91,121,152,182,213,244,274,305,335};

//{degree,minute,sec}
int ip_dec[] = {0,0,0};
//{hour,minute,sec}
int ip_ra[] = {0,0,0};
//{hour,minute} in 24HRS format
int ip_t[] = {0,0,0};
//{value in decimal}
float ip_lat = 10.05542;
//{value in decimal}
float ip_long = 76.35792879999997;
//date,month,year
int ip_date[] = {0,0,0};

float pi = 3.1415;

float al = 0;
float az = 0;

void setup() {
int i=0,j=0;
char chr;
String name,ra,dec,latlong,dt,mn,yr,hour,minu,sec,form;
String data="";
//Initiate Serial communication.
Serial.begin(9600);
softserial.begin(9600);

delay(10000);

//send start '*' signal to secondary board to initiate home positioning
softserial.println("*");

while (!softserial.available()) {
// waiting for feedback
}

// after home position set, feedback '#' is received
if(softserial.available()){
String vals = softserial.readString();
if (vals == "#") {

while (!Serial.available()) {
// waiting for bluetooth data
}
// when data from bluetooth starts receiving
//vals = Serial.readString();
//softserial.println(vals);

Serial.readStringUntil('(');
Serial.readStringUntil('(');
name = Serial.readStringUntil(' ');
Serial.read();
ra = Serial.readStringUntil(' ');
Serial.read();
dec = Serial.readStringUntil(')');
Serial.readStringUntil('(');
Serial.read();
latlong = Serial.readStringUntil(')');
Serial.readStringUntil(' ');
Serial.read();
dt = Serial.readStringUntil(';');
Serial.read();
mn = Serial.readStringUntil(';');
Serial.read();
yr = Serial.readStringUntil(';');
Serial.read();
hour = Serial.readStringUntil(';');
Serial.read();
minu = Serial.readStringUntil(';');
Serial.read();
sec = Serial.readStringUntil(';');
Serial.read();
form = Serial.readStringUntil('m');

delay(3000);

}
}

j=0;
for (i=0;ra[i]!='\0';i++){
if (ra[i]==','){
ip_ra[j] = data.toInt();
j++;
data="";
}else{
data = data + ra[i];
}
}
ra[j+1]=data.toInt();

j=0;
for (i=0;dec[i]!='\0';i++){
if (dec[i]==','){
ip_dec[j] = data.toInt();
j++;
data="";
}else{
data = data + dec[i];
}
}
dec[j+1]=data.toInt();

ip_date[0] = dt.toInt();
ip_date[1] = mn.toInt();
ip_date[2] = yr.toInt();

ip_t[0] = hour.toInt();
ip_t[1] = minu.toInt();
ip_t[2] = sec.toInt();

// converting time into 24hour format
if (form == "a") {
if (ip_t[0] == 12) {
ip_t[0] = 0;
}
}
else if (form == "p") {
if (ip_t[0] != 12) {
ip_t[0] = ip_t[0] + 24;
}
}

// find position of celestial object
float alt_val = get_altitude();
float azimuth_val = get_azimuth();

String tempVal = String(alt_val) + "," + String(azimuth_val) + ",";
//send altitude and azimuth
softserial.println(tempVal);
}

void loop() {

if (softserial.available()){
if (softserial.readString() == "R") {

if (ip_t[1]<59) {
ip_t[1] = ip_t[1] + 1;
} else {
ip_t[1] = 0;
if (ip_t[0]<23) {
ip_t[0] = ip_t[0] + 1;
} else {
ip_t[0] = 0;
if (ip_date[0]<30) {
ip_date[0] = ip_date[0] + 1;
}else {
ip_date[0] = 1;
ip_date[1] = ip_date[1] +1;
}
}
}
//recalculating - for tracking
float alt_val = get_altitude();
float azimuth_val = get_azimuth();

String tempVal = String(alt_val) + "," + String(azimuth_val) + ",";
//send altitude and azimuth
softserial.println(tempVal);

}
}

}

// to convert value in (degree,min) to degree
float dec_to_degree(int val[]) {
float result;
result = val[0] + (val[1]/60.0);
return result;
}

// to convert value in (hour,min) to degree
float ra_to_degree(int val[]){
float result;
result = (val[0] + (val[1]/60.0))*15;
return result;

}

// to convert value in (hour,min) to hour
float time_to_hour(int val[]){
float result;
result = val[0] + (val[1]/60.0);
return result;
}

//Local Sidereal Time
//longitude,time,date as inputs
float get_lst_value(float lngt, int t[], int dt[]) {
float lst;
//for calculate from epoch (reference date is J2000)
//days from J2000 upto 2017 is 6208.5
float total_days = 6208.5+(dt[2]-2017)*365 + time_to_hour(t)/24;
//if leap year, add one more day
if ((dt[2] % 4) == 0) {
total_days += 1;
leap_year = 1;
}
//add total days of current month and date
//currently we processed only days in year
if (leap_year == 1) {
total_days = total_days + days_leap[dt[1]-1] + dt[0];
}
else {
total_days = total_days + days[dt[1]-1] + dt[0];
}
//last element is time converted to GMT
//lst = float(100.46) + float(((time_to_hour(t)-5.5)/24)*total_days) + float(lngt) + float(15*(time_to_hour(t)-5.5));
lst = float(100.46) + float((0.985647*total_days)) + float(lngt) + float(15*(time_to_hour(t)-5.5));
//lst = (100.46 + 0.985647 * total_days + float(lngt) + 15 * (time_to_hour(t)) + 360) - (((int)((100.46 + 0.985647 * total_days + float(lngt) + 15*(time_to_hour(t)) + 360)/360))*360);
//BRINGING VALUE B/W 0 & 360
//int temp = (lst/360)+1;
//lst = 360*temp - lst;
return lst;
}

//to find Hour Angle (HA)
//HA = LST - RA
float get_ha() {
float lst_ = get_lst_value(ip_long, ip_t, ip_date);
float ra_ = ra_to_degree(ip_ra);
float ha = lst_ - ra_;
//float ha = (lst_ - ra_ + 360)- ((int)((lst_ - ra_ + 360)/360))*360;
return ha;
}

//to calculate Altitude(ALT)
float get_altitude() {
float alt = asin(sin(dec_to_degree(ip_dec)*pi/180)*sin(ip_lat*pi/180)+cos(dec_to_degree(ip_dec)*pi/180)*cos(ip_lat*pi/180)*cos(get_ha()*pi/180));
return alt*180/pi;
}

//to calculate Azimuth(AZ)
float get_azimuth() {
float a,az,ha;
a = acos((sin(dec_to_degree(ip_dec)*pi/180)-sin(get_altitude()*pi/180)*sin(ip_lat*pi/180))/(cos(get_altitude()*pi/180)*cos(ip_lat*pi/180)));
a = a*180/pi;
ha = get_ha();
if (sin(ha*pi/180) > 0) {
az = 360-a;
}
else {
az = a;
}
return az;
}
All codes are downloadable from bottom of the page.
Current Status
Project is almost completed. There is slight issue with the caster wheels at the base plate. Friction is too much. We have to replace the caster wheels and try again. Also there are some finishing working to be done for better look and feel.
Bill of materials
| Item | Price |
| 6" Optical Kit | Rs 8292 |
| Rack and Pinion Focuser | Rs 749 |
| GT2 Pulley | Rs 1000 |
| GT2 Belt | Rs 440 |
| Ball Bearing | Rs 240 |
| Ball Castors | Rs 210 |
| Small Castor Wheels | Rs 180 |
| Spray Paint | Rs 510 |
| 200 mm Dia PVC Pipe | Rs 480 |
| 3D Print- OTA Clamp | Rs 3150 |
| 3D Print- Guide Ring Bottom | Rs 1000 |
| 3D Print- Guide Ring Top x2 | Rs 1500 |
| 3D Print-Primary mirror mount base | Rs 973 |
| 3D Print- Primary Mirror adjustable base | Rs 442 |
| 3D Print- Laser Holder | Rs 520 |
| 3D Print- Secondary mirror- Spider net | Rs 445 |
| 3D Print- Secondary Mirror Cell | Rs 150 |
| ShopBot CNC Cutting | Rs 725 |
| Laser Cutting - Gears | Rs 100 |
| Laser Cutting -Box Enclosure | Rs 250 |
| Electronics Production- MotorControl/LCD Board | Rs 325 |
| Electronics Production-Master Board | Rs 200 |
| Total | Rs 21881 |
The overall cost of building the ZenithScope comes to 21881 rupees, which is approximately equal to 338 USD.
License
This project is licensed under GPL V3.
References
- The Principals of Astronomical Telescope Design - By Jingquan Cheng
- www.w8isms.blogspot.in
- HomeBuilt Reflector Telescopes- Sam Brown