FINAL PROJECT
1. 1st concept
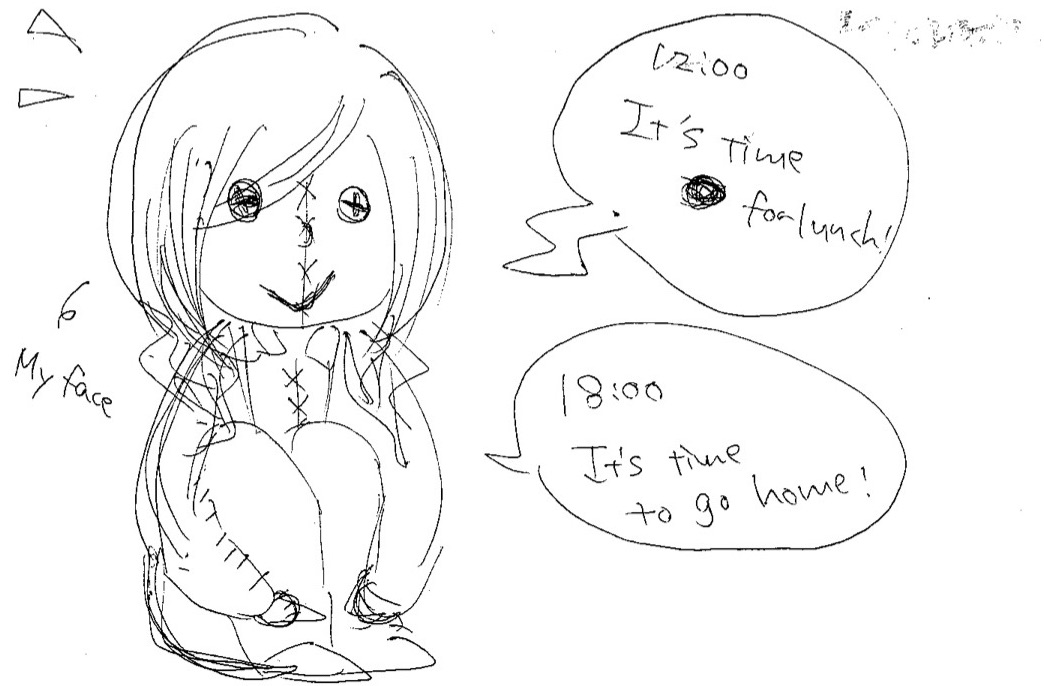
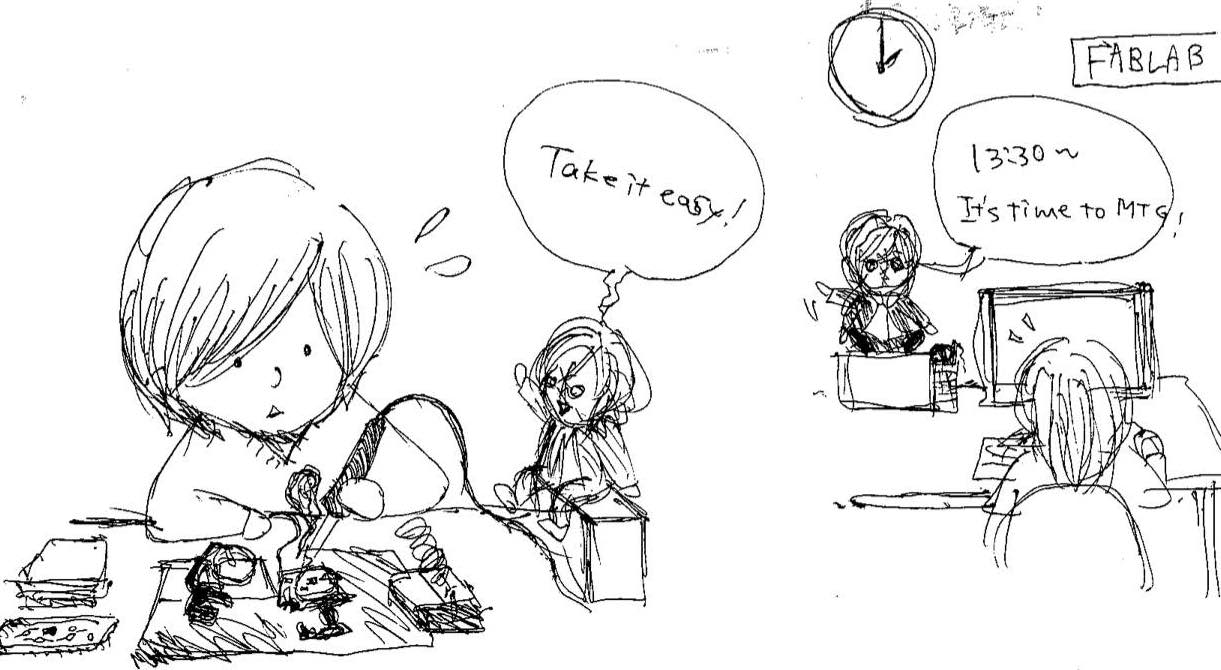
A puppet substitutes for me when I’m not in the fablab.
It can be an alarm and a clock. You can set alarms to remind appointments.
It cheers us constantly like "Do your best!” “Don’t be serious” ”Take it easy.”
- Optional :
- the face of the puppet looks like each persons face and it speaks in his voice.
- dancing with music
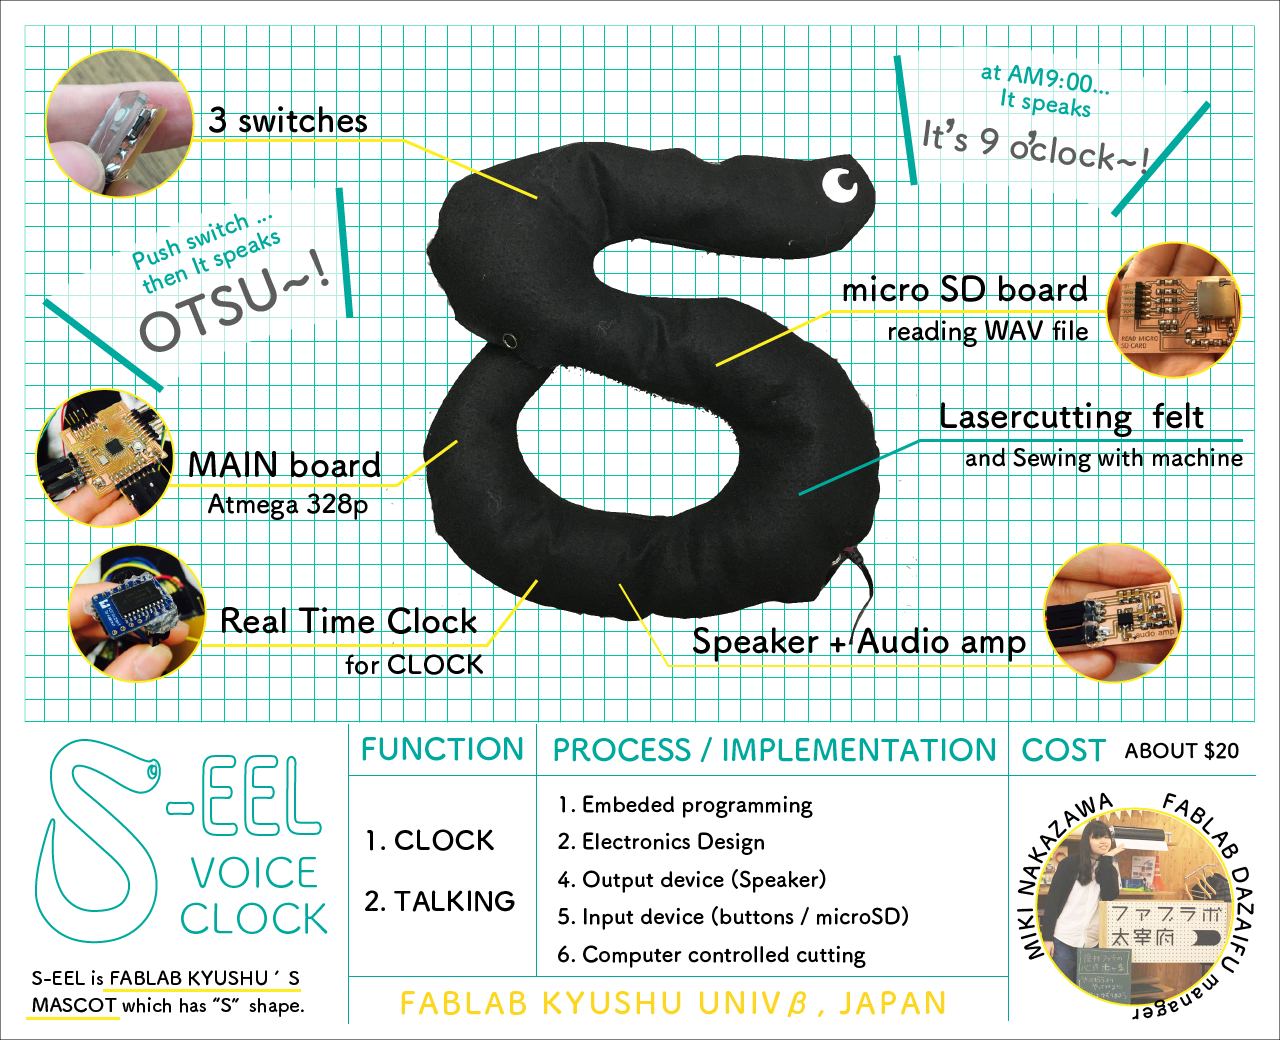
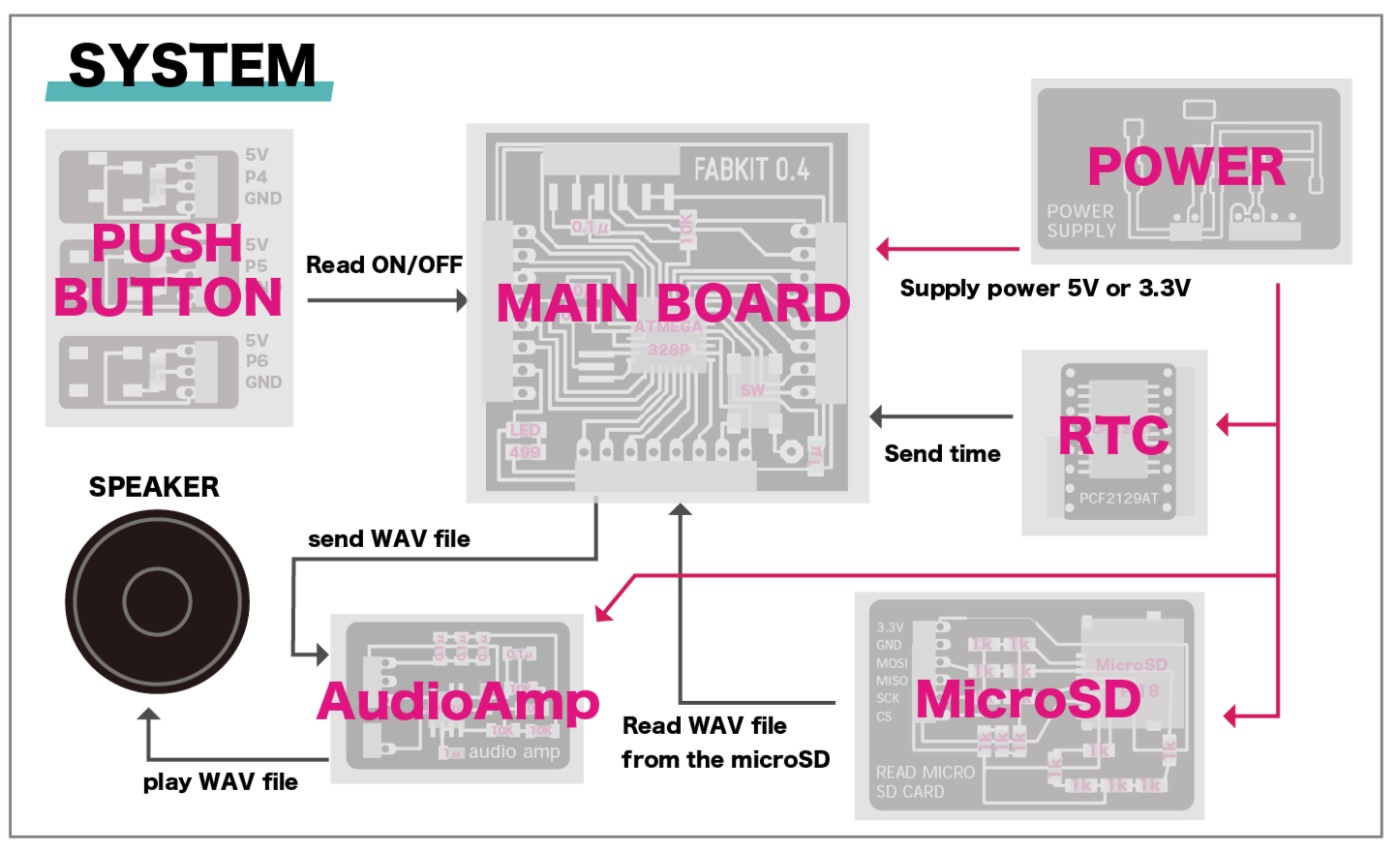
Finally, I decided my final project. I made "s-eel clock".
It has three imput devices.
- [INPUT] push button
- [INPUT] reading WAV files from microSD card.
- [INPUT] Real time clock for mesuaring time
And when I push the buttons / when it become the time I set up
- [OUTPUT] speaker for playing WAV.file from micro SD card
===What's s-eel?===
S-eel is a mascot of fablab kyushu univ.β designed by Shinichiro Ito. It has "S" shape in English and olso has "乙" shape in Japanese Kanji. "乙" call "otsu" in japanese. Therefore, we call this "otsu-unagi".
Reference : How to make otsunagi (in japanese)
2. PROCESS
2-1. Making boards
My project plan is here.
I made 5 boards : read_microSD/ audio amp / power_supply / push_switch and got RTC board from online electronics parts shop.
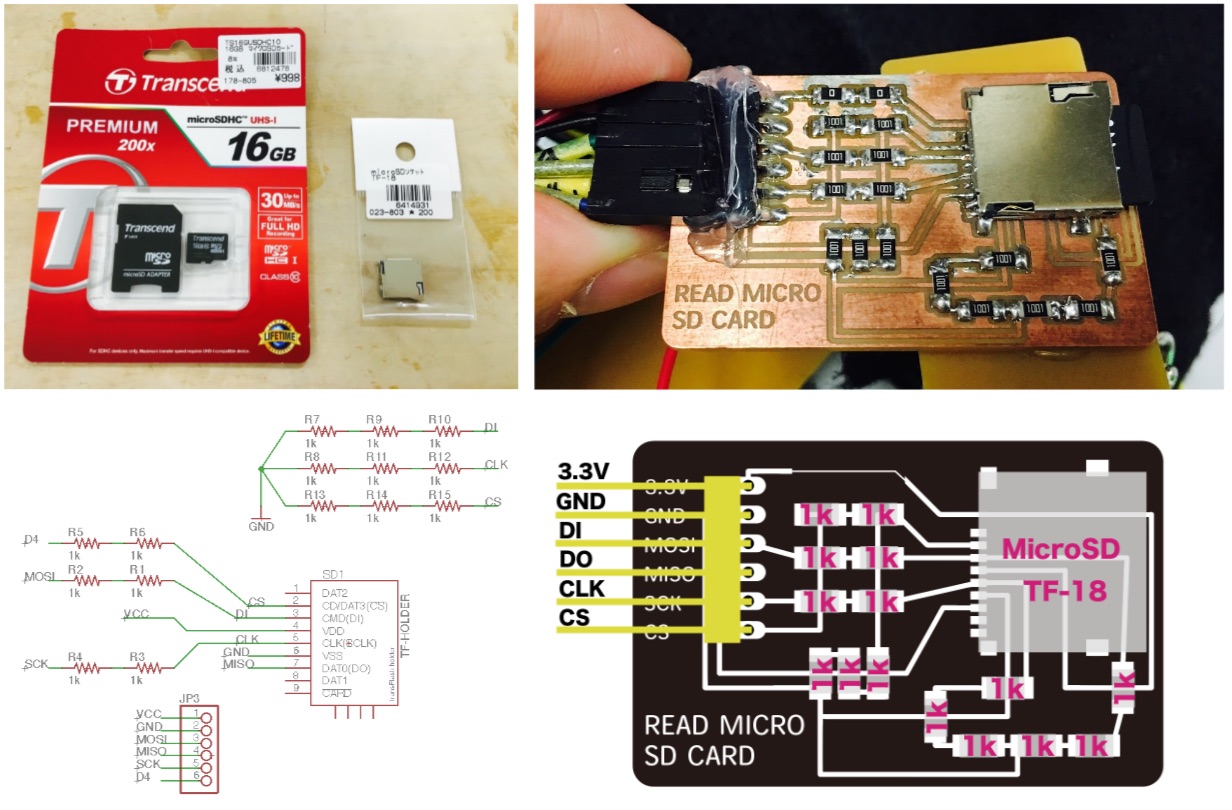
- A. microSD reading board [INPUT]
- Download : read_microSD.zip :include.sch/.brd/.ai/.png
- Download : WAVfile [dropbox]
- * save this WAV files in this micro SD. * pitch ×2 : I changed the pitch of the voices because main board has different clock from wav.file. microSD
- microSD 16GB ×1 ¥998 / Kaho parts center (Link)
- resister 1k ×15 ×1 / digikey
- microSD soket - TF-18 ×1 ¥200 / Kaho parts center (Link)
- 1×6 pin header ×1 / Akizukidenshi
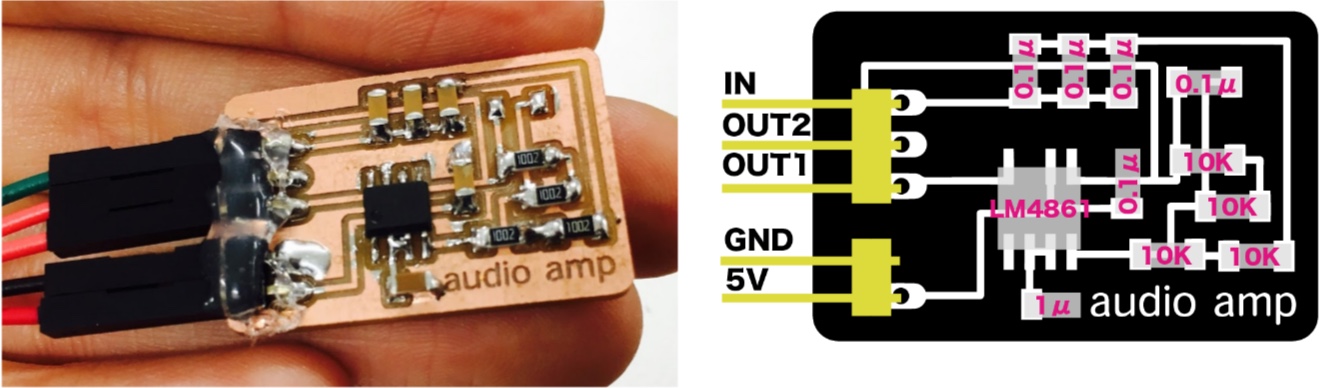
- B. speaker + audio amp [OUTPUT]
- Download : amp.zip
- audioamp LM4861 ×1 / digikey
- resister 10kΩ ×4 / digikey
- capacitor 0.1μF ×4 / digikey
- capacitor 1000pF ×1 / digikey
- capacitor 1μF ×4 / digikey
- 1×3 pin header ×1 / Akizukidenshi
- 1×2 pin header ×1 / Akizukidenshi
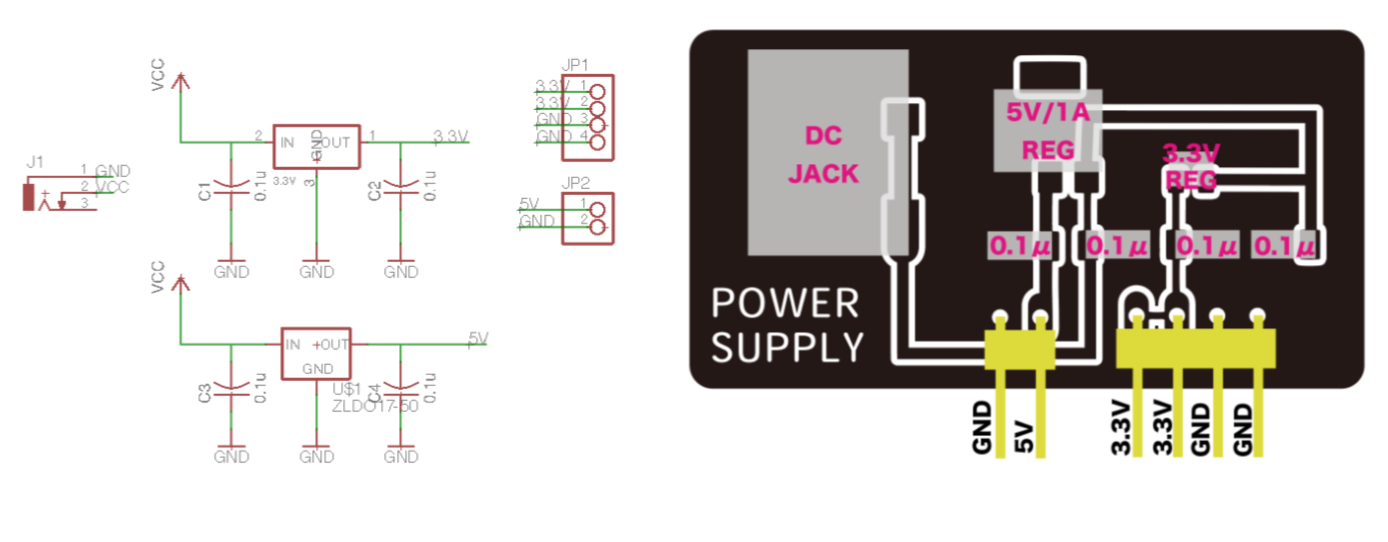
- C.Power supply board
- Download : power_supply.zip
- DC Jack ×1 $ / digikey
- regulator 3.3V 0.1A ×1 / digikey
- regulator 5V / 1.0A ×1 / digikey
- 1×2 pin header ×1 / Akizukidenshi
- 1×4 pin header ×1 / Akizukidenshi
- capacitor 0.1μF × 4 $ / digikey
- AC adaptor 6V 1.8A /Kaho parts center
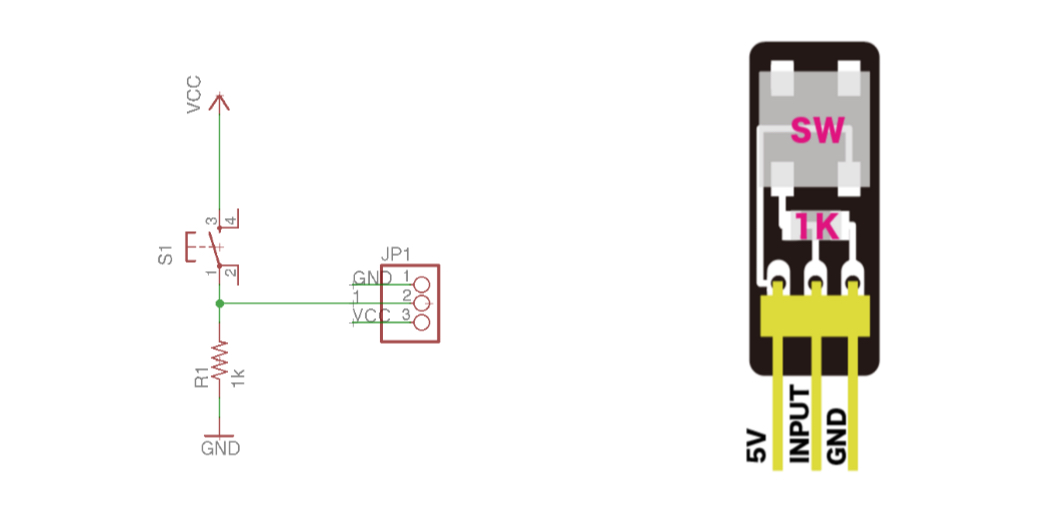
- D. switch [INPUT]
- Download : push_button.zip
- push switch ×3 / digikey
- resister 1kΩ ×3 / digikey
- 1×3 pin header ×3 / Akizukidenshi
- acrylic 2mm // for push button
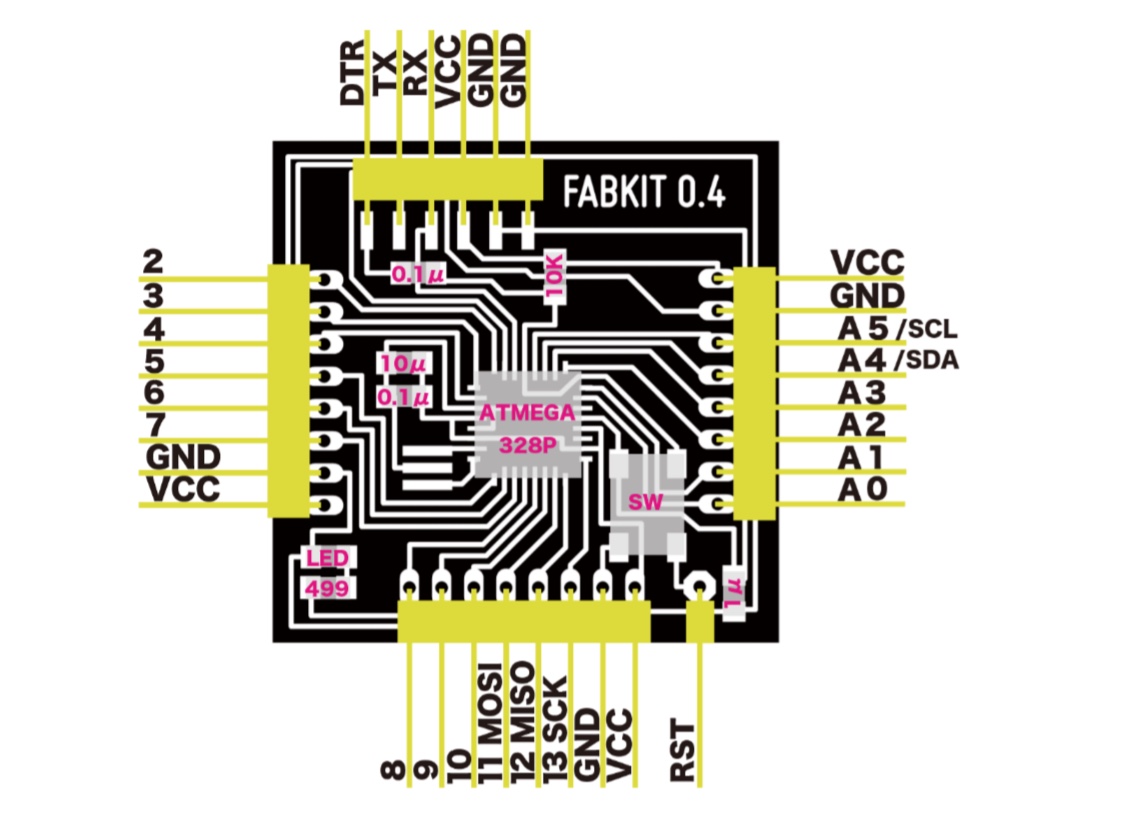
- E. Main board [microcontroller]
- I used FABKIT V4.0 for main board.
- ATMEGA 328p ×1 / digikey
- LED red ×1 /digiley
- resister 499 Ω ×1 /digikey
- resister 10kΩ ×1 /digikey
- capacitor 0.1μF × 2 / digikey
- capacitor 1μF ×1 / digikey
- capacitor 10μF ×1 / digikey
- push switch ×1 / digikey
- Resonator 8Mhz / digikey
- 1×8 pin header ×3 / Akizukidenshi
- 1×6 pin header ×1 / Akizukidenshi
- 1×1 pin header ×1 / Akizukidenshi
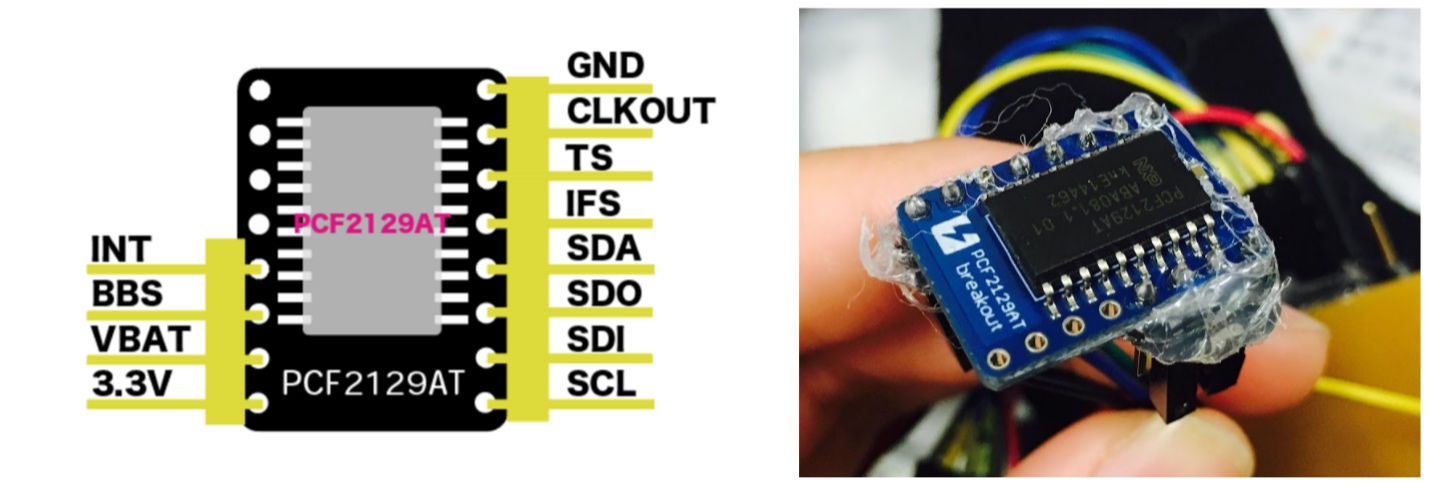
- F. Real Time Clock
- I used PCF2129AT board for measuring the time.
- PCF2129AT board ×1 / switchscience
- resister 1kΩ ×2 /digikey
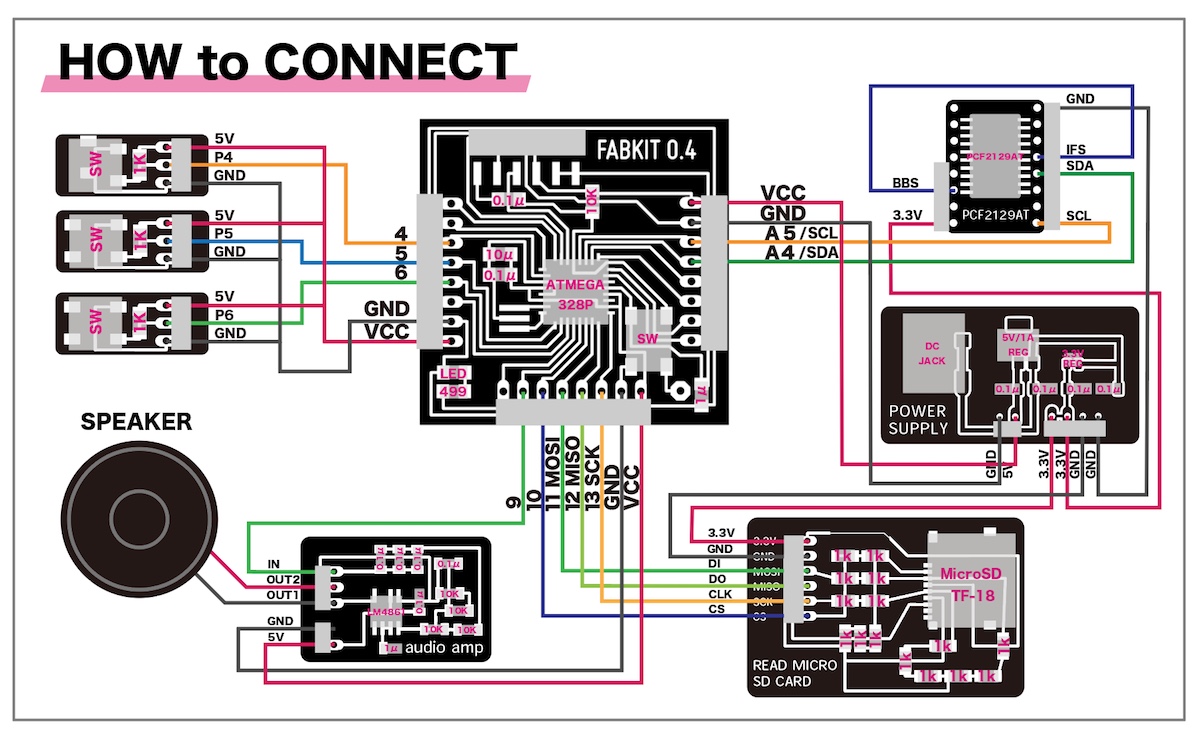
2-2. Connecting boards
2-3. Program
I wrote a program with Arduino IDE. I used three libraries : PCF2129AT / TMRpcm / SD.
Download :
program.zip
         /*
        otsu_clock!!!!!!!!
        Arduino 1.6.9
        Library - PCF2129AT/TMRpcm
         */
        #include "Wire.h"
        #include "PCF2129AT.h"
        #include "SD.h"
        #define SD_ChipSelectPin 10
        #include "TMRpcm.h"
        #include "SPI.h"

        PCF2129AT rtc;
        dt_dat dt,dt_alarm;

        TMRpcm tmrpcm;

        int pH;
        int swA = 4; // push button pin number
        int swB = 5;
        int swC = 6;

        void setup()
        {
            pinMode(swA, INPUT); // push button I/O setting
            pinMode(swB, INPUT);
            pinMode(swC, INPUT);

            tmrpcm.speakerPin = 9; // speaker

            Serial.begin(9600);

            Wire.begin();
            rtc.init();

            Serial.println("PC2129AT Sample Program");

            dt.h = 13; //   set starting time : hour,month,second
            dt.m = 8;
            dt.s = 50;
            rtc.setDate(&dt);
            rtc.setAlarm(&dt_alarm);

            pH = dt.h;

            if (!SD.begin(SD_ChipSelectPin)) {
            Serial.println("SD fail");
            return;
          }
        }

        void loop ()
        {
            rtc.getDate(&dt);

                if(dt.h != pH && dt.h == 9){
                tmrpcm.play("9.wav");
                }else if(dt.h != pH && dt.h == 10){
                tmrpcm.play("10.wav");
                }else if(dt.h != pH && dt.h == 11){
                tmrpcm.play("11.wav");
                }else if(dt.h != pH && dt.h == 12){
                tmrpcm.play("12.wav");
                }else if(dt.h != pH && dt.h == 13){
                tmrpcm.play("13.wav");
                }else if(dt.h != pH && dt.h == 14){
                tmrpcm.play("14.wav");
                }else if(dt.h != pH && dt.h == 15){
                tmrpcm.play("15.wav");
                }else if(dt.h != pH && dt.h == 16){
                tmrpcm.play("16.wav");
                }else if(dt.h != pH && dt.h == 17){
                tmrpcm.play("17.wav");
                }else if(dt.h != pH && dt.h == 18){
                tmrpcm.play("18.wav");
                }else if(dt.h != pH && dt.h == 19){
                tmrpcm.play("19.wav");
                }else if(dt.h != pH && dt.h == 20){
                tmrpcm.play("20.wav");
                }else if(dt.h != pH && dt.h == 21){
                tmrpcm.play("9.wav");
                }else if(dt.h != pH && dt.h == 22){
                tmrpcm.play("10.wav");
                }else if(dt.h != pH && dt.h == 22){
                tmrpcm.play("11.wav");
                }else if(dt.h != pH && dt.h == 22){
                tmrpcm.play("otsu_taiiku.wav");
                }else if(dt.h != pH && dt.h == 23){
                tmrpcm.play("otsu_taiiku.wav");
                }else if(dt.h != pH && dt.h == 24){
                tmrpcm.play("otsu_taiiku.wav");
                }

                if(digitalRead(swA) == HIGH){
                tmrpcm.play("otsu.wav");
                }
                if(digitalRead(swB) == HIGH){
                tmrpcm.play("10.wav");
                }
                if(digitalRead(swC) == HIGH){
                tmrpcm.play("13.wav");
                }

                Serial.print("\t hour :");
                Serial.print(dt.h,DEC);
                Serial.print("\t minutes :");
                Serial.print(dt.m,DEC);
                Serial.print("\t second :");
                Serial.println(dt.s,DEC);
                delay(1000);

                pH = dt.h;
        }
I wrote this program on the main board. Finally, it worked!
2-4. Making S-eel body
- A. Material
- black felt ×1 / 100 yen shop
- cotton ×1 / 100yen shop
- white seal felt ×1 / 100 yen shop
- Snap button ×3 / 100 yen shop
- B. Machine / tool
- Sewing hand tool
- lasercutter
- Sewing machine
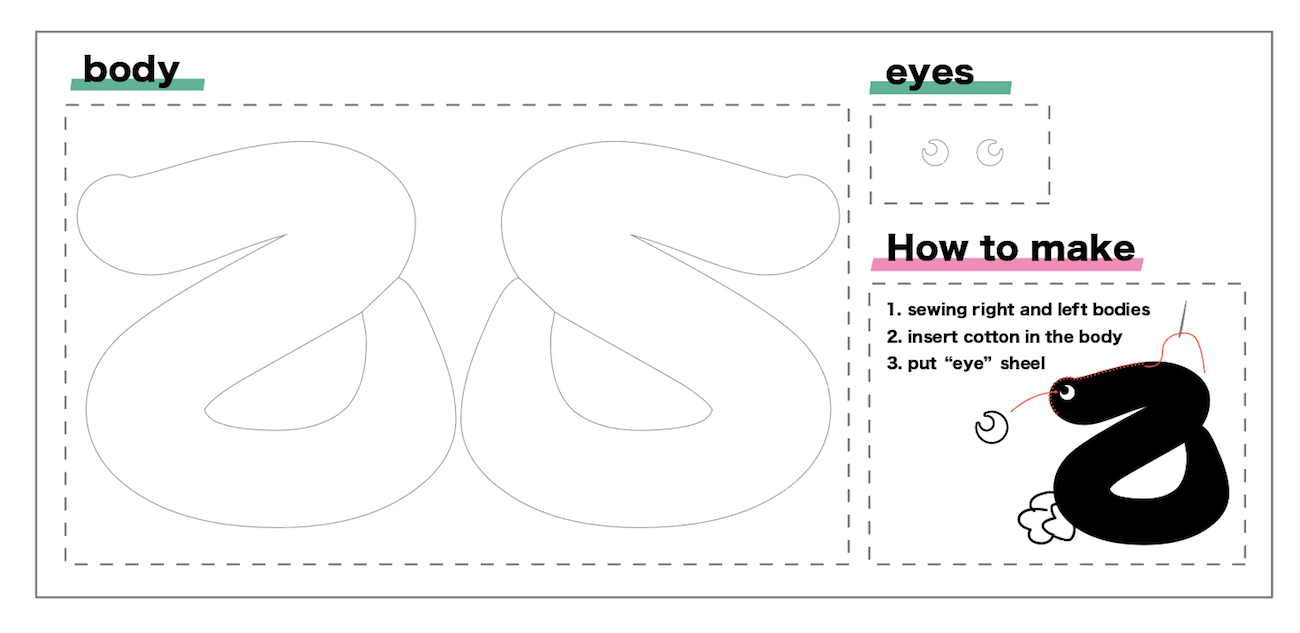
- Download : s-eel.ai
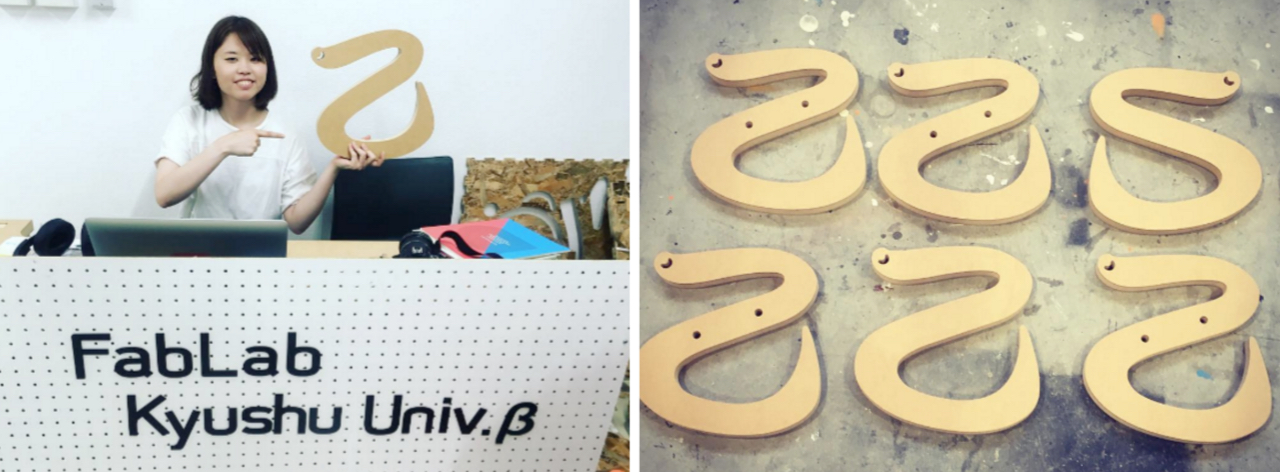
I lasercut body and eyes parts with trotec speedy300 80W.
In felt 1mm, laser cutter setting is power 30% speed 4.2%. In seal felt 1mm, power 30% speed 1%.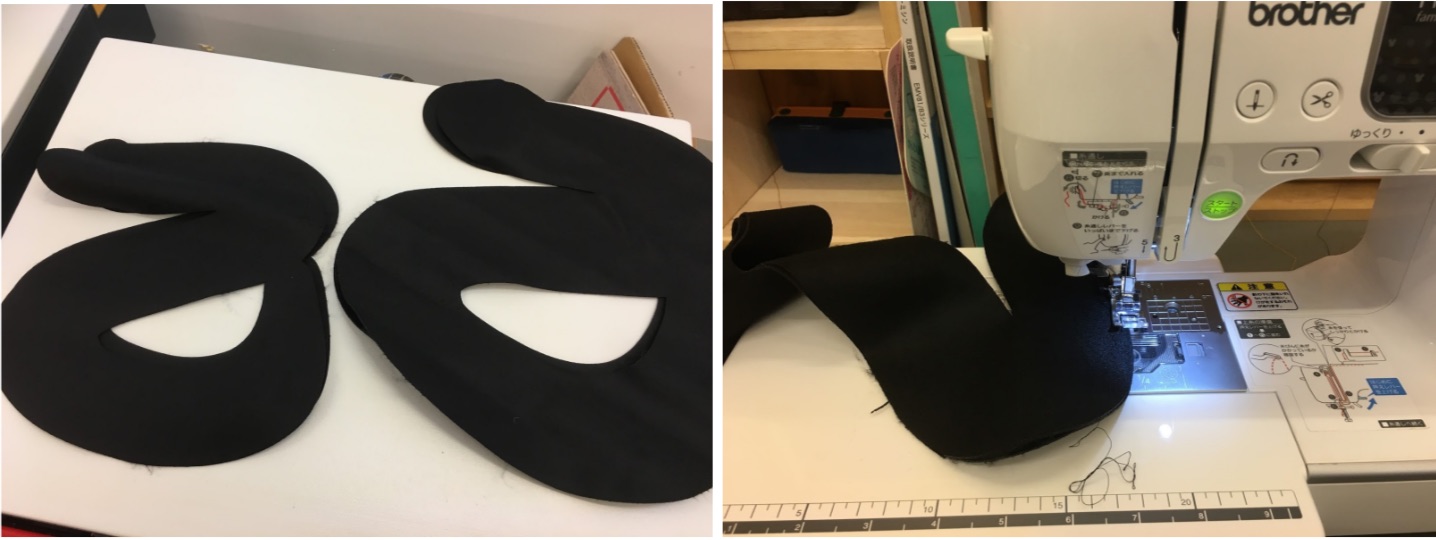
Then, I sewed left and right body with sewing machine.
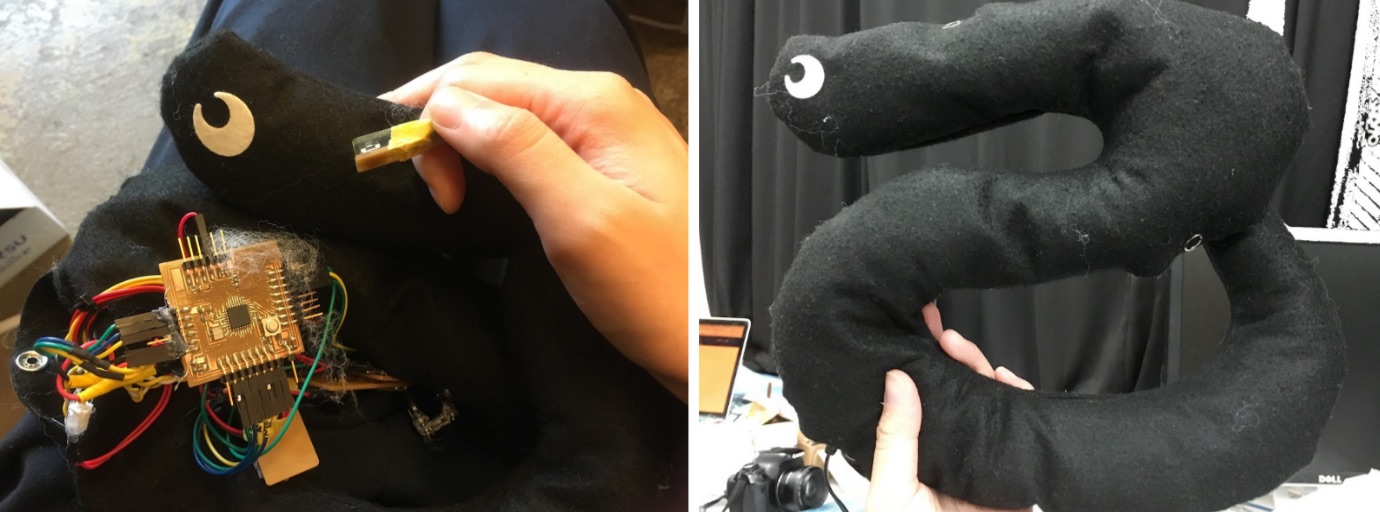
2-5. Assemble
I inserted boards and speaker into the s-eel body with cotton. Then I finished!
3. Movie & poster