3D-printing design rules
Testing the design rules of our printers in Fablab-Barcelona
BCN3D

We've downloaded a standard test on Thingiverse and printed one. We discussed several points to look for when printing and how to solve some of the problems. This is the test list and what we can conclude from it:
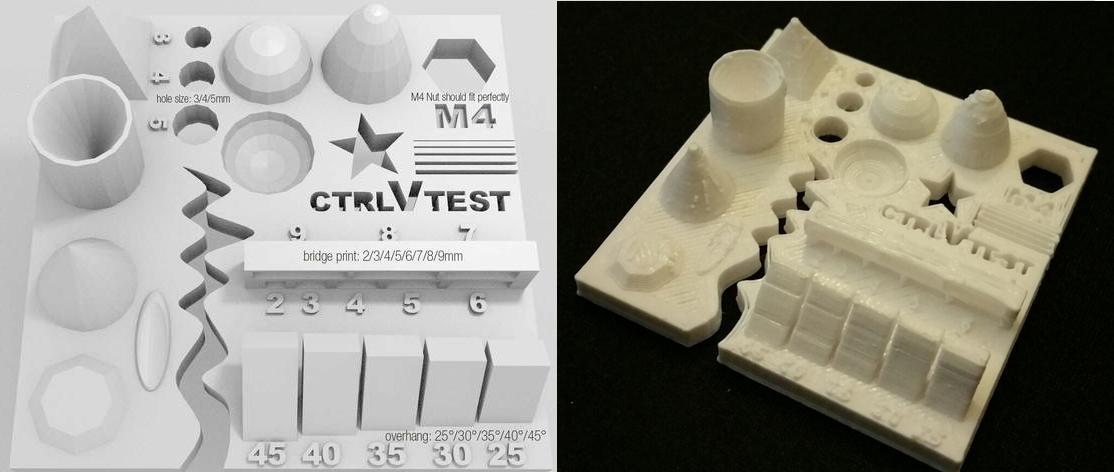
- Size: the object is 4 x 50 x 50 mm (baseplate) — measure with a caliper
- Hole size: 3 holes (3/4/5mm) — measure with a caliper/drill
- Nut size: M4 nut should fit perfectly — insert an M4 nut; it should need a little pressure
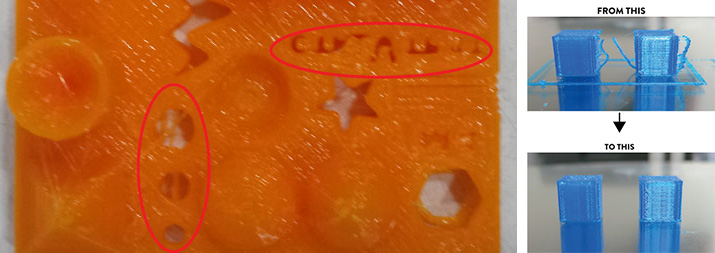
- Fine details: pyramid, cone, all numbers — check if all things look nice and smooth
- Rounded print: wave, half sphere — check if all things look nice and smooth (not every printer handles round things similar, e.g, it will be split in polygons) see here for more details
- Minimum distance between walls: 0.1/0.2/0.3/0.4/0.5 mm — depending on your nozzle size and slicer settings you will get different results
- Overhang: 25°/30°/35°/40°/45° — depending on printed material/cooling, these will not be as seen on the rendering provided
- Flatness: all flat areas — these should be flat with no gaps
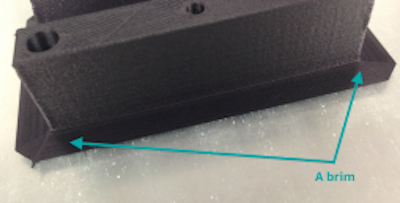
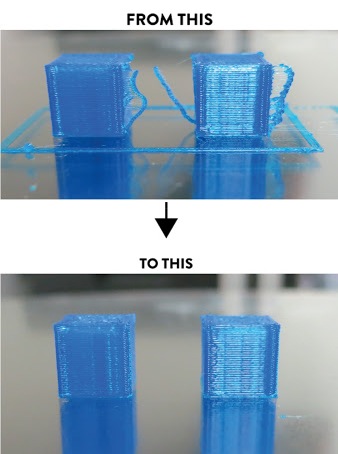
Warping:
When the corners of the print start to bend. Here are a couple of the methods to reduce the warping effect

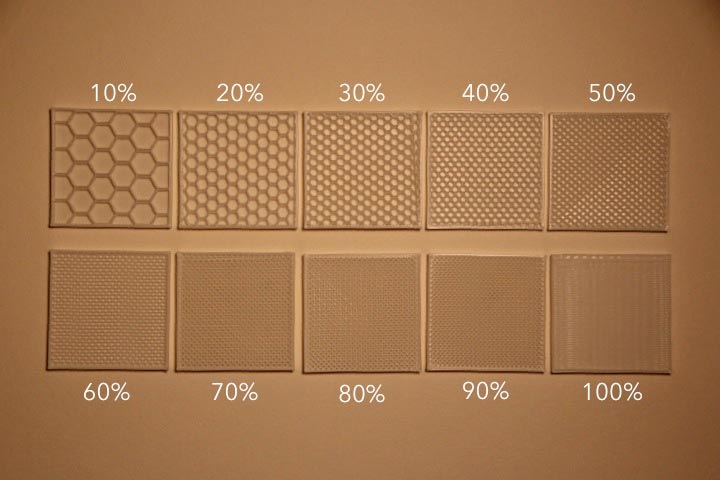
- Reducing the in fill(different sizes and patterns) the less dense the model gets (Choose different sizes and patterns, the hexagonal ones take longer not recommended)
- Reduce wall thickness
- Create pads int he corners of your model
- Brim - good to maintain the model on bed
- Raft - only good for model ta touch little the bed
- Heat platform of printer
- Hairspray is very good to stick models in the printers bed especially heated ones (take glass and spray, good for 5 prints)


Retraction Fail:

If the top exmple is happening you have to change the retraction settings of your printer.
Formbytes

We used this test (below), but we did it wrong because we scaled the model, do not scale the model:
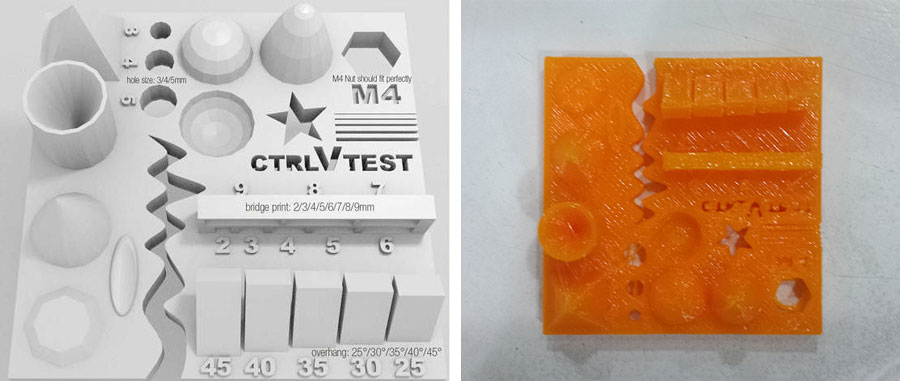
The printer settings should be set to its lowest possible layer height (0.1 mm in most cases), with an infill of approximately 33%, in order to ensure that all the details come out correctly. Once the object has finished printing, you can check to make sure everything is calibrated and working correctly by using the following methods below:
Size: the object is 4 x 50 x 50 mm (baseplate) - measure with a caliper
Hole size: 3 holes (3/4/5mm) - measure with a caliper/drill
Nut size: M4 nut should fit perfectly - insert an M4 nut; it should need a little pressure Fine details: pyramid, cone, all numbers - check if all things look nice and smooth
Rounded print: wave, half sphere - check if all things look nice and smooth
Minimum distance between walls: 0.1/0.2/0.3/0.4/0.5 mm - depending on your nozzle size and slicer settings you will get different results
Overhang: 25°/30°/35°/40°/45° - depending on printed material/cooling, these will not be as seen on the rendering provided
Flatness: all flat areas - these should be flat with no gaps
Dowload test
PROBLEMS WITH THE PRINTING TEST (besides the scale):
Warping, how to avoid it:
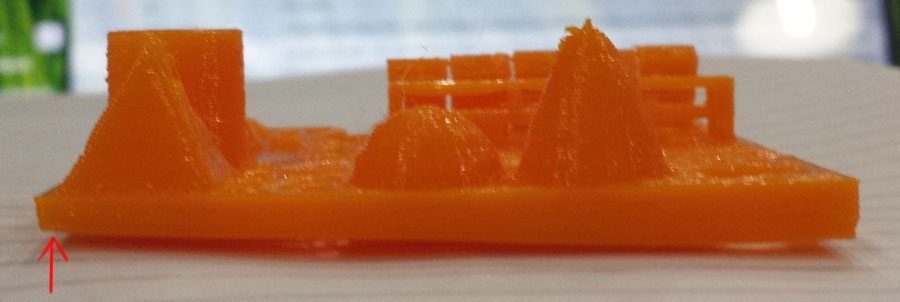
* Layer hight (recommended 0.2 or 0.3)
* Fill density (recommended 15%, 20% or 25% depending on the piece)

* Add brim, printing spots, raft (in case the piece has few points of contact) or something manually as little horizontal lines, other option is heating the space or the platform, so that the piece doesn't cool down so quickly.
* Retraction (recommended minimum travel 1.5mm).
* We sent the model from cura to the Formbytes, but the origins are not the same, if the piece is not symmetrical you have to rotate it.
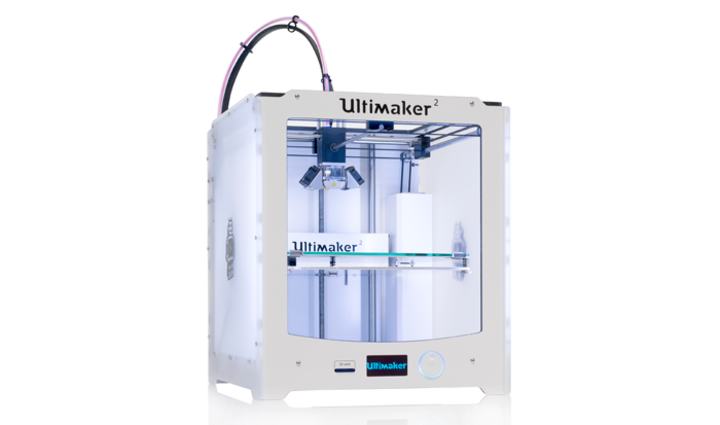
Ultimaker2
Before priliminary print a Test sample was made. This is to check various paramers such as hole size, nut size, fine details, rounded prints, minimum distances, overhangs and flatness. The printing test had some warping; this could be avoided through adjusting layer height(recommended .2 or .3); fill density (recomended 15%-25% depending on the piece); adding brim, print spots (can be done manually on 3d) or in extreme cases rafting (not suggested)
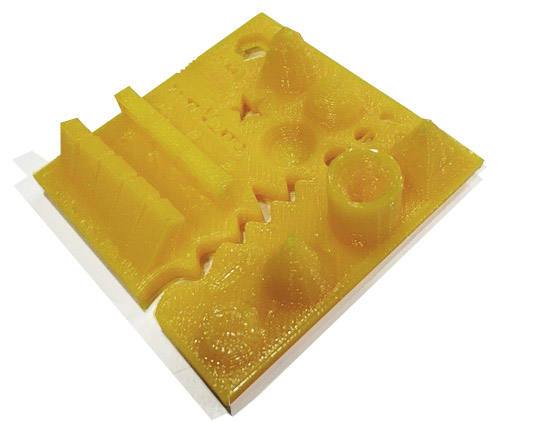
We used a standart 3D printing test piece from thingyverse. The printer settings should be set to its lowest possible leyer height (0.1 mm in most cases), with an infill of approximately 33%. This ensures details to come out nicely.
Methods to test finished 3D printed object:
* Size: the object is 4 x 50 x 50 mm ( the size of the baseplate) — measure with a caliper/drill
* Hole size: 3 holes (3/4/5mm) (control measure with caliper or drill)
* Nut size: M4 nut should fit perfectly — insert an M4 nut; it should need a little pressure
* Fine details: pyramid, cone, all numbers — check if all things look nice and smooth
* Rounded print: wave, half sphere — check if all things look nice and smooth
* Minimum distance between walls: 0.1/0.2/0.3/0.4/0.5 mm — depending on nozzle size and slicer settings you will get different results
* Overhang: 25°/30°/35°/40°/45° — depending on printed material/cooling, these will not be as seen on the rendering provided
* Flatness: all flat areas — these should be flat with no gaps

Common 3D Printing Problems
1) Warping: When the corners of the print start to bend.
Methods to reduce the warping effect:
* Reducing the in fill(different sizes and patterns) the less dense the model gets (Choose different sizes and patterns, the hexagonal ones take longer not recommended)
* Reduce wall thickness
* Create pads in the corners of your model
* Brim - good to maintain the model on bed
* Raft - only good for model ta touch little the bed
* Heat platform of printer
* Hairspray
2)Retraction Fail: need to change retraction settings of the printer
 Material
Filament Material
PLA
Temperature
190~220
Filament Colors
Yellow, Green, Orange, Gray
Filament diameter
1.75mm
Material
Filament Material
PLA
Temperature
190~220
Filament Colors
Yellow, Green, Orange, Gray
Filament diameter
1.75mm
All in One Test Sample
- File
- About
- Check Lists
| Size: the object is 4 x 50 x 50 mm (baseplate) | Measure with a caliper |
| Hole size: 3 holes (3/4/5mm) | measure with a caliper/drill |
| Nut size: M4 nut should fit perfectly | insert an M4 nut; it should need a little pressure |
| Fine details: pyramid, cone, all numbers | check if all things look nice and smooth |
| Rounded print: wave, half sphere | check if all things look nice and smooth (not every printer handles round things similar, e.g, it will be split in polygons) |
| Minimum distance between walls: 0.1/0.2/0.3/0.4/0.5 mm | depending on your nozzle size and slicer settings you will get different results |
| Overhang: 25°/30°/35°/40°/45° | depending on printed material/cooling, these will not be as seen on the rendering provided |
| Flatness: all flat areas | these should be flat with no gaps |
Test Probes
- Technical Performance
- Heatbed temperature ~200
- Print speed ~50mm/s
- Cooling pan ~good
- Strain relief (wires) ~no wire pinch points
- Thermocouples well attached to Hot end ~fair
- Thermocouple well attached to Heated Bed ~good
- Expression Issues
- Flateness ~bad
- Axis ~mirrored (setting required when texts are supposed to be printed)
- Text, numbers ~hard to read
- Fine details: Pyramid, cone ~fair (tip point is clumsy)
- Rounded print: Wave, half sphere ~good
- Bridging:2/3/4/5/6/7/8/9mm ~good
- Overhangs: 25/30/35/40/45 ~good
- Calibrating
- Object Size (4x50x50mm) ~(_/50x50mm)
- Hole size (3.0/4.0/5.0mm) ~ (3.1/4.7/4.9mmm)
- Nut size ~M4 fits
Testing Andys printers
I have 3 craftbots from Hungary

1 Uli2go from the Netherlands 
one Kiwi3D from Italy
and 3 Micos from the US in my lab.

I already spend quite some testing the limits of these printers.
For this assignment I downloaded a test from Thingiverse to test the limitations of my printers.
The test piece from Vctrl takes about 1:30 to print and includes 30 test.

Testing the CraftBot+ vs Ulti2go
The white piece was green piece was printed on the Craftbot+ and the white one on the Ulti2go.
- 01 Nut, Size M4 Nut should fit perfectly
It fits but I had to push it in a bit hard. It seems to fit a bit better at the Ulti2go piece.
- 02 Wave, rounded print
They waves are very round at the Ulti2go piece but do not look so good with the Craftbot+.
- 03 Star, Sharp Edges
They are both sharp. The Ulti2go piece look a little bit sharper.
- 04 Name, Complex Shapes
Looks good at both pieces.
- 05 Holes, Size 3, 4, 5 mm
Ulti2go: 2,72 mm / 3,66 mm / 4,84 mm Craftbot+: 2,32 mm / 3,44 mm / 4,62 mm
- 06 minimal Distance: 0.1, 0.2, 0.3, 0.4, 0.5, 0.6, 0.7 mm
Looks that the Ulti2go can print with more detail.
- 07 Z height: 0.1, 0.2, 0.3, 0.4, 0.5, 0.6, 0.7, 0.8, 0.9, 1.0, 1.1 mm
Looks that the Ulti2go can also print with more detail in the z-axis.
- 08 Wall Thickness: 0.1, 0.2, 0.3, 0.4, 0.5, 0.6, 0.7 mm
- 09 Bridge Print: 2, 4, 8, 16 mm
They both do not look that great.
- 10 Sphere, Rounded Print 4.8mm height
Both look good.
Ulti2go: 4,85 mm Craftbot+: 4,86 mm
11 Sphere Mix, 7 mm height
12 Pyramide, 7 mm height
Both look good.
Ulti2go: 6,9 mm Craftbot+: 6,67 mm
- 13 Overhang: 25, 30, 35, 40, 45, 50, 55, 60, 65, 70°
Both overhangs look good. Just the Ulti2go a bit better.
- 14 Warp, does it bend?
Both bend and both have problems on the very top. The Craftbot has a bit more problems in the middle.
- 15 3D Print Font, optimized for 3D printing
It looks a bit sharper withe the Ulti2go.
- 16 Surface, Flatness
Yes both pieces are flat.
- 17 Size, 100 x 100mm x 23.83 (10mm width)
Ulti2go: 92,5 x 92,1 Craftbot+: 92 x 92,12
- 18 Spike, minimum Layer Time, 21 mm height from Bottom (include Baseplate)
Not quite 21mm. The top looks better at the Ulti2go.
Ulti2go: 16,93 Craftbot+: 17,82 mm
- 19 Hole in Wall, 4 mm diameter, check for proper print
At both pieces the top is not round.
Ulti2go: 3,96 mm Craftbot+: 4,3 mm
- 20 Raft Test, raft should be just under the model
Raft are both good. I just made it too thick at the craftbot.
- 21 Retract Travel, check retract settings for longer travel
