Sander van Vliet
Fabacademy2016
@Fablab Amsterdam
Principles and Practices, Project Management
Week 1 (27 January - 3 February)
Fabacademy 2016 has started!
Although I have been in Fablab Amsterdam before, it is exciting to be here today. I am part of a group of seven students who will do the Fabacademy here in Fablab Amsterdam. After we met Emma Pareschi, who is the coordinator and also our instructor for several assignments, we introduced ourselves and in short expressed what we each expect from the course or which assignment seems to be the biggest challenge. I found it nice to see with whom I will go through this the coming months!
Lecture
At 15:00 we joined the video conference system which connected us to all participating Fablabs around the globe. We had a lecture from Neil Gershenfeld (Director and professor at The center for Bits and Atoms at MIT) in two parts:
- What is the origin of Fabacademy and how did the network of Fablabs originate and develop and a lot of interesting information on the development and application of digital fabrication in general
- Version control software, web development and project management principles, in preparation of our first assignments to complete this week:
Assignment part 1
Build a personal web site describing you and your final project and
upload it to the class archive. Do a git tutorial.
(For assignment part 2, please scroll down to see how I planned and sketched a potential semester project during this first week.)
HTML editing
I had done some HTML editing a long time ago and followed the Codecademy HTML&CSS course a few months ago to prepare myself for Fabacademy. I installed Komodo Edit on my laptop and started to write some basic HTML to start build a site. At home I continued on my desktop computer and got a tip to try out Brackets, yet another open source text editor which also has handy functions that saves you time and hassle. I prefer Brackets over Komodo Edit because of a few of those handy functions like getting the html pages as an option to click when creating a link / a href, instead of having to type the full names.
Other sources I used are:
Using GIT and the Repository
Another tool we will be using is GIT, a version control tool which stores the data of multiple users working on the same
project. In this case, the project in GIT will be the web sites of the Fablab Amsterdam students. GIT stores all previous file versions which is practical for development projects. During the local lesson on
Webpage Development we were instructed how to configure and use GIT from the command line. I have a Windows laptop so I
used GIT Bash. Basically these were the steps I had to take:
- create a SSH key for for my laptop for connecting securely to the GIT environment. Command: ssh-keygen -t rsa -b 4096 -C "snader@xs4all.nl"
- Show the contents of the file. Command: cat ~/.ssh/id_rsa.pub
- Copy the complete key starting with ssh-rsa and ending with your username and host. Command: sudo apt-get install xclip -y and then xclip -sel clip < ~/.ssh/id_rsa.pub
- Then we created an account at http://fablabs.io so Emma could activate that account on
http://git.fabacademy.org/fabacademy2016/
- Next step was copying the contents of the SSH key (filename id_rsa.pub) to my profile on git.fabacademy.org so the
connection requests from my laptop will be authorized and trusted.
- Then I needed to create the repository in a local folder on my laptop. Command: git clone git@git.fabacademy.org:fabacademy2016/fablabamsterdam.git
- For Git to register my details to every commit I do, my e-mail address and name should be configured. Command: git config --
global user.name 'Sander van Vliet' and
git config --global user.email snader@xs4all.nl
- In the Students folder I created a folder for my project. Command mkdir 21 (that's my student nr)
- And then I copied the whole repository containing all the Fablab Amsterdam students' website's and files to this folder
so I now have an exact clone of the online one stored locally. Command: git pull
- And the first file created there was index.html. Command: touch index.html
- After editing the file a bit in Komodo Edit I uploaded it to the online repository:
- Add index.html to all the files that Git is keeping track of. Command: git add index.html (or just "git add" which
means add all files in the folder which have not been added yet)
- Confirm the changes done in the file. Command: git commit -am ' like "added index.html"' (check Gitref.org to see all Git commands and the possible options and switches.
- See what files have been changed. Command: git status
- Update my local repository with any changes done by other students using this repository. Command: git pull
- Update the online repository with the file(s) that I have edited and committed. Command: git push
So far so good. Until I went home and tried to do it all over so I would be able to use Git from my desktop pc as well. Also by going through the process again it would be a check to see if I knew how to set it up without any assistence. I was looking for the right commands and believed to remember that we used the "git init" command. This created a new repository next to one we are supposed to use! I did not know if this had negative consequences because I was not so familiar with Git yet. Next to the fabacademy repository now there was another repository visible named Snader / Site. I tried finding out how I could remove it again and what the implications were. Also looked on http://git.fabacademy.org but was still unsure and decided that I would wait and ask our instructor Ivo de Kler. At a support session he explained that the repository had not even been visible for other people and that I could just remove it quite easily in the Gitlab interface. I had looked there, but now I saw that I missed just a little thing (stress?!) and that's why I wasn't able to remove it myself.
Assignment part 2
Plan and sketch a potential semester project and add it to your website.
An idea involving the carbon dioxide level in my house
The idea for my final project is to design and make a window control / ventilation system responding to CO2 levels (prototype)
See how I eventually developed my final project on this page.
Carbon dioxide level control
A while ago at a friends house I saw his Netatmo weather station. He showed me some of the data which the Netatmo had gathered during that day, like temperature, humidity and also the current level of carbon dioxide (CO2) in his house. He found that to be a bit high and opened a window. This was around 20:00 hrs. An hour Later we viewed the graph again and now the CO2 level had gone down quite a bit. This indicated ventilation of the room.
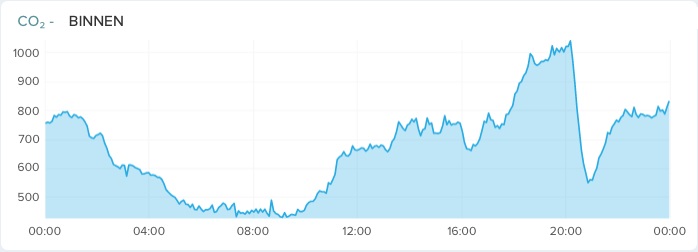 Until then I never had thought about this much but seeing this value go down like this made me aware and think about my own house and what the level of CO2 would be there.
The CO2 level in a house can be used as an indicator for the level of ventilation and it is common knowledge that good ventilation has benefits healthwise. Some info I found about this:
Until then I never had thought about this much but seeing this value go down like this made me aware and think about my own house and what the level of CO2 would be there.
The CO2 level in a house can be used as an indicator for the level of ventilation and it is common knowledge that good ventilation has benefits healthwise. Some info I found about this:
Carbon Dioxide levels and health effect
Benefits of good ventilation
Evaluation Building IAQ and Ventilation with Indoor Carbon Dioxide
Typical ppm values
- Outdoor, CO2 level is always around 400 ppm.
- In an appropriately ventilated room, the CO2 level should remain below 1000 ppm for the upmost comfort.
- In a closed room such as a meeting room with several people or a small bedroom at night, CO2 can easily go past 1000 ppm. (Source)
Window operation based on carbon dioxide level
Because our house which is built in 1938 does not have anything like trickle vents (small ventilation openings integrated into window frames) there is not much ventilation. Ofcourse we open windows to ventilate, but sometimes we forget to do this. Because of this I like the idea that a window would open automatically if the CO2 level in the house rises above a certain value and close again when the CO2 level is below a certain level.
The idea for my final project is to design and make a CO2 dependant window control system.
My design would include a CO2 sensor in the living room. Its data output should be sent via a wireless connection to a control board which controls an actuator of some kind, mounted on the window frame, which can open and close a window.
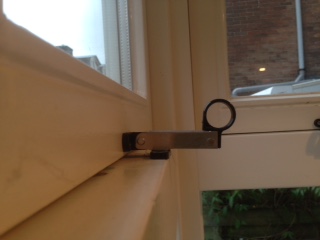
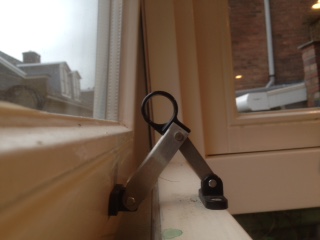
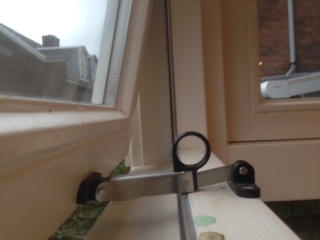
This is the current manual folding window opener we use:
A sketch of how it revolves when opening the window:
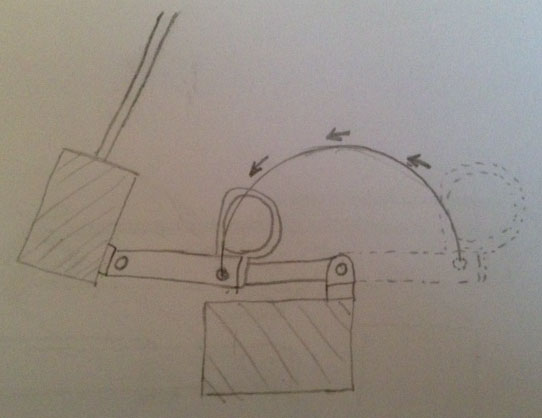
And here is a sketch of a first idea of an automated window control system:
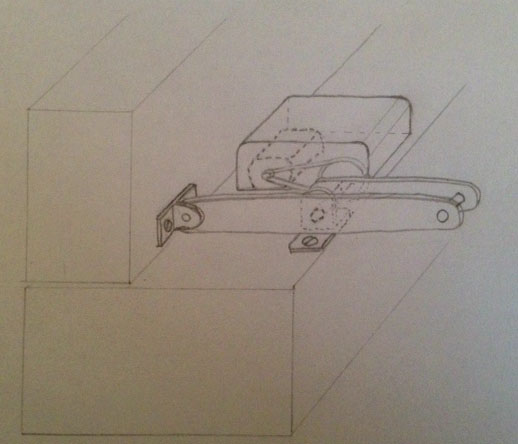
And a panel somewhere in the room which includes a CO2 sensor and as an extra option it could have a led display with the current CO2 value.
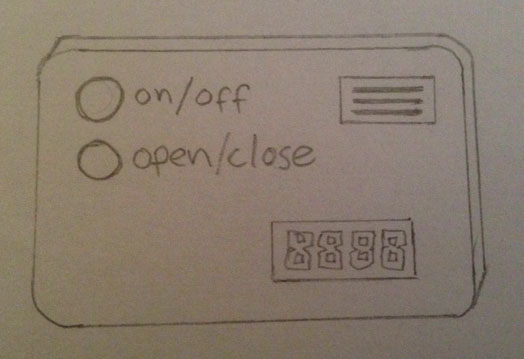
Optional features:
-Open and close functions which put the automatic operation to a halt
-On/Off button
-LCD display in the sensor casing displaying the current CO2 value
-Clock function which keeps the window closed during a set time window
-RF id sensor for switching the system on when you come home and off when you leave the house