This week we discussed computer aided design. The
assignment is to model, and possibly simulate something. As
part of this I will need to try various tools and choose a 2D / 3D
tool chain that I'm happy with. Once again my nemesis this
week was time management, I've spent far too long looking into
different tools rather than just picking one and learning to use
it effectively.
Sketch Book Express: I've
been using Sketch Book Express for the past few weeks as it's free
and works well with the pressure sensitivity of my Wacom tablet. It's great for
doing more artistic conceptual sketches.
GIMP: I've been using GIMP to
re-scale, colour reduce and format convert my images. For
this blog I've re-scaled images to 640x480 and re-saved as
JPEG. If I start to get a large number of similar images I
may investigate 'Image Magic' for the batch processing /
conversion of images.
InkScape: I'll be using
InkScape for 2D vector graphics.
There are a huge number of similar tools available here. To
find one where the workflow fits my design process and the feature
set contains everything I want requires quite a bit of time trying
tools. Ultimately I'm unhappy with my choice of SketchUp
here, at first I thought that it was great but I've since found it
frustrating. As a follow on task I plan to try some of the
other 3D CAD tools over the next couple of weeks.
SketchUp: I've used
SketchUp a few time before and thought that it would be a good
starting point, especially as it's free. However the further
I went with it the more it frustrated me, particularly the way
that it splits of joins faces when I don't want it too and the
lack of built in animation facility.
I've modeled some parts of a simple marble logic gate as an
exploration of the features of SketchUp, .skp file here. This part is
based on this
excellent mechanical clock design.
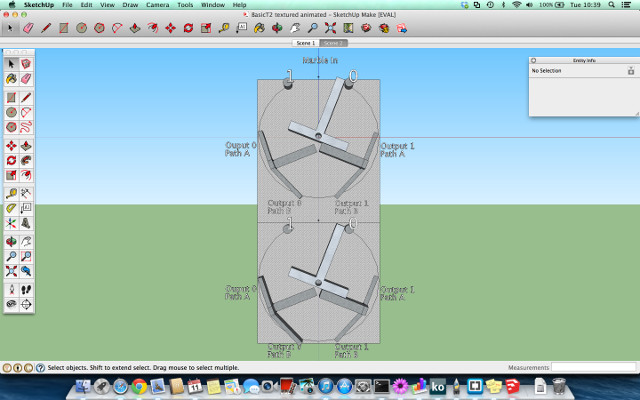
I had planned on animating a marble falling through this set of
gates, however the most recent versions of SketchUp don't have
built in object animation. SketchUp has also cross linked
sections of my mesh that I didn't want it to, meaning that when I
move sections of the design the mesh now becomes distorted.
Kokopelli: I
think that the concepts of hierarchical and parametric design are
absolute musts for any larger design project. Without them
it will become impossible to maintain the design. For this
reason I next tried Kokopelli
. I decided to model the LED cube concept as it is a
replication of identical objects that lends itself nicely to being
parametrized. The .ko file is here.
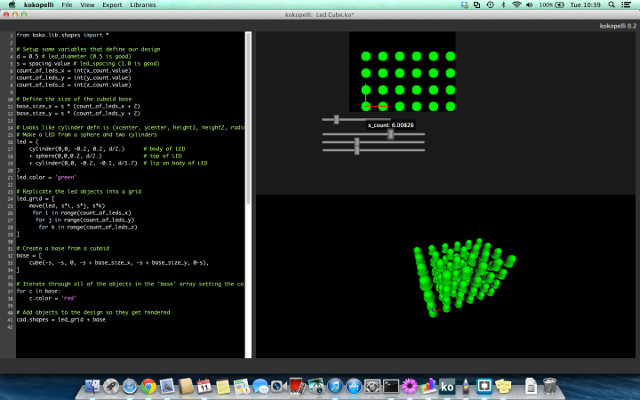
This is a very simple design that just creates an LED shape from
2 cylinders and a sphere and then replicates that into a grid
structure. I've added sliders to control some of the
parameters such as LED spacing and number of LED's in each
direction.
My comments on Kokopelli are:
1) Lack of documentation. I had to pull apart the example
files to work out what the shape definitions were.
2) Error handling. Errors are just reported as 'Math Error
in CAD', it would be nice to at least get a line number for the
error to help debug the design.
3) This model should have a cuboid base, but I haven't yet worked
out why that isn't being displayed.
Antimony: After
my experiences with Kokopelli, I decided to try Antimony. I
needed to instal Qt 4.8 and PySide in order to
get it working. Again lack of documentation meant that I
just had to play with it to work out how to link objects together
etc. I decided to construct a very simple CSG object
representing one of the marble logic gate 'T pieces' used in the
SketchUp model. The .sb file is here.
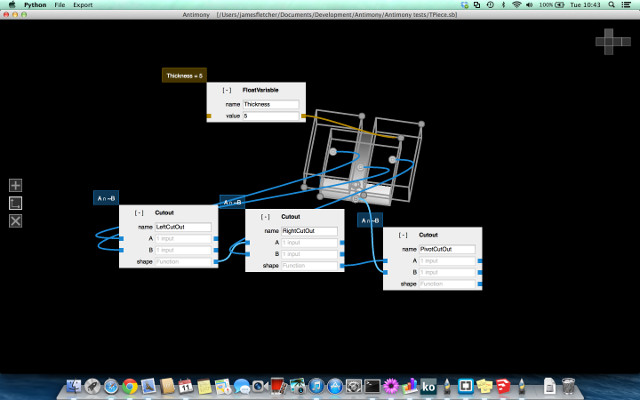
Once you understand Antimony it's very nice to use. I've
added a single variable 'Thickness' that allows you to control the
material thickness of the piece. However this isn't yet
robust as it doesn't control the thickness of the cut-outs.
This could be achieved by either adding a set of 'maths' functions
for variables or by be basing all objects on a scaled piece of
material.
A simple physics simulation of the 'T Piece' marble logic gate
(requires HTML5 and JavaScript). It uses Box2DWeb a simple
game oriented physics engine that is optimised for speed rather
than accuracy.
Currently most of the javascript code (found here) is used to setup
the world, it would be good to be able to import this world setup
directly from CAD files.
Due to my lazyness I didn't get around to setting the initial
angle of the 'TPiece' correctly, so you have to drop the first
marble in to knock it into place.
Whilst a lot more work is required I've discovered from a simulation even as simple as this that the size and shape of the TPiece is quite critical to getting the marble to 'flow' correctly through the system.