Final Project
Video - Final Presentation
Presentation Slide
Presentation Video
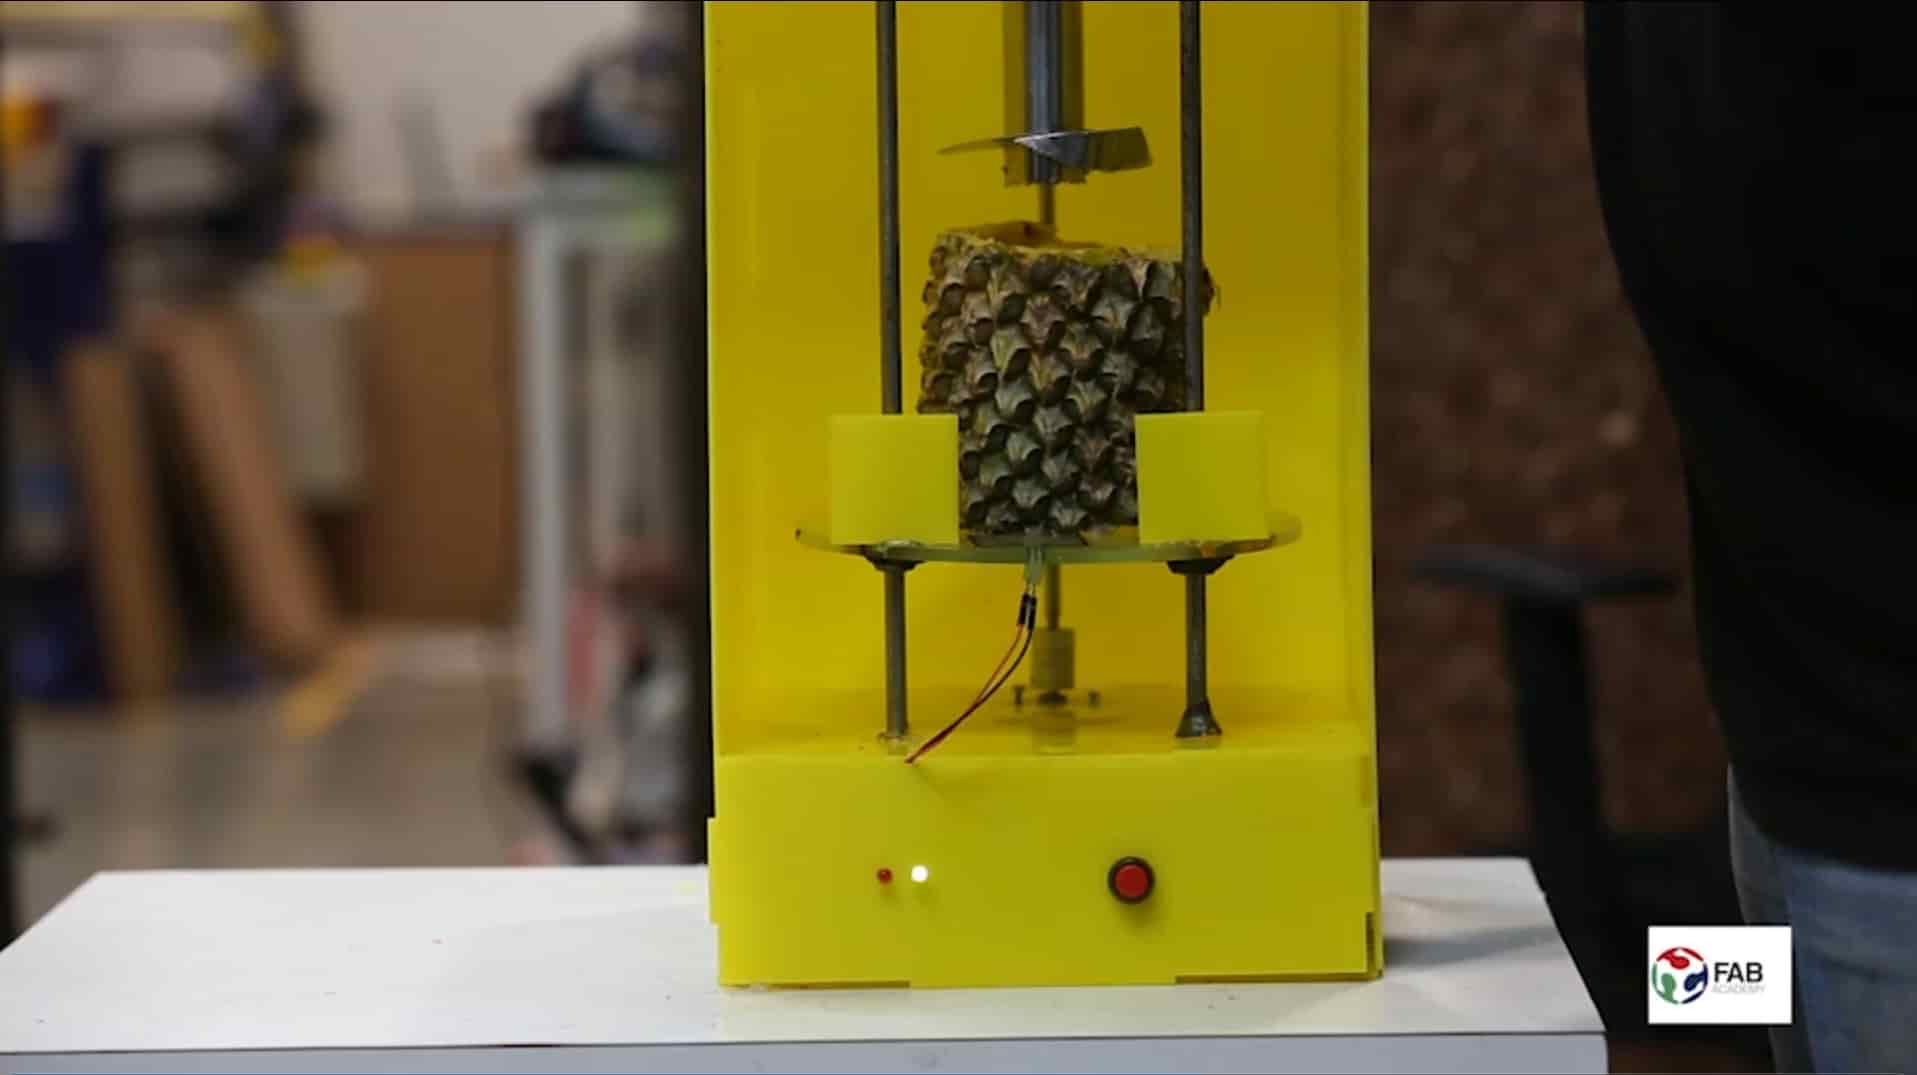
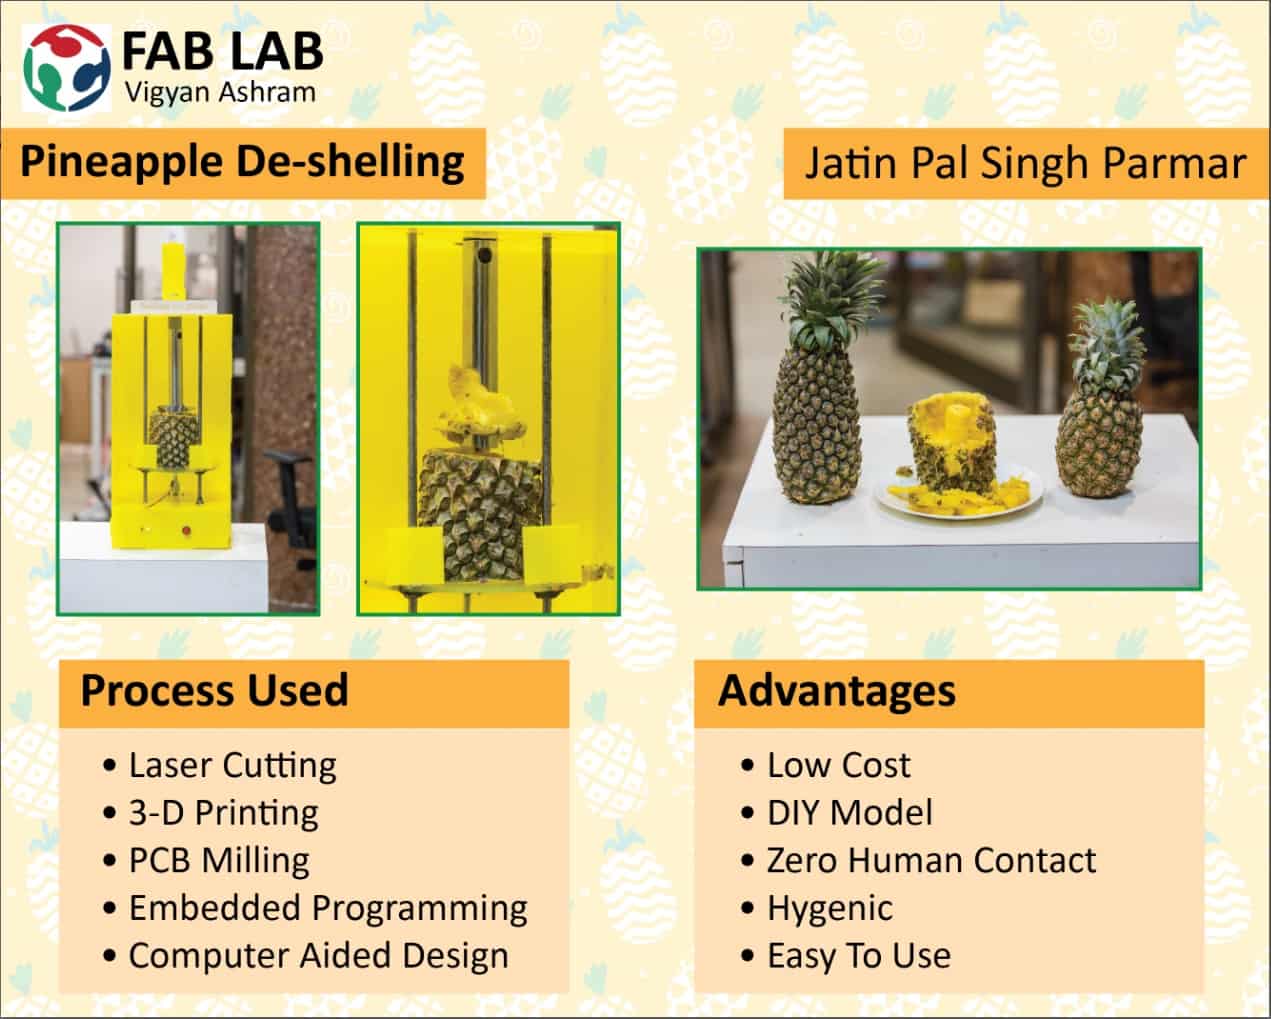
Pineapple De-Sheller
Problem Statement:
Pineapples are huge in demand in market in the form of raw fruit and its by-products. While making its
by-products cutting or removing its outer thick core is the major challenge. Currently there are no such
products or machines in the market to cut pineapples outer skin. Many industries are small and medium scale
which can't afford heavy machines for removing its outer cover.
Solution:
I am planing to make a automised pineapple de-shelling machine which is low cost and very simple to use by
understanding its ergonomics and application . The machine I am planning to design and manufacture will be semi
automatic but efficient.
Introduction:
The pineapple (Ananas comosus) is a tropical plant with an edible multiple fruit consisting of coalesced berries,
also called pineapples, and the most economically significant plant in the Bromeliaceae family. Pineapples may be
cultivated from a crown cutting of the fruit, possibly flowering in 5-10 months and fruiting in the following six
months. Pineapples do not ripen significantly after harvest. Pineapples can be consumed fresh, cooked, juiced, or
preserved. They are found in a wide array of cuisines. In addition to consumption, the pineapple leaves are used
to produce the textile fiber piña in the Philippines, commonly used as the material for the men's barong Tagalog
and women's baro't saya formal wear in the country. The fiber is also used as a component for wallpaper and other
furnishings.
Benefits of Pineapple:
Pineapple have a 131 percent of the daily value of Vitamin C in it. A natural antioxidant, vitamin C is needed
for synthesizing collagen, which is the main structural protein in body for healthy blood vessels, organs, skin
and tissue support.
Despite Pineapple being so nutritional less number of people eat it just because of peeling it is a very tedious
job, but as it is once cut no one can stay away from its delicious taste, that's why most of the people who like
pineapple prefer eating it at some Road side Vendor's stall usually here. So, wont it be good if one can just buy
a pineapple and cut it at home whenever one needs to eat.
After thinking on such things I thought of making a Pineapple De-Shelling Machine which will be low cost, easy
to make, compact, and very handy in operation, which can be used by anyone at home willing to eat pineapple
whenever there want by just peeling the upper skin at this machine.
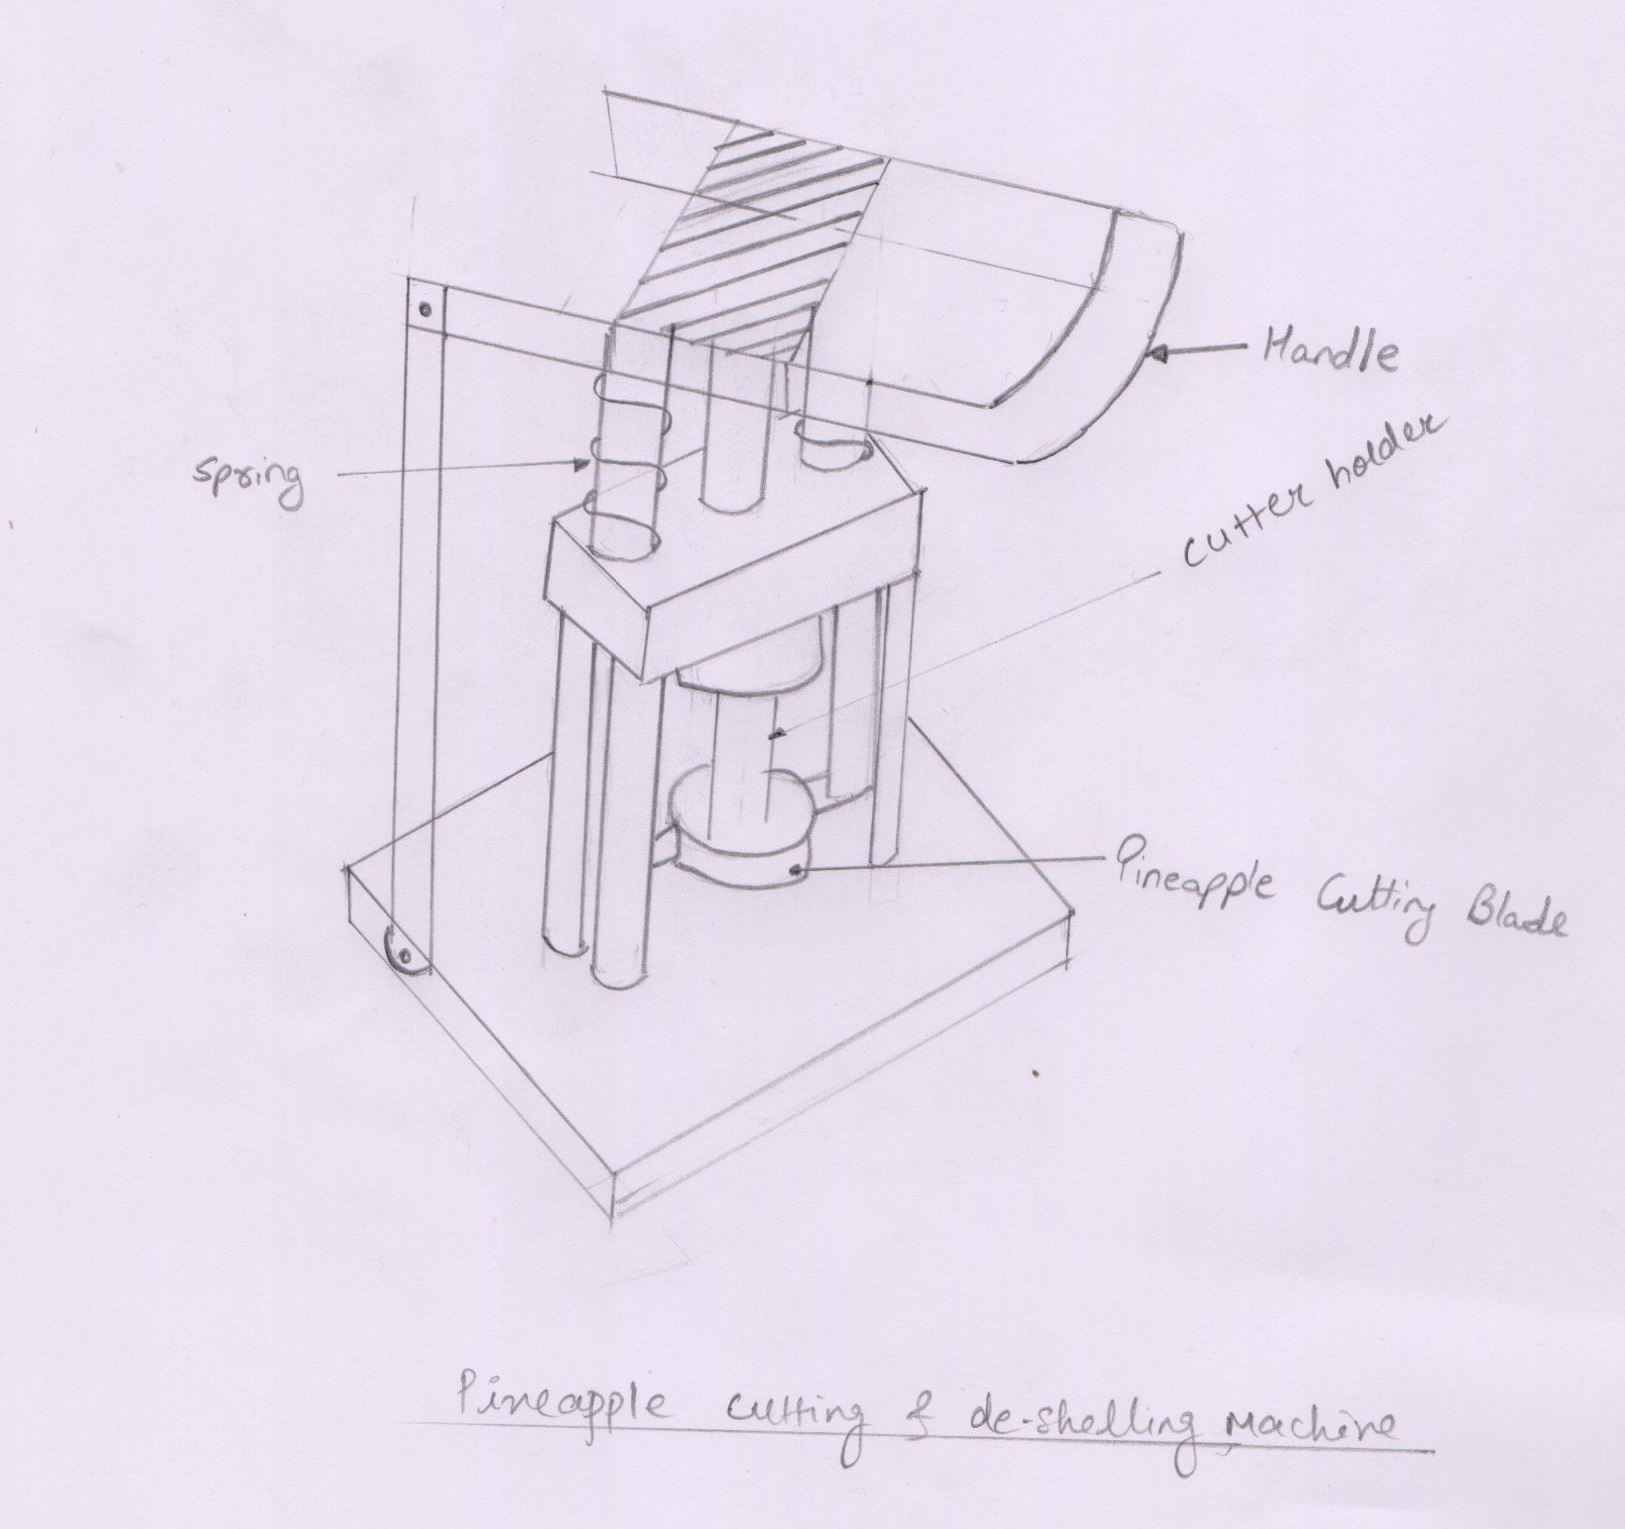
Now coming to the making of the Pineapple De-shelling Machine, I first began with the Rough Design of the
Machine which I made while my First Assignment, and then I made a proper 3D model of that Rough design in CATIA
for Assignment Second. But then after thinking about this project more I was not fully happy with the design so
then I modified the whole design working simultaneously while completing the weekly assignments. Now step-by-step
I will describe the whole Machine and how I made it making use of most of the assignments for completing this
project.
The Major Steps of this Project are:
• Designing
• Cutting and Printing the Parts
• Assembling
• Making the controller
• Programming
• Testing
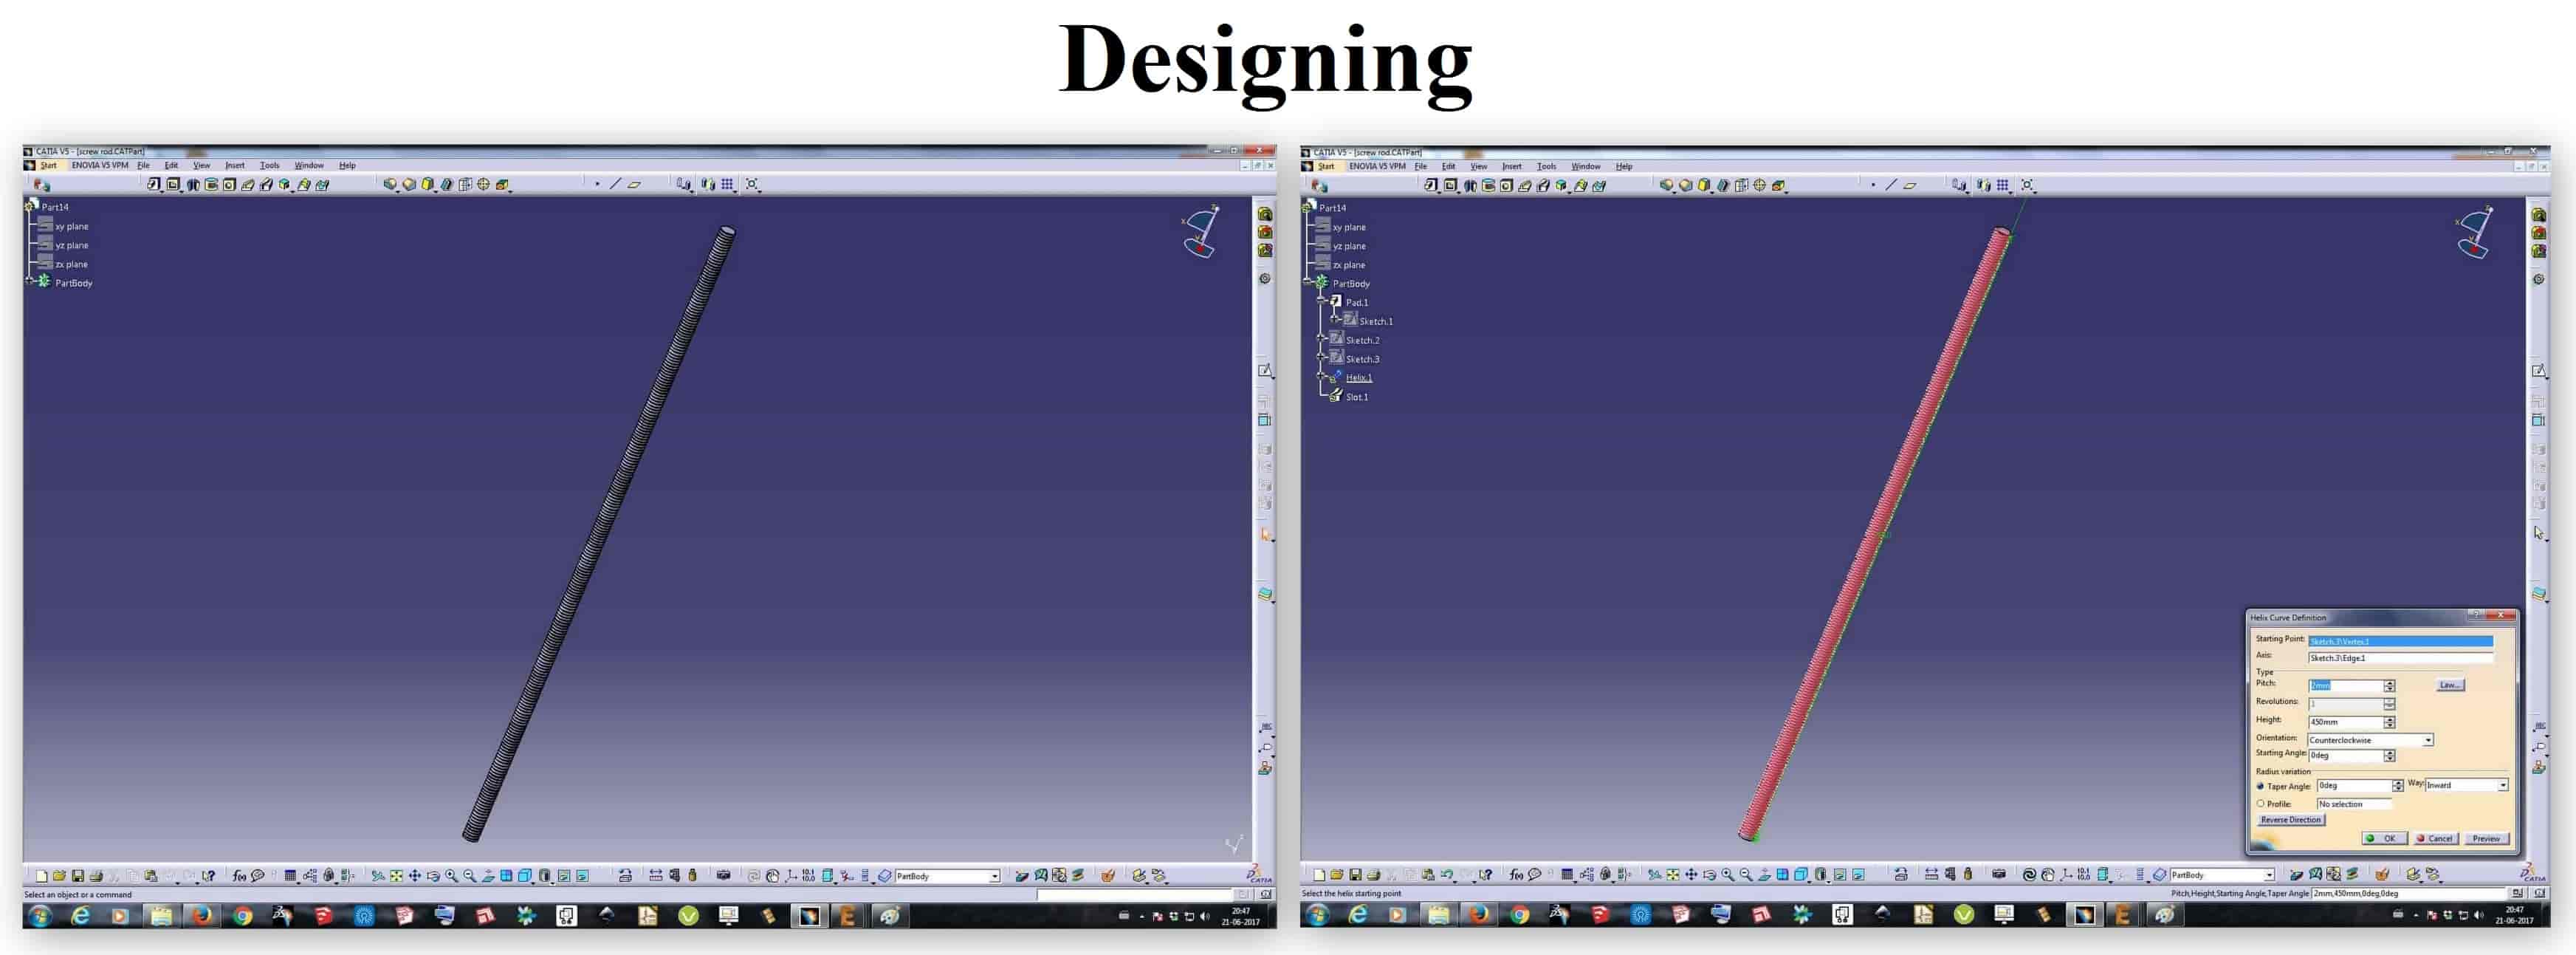
Designing:
I made the rough design of my Machine while doing the Computer Aided Design Assignment, but that design was not
good enough to move on with so I decided to work on the new design of the machine. I used Catia to design the
whole machine, some screenshots of the design are shown below.
Basically I just made the design of only those things what I was going to Laser Cut or 3D Print in my machine.
So I began with the walls of the machine, the total dimension of the machine was been calculated by me taking in
consideration all the major dimensions of the things going to be placed in the machine, like Pineapple, Cutter,
Coupling, Motor, etc. after sorting that all out I started to design the outer body first which I was going to make
out of Acrylic.

I was going to use a stud screw for the up and down movement of bed (also can call it as the Z axis) on which a
round acrylic sheet is going to be mounted which will carry the pineapple on it and will move upward to the cutter.
So as there was going to be a lot of weight on the Bed which will not get supported by just a single Stud Screw so
to overcome that I made a supporter which will be mounted below the bed and will carry the nut on it and the Stud
Screw will be moving through it, allowing the bed to move upward and downward properly.

Final Files to Download:
Design Files in .CAT format
Cutting and Printing the Parts:
After completing the 3D design it was time to convert all the design in various forms so that I can use
different digital fabrication machine's like laser cutter, 3d printer, etc. So, I started with 3D Printing,
I knew there were things in my project that could have not been made subtractively so I converted those 3D
design file from Catia to ".STL" format which is compatible to 3D printing software.

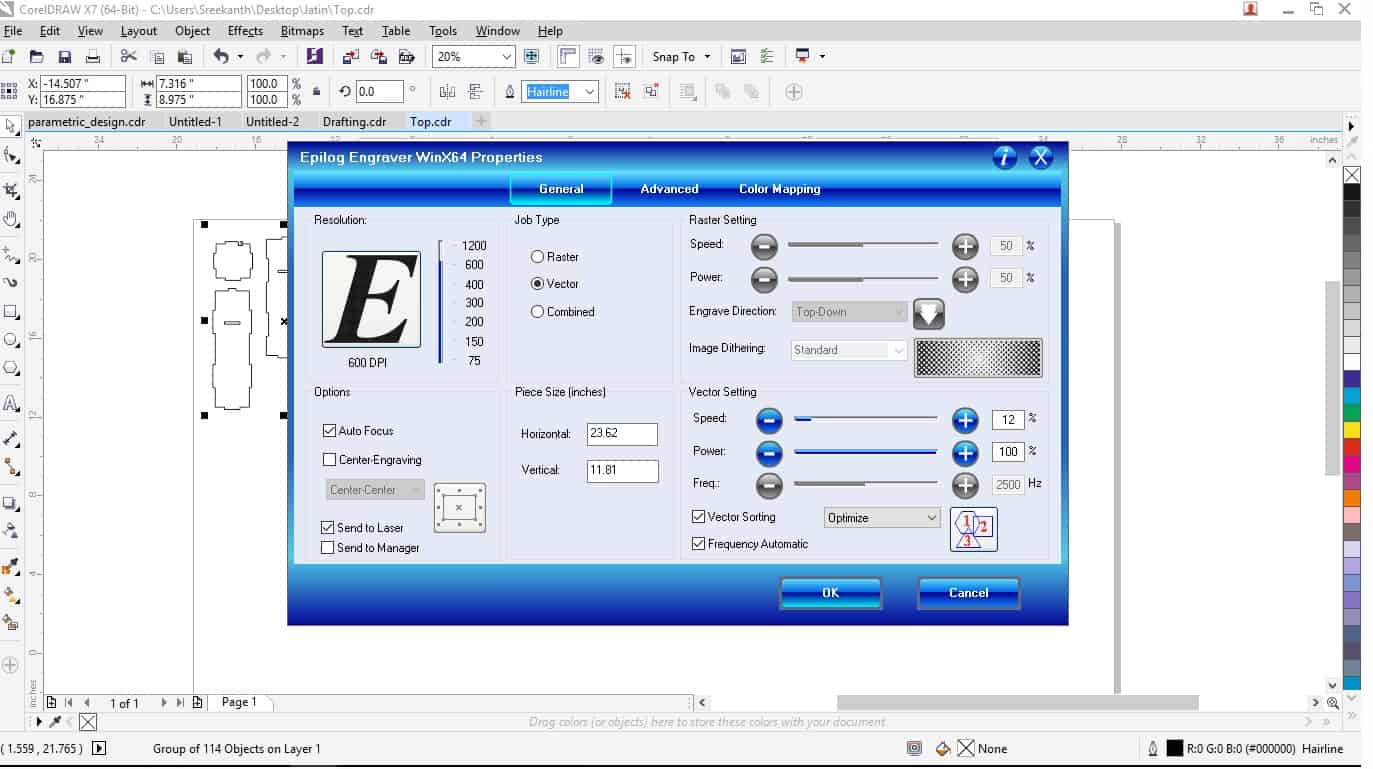
Later as I applied my design for 3D printing I went for all laser cutting stuff, the side walls, top plate, base,
bed, etc. all were going to be laser cut, so again from Catia I converted all my 3D design file to 2D design file as
Laser cutter works with 2D designs, so I converted the file in ".PDF" format and opened it in CoralDraw for Laser
Cutting.


Final Files to Download:
Design Files in .STL and .PDF format
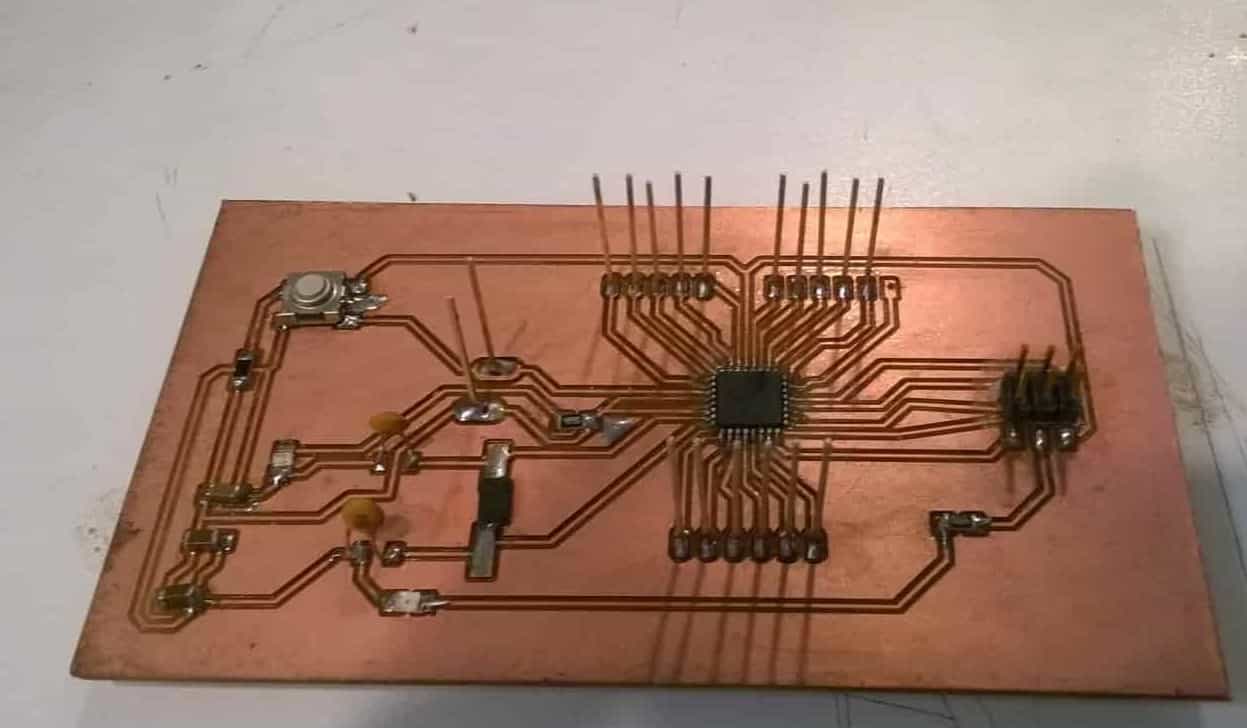
Electronics
There were things like motor, sensor, LEDs, etc which is going to be placed in my Final Machine to make it of
less efforts to use. I was suppose to make a Micro-Controller board to control all the things going on in the
machine from that board. So I decided to use "Atmega 328P AU" as my micro-controller IC as it has more number
of programming pins, this same IC is used in Arduino boards also, so, I can say that made my own Arduino using
this IC.
I started to design the board using the Atmega 328P AU IC, I first went in search of Pin-Out of 328P on google
and then looking at the Pin-Out and with some previous experience of making the boards in earlier assignments I
started designing. I of course also went through the Data Sheet of Atmega 328P AU for better understanding. I used
"Eagle" to design the micro-controller board.


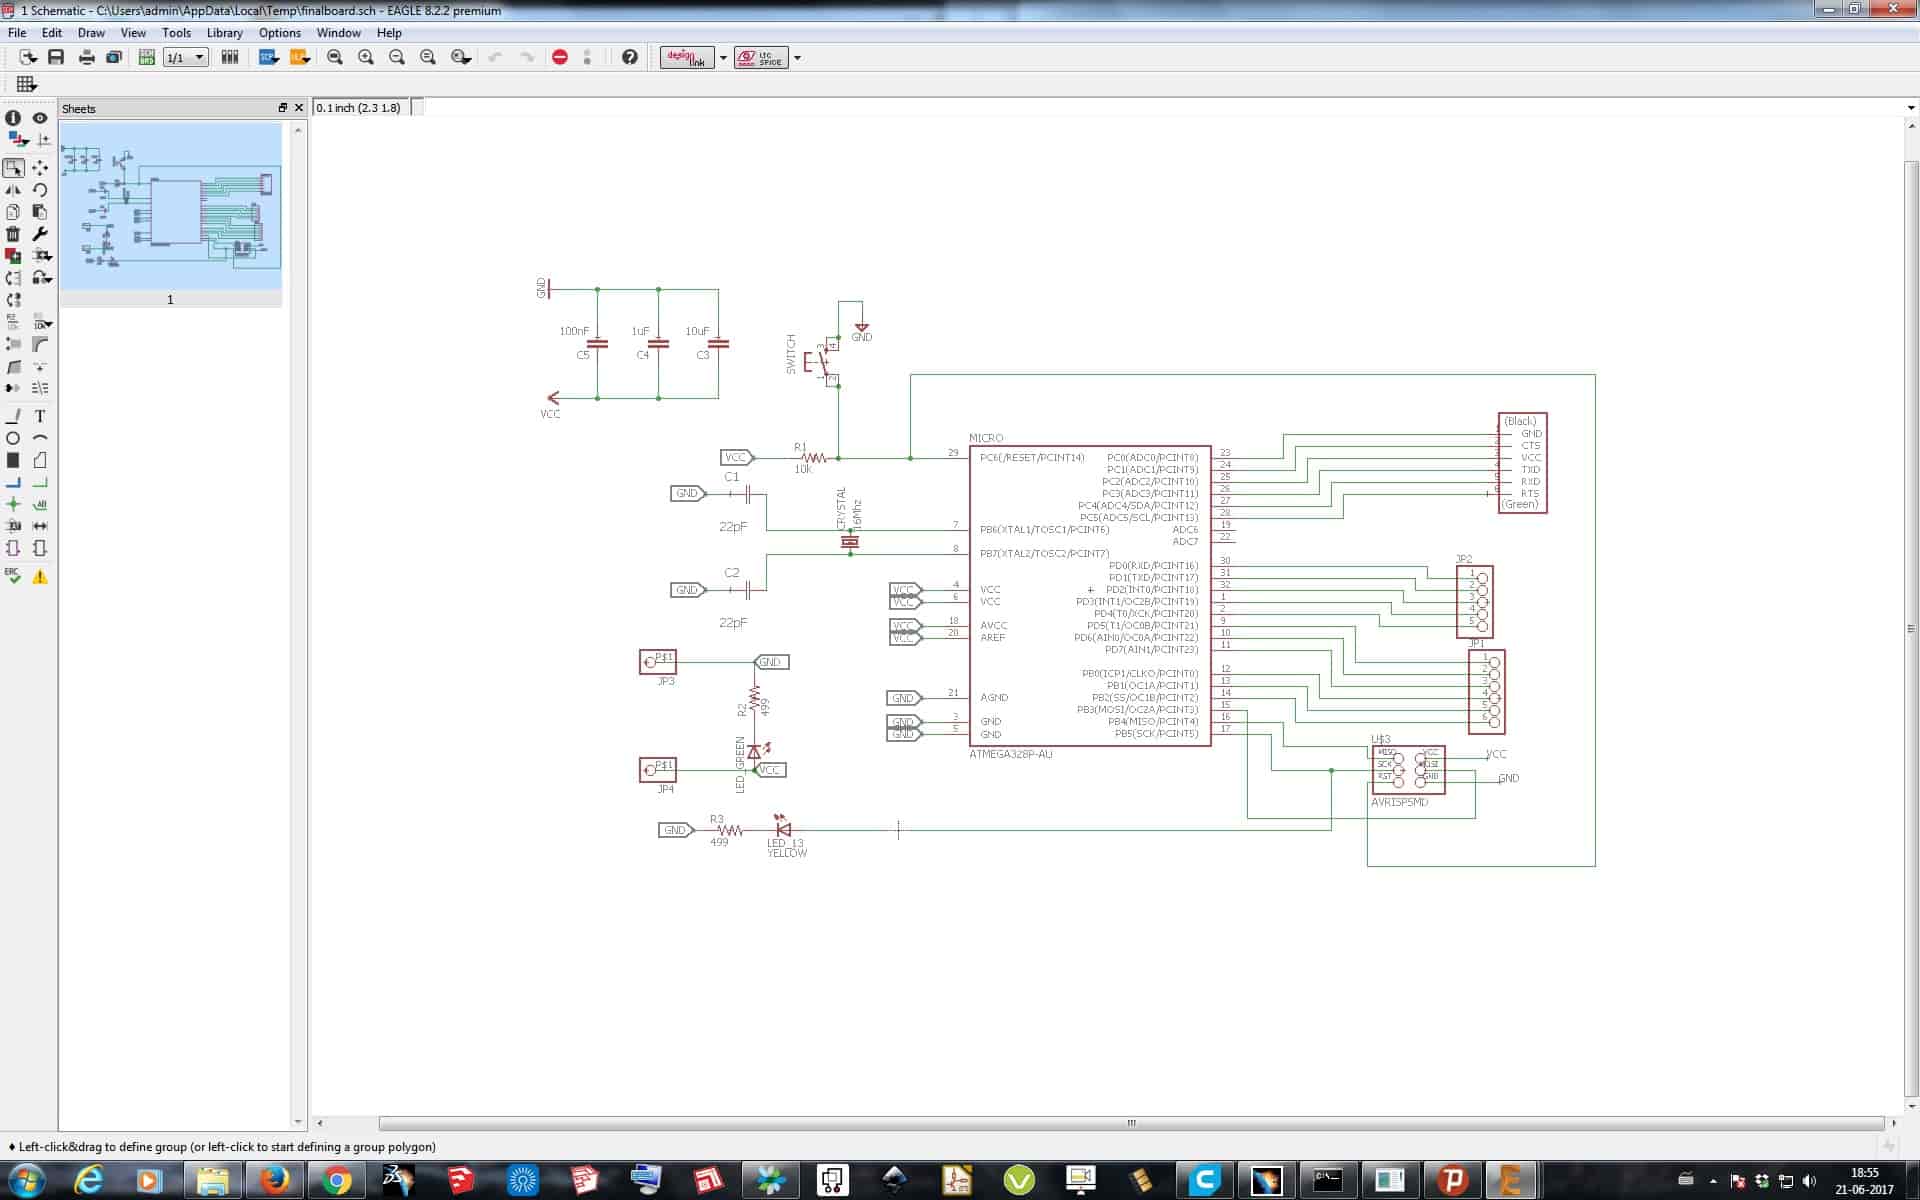

List of Components used in this Board:
• Atmega 328P AU
• 6 Pin header
• SMD Switch
• 20 MHz Crystal
• 2 LED's
• 2 499 ohm's resistor
• 10K Resistor
• 100 nP Capacitor
• 10uP Capacitor
• 0.1uP Capacitor
Final Files to Download:
Eagle and .PNG Files
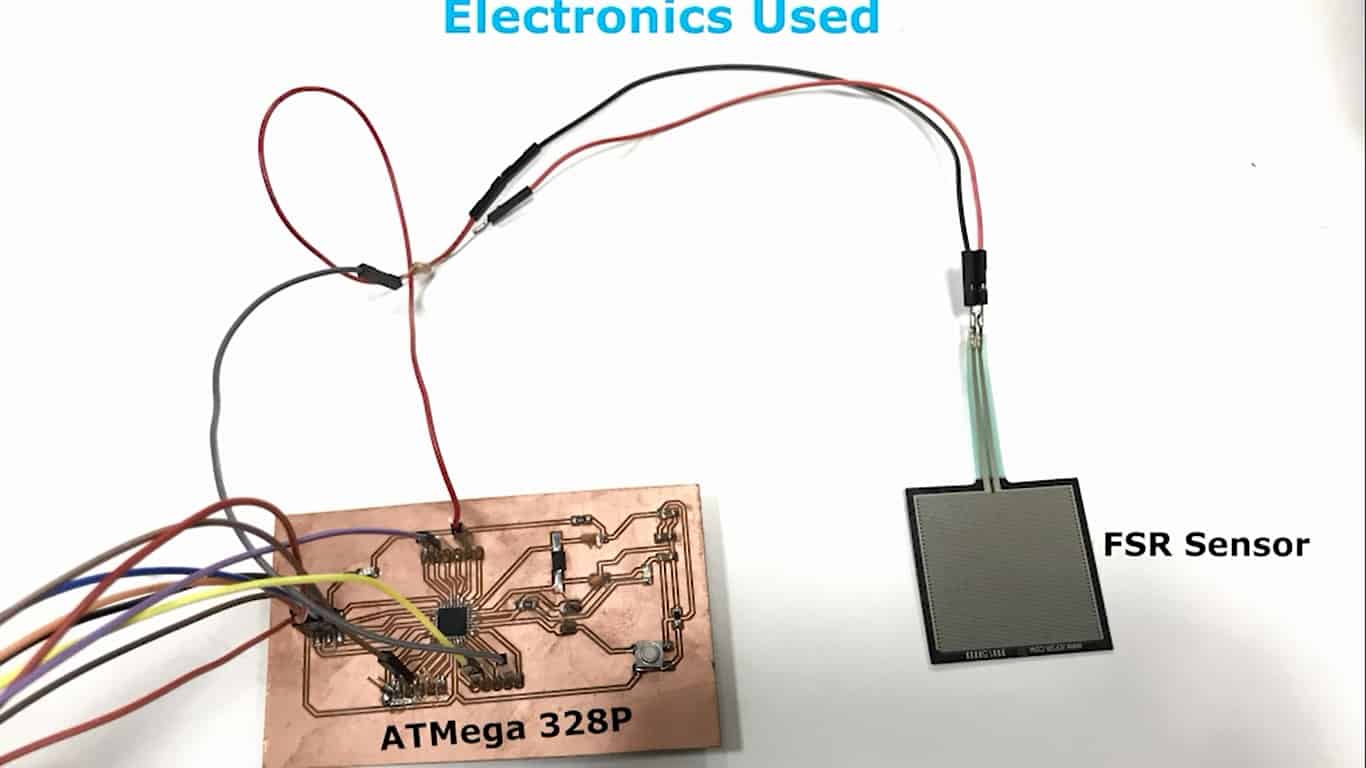
Sensor:
Its mandatory for me to use a sensor in my final project, so, I decided to use a FSR (Force Sensitive Resistor)
sensor in my project.
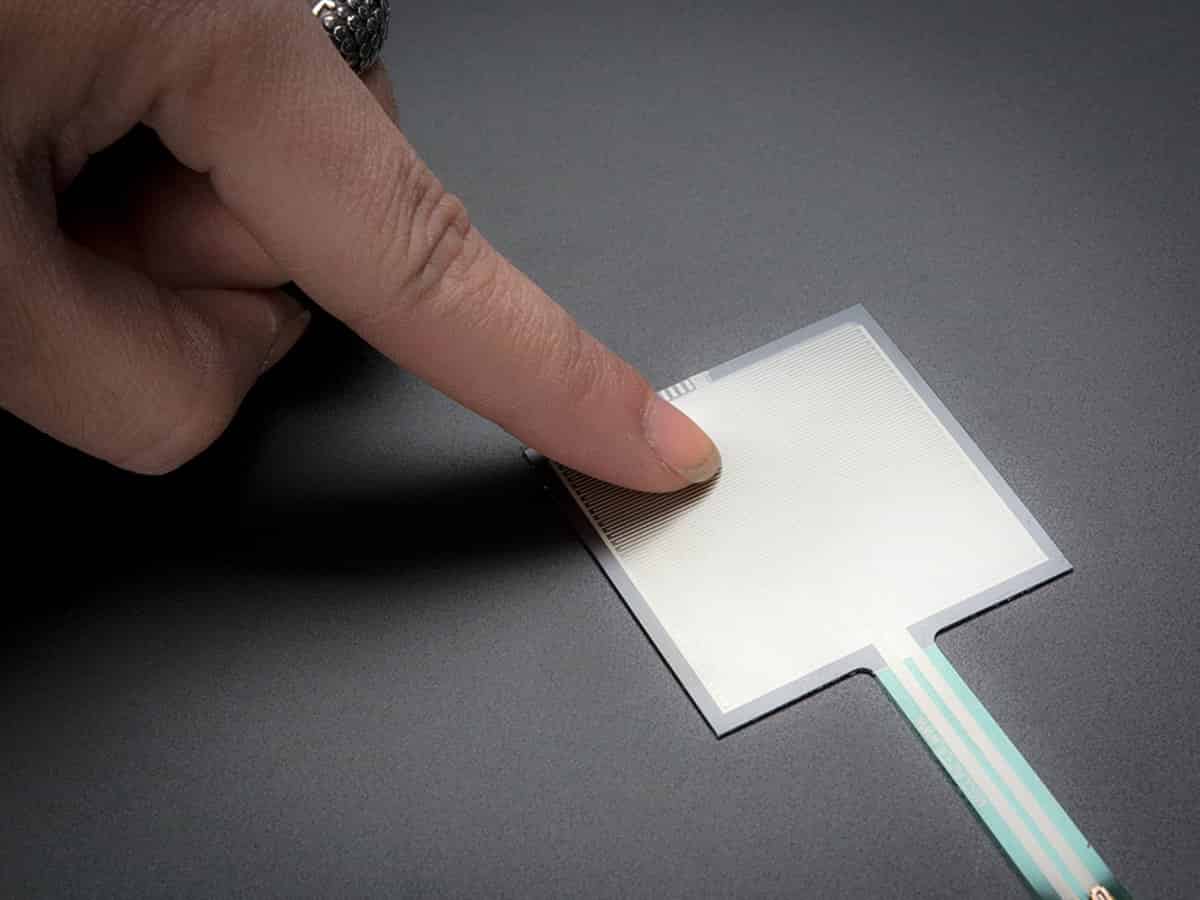
I am going to place this FSR senor on top of my Bed where the Pineapple will be placed, below the pineapple,
so as the Pineapple will be placed on the bed it will sense the weight and switch the LED connected to it from Red
to Green which will indicate the machine is ready to use. A FSR sensor just have 3 pins one is VCC, then Input pin
and a GND pin, quite easy to use.
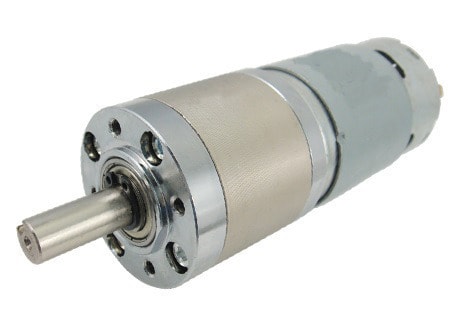
Motor:
Motor for Cutting Pineapple
I have used two DC motor in my Final Project. One is for the Z-axis movement and
other is for the rotation of the cutter blade.
The motor used for rotation of the cutter blade is of 45 kg-cm Torque which was of quite good specification.
I bought a cutter blade for slicing the Pineapple, which I attached on this motor using a flexible coupler.
Specifications:
• RPM: 10
• Voltage: 4V to 12V
• Stall torque: 45Kg-cm at maximum limited stall current of 4Amp.
• Shaft diameter: 6mm
• Shaft length: 18mm
• Gear assembly: Spur
• Motor weight: 180gms
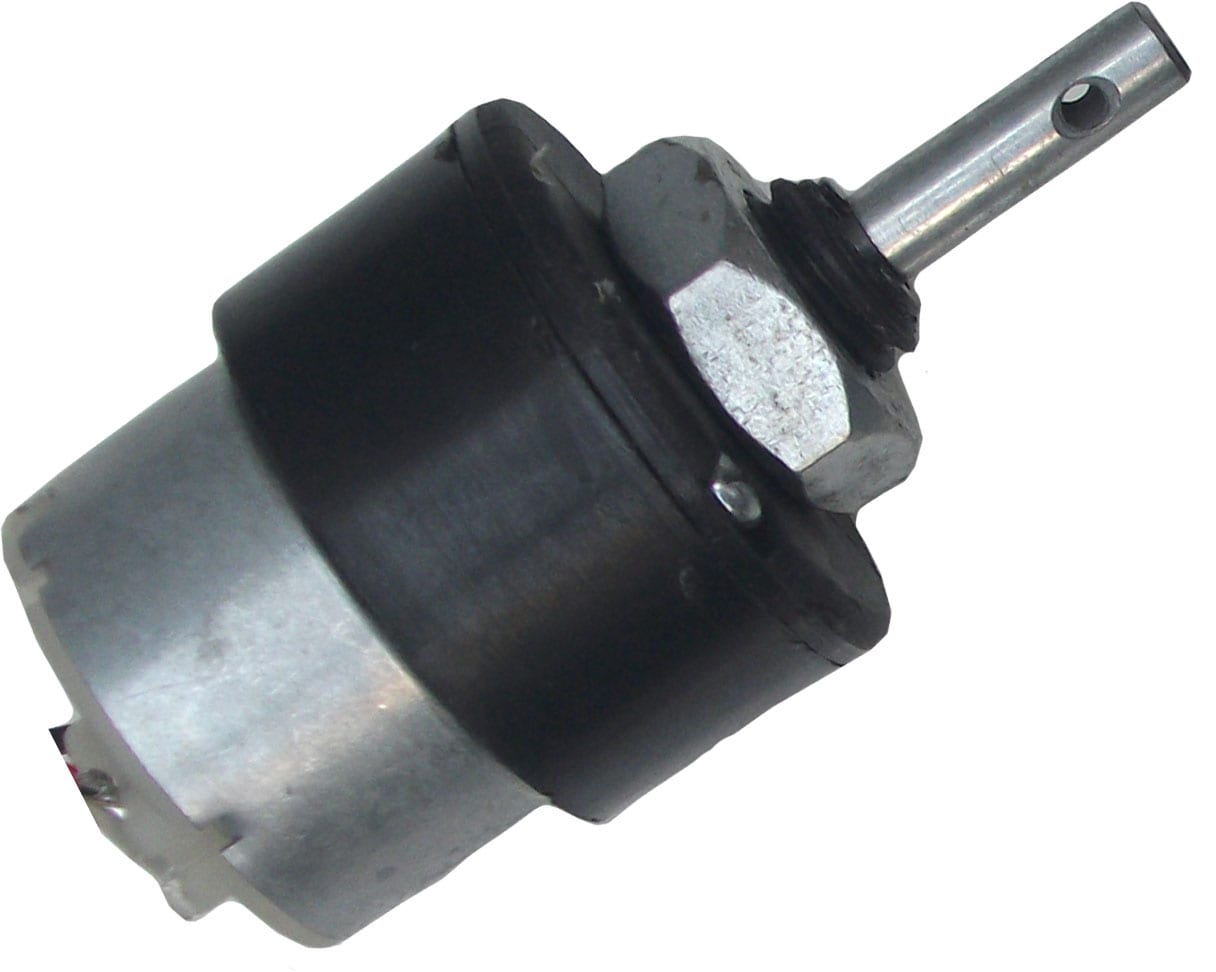
Motor for Z-axis
I used one more DC Motor of 25 kg-cm torque for the Z-axis movement. This motor shaft is attached with a
flexible coupling and on the other side of the coupling there is a stud screw on which a acrylic bed is mounted
for placing the pineapple and for slicing it by moving up and down through this motor.
Specifications:
• RPM: 300
• Voltage: 4V to 12V
• Stall torque: 25 Kg-cm at maximum limited stall current of 4Amp.
• Shaft diameter: 6mm
• Shaft length: 18mm
• Gear assembly: Spur
• Brush type: Carbon
• Motor weight: 180gms

Motor Drivr Board:
I made a DC Motor Driver board using a Relay and Power jack for taking Input and Output. I made the Board in Eagle.
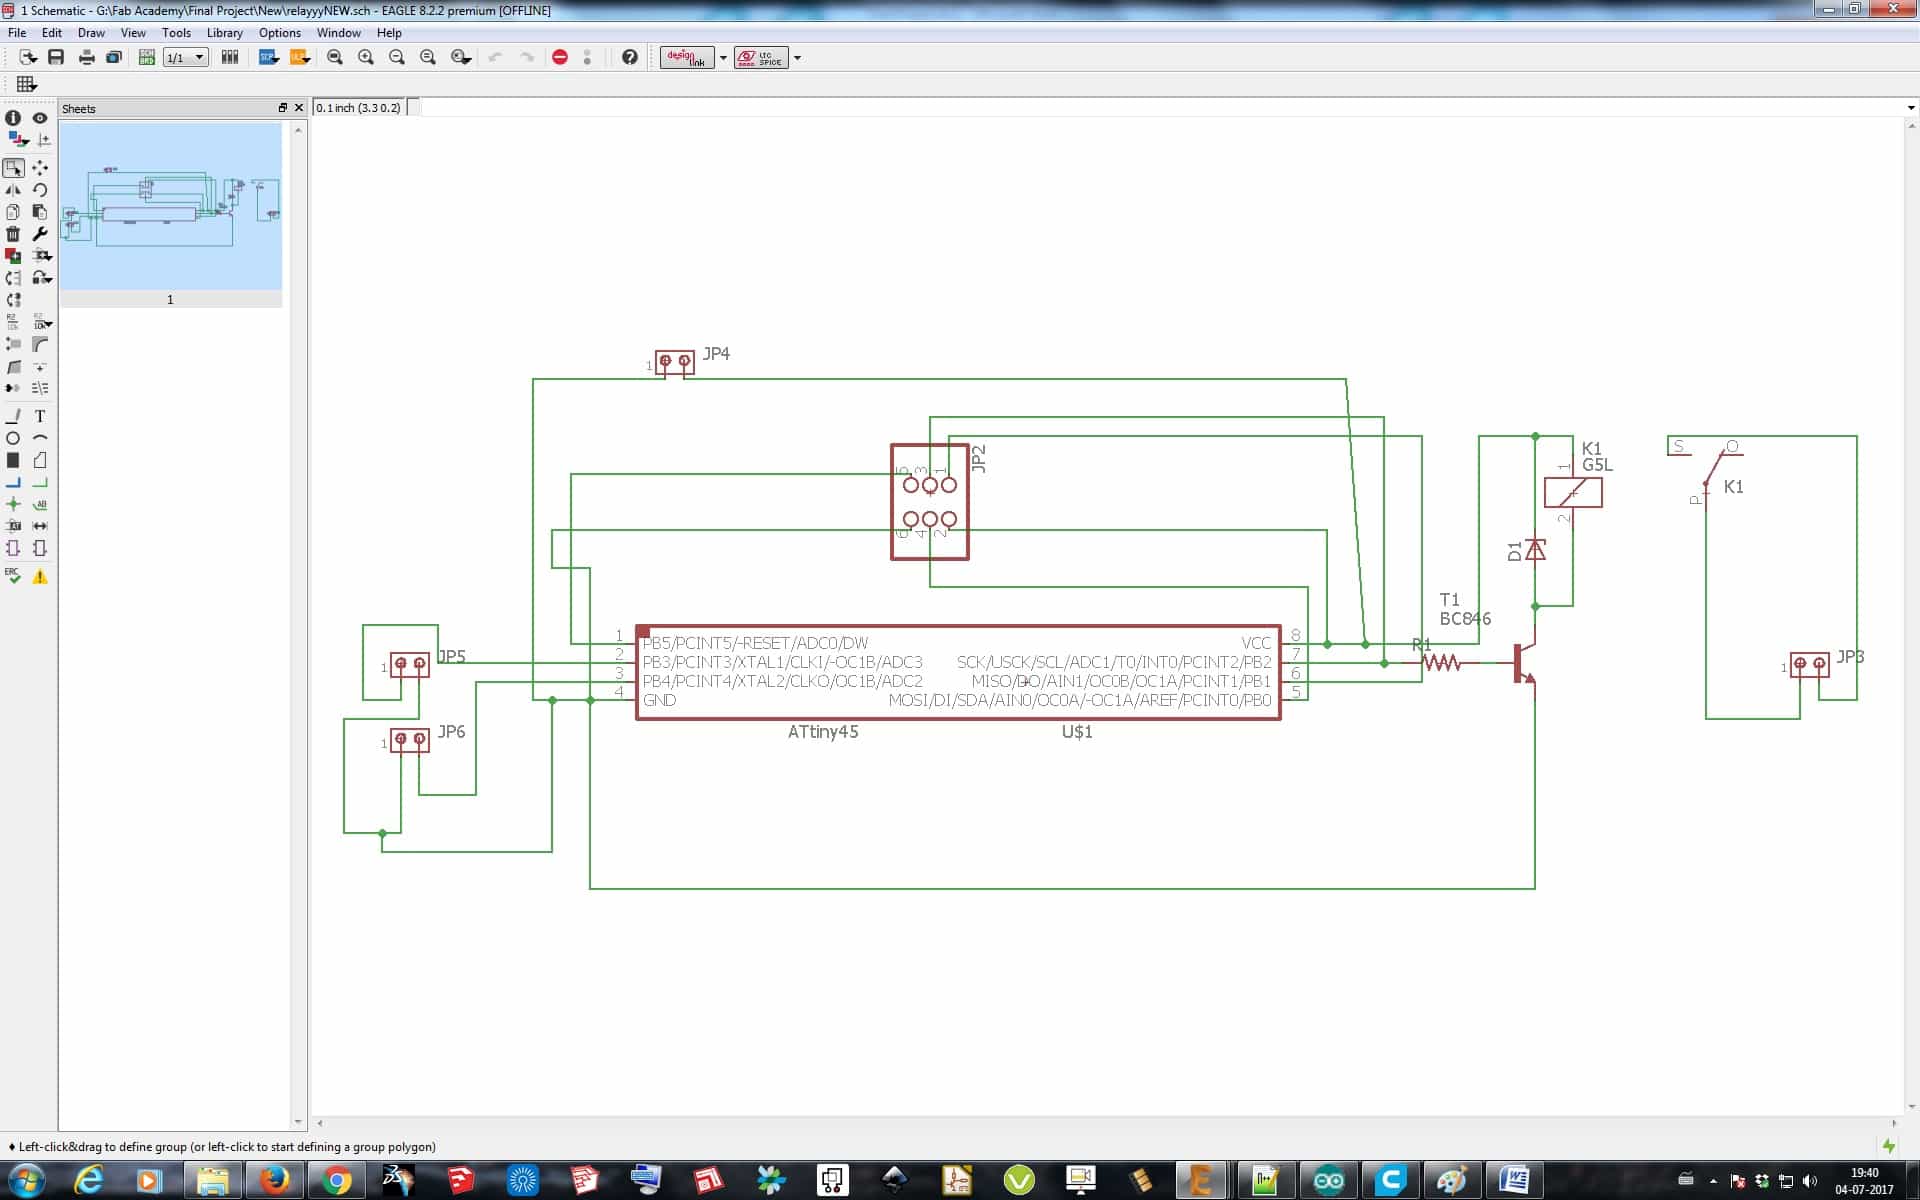
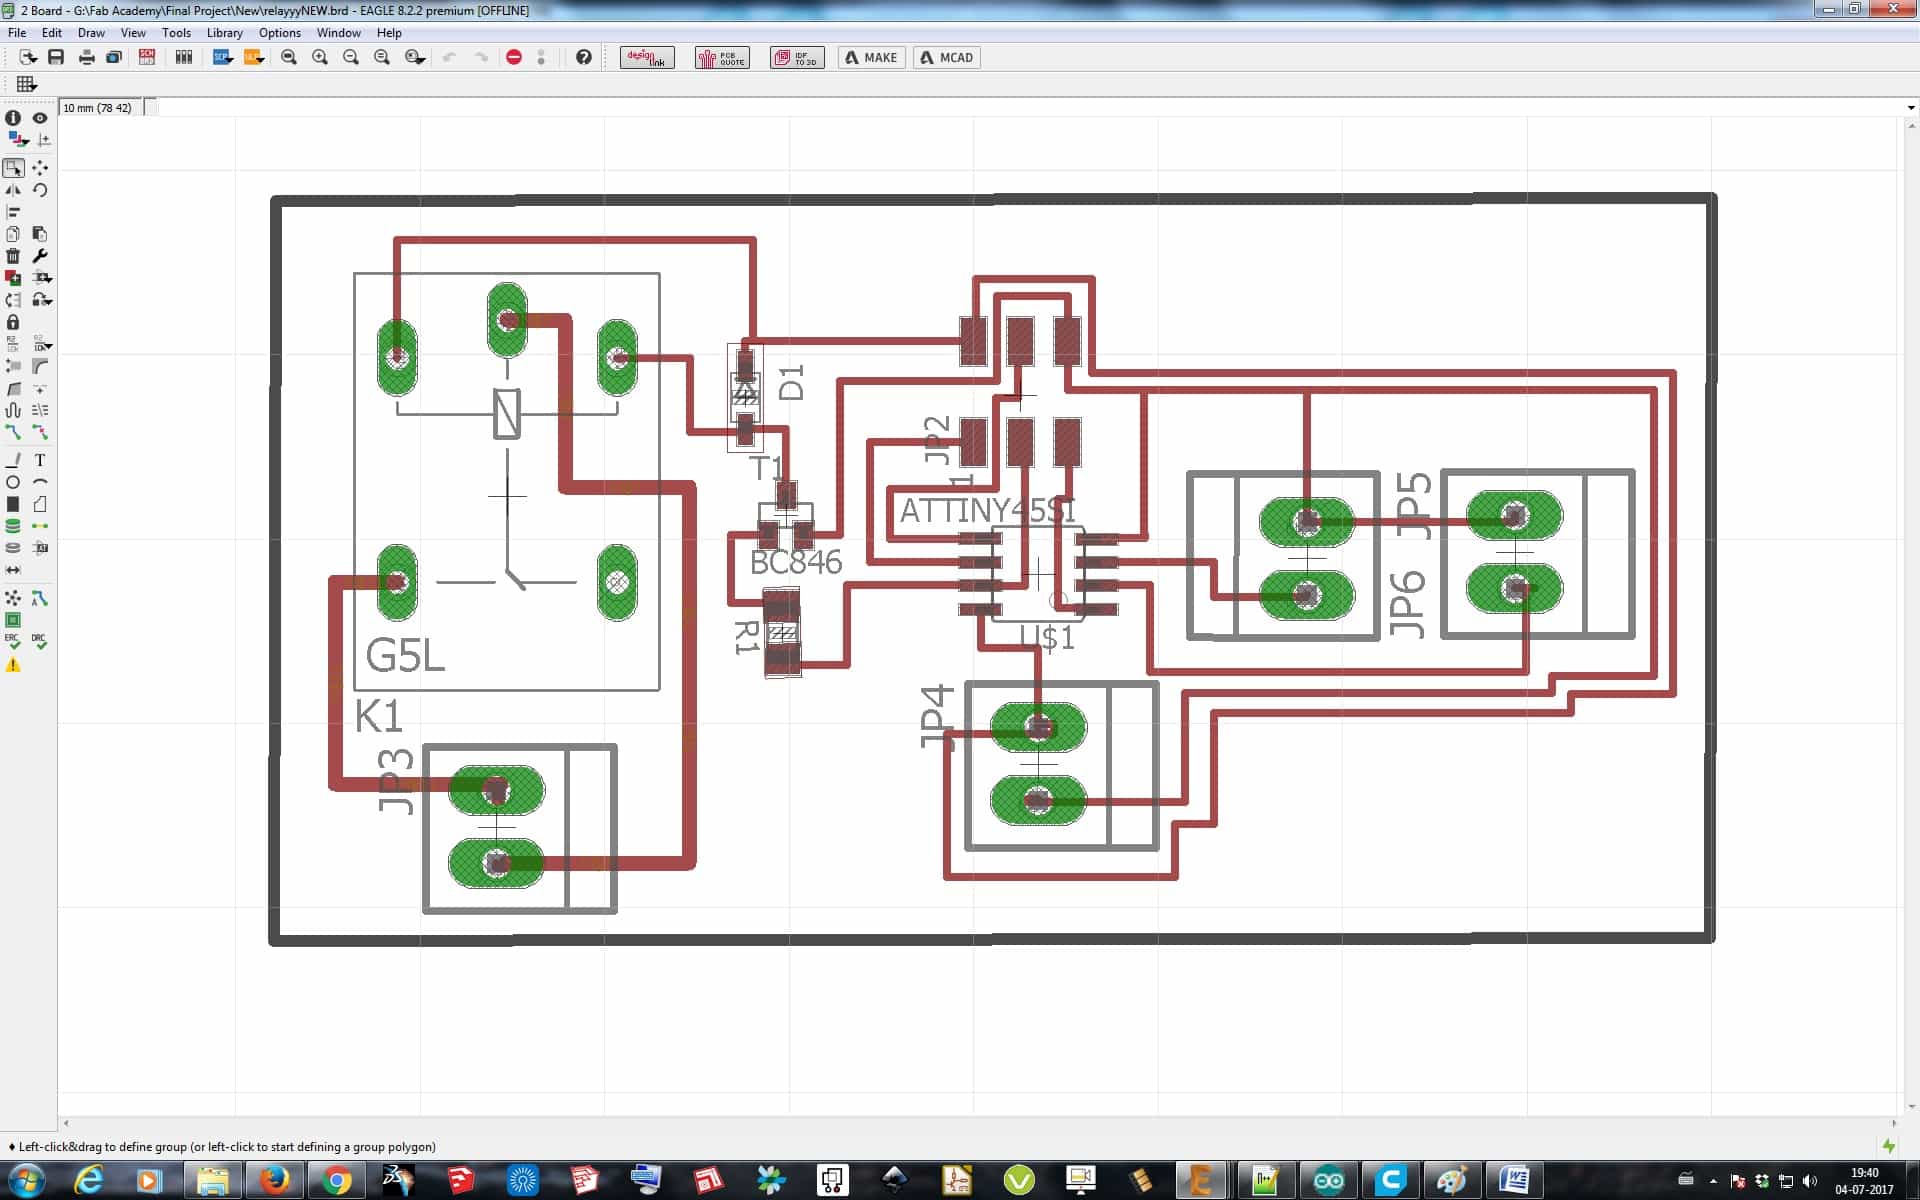
In the board I used a Transistor BC547 which is been biased by the Resistor, and as Relay has Inductive load
which gives back EMF, so to nullify it a Diode has been used in between that. This board has been made for
single Motor to control, so I made such two boards for controlling the motors, one at the top for Deshelling
the Pineapple and second one for operating the Z-axis of the machine where the Pineapple will be placed.
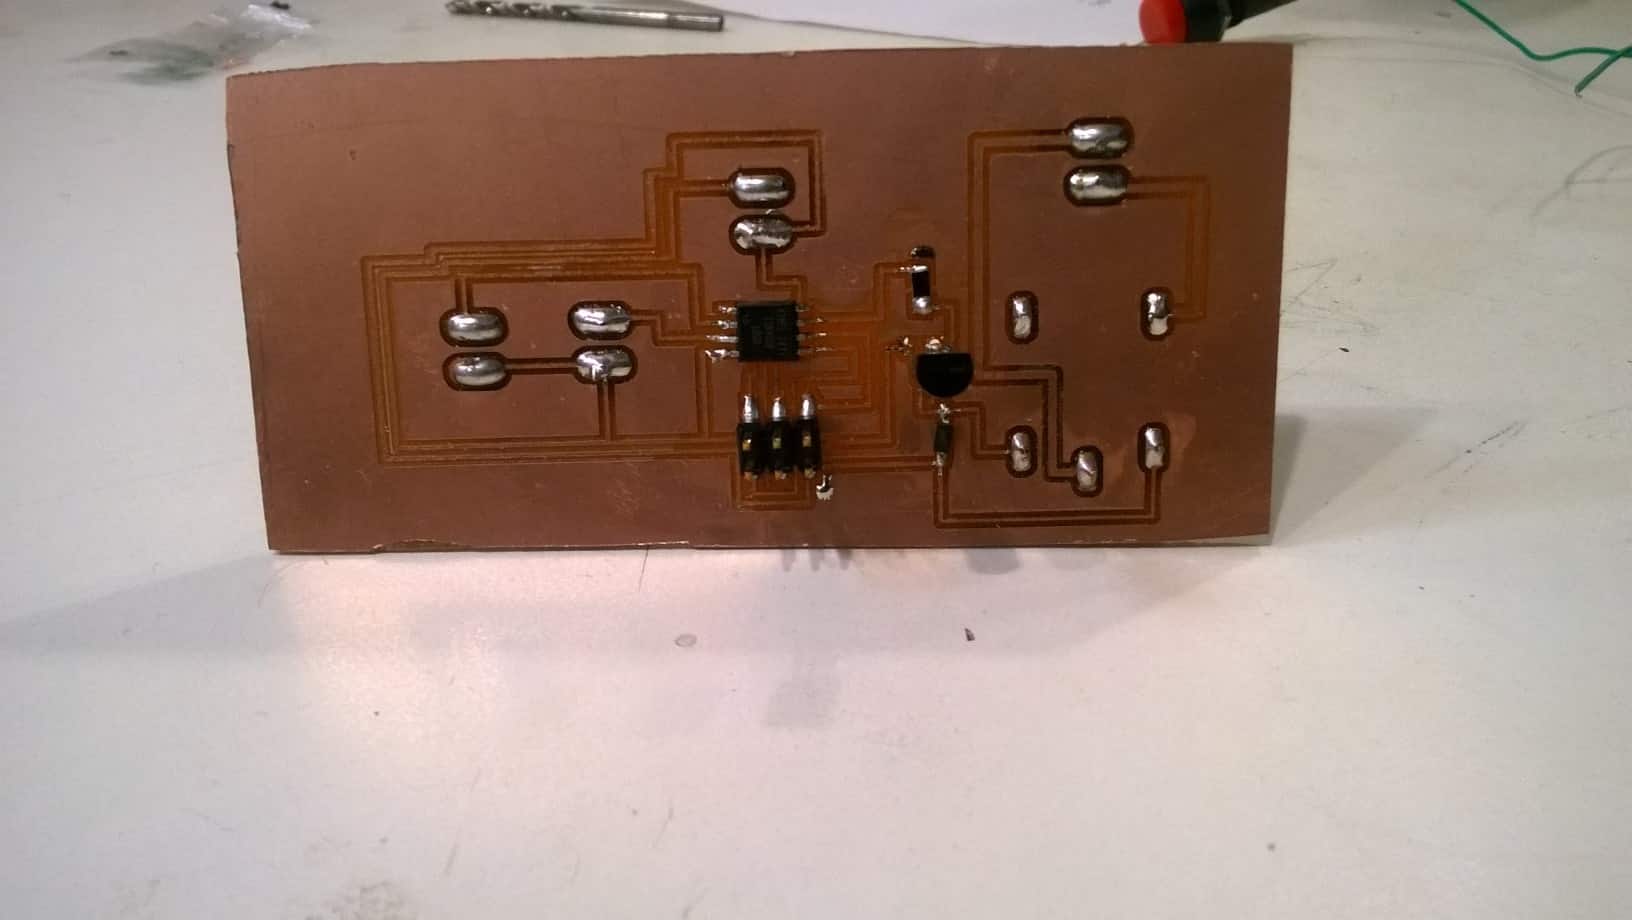


List of Components used in Motor Driver Board Board:
• ATTiny 45
• 6 Pin header
• Resistor 10K
• Diode 5V
• Relay
• Power Jack
• Transistor BC 547
Programming:
I programmed the board so that the FSR should sense the Pineapple on it and the Cutter rotation should start
along with the Z-axis movement slowly towards the cutter. I used Arduino IDE for programming my board. The program
is shown below and also be downloaded.
int switch1=10; // pin 10 declared as variable switch1
int switch2=9; // pin 9 declared as variable switch1
int fsr;
int motor1=8; // pin 8 declared as variable motor1
int motor2=7; //pin 7 declared as variable motor1
int redLed=13;
int greenLed=12;
void setup() {
pinMode(switch1,INPUT);// Pin 10 initialised as input pin
pinMode(switch2,INPUT);
pinMode(motor1,OUTPUT);
pinMode(motor2,OUTPUT);// pin 7 initialised as outout pin
digitalWrite(motor1,LOW); // motor one off
digitalWrite(motor2,LOW);
}
void loop() {
fsr=analogRead(A0);
digitalWrite(redLed,HIGH);// red led to glow
digitalWrite(greenLed,LOW);
while(fsr>1000)
{
fsr=analogRead(A0);// reading fsr value
}
delay(200);
digitalWrite(greenLed,HIGH);
digitalWrite(redLed,LOW);
while(digitalRead(switch1)==HIGH) //looping till the switch 1 goes low
{
digitalWrite(motor1,HIGH);
delay(100);
digitalWrite(motor2,HIGH);
}
digitalWrite(motor1,LOW);
delay(100);
digitalWrite(motor2,LOW);
while(digitalRead(switch2)==HIGH) //
{
digitalWrite(motor1,HIGH);
delay(100);
digitalWrite(motor2,LOW);
}
}
Final Files to Download:
Programs
Assembly:
After completing all the 3D printing, Laser Cutting and Electronics work I started assembling the machine for its
final test of Cutting the Pineapple. Assembling was not an big deal for me as everything else was done separately
only it's only suppose to be doing together now.

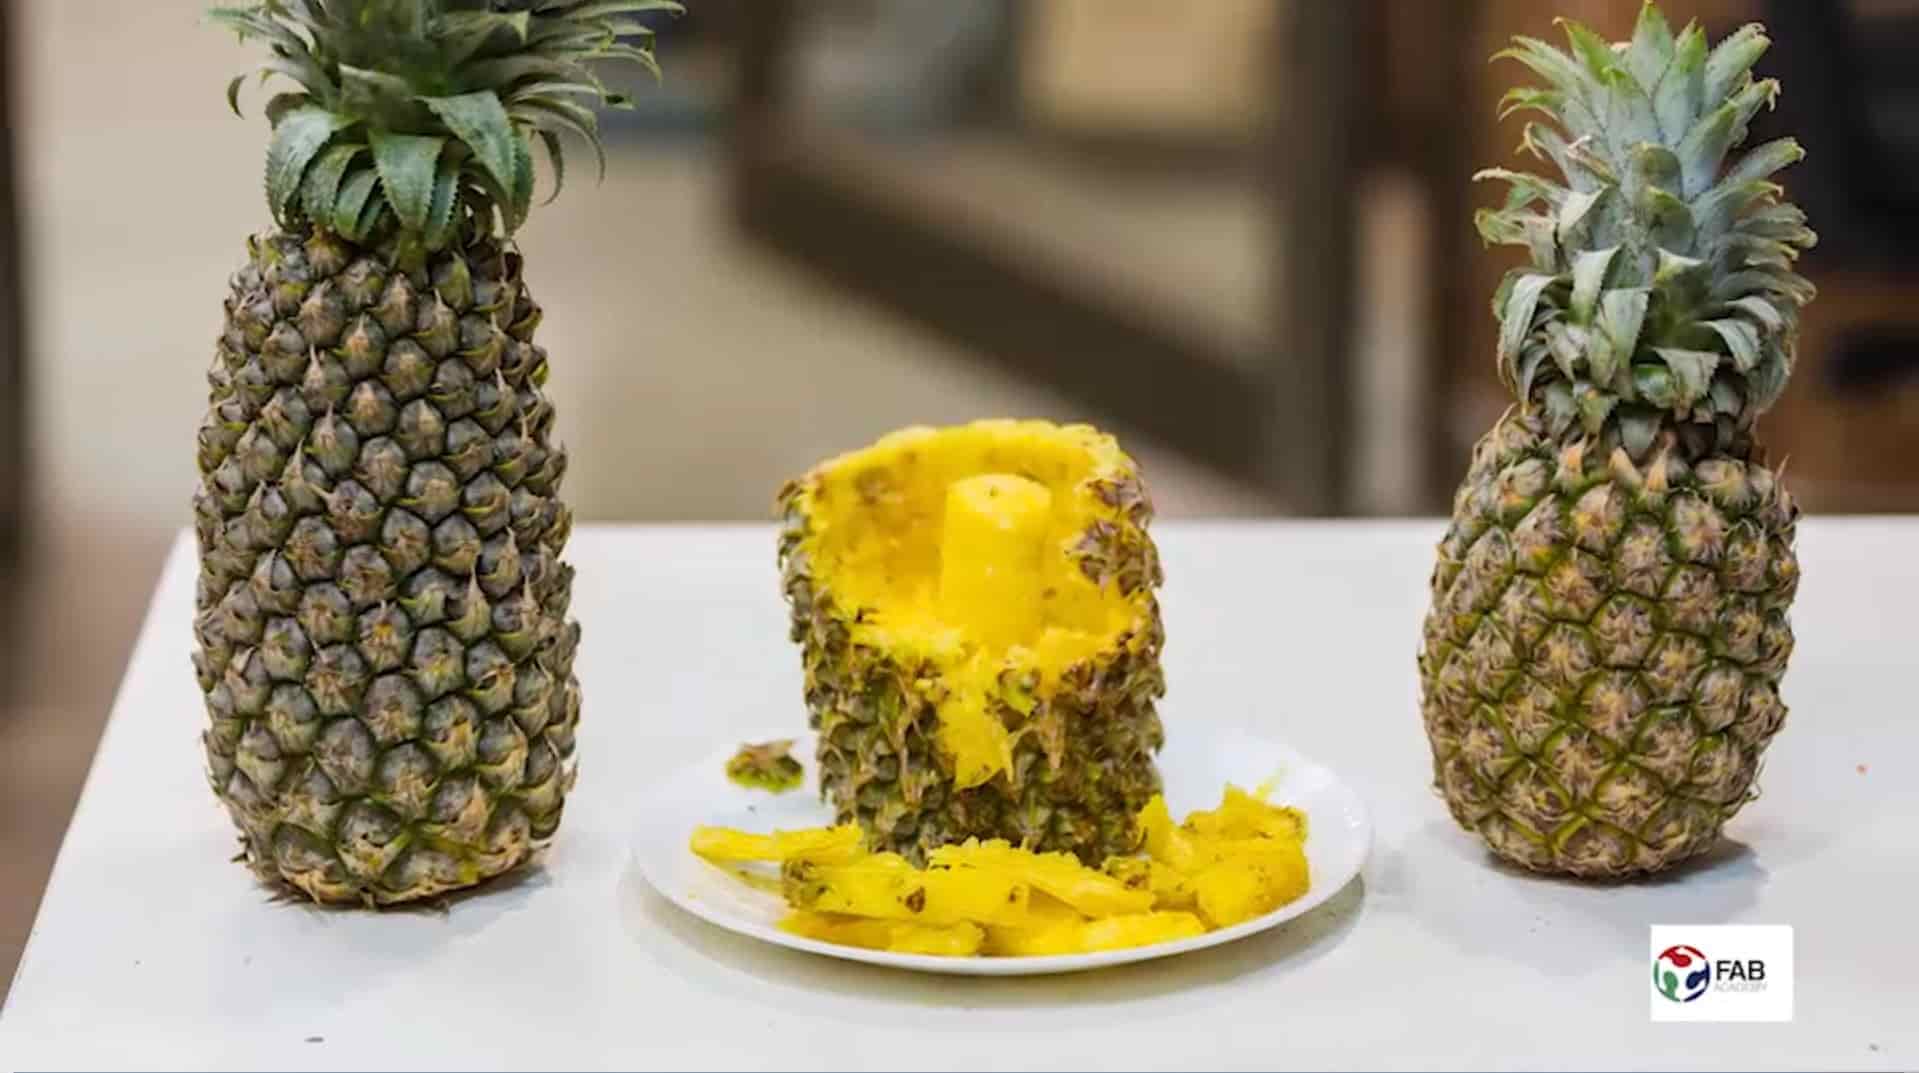
Testing:
After all such long working days, hours, it was time to test the efforts put on in making the machine work.
So finally after assembling I checked again with all the connections and just started the machine in idle condition,
and it was working good. I then cut a pineapple from both the end and then placed it on the bed and again tested
it, but now the peeling of pineapple was not that up to the mark as expected. Only the upper layer was being sliced
say just up to 5 mm deep then it got miss placed from the bed.
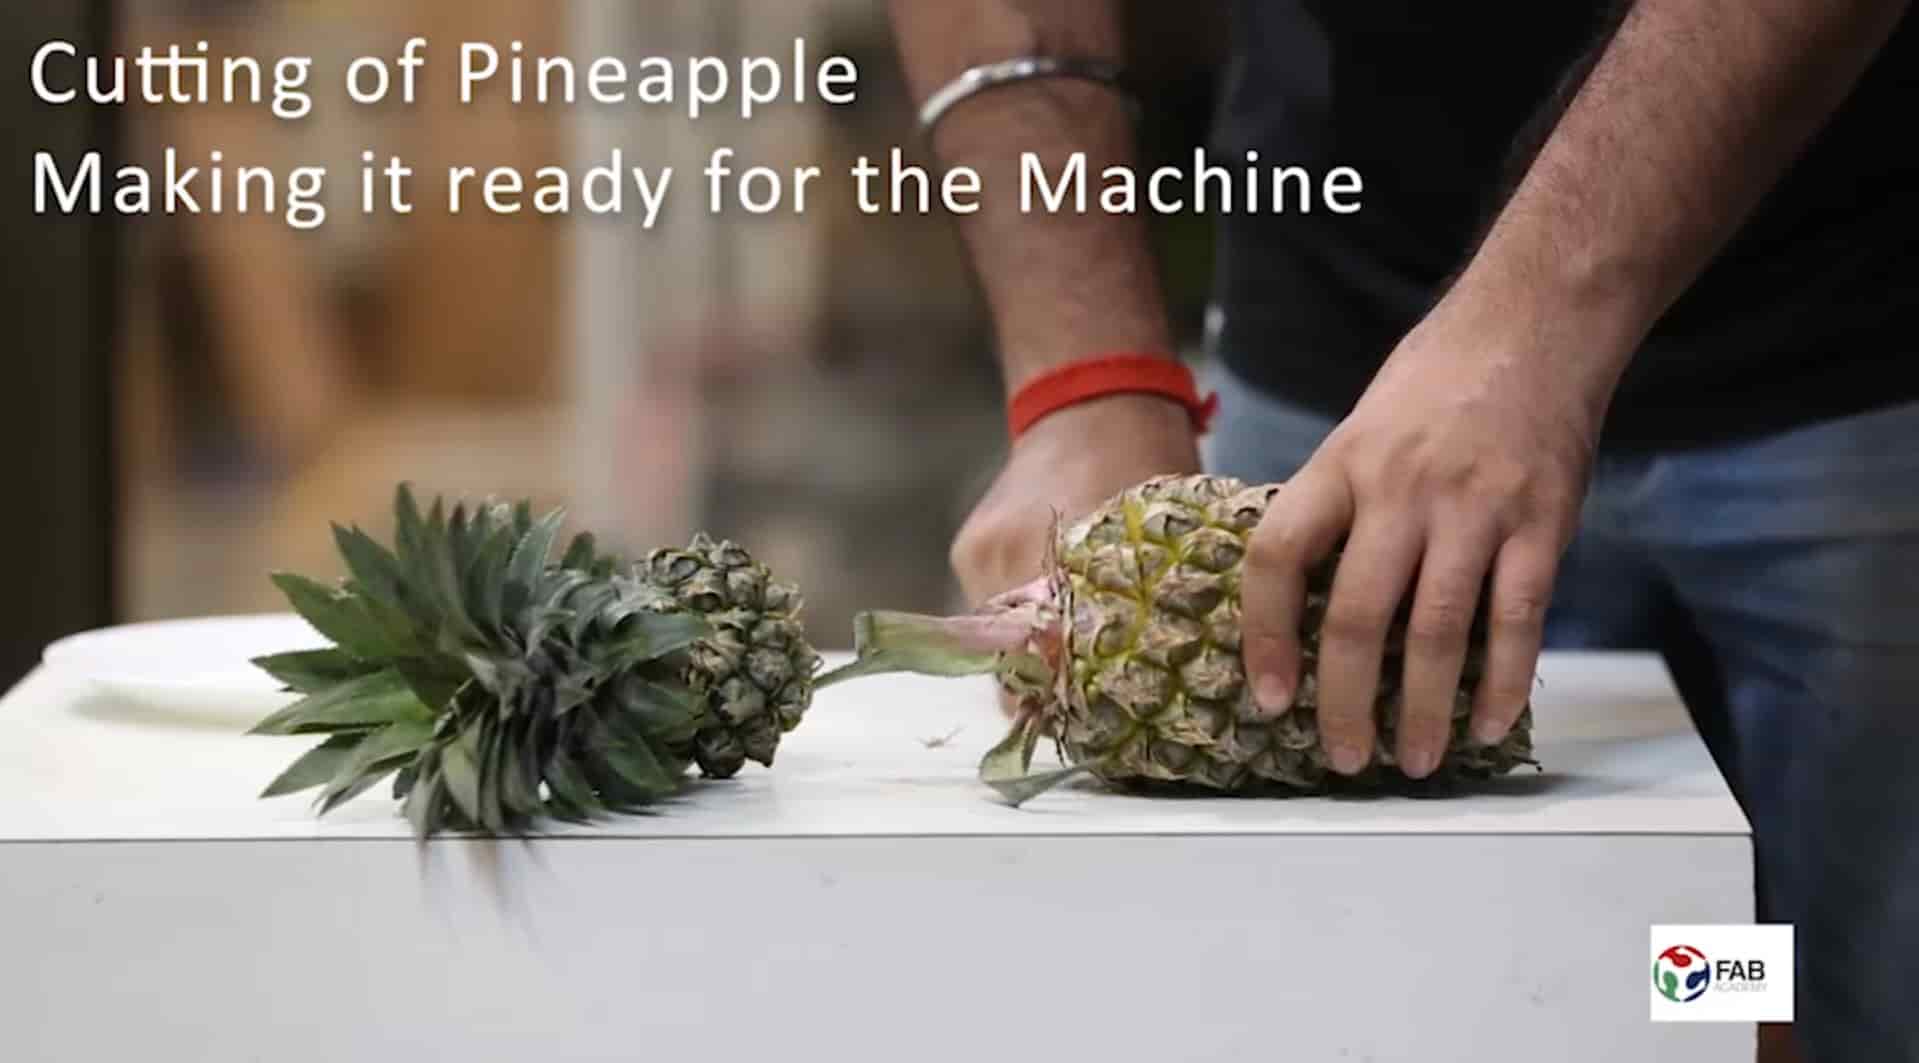
So now I again thought of testing it by just placing it firmly on the bed, now this time it was slicing the
pineapple properly and went till a sufficient depth, but still it wasn't that up to the mark as I expected but it
all for now in this first prototype or just say a Proof of Concept device, and for my Fab Academy. I guess I have
to switch to some other powerful motor with high torque for cutting and for Z-axis. I am planning to work on a New
Design from now on for this Device and come up with a proper product for the people in the market.
Bill of Material:
Mechanical
• Acrylic Sheet of 300mm x 600mm size 3mm in thickness - 5 Nos. (Lab)
• Flexible Coupling - 2 Nos. (Lab)
• Cutter Blade - 1 Nos. (Amazon)
• M8 Stud Screw - 450 mm length (Lab)
• M8 Nut - 2 Nos. (Lab)
• Guide Rods of 8mm diameter & 450 mm length - 2 Nos (Lab)
Electronics
• Copper Clad 100mm x 50mm - 1 Nos. (Lab)
• Resistors SMD 10K, 499 ohms - 1 Each (Lab)
• Capacitor SMD 100nF, 1uF, 10uF - 1 Each (Lab)
• Capacitor DIP 22uP - 1 (Lab)
• Atmega 328P AU - 1 Nos. (lab)
• 2 DC Motor (Lab)
• SMD Switch - 1 (Lab)
• LED SMD - 2 (lab)
• 20 MHz Crystal - 1 (Lab)

Pineapple Desheller by Jatin Pal Singh Parmar is licensed under a Creative Commons Attribution-ShareAlike 4.0 International License.

