My first weekly assignment was to design a personal website, to learn about version control system and to think about my final project. This first week represented an opportunity to deeply meet with Informatics, since I just studied it briefly and generally at University.
Installation of Linux Mint:
The beginning of my unfortunate problems with IT
First step: having what Fiore Basile calls “human OS”. I have to thank a lot Simone Guercio that give me big help for the installation setup. Installing Linux Mint was quite easy actually, I just followed step by step what asked to do and the only thing I freely decided was the dimension of the hard disk partitioning. The problems came just after I restarted my notebook.
Bothersome snags with wifi connection: wi-fi drivers for Linux Mint
When I run my new OS the first time I could connect just by cable
to the internet because I was missing wifi driver.
Possibly, default drivers were already installed with the OS but they didn’t suit my device.
Therefore I:
-
firstly checked the chip number of my notebook network card, using command
lspciwhich finds out more information about all PCI devices
-
searched online a guide to tell me how to install wifi driver for my specific card (chip: BCM43142).
[I choose one written for DEBIAN (a Linux distribution, like Mint) since its online documentation is clearly and completely written. That meant to make little differences to the shell commands but I will explain below]. -
as always recommended before downloading packets, ran the command
sudo apt-get updateso as to get the most recent version of programs.
[NB I skipped the first passage, which requires to create space for the packets to be downloaded, since, like in this case, the driver belongs to the company that made it and so it’ s not open source. This step is needed in Debian, due to greatest strictness towards “non-free” components]. -
installed the driver needed with
sudo apt-get install broadcom-sta-dkms[DEBIAN version also installs latest linux-image and linux-headers but I already had them on Mint].
-
told the OS not to run those wifi drivers installed by default that are in conflict with the one being installed any more, using the command:
sudo modprobe wl
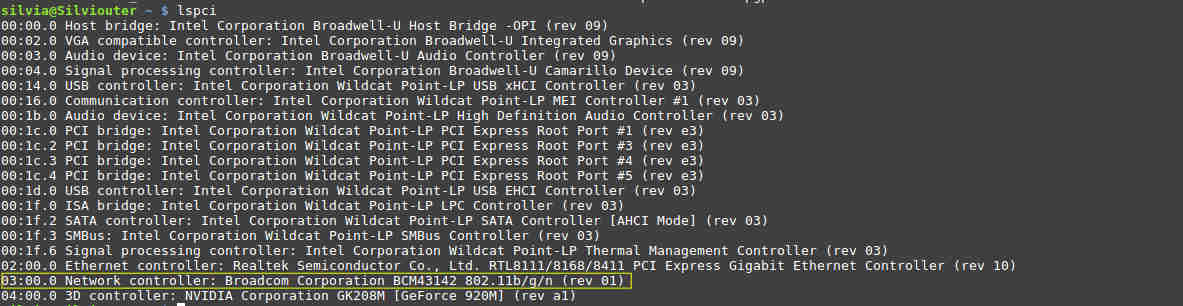
ATTENTION! Please check if your net card is among these (BCM4311, BCM4312, BCM4313, BCM4321, BCM4322, BCM43224, BCM43225, BCM43227, BCM43228, BCM43142, BCM4331, BCM4352, BCM4360) before following the steps above.
Learning about versioning...
I didn't know at all what this word means till I started FabAcademy. I expected it to be concerned with “versions” of something but I wanted to start with few prejudices and I begun learning in the easiest way: Wikipedia. And what did I found out?! That Wikipedia' s chronology is an example of version control system development itself. In fact, the principle is that with VCS, people from different part of the world can cooperate in group shared projects at the same time, modifying, removing or adding parts to the same files. This is possible because VCS can trace every single change, who and when made it; therefore each user can choose the “version” of the job (seen as the merge of several implementations) he likes most and put a copy on his own local device, develop new improvements (creating a new “branch”)and only after merge them with the main source repository, located in a remote server somewhere in the world, where all the people allowed uploaded branches they've been working on or modified files. Merge and change memory functionalities play a great role if you think that, in those case when overwriting is the only implementation method considered, someone can destroy your entire work. I made myself an idea about this fundamental aspect of VS, playing a bit with Git Lab, Fabacademy' s VCS.
GitLab registration and SSH key generation
First of all I had to create my own account at www.fablabs.io/labs, to register myself at GitLab with those credentials and communicate my username to the istructor so at that he could enable me to load files on my FabLab repository. To autenticate yourself while loading or downloading files, you need a SSH key (Secure Shell Key) which is a way to create a secure channel in an unsecured network. In few words it’s like giving your device a name that like people’s one is divided in two parts: let’s consider first name is private and the last is public. You have to use the second one in pulling and pushing files or directories from and into the repository of your group shared project. Here there’s GitLab Documentation page about SSH key generation.
Cloning of Git repositories and starting commands
To clone my lab repository on my notebook, I :
-
created a directory to put git repository inside:
mkdir FabAcademy17 -
opened it with:
cd FabAcademy17 -
got all the repository content from git using the address the repository (in red) :
git clone git@git.fabacademy.org:fabacademy2017/fablabtoscana.git
Once I could see all the files in my local computer, I begun to play a bit
with git starting commands to make direct aquaintance with VCS.
I added a .txt file in my personal repository
and also I modified one of my mates “index.html”.
Till that point, the implementations where just on my personal computer
and people looking up on the Internet to the same page couldn't see them but
I then learnt how to push a modified file in the Git Lab repository,
from GitLab documentation and also from easy and intuitive tutorials I found
here
Briefly, the commands I will need most to manage my Fabacademy documentation are:
git status
to view changes made that haven’t been uploaded yet (they’ll be displayed highlighted in red)
git add CHANGES IN RED
git commit -m "DESCRIBE THE INTENTION OF THE COMMIT"
to confirm the changes you made – it’s actually creating a new file version- and give a title to this operation.
git push REMOTE NAME-OF-BRANCH
to push local file in the remote master repository.
If before pushing, someone else already uploaded a new “version” of the repository of interest, a
git pull REMOTE NAME-OF-BRANCH
is needed to update your local files.
Then, all my mates could see the details (time, author and modified parts) of the changes that I made and uploaded to a file that didn't belong to my repository, but, for everyone's relief, I found out it' s always possible to roll back in time and update the local version with the preferred remote one. To have a look at all the “commit” people made, one way is to check it on GitLab directly, otherwise there are few simple commands to see info needed in the shell:
-
if you want to know exactly what you changed, not just which files were changed, you can use:
git diffit shows you the exact lines added and removed.
-
if you committed severl times, or if you cloned a repository with an existing commit history, you’ll probably want to look back to see what has happened. The basic tool to do this is:
git log
Once I saw that I successfully changed my friend's web page, I perfectly understood the responsibility everyone has in managing also other people's repository and I heartily wished my friend not to start VCS terrorism.
I also looked for material to start making steps forward with shell commands both for git activities (here) and to use my laptop without mouse support (here)
Making acquaintance with HTML 5 and Bootstrap
That could be the most critical point of my week: I’ve always maintained
a suitable distance from languages that didn’t come from a group of people
living in the same area that many centuries ago developed a way to understand
each other. Just think my previous experience with such an obscure, unspoken,
schematic language as HTML.
Anyway, I knew I would have had to face with it sooner or later.
At the first attempt, looking for a simple guide related to the subject, I
bumped into this website Beginning HTML5 and CSS3 For Dummies
which personally
I didn’t find clear at all, having difficulties even in trying to download files.
Considering that I was confused enough even only about “HTML” word, I preferred
to look for a clearer guide. I found w3schools be an encyclopedia
about site developing, since it contains the
answers to all the question I may have while editing my web page and the loads
of info and tutorials are well structured and divided into topics properly.
I was recommended to use Bootstrap, one of the most used framework for responsive
and mobile-friendly website design. On Bootstrap site,
I also found some already-made basic template and I considered to get one of them
and improve it little by little. I started moving like this but I then realised
that striving myself in perceiving a CSS (a style sheet written in HTML, used to
define “class of objects” that you want to repeat with the same characteristics
in your website) that someone else had written before, would have taken me a lot
longer than writing one on my own(despite the template chosen was really super-cool).
Surely I needed at least a basically structured html file and I found here
the html template for the students of Fab Academy.
Seeing that my documentation still looks like a telegram, I sometimes regret that
beautiful, already-made template, but I'll turn out to have quite a presentable website.
I also thought that I may never have again the possibility to learn how to fully
design my page, so it's a nice opportunity
to be caught: Fab Academy’s disposition to overtake the limit of your knowledge
was seizing me.
Anyway, you see I haven't gone quite far yet.
Project Planning
For my final project, what I would like to do is to create a device
for deaf people to help them understanding the sounds around.
I am
not aiming at creating an hearing appliance, instead I would like to
use wearable technologies, maybe adapted to common objects like clothes
or jewelry, to make them send vibrations based on noise power.
I still have no idea about how devices like these are built, mostly for what
regards electronic and programming aspects. I just have basic knowledge of
sewing and sometimes I create pieces of jewelry, also using digital fabrication
technologies like laser cutting or 3D printing. But I’m pretty sure I’ll figure
out what I need to use and how during the next months.
In any case, what I intend to do first is to get in touch with someone who
suffers from those problems, maybe also considering more that one case, for
better understanding on their perception of sounds and situations. Only after,
I will focus on a precise object to create.
Planning Models
Owing to my project ambition, I had to plan the steps that would have lead me to my goal in a rational way and even if that would seem quite simple, I realised it's not like that, since I still don't know definitely the items I'll have to create and how I'll do it. Therefore, having no ideas about time, procedures and difficulties, I had to find a method to face the process of my project realization.
I discovered that plans can be made by and follow paths that can be the opposite
one from another. After achieving a brief knowledge about the main ones and their
principles, I set up my work according to The Spiral Model .
This planning method proceeds with evolving cycles that, one by one, enhance the starting
prototype structure and functionality.
This picture clearly represents how
the project grow as the process goes on.
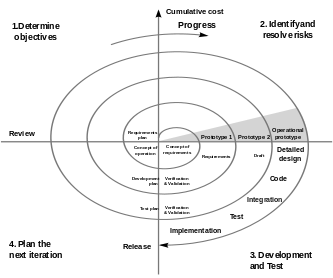 The characteristics I found more suitable with my work were:
- definition of the objective
- concepts of requirements and operations
- testing of the prototype at each cycle
- considerations and possible improvements of the prototype
Infact, doing so, I think I'll better understand my project weak spots and potentialities during its realization, without compromising its functionality.
I then found my reasoning to be quite close to another planning method:
The Agile Modeling .
Infact, agile development basically relies on minimal short-term planning
and task division, that are verified by means of sequential iterations.
Each of these involves a cross-functional working structure:
- planning
- requirements analysis
- design
- coding
- testing

According to this method, to release a product it could be required
to do multiple iterations, in order to check and minimizes risks and
also to help the project in adapting to changes quickly.
Even if just few of the iterations add remarkable functionality,
frequent testing support having an available release (with minimal bugs).
In the end, I think I'll mostly proceed with spiral model method, which
suits better my future intention to face with direct experience, which I expect
bring basis for project implementations and maybe also changes.
But I will consider also consider agile method for what regards having a realasble
project before July.
You can find my Final Project status here.
9th March '17: Update
I wanted to give my documentation a good organization and clarity because, being quite long, I realized it was hard to understand
topics division. Therefore I added an upper box where to put link using the code below in the body of the page:
  < div class="container-fluid" style="background-color:rgba(0,255,0,.3);color:black;;height:300px;text-align:center;">

    < h1>< b>< u>Week #: Weekly assignment< /u>< /b>< /h1>

    < h3>Useful links:< /h3>

    < p>

    1-< a href="">Link1;

    2- < a href="">Link2;

    3-List:

    3.1-< a href"">Link 3.1< /a>;

    3.2-< a href="">Link 3.2< /a>;
Also, I wanted to have an active summary on the left of the page:
    < div class="container">

      < div class="row">

        < nav class="col-sm-3">

          < ul class="nav nav-pills nav-stacked" data-spy="affix" data-offset-top="205">

            < li class="active">< a href="#section1">Installation of Linux Mint (and wifi driver issue)< /a>< /li>

            < li class="active">< a href="#section2">Versioning< /a>< /li>

                < ul>

                  < li class="active">< a href="#section21">SSH key generation< /a>

                  < li class="active">< a href="#section22">How to clone a repo< /a>< /li>

                < /ul>

            < li class="active" >< a href="#section3">HTML 5 and Bootstrap< /a >

            < li class="active">< a href="#section4">Project planning< /a >

            < /u l>


        < /nav >
I found great inspiration on w3schools
and on this page.