Exercise 17 - Applications & Implications
What will it do?
My project is a desktop sized Vacuum former. It is to make job easier for users who want to replicate models printed from the 3D objects.
Who's done what beforehand?
It was inspired by these kickstarter projects:
https://www.mayku.me/

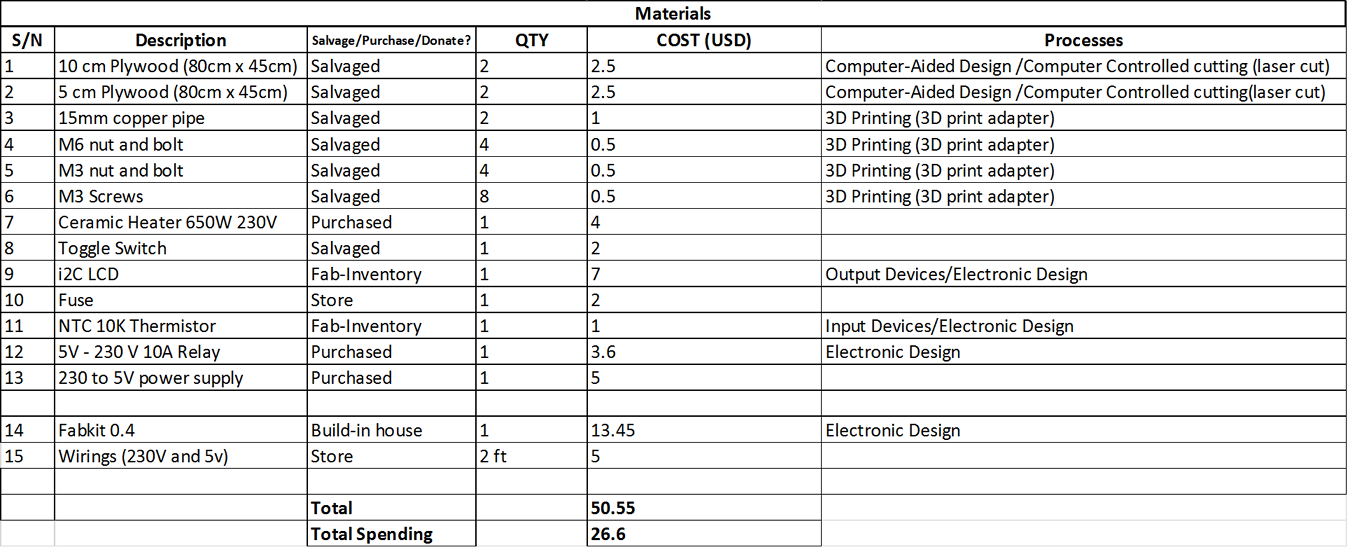
What materials & components will be required?
What tasks needs to be completed?
- Understanding which heater to be used.
- Understand which material to be used for vacuum forming
- Figuring out how to mount copper pipes on the vacuum former
- 3D designing the mounts for copper pipes
- 2D laser cut the body of the former
- Design and construct microcontroller boards
- Programming the board
What needs to be made?
- 3D Design and print adapters for the copper pipes
- Milling of Breakout boards, Fabkit. Solder and testing of codes
- Laser cutting of 10mm and 5mm plywood for the Vacuum Former body
What questions need to be answered ?
- How do I make the rods stable?>
- How much heat will it produce from the heater?
- How do you assure the safety of use of the machine?
- Can it vacuum form other materials?
- Why is the build size so small?
What is the schedule ?
15 Apr - Soldering Fabkit
22 Apr - Designing microcontroller
29 Apr - Testing board with Arduino IDE and other input devices and output devices
6 May - planning and designing 2D and 3D designs of the vacuum former.
13 May - Fabricating partial 2D designs of the vacuum former (test cut)
20 May - Fabricating 2D designs on plywood
27 May - Designing and fabricate 3D design for the vacuum former.
How will it be evaluated?
- Successful in vacuum forming HIPS plastic (1mm thick)
- Some sort of indication(LED) or a switch to help user to be in control of the machine.
- Little or no leakage on the Vacuum Chamber.
- Relay able to control the temperature.