Parametric Design and Kerf

One of the difficulties I had with this weeks assignment, was that prior to this I had not done any parametric design. But it was not challenging to figure out, altough a fully parametric item can be complex to design. It adds a useful layer of complication to the cad designed parts. In essence parametric design is about math. You can define parameters, like thickness and kerf, and then use them in mathematical formulas to dictate the final value. This makes it possible then to change one value, like thickness, and all related items adapt to the new values. For example when you are making slits, like the ones I have in my bone of contention, the width of the slits is dependant on the thickness of the material.
Since the purpose is to be a fit snug enough that the pieces stick to each other, the kerf and the thickness need to be influencing values. If the thickness and kerf weren't defined as parameters for the piece, and I had to make some change, say the material at the lab has different thickness, or I had to use a different laser. Then I might as well make whole new parts, because the work to change every measure and remember all of them, would be huge. With the thickness and kerf as parameters, I can just tell the program the material is now 4mm thick, or the laser now has 0.25mm kerf instead of 0.2mm and the program does all the work for me.
By using the height and width of the piece as parameters, one can use them to define a center point, that always stays in the middle even if the shape of the piece is changed. The more and more parameters you need for your piece, harder it becomes to keep it all together, and it is possible to break the model if there are too many parameters and then changing one causes conflict with others.

Once again as I am most familiar with Autodesk Inventor, I used it for my assignment. Inventor in essence considers all defined values parameters, and they can be referred to in other parameters. In complex pieces there can be hundreds of values, and naming the important ones becomes invaluable.

Inventor has this window under the manage tab, when designing a part, through here you can name and define parameters. Even the model parameters can be renamed, and it is possible to use those then named parameters in the design process. While I didnt use it for this assignment, it is possible to link or embed spreadsheets, making it simple to handle large number of parameters or use one set of parameters for all parts. A crucial feature for major projects, like the final projects can be.
Since we like to use Adobe Acrobat for laser cutting, the completed model then needs to be managed to properly cut it out. It needs to be exported as a DWG file.


Then I used DWG trueview program by autodesk, to inspect the file and plot it. In this cas e plot is used in place of print, so I essentially printed the part out as an PDF file. The thing is, the purpose of the program is to view files and print them out, so the file then needs to be imported into the inkscape for further processing.

Altough you will want to check the scale to be sure...

While this sending to inkscape for simple purpose of line width change does seem unnecessary initially, it does offer the opportunity to add labeling and other features one might want to raster on to the laser cut pieces.


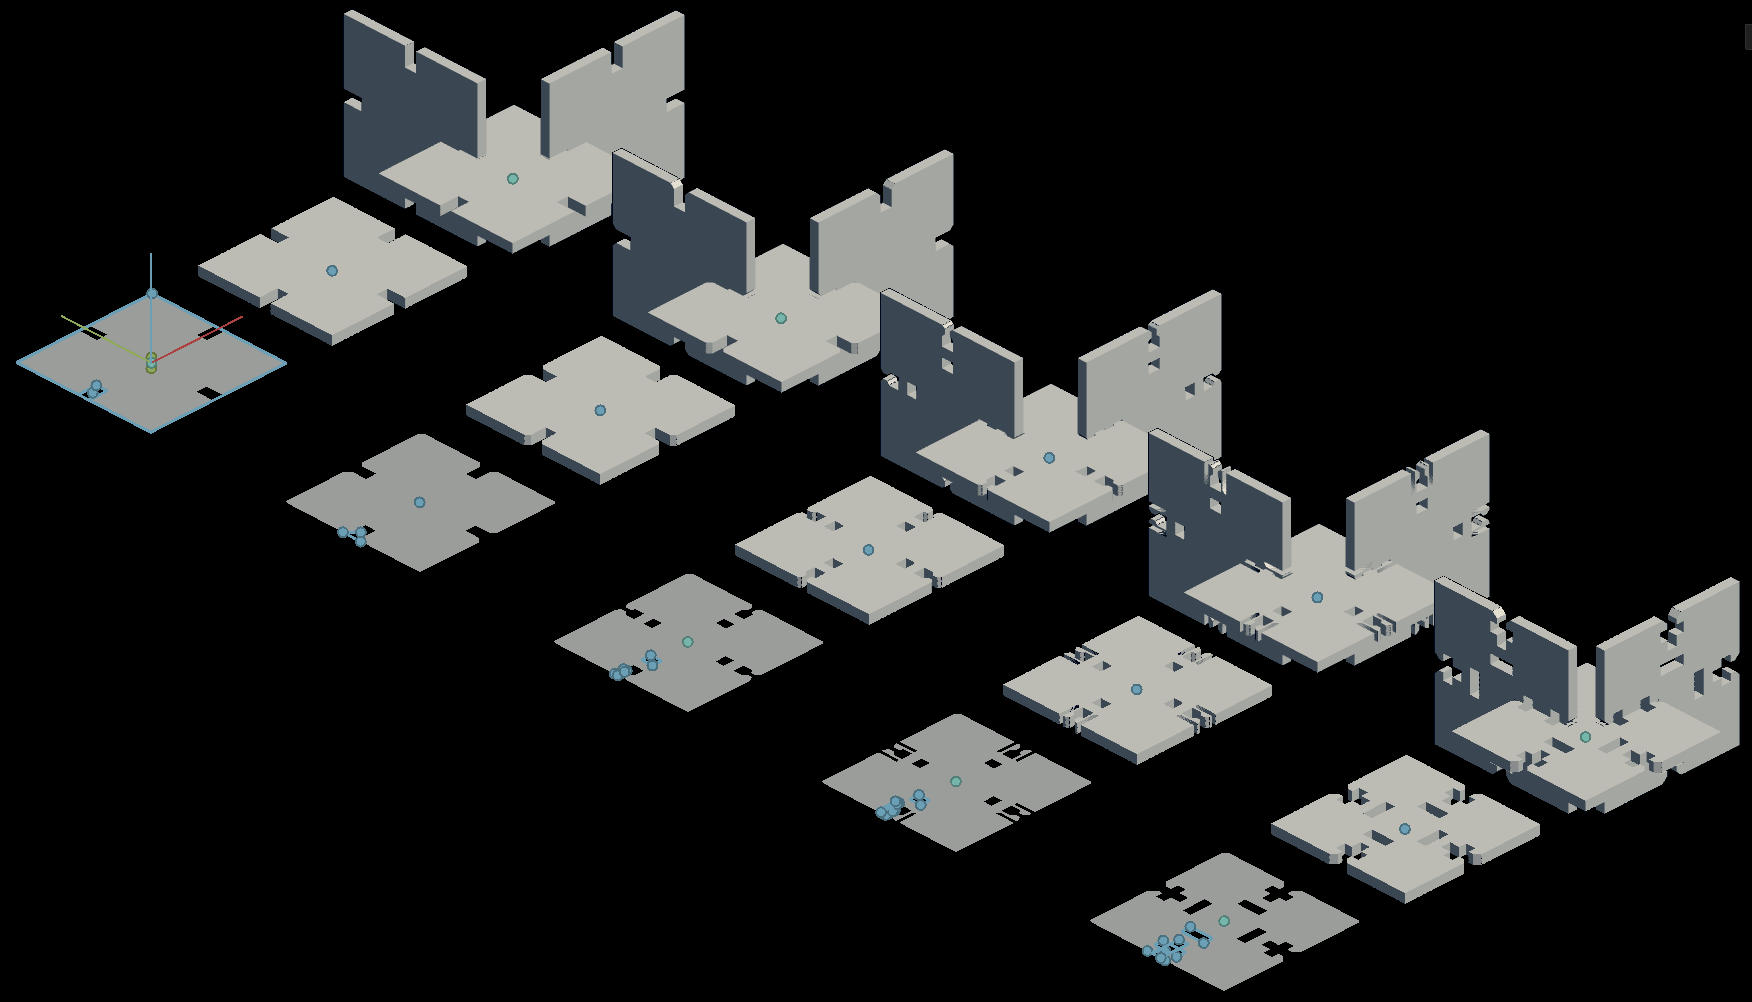
So, what is kerf? it is the amount of material the laser removes when it cuts. The group assignment was to test the kerf on the lab laser cutter, to make pieces that fit snuggly enough together. Also the pieces were supposed to be parametric, which is a valuable feature, as the material thickness can vary.
We came to the conclusion of using this comb like model for testing the kerf, each slot is a little bit smaller giving us an array of slots to work with. Then it was just a simple matter of matching the two combs, to see which slot had the best fit. In these pictures you see three iterations of the comb. The 3mm version is the latest, meant for testing the 3mm material we have at the lab. The cut piece set was the most useful one, as it indicated the kerf involved properly. The scetch is of the initial comb, that went only to the 0.1mm kerf.
In the end when it comes to kerf, the best rule of thumb is, "insides in, outsides out". 'Which means that to make a proper fit, to take kerf into consideration. Internal holes need to be made that much smaller, and outside sections need to be made that much bigger.
When one is using the laser cutter it is important to remember to turn on the suction and the replacement air, to make sure the occasional smoke from the cut peices doesnt stick around in the machine.

With the interface on the machine itself, you can move the laser head to the spot you need, by selecting the JOG from the menu on the right, and then with the knob under the go and stop buttons, you can move the head. Once it is where you need it, in general the top left corner of your piece you can press the knob to confirm the XYorigo.

Then when in the focus state, you can move the bed up and down, until you have the Z origo of the piece defined. For this the laser cutter has a template piece that defines the exact distance the head needs to be from the material for clean cuts. Once both Zorigo and XYOrigo is set you can move to JOB, and by pressing GO the job starts.
To send a job for the laser cutter, we use the adobe acrobat, and simply print it to the lasercutter. In this window you can see the menu through which the laser cutter gets its settings for that job. Rasteration is when you want to etch the surface and vector is when you want to cut it, and your lines are 0.02mm thin in the pdf file for it to undertstand them as cutting lines.

Speed, power and frequenzy are related to the material, and can be changed around to define how well it cuts. In some cases y ou dont want it to cut through and in others you need it to slice through something thick, these three settings are that define it.
Bone of contention
This week's individual assigment was to make a piece that fits together in multiple ways. So I made my bone of contention.
In my bone of contention, the parametric values are for defning the different slots, their location and depth. The slot for twisting needs to be exactly in the middle, and the slots that give it the bone like look need to be where they are to give the piece its capacity to connect in multiple ways.
It is the slots on the sides that make the middle in between them exactly 10mm wide, making it just wide enough that it can twist into place in the middle.
In the lecture there was this image of different joints, but none of them were internal as such. They were snap fit, but not twist fit.
So I wanted to make a piece with a twist fit. so the hole in the middle is wide enough for the piece to slide through it, and the slots on the side make the piece narrow enough in the middle that the piece can then be twisted into place.


The paperwork
- Assesment
- Have you, explained how you parametrically designed your files?
- Have you, Shown how you made your press-fit kit?
- Have you, Included your design files and photos of your finished project?
- Lecture Details
- Lecture Video
- Review Video
- The Files
Sub-pages
-
 The Laser Cutting
This week's assignment, to make a piece that can be fitted in many different ways
-
The Vinyl Cutting
One of the Alliances I am involved with in EVE online. Since their logo has the colors the lab has available, I use it for the vinyl cutting assignment.
Kerf Assignment group
Acknowledgements
Some of the laser cutter pictures were taken by group members.