Invention, Intellectual Property, and Income
High School Lesson Plan (Purpose)
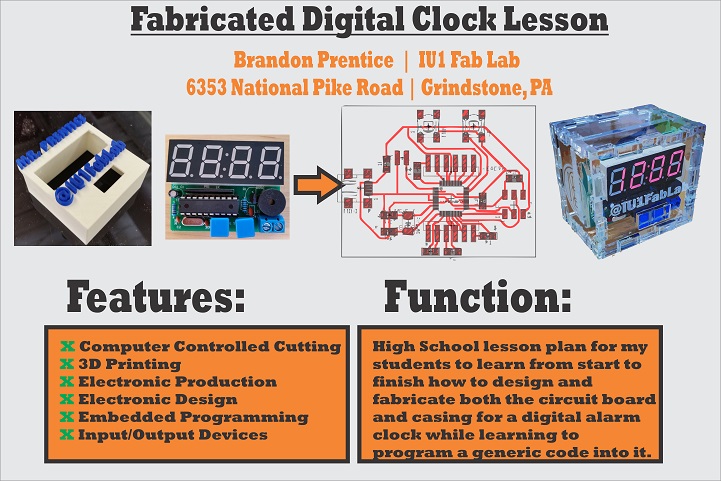
Students will learn to construct a digital clock circuit while designing a casing for it. This project gives students an understanding of basic electronics/circuitry as well as different fabrication features to build an exterior for it. Option to take this project an extra step further where students can learn from start to finish how to design the circuit board itself, have it cut from a CNC milling machine, and then programming a code into it.
Educational Standards
National Standards for Technological Literacy:
STL9.9-12.L - The process of engineering design takes into account a number of factors.
STL11.9-12.Q - Develop and produce a product or system using a design process.
STL17.9-12.L - Information and communication technologies include the inputs, processes, and outputs associated with sending and receiving information.
STL17.9-12.P - There are many ways to communicate information, such as graphic and electronic means.
Pennsylvania Academic Standards for Science, Technology and Engineering Education:
PA.3.4.10.C1 - Apply the components of the technological design process.
PA.3.4.12.C2 - Apply the concept that engineering design is influenced by personal characteristics, such as creativity, resourcefulness, and the ability to visualize and think abstractly.
PA.3.4.10.E4 - Evaluate the purpose and effectiveness of information and communication systems.
PA.3.4.12.E4 - Synthesize the effects of information and communication systems and subsystems as an integral part of the development of the Information Age.
Learning Objectives
1) Students will identify different circuitry components to solder and produce a digital clock.
2) Students will analyze principles of electrical engineering to design or form a circuit.
3) Students will digitally fabricate a casing for a fitted circuit board.
Dissemination Plan
- Showcase at local events, fairs, camps, etc.
- Use as a official mobile lab lesson to show school district our wide range of processes.
- Share results and project proposal to the Fab Lab network.
- Develop a whole design brief for teachers interested in using this lesson in their classroom.
Licensing Choices
2D Vectoring
During the length of this course, I have experiemented a lot with the capabilities of CorelDRAW and Adobe Illustrator; two excellent programs when it comes to node editing and vector layouts. Where Adobe’s layout feels more professional with it’s tool options, I still find CorelDRAW to be way easier to teach students at a younger age. The navagation/manipulation tools are easier to catch onto and to design the certain types of vectors we need for CNC machines. The other reason is the cost/availability. All of my labs already have a 1-time license fee for CorelDRAW where Adobe packages are twice the cost, with annual fees.
3D Modeling
I am more open to the choice of this kind of software since starting my project proposal. I’ve gotten to use more free software (SketchUp, Tinkercad, etc.) for the great accessibility and easy interface with younger crowds. Since this project is for more advance students, the capabilities could be endless when it comes to sculpting the 3D model case itself. I have been playing around with Blender, Meshmixer, and Rhino 5 since this course, and would like to implement them for future oppurtunities.
Circuit Design
Throughout this course, I have primarily used Eagle to do all of my circuit designs. Although it was very tricky for me at first, I have grown to feel comfortable when drawing out a design. My other software experience came to me from a friend working in electrical engineering, where he primarily used Kicad. My experiences with this software were very positive, but the one major downfall that I saw was the inability to create a monochrome PNG of my finished layout.
Programming
I started this academy school purchasing a MK11 programmer with AVR Studio 4 to pave the way through programming the various boards I would be making. As I moved through the course though, I began using our Arduino Uno’s we had in inventory and then eventually creating my own clone to do my programming for me on Arduino IDE. I found myself more attached with arduino’s IDE with it’s simplicity and largly universal support/communities behind it. It seemed like a very easy structure to learn for a 7-12th grade classroom and yet still can be used for the most advanced or complicated assignments.
Future Opportunities
I find this project to be very intriguing for future classrooms. Integrating the fundamentals of graphic designing, 3D modeling, circuit board design, and programming. This formula puts all these variables into in a small fun package for students to explore the possibilities inside a Fab Lab while making their own practical item. I can see this project splitting off into many processes when it comes to design and purpose. Whether it’s the size and scope of the product, or the complexity of the program features that are uploaded into it. Many materials/processes can be experienmented with such as with glass, silicone molds, embroidery fabrics, and more!