Week 08
Embedded Programming
The eighth lecture on Wednesday March the 15th was about Embedded Programming: microcontroller architectures, families, attributes (memory, peripherals, data units size -8, 16, 32, 64 bits), boards (echo hello-world, arduino, fabduino, satshakit), communication (RS232, USB, FTDI) and microcontroller programming basics (ISP feature, programmers, assembly, C). Assignment given by Neil for this eighth week was:
- Read a microcontroller DATAsheet
- Program a board to do something
Reading a microcontroller DATAsheet
A microcontroller (also known as MCU) is small computer in a single integrated circuit; it contains a one or more CPUs ("Central Processing Units": processor cores) in addition to a fixed amount of RAM, ROM and other peripherals embedded. Between the different MCU families and models, I chose to read Atmel 8bit AVR ATTiny 24A-44A-84A Datasheet, which has been proposed as default reading by Neil during this week ecture, and being ATTiny 44A also featured on as default MCU on the echo hello-world board. As a matter of fact, Atmel ATTiny represent maybe the best balance between microcontroller market price and industry actual and perspective standards; following the wide success of Arduino Platform, it seems also better community-supported than PIC; this difference however seem to become less and less relevant since Microchip (PIC microcontroller creator) recently acquired Atmel (AVR microcontroller creator).
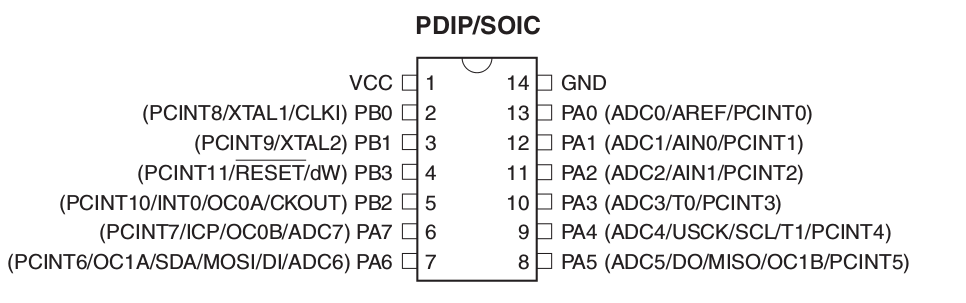
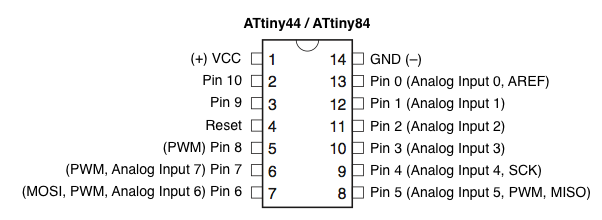
Pinout Schema (the same for all 24A-44A-84A types)
PIN descriptions
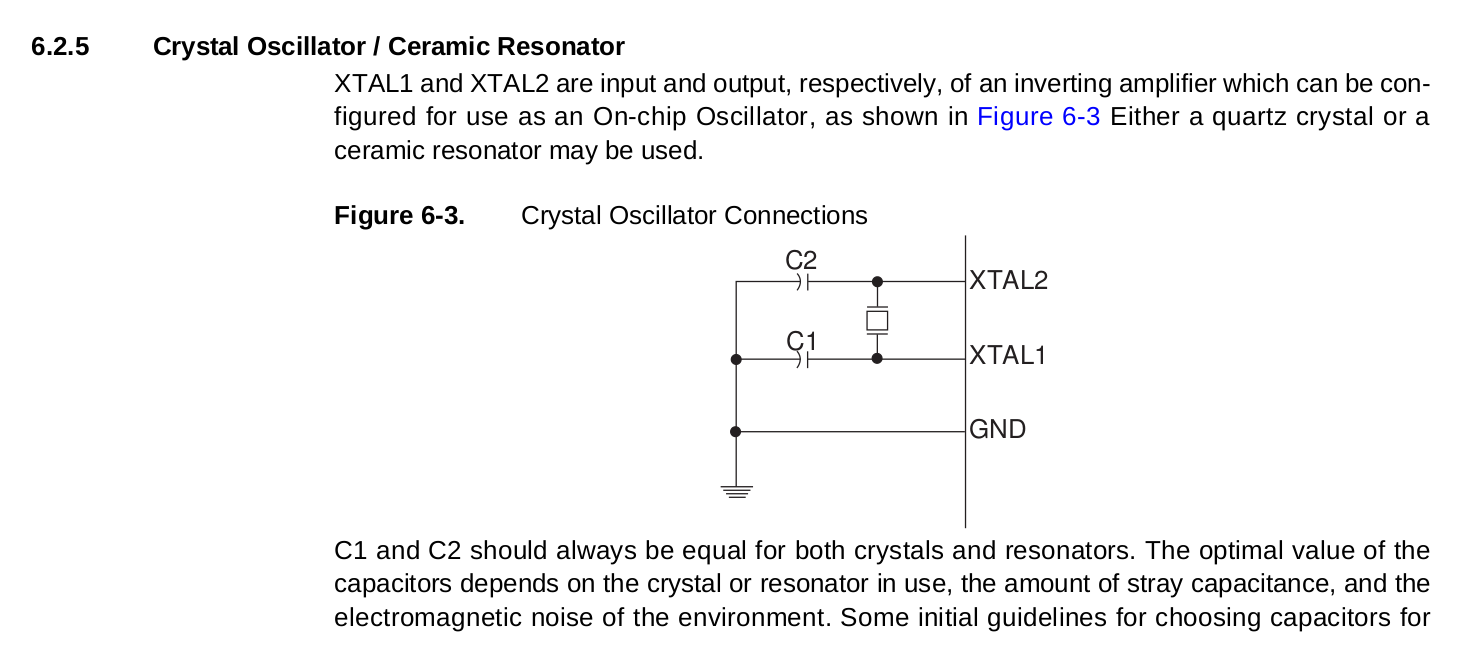
Clock sources

Cristal Oscillator
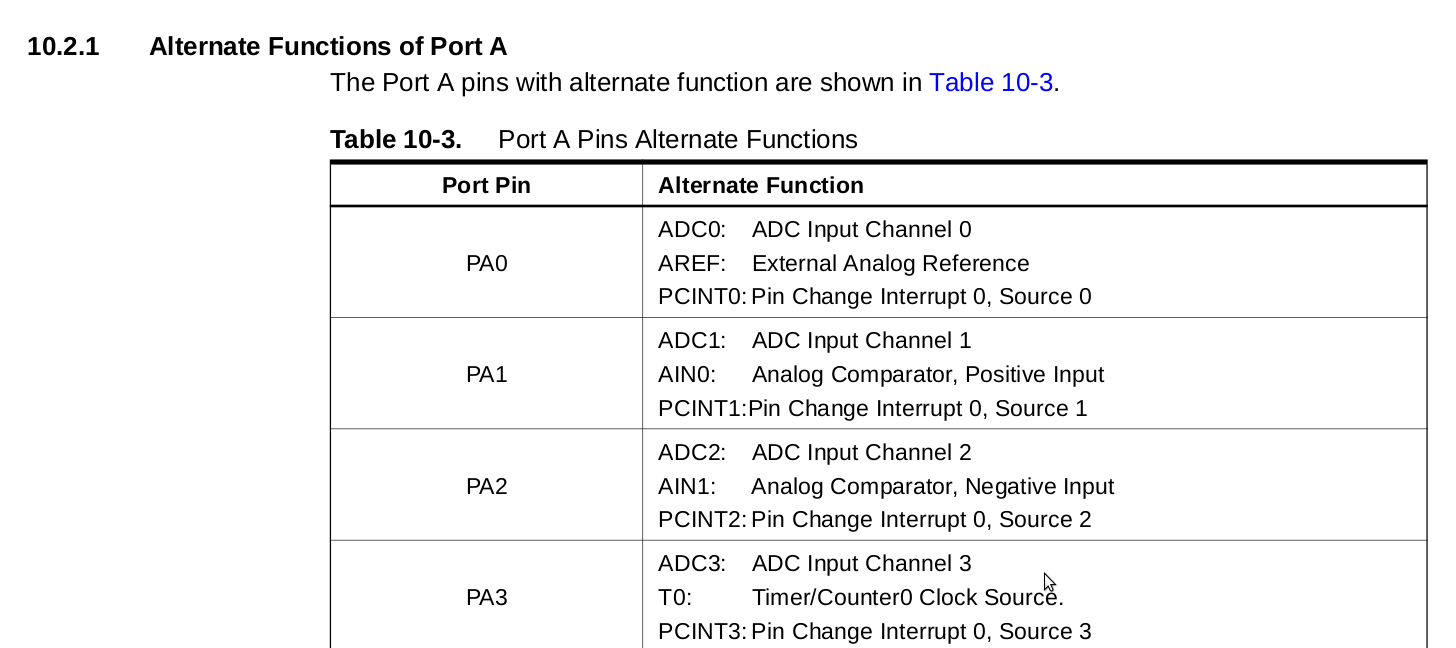
Alternate Port A Functions
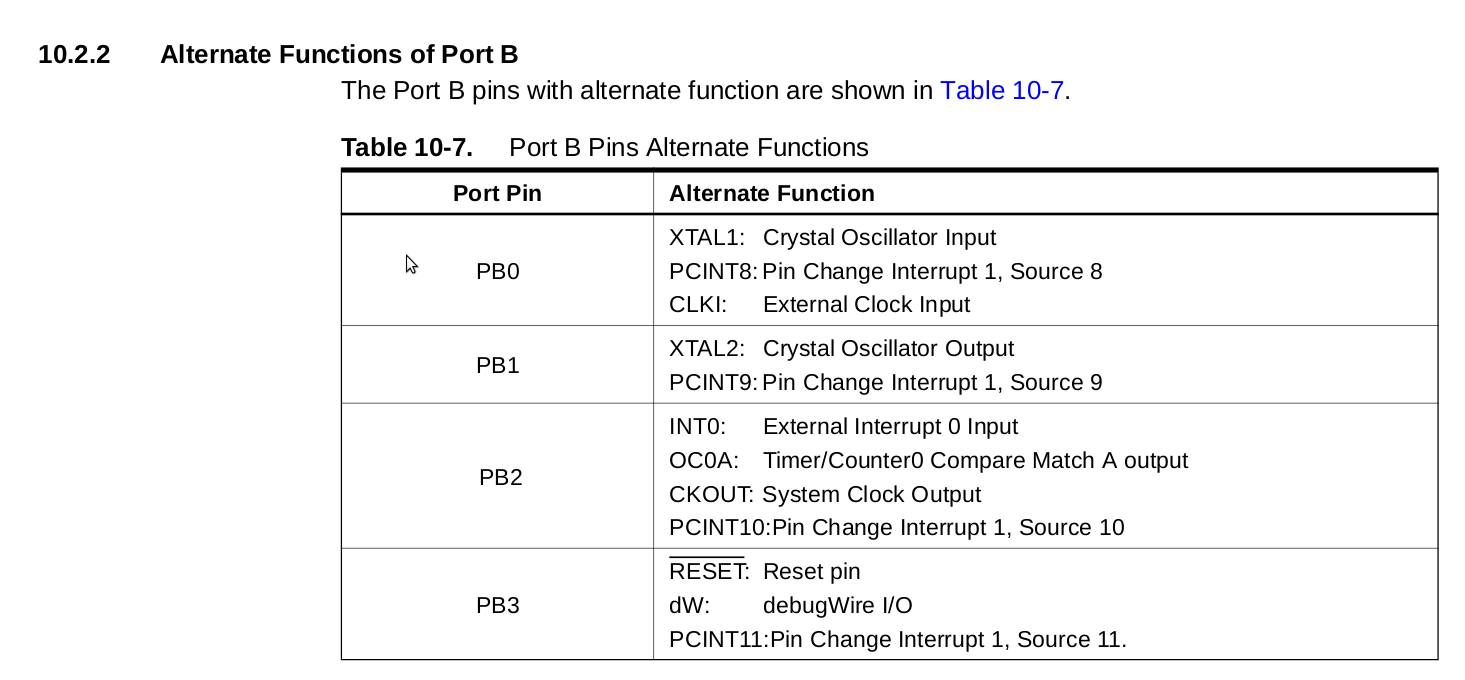
Alternate Port B Functions
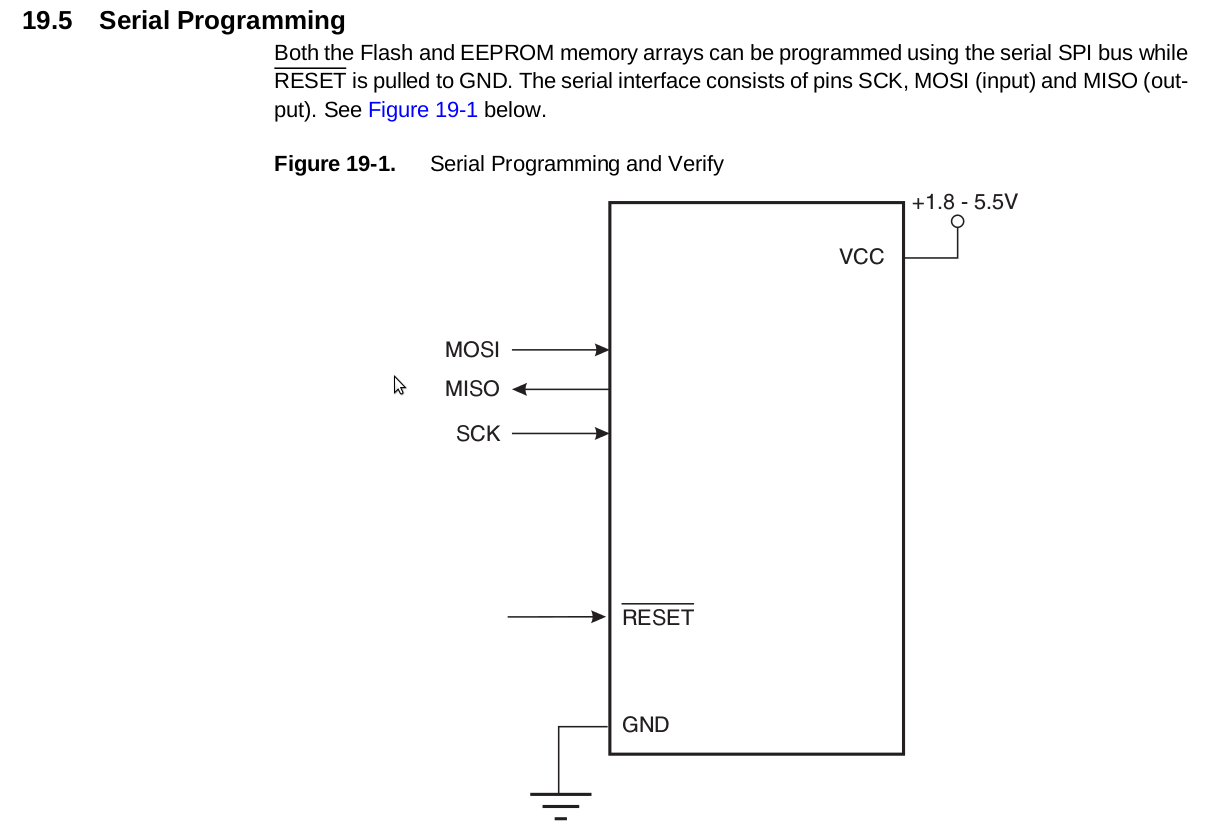
Serial Programmina MISO MOSI
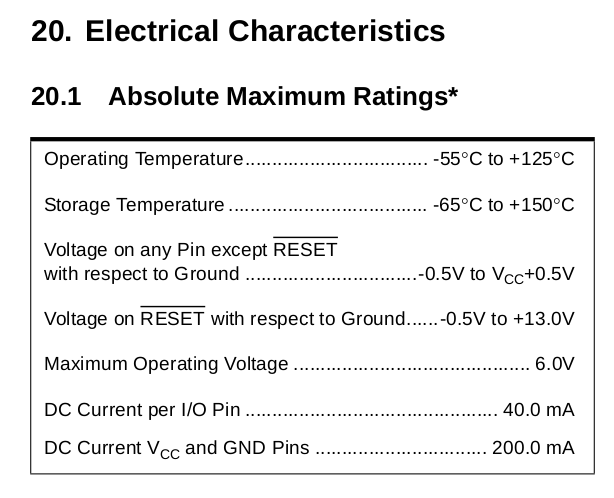
Electrical Characteristic
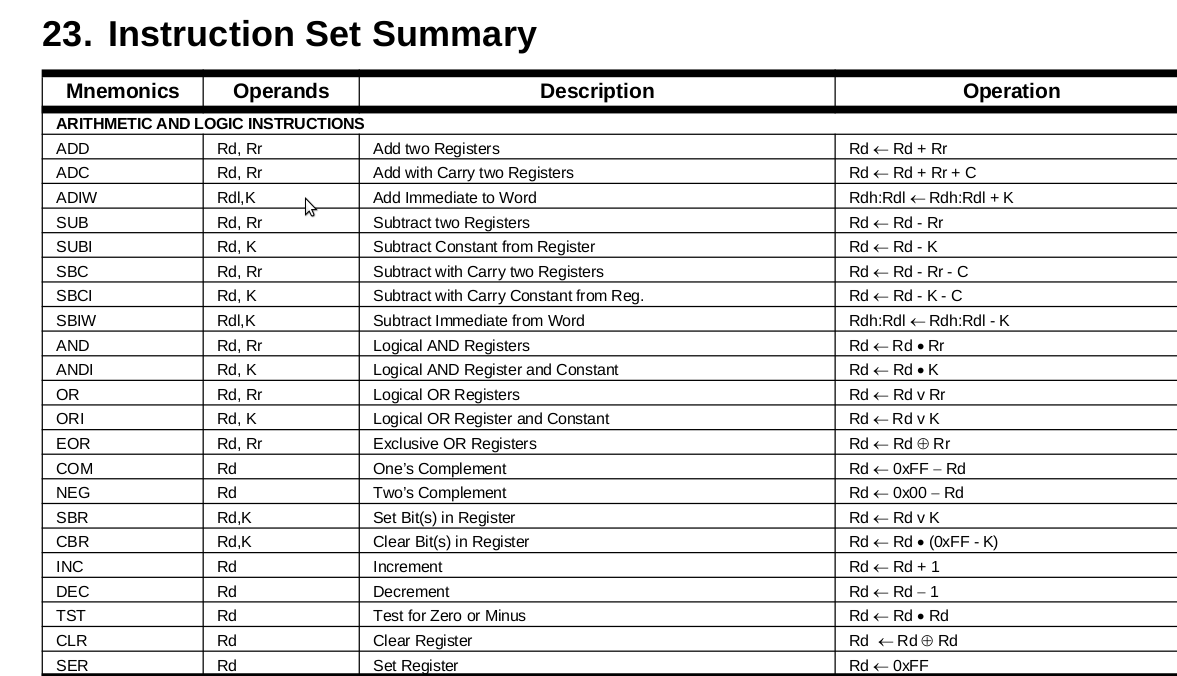
Instruction Set
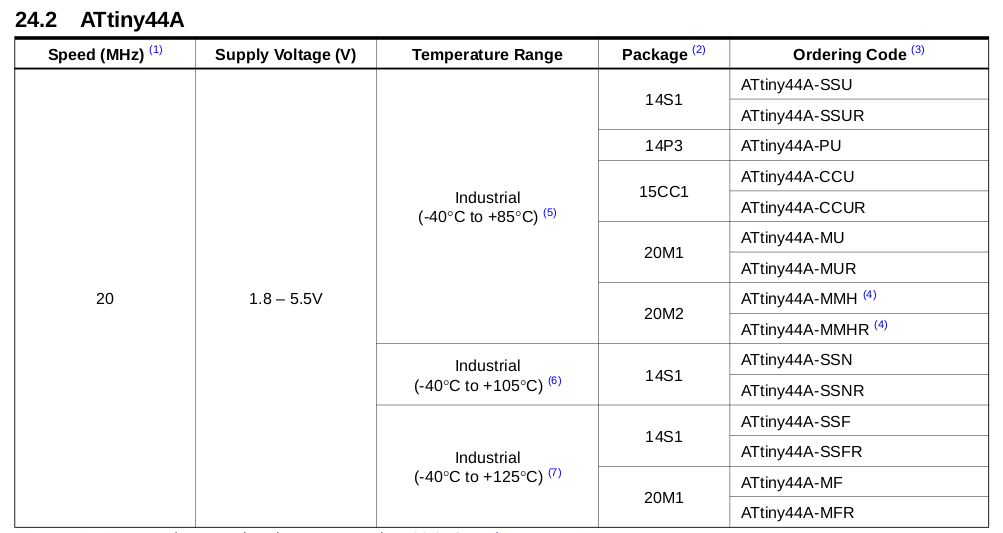
Packages
ATTiny 24A-44A-84A-SSU Package / Dimensions (mm/inches)

Programming the echo hello-world board to do something
Second part of this week's assignment was "Program a board to do something" and I decided to program the echo hello-world board to light the LED when pushing the button and at the same time write a message on serial interface that says "Button pressed!"; indeed not very creative thing and -I believe- a big classic over Fab Academy Programming Week assignment, but since I don't have engineering nor computer-science school background and this was my very first time programming an ATTiny microcontroller board, I wanted to take it easy.
Between the different programming options presented by Neil during this week's lecture I also choose what is maybe the most simple option for a beginner level: the Arduino IDE -sorry, really nothing against assembly or straight C! :) During my past electronics tinkering experiences as an hobbyist, I already became little familiar with the Arduino Platform, at least to setup some wirings -through a breadboard- between an Arduino UNO board and some sensor and actuators, and modifying some of the given Arduino Sketch Examples just to have fun.
Arduino is a widespread opensource electronic prototyping platform that enables users (mostly -but not only- at a beginner level) to create interactive electronic objects. The project's products are distributed as open-source hardware and software (released under the terms of GNU/GPL or GNU/LGPL licenses), permitting the manufacture of Arduino boards and software distribution by anyone. Arduino boards are available commercially in preassembled form, or as do-it-yourself kits; there'is also a bunch of projects for a fully fabbable Arduino libraries compatible board, the most notable being Fabkit, Fabio and Satshakit.
Arduino platform consists, as a matter of fact, in a bundle of five different things:
- Arduino Board
- Arduino C Libraries
- Arduino IDE
- Arduino Bootloader
- Arduino Header
A brief history of Arduino Project is also interesting: it started in 2003 as a program for students at the Interaction Design Institute Ivrea (Italy) as an easy and low-cost framework for interactive electronic devices and art installations, being heavily inspired by the Wiring Platform Master's IDII thesis by colombian student Hernando Barragán under the supervision of professors Massimo Banzi and Casey Reas; after the first development years as a start-up business, Arduino finally took off becoming viral and a de-facto standard choice for makers, tinkerers and electronic hobbyists all over the world; this big result (reached by a small company) has been possibile thanks to a bunch of key-features: ease-to-use, low-cost, opensource licenses, wide documentation and strong community support.
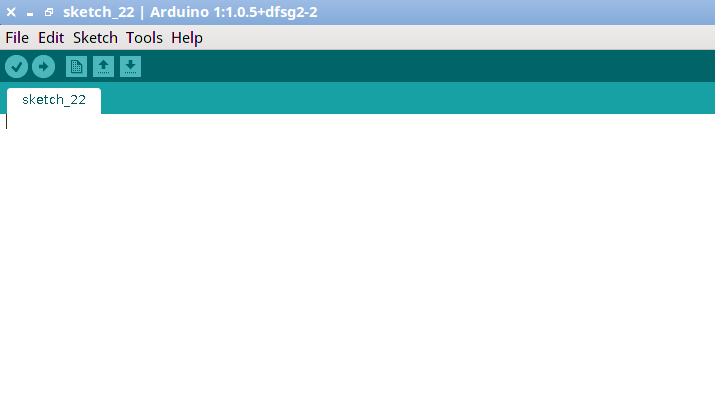
Arduino Integrated Development Environment contains a text editor for writing code, a message area, a text console, a toolbar with buttons for common functions and a series of menus; it connects to the Arduino hardware to upload compiled programs and communicate with them. Arduino IDE software can be found online with different options: as a webeditor and as a download (for Windows, Mac and GNU/Linux systems -along with software sources) from official website, or from the online software repositories of the main GNU/Linux distributions; in a Debian or derivatives (e.g. popular Ubuntu and Mint distributions), it's easy as opening a terminal and using apt-get package manager:
~ $ apt-get install arduino
Programs written using Arduino IDE are called sketches and programming language is merely a set of C/C++ functions that can be called from the code: the sketch undergoes minor changes (e.g. automatic generation of function) and then is passed directly to a C/C++ compiler (avr-g++). The sketches are written in the text editor and saved with the file extension .ino; the editor supports cutting/pasting and searching/replacing text. The message area gives feedback while saving and exporting and also displays errors. The console displays text output by the Arduino Software (IDE), including complete error messages and other information. The bottom righthand corner of the window displays the configured board and serial port. The toolbar buttons allow you to verify and upload programs, create, open, and save sketches, and open the serial monitor.
ATtiny microcontroller series is not included by default in Arduino IDE support, however it's possible to add it simply following a very good step-by-step tutorial by High Low Tech research group at MIT Media Lab; although not credited in particular, this tutorial has probably been created by David A.Mellis, part of both Arduino Project (as lead software developer) and High Low Tech Group, and it also contains a clear schema about mapping between Arduino PIN numbers and ATtiny 84A-SSU PIN/PORT registers.
Time to write code! First of all, including SoftwareSerial library
#include <SoftwareSerial.h>
defining constants for PIN 7 and 8, where button and LED are attached
const int buttonPin = 7;
const int ledPin =  8;
defining a variable later used to track button state
int buttonState = 0;
initializing SoftwareSerial on PIN 1 and 0
SoftwareSerial mySerial(1, 0);
in void setup function (the code that microcontroller is going to execute once at the beginning), initializing the LED PIN as an output, and the Button PIN as an input, then starting serial communication at 9600 baud rate
void setup() {
    // initialize the LED pin as an output:
    pinMode(ledPin, OUTPUT);
    // initialize the pushbutton pin as an input:
    pinMode(buttonPin, INPUT);
    digitalWrite(buttonPin, HIGH);

    mySerial.begin(9600);
    mySerial.println("Echo hello!");
}
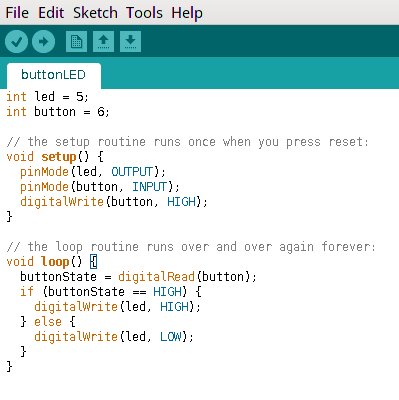
in void loop function (the code that microcontroller is going to execute over and over), reading the state of the button and putting it in buttonstate variable; if buttonstate is LOW, turning on the LED and printing on serial interface "Button Pressed!" phrase, else keeping the LED turned OFF
void loop() {
    // read the state of the pushbutton value:
    buttonState = digitalRead(buttonPin);

    // check if the pushbutton is pressed
    // if it is, the buttonState is LOW:
    if (buttonState == LOW) {
        // turn LED on:
        digitalWrite(ledPin, HIGH);
        mySerial.println("Button pressed!");
    } else {
        // turn LED off:
        digitalWrite(ledPin, LOW);
    }
}
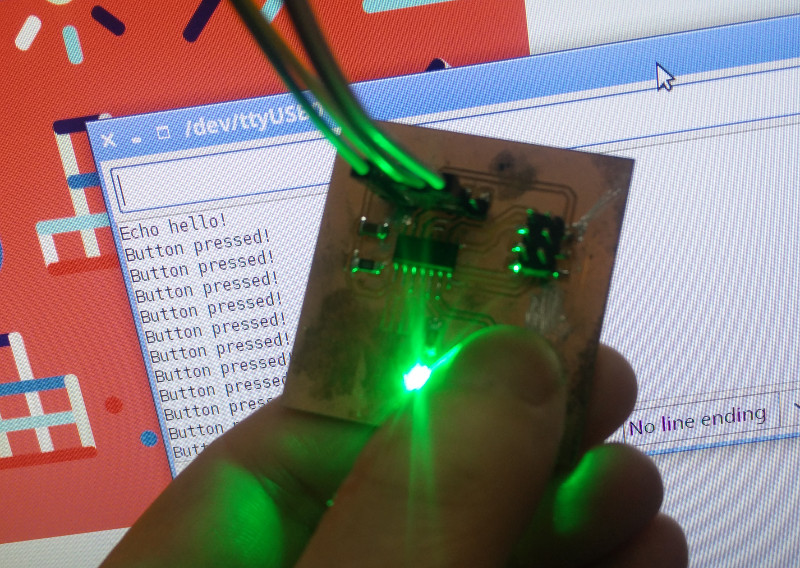
After programming the echo-hello world board with this code, with it attached to USB reading serial from Arduino IDE Serial Monitor: when button is pressed, microcontroller lights the LED on the board and in the meantime the phrase "Button Pressed!" appears on Arduno IDE serial interface
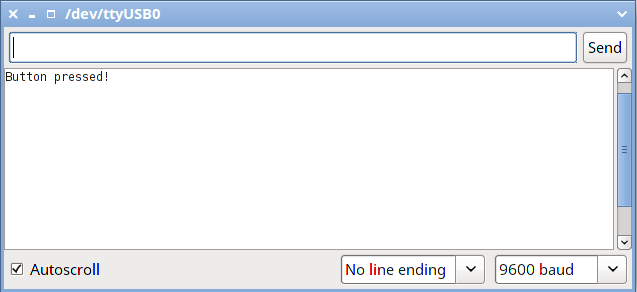
Testing it -working fine!
Source files
- buttonLED.ino -Arduino IDE output INO File