Assignment
-
Read a microcontroller data sheet.
-
Program your board to do something, with as many different programming languages and programming environments as possible.
-
Optionally, experiment with other architectures.
For this assignment began studying the Attiny family of Atmel processors. Attiny
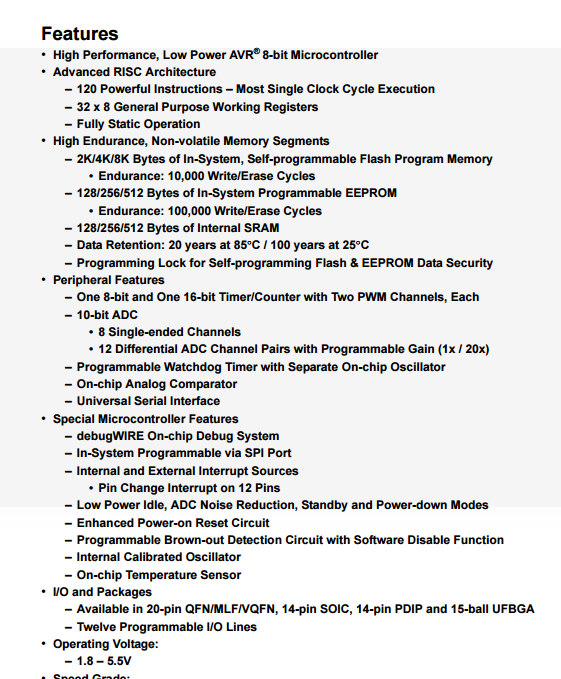
When we work with any electronic component, and more when it is a chip, all of them have their datasheet, these sheets give us the necessary information to be able to use them in any design we make, such as work voltages, currents, programming, arrangement of pins, size, etc.

For this week I decided to investigate to be able to make my board have a bootloader as an arduino and be able to use the Arduino IDE.
In order to make my board use its own bootloader, I have found two projects that have served me for this, one is the v-usb project, which allows: "V-USB is a software-only implementation of a low-speed USB device for Atmel's AVR® microcontrollers, making it possible to build USB hardware with almost any AVR® microcontroller, not requiring any additional chip. " , and the other is a bootloader called Micronucleus:"Micronucleus is a bootloader designed for AVR ATtiny microcontrollers with a minimal usb interface, cross platform libusb-based program upload tool, and a strong emphasis on bootloader compactness. To the authors knowledge this is, by far, the smallest USB bootloader for AVR ATtiny", in this case I have created a fork of the repository and I have modified the configuration to use the Attiny44 since it was not included. Modification Attiny44
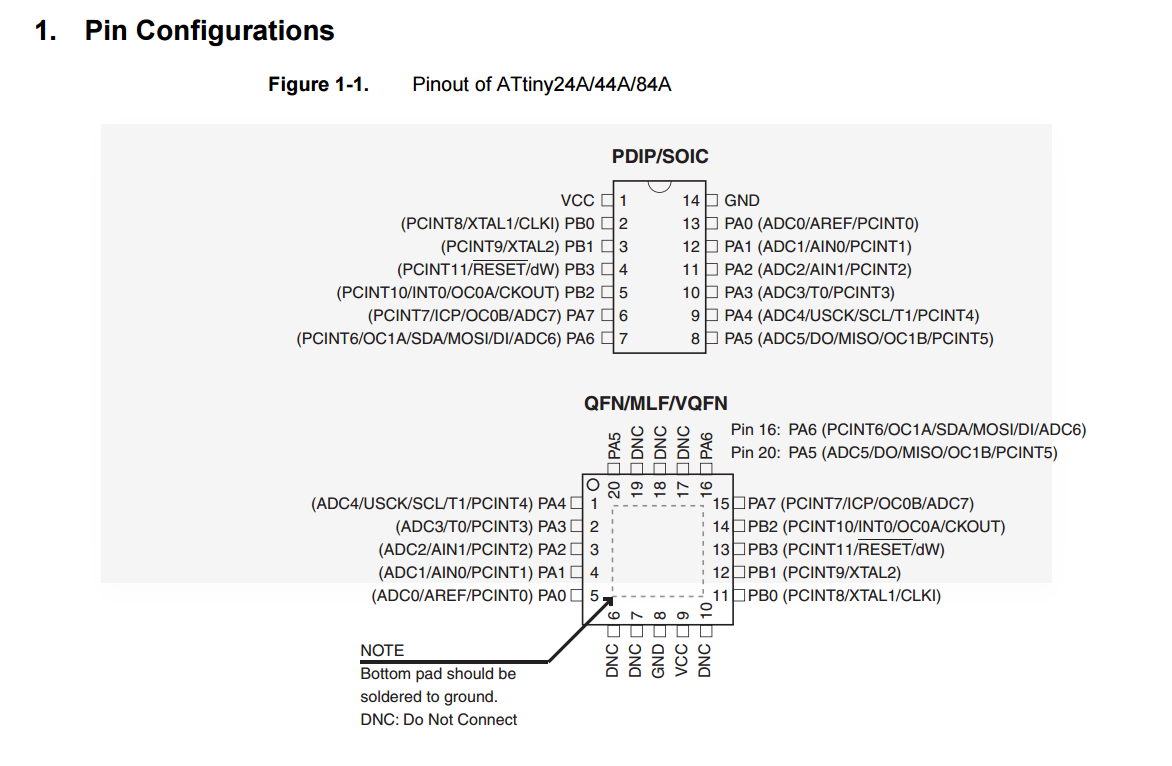
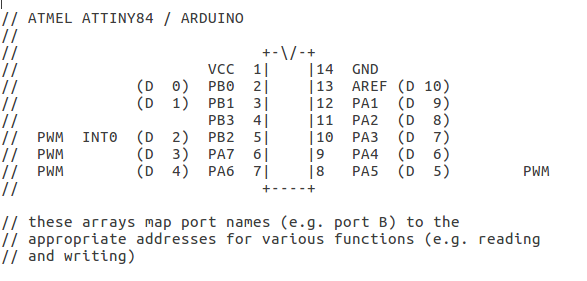
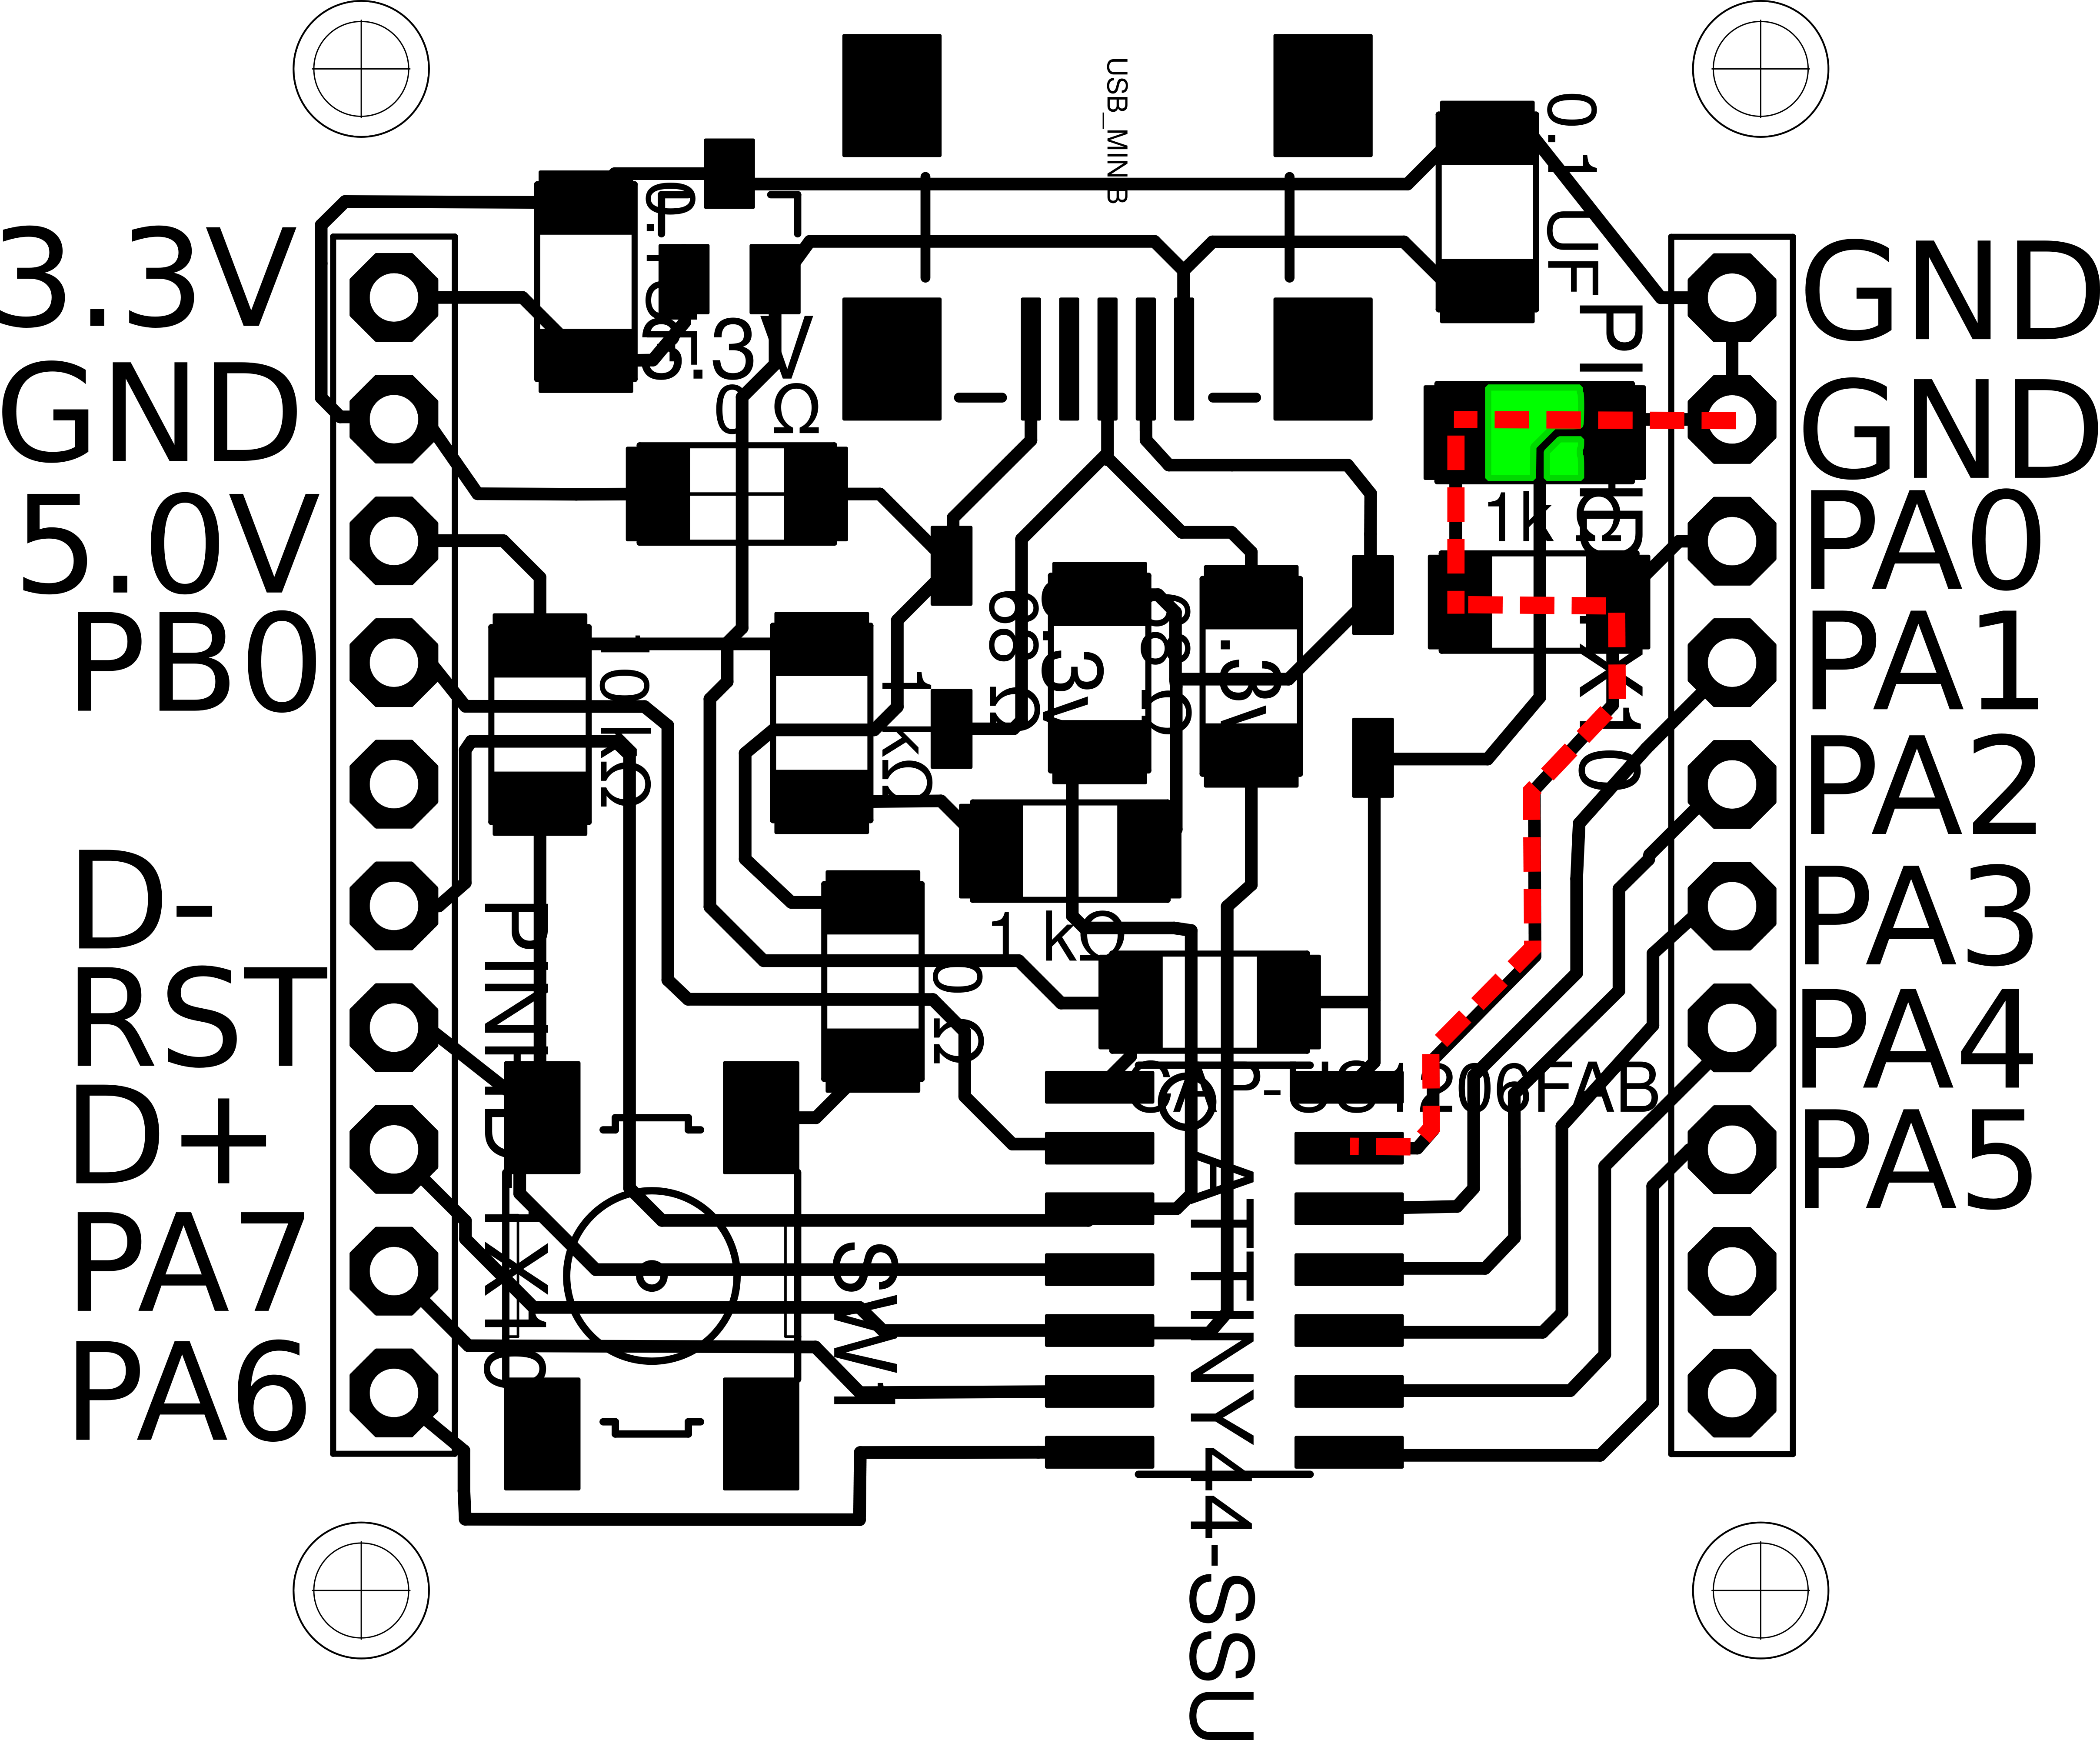
For this I will use a bootloader that I have modified and can be used with the attiny44, also it is necessary to know how the pins of the atiny are mapped with the pins of Arduino, here we see a picture of how this would be.
This allows me to upload all the code through the USB port without having to have 6 extra pins and the FABISP.
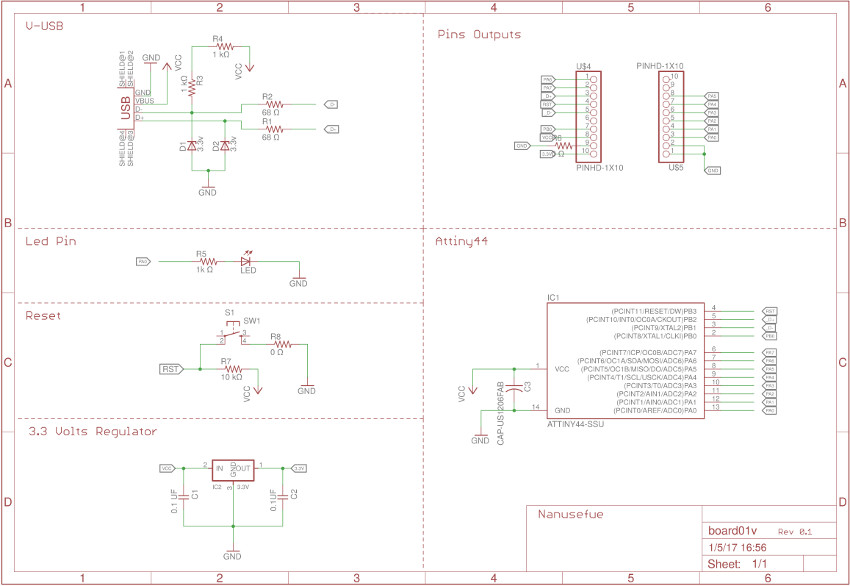
Schematic
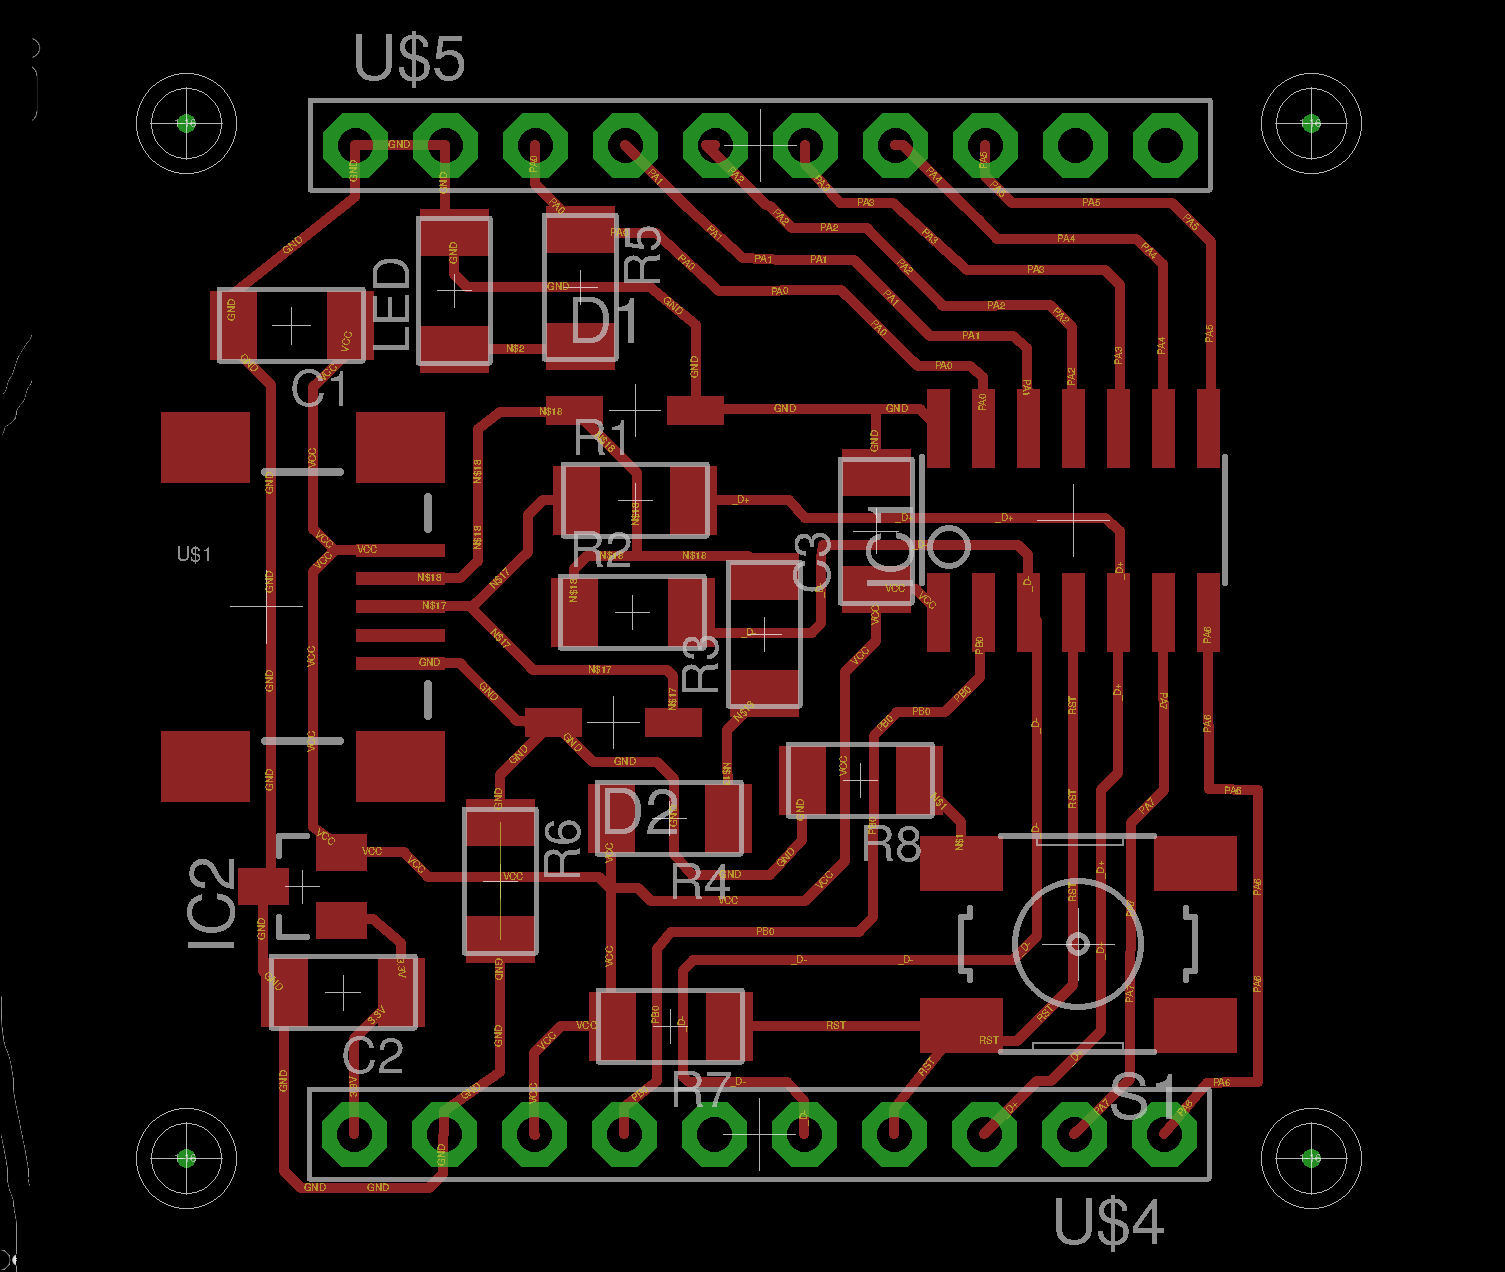
Eagle/PCB
The first program is a blink, to prove that everything works correctly.
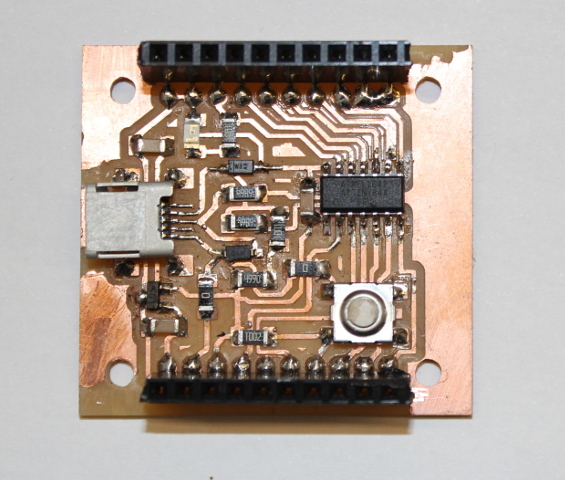
the board includes an internal led as an arduino the difference is that it is internally connected to the PA0 pin.
1
2
3
4
5
6
7
8
9
10
11
12
13
14
	/*   Blink */
	// the setup function runs once when you press reset or power the board
	void setup() {
	  // initialize digital pin LED_BUILTIN as an output.
	  pinMode(10, OUTPUT);
	}

	// the loop function runs over and over again forever
	void loop() {
	  digitalWrite(10, HIGH);   // turn the LED on (HIGH is the voltage level)
	  delay(1000);                       // wait for a second
	  digitalWrite(10, LOW);    // turn the LED off by making the voltage LOW
	  delay(1000);                       // wait for a second
	}
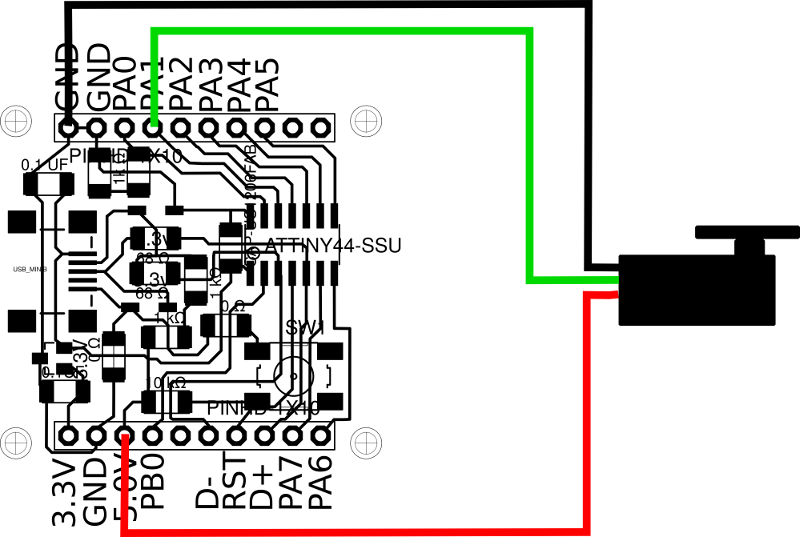
The second program used the library to control servo motor, basically with this board we can use almost all libraries of arduino, the only problem is the space that is available to our programs, as the 44 attiny is only 4k.
So that our plate can control a servo motor we can follow the connections that we see in the superior image, gnd, 5volts and the pin PA1 that is in charge of controlling it.
1
2
3
4
5
6
7
8
9
10
11
12
13
14
15
16
17
18
19
20
21
22
23
24
25
26
27
28
29
30
31
32
33
#include <SoftRcPulseOut.h>

SoftRcPulseOut myservo;  // create servo object to control a servo
                        // a maximum of eight servo objects can be created
#define SERVO_PIN         9

#define REFRESH_PERIOD_MS 1

#define NOW               1

int pos = 0;    // variable to store the servo position

void setup()
{
  myservo.attach(SERVO_PIN);  // attaches the servo on pin defined by SERVO_PIN to the servo object
}


void loop()
{
  for(pos = 0; pos < 180; pos += 1)  // goes from 0 degrees to 180 degrees
  {                                  // in steps of 1 degree
    myservo.write(pos);              // tell servo to go to position in variable 'pos'
    delay(REFRESH_PERIOD_MS);        // waits 20ms for refresh period
    SoftRcPulseOut::refresh(NOW);    // generates the servo pulse Now
  }
  for(pos = 180; pos>=1; pos-=1)     // goes from 180 degrees to 0 degrees
  {
    myservo.write(pos);              // tell servo to go to position in variable 'pos'
    delay(REFRESH_PERIOD_MS);        // waits 20ms for for refresh period
    SoftRcPulseOut::refresh(NOW);    // generates the servo pulse Now
  }
}
C and Attiny44
To compile the micronucleous application that is responsible for connecting the computer to our pcb, we use the make command, this compile for our system and architecture type, then we can copy the result to the folder / "usr/local/bin", and we can access this from anywhere in our console.
1
2
3
4
5
6
7
8
9
10
11
12
  ~ $ make
      Building library: micronucleus_lib...
      gcc  -L/usr/lib/x86_64-linux-gnu -lusb -Ilibrary -O -g -D LINUX -c library/micronucleus_lib.c
      Building library: littleWire_util...
      gcc  -L/usr/lib/x86_64-linux-gnu -lusb -Ilibrary -O -g -D LINUX -c library/littleWire_util.c
      Building command line tool: micronucleus...
      gcc  -L/usr/lib/x86_64-linux-gnu -lusb -Ilibrary -O -g -D LINUX -o micronucleus micronucleus.c
       micronucleus_lib.o littleWire_util.o -L/usr/lib/x86_64-linux-gnu -lusb
  ~ $ sudo cp micronucleus /usr/local/bin/
  ~ $ micronucleus
      usage: micronucleus [--help] [--run] [--dump-progress] [--fast-mode]
      [--type intel-hex|raw] [--timeout integer] [--erase-only] filename [--no-ansi]
Blink in C
1
2
3
4
5
6
7
8
9
10
11
12
13
14
15
16
17
18
19
20
21
#include <avr/io.h>
#include <util/delay.h>

int main (void)
{
  // set PA0 to be output
  DDRA = 0b00000001;
  while (1) {

    // flash# 1:
    // set PA0 high
    PORTA = 0b00000001;
    _delay_ms(90);
    // set PA0 low
    PORTA = 0b00000000;
    _delay_ms(20);

    }

  return 1;
}
I use a modification of the Niels Make file, to create the .hex file of our program.
1
2
3
4
5
6
7
8
9
10
11
12
13
14
15
16
17
18
19
20
21
22
23
24
25
26
27
28
29
30
31
32
33
34
35
36
37
38
39
40
41
42
43
44
45
46
47
48
49
50
51
52
53
54
55
56
57
58
59
60
61
62
63
64
65
# Name: Makefile
# Project: custom-class example
# Author: Christian Starkjohann
# Creation Date: 2008-04-07
# Tabsize: 4
# Copyright: (c) 2008 by OBJECTIVE DEVELOPMENT Software GmbH
# License: GNU GPL v2 (see License.txt), GNU GPL v3 or proprietary (CommercialLicense.txt)
# This Revision: $Id: Makefile 692 2008-11-07 15:07:40Z cs $

DEVICE  = attiny44
#F_CPU   = 12000000	# in Hz
F_CPU   = 16000000	# in Hz
FUSE_L  = 0xE2
FUSE_H  = 0xDD
#AVRDUDE = avrdude -c usbtiny -p $(DEVICE) -D -F # edit this line for your programmer
#AVRDUDE = avrdude -c avrisp2 -p $(DEVICE) # edit this line for your programmer
AVRDUDE = avrdude -c atmelice_isp -p $(DEVICE) # edit this line for your programmer


CFLAGS  = -DDEBUG_LEVEL=0
OBJECTS =main.o

COMPILE = avr-gcc -Wall -Os -DF_CPU=$(F_CPU) $(CFLAGS) -mmcu=$(DEVICE)

# symbolic targets:
help:
	@echo "This Makefile has no default rule. Use one of the following:"
	@echo "make hex ....... to build main.hex"
	@echo "make clean ..... to delete objects and hex file"

hex: main.hex

# rule for deleting dependent files (those which can be built by Make):
clean:
	rm -f main.hex main.lst main.obj main.cof main.list main.map main.eep.hex main.elf *.o usbdrv/*.o main.s usbdrv/oddebug.s usbdrv/usbdrv.s

# Generic rule for compiling C files:
.c.o:
	$(COMPILE) -c $< -o $@

# Generic rule for assembling Assembler source files:
.S.o:
	$(COMPILE) -x assembler-with-cpp -c $< -o $@
# "-x assembler-with-cpp" should not be necessary since this is the default
# file type for the .S (with capital S) extension. However, upper case
# characters are not always preserved on Windows. To ensure WinAVR
# compatibility define the file type manually.

# Generic rule for compiling C to assembler, used for debugging only.
.c.s:
	$(COMPILE) -S $< -o $@

# file targets:

# Since we don't want to ship the driver multipe times, we copy it into this project:
usbdrv:
#	cp -r ../../../usbdrv .

main.elf: usbdrv $(OBJECTS)	# usbdrv dependency only needed because we copy it
	$(COMPILE) -o main.elf $(OBJECTS)

main.hex: main.elf
	rm -f main.hex main.eep.hex
	avr-objcopy -j .text -j .data -O ihex main.elf main.hex
	avr-size main.hex
Make command Help
1
2
3
4
 make
This Makefile has no default rule. Use one of the following:
make hex ....... to build main.hex
make clean ..... to delete objects and hex file
Create .hex file
1
2
3
4
5
6
7
8
make hex
avr-gcc -Wall -Os -DF_CPU=16000000	 -DDEBUG_LEVEL=0 -mmcu=attiny44 -c main.c -o main.o
avr-gcc -Wall -Os -DF_CPU=16000000	 -DDEBUG_LEVEL=0 -mmcu=attiny44 -o main.elf main.o
rm -f main.hex main.eep.hex
avr-objcopy -j .text -j .data -O ihex main.elf main.hex
avr-size main.hex
   text	   data	    bss	    dec	    hex	filename
      0	    102	      0	    102	     66	main.hex
Upload using Micronucleus program
1
2
3
4
5
6
7
8
9
10
11
12
13
14
15
16
17
18
19
micronucleus --run main.hex
> Please plug in the device ...
> Press CTRL+C to terminate the program.
> Device is found!
connecting: 33% complete
> Device has firmware version 2.3
> Device signature: 0x1e9207
> Available space for user applications: 2554 bytes
> Suggested sleep time between sending pages: 7ms
> Whole page count: 40  page size: 64
> Erase function sleep duration: 280ms
parsing: 50% complete
> Erasing the memory ...
erasing: 66% complete
> Starting to upload ...
writing: 83% complete
> Starting the user app ...
running: 100% complete
>> Micronucleus done. Thank you!
