Git vs. Mercurial
Summary
Key concepts
Version Control Software has been around for a while. It is really important for software development, but can help a lot i.e. also for writing books, managing websites, etc.
The important concepts of version control are:
- along with files we keep their version history, so we can revert each file if we need to
- we keep track of diffs, so we know which lines of each file have changed
- we can merge different versions of each file, so we can edit two different parts and then join them in a new version
- we can branch a project, creating a new working copy of it and then merge back our changes, or not
- each time we want to make a snapshot of our files creating a new version we commit changes.
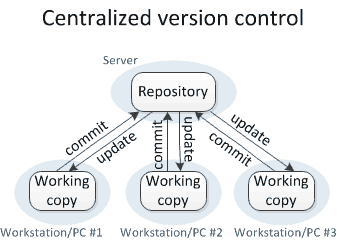
- versioning is usually done on a local computer, or on a remote server, which we call repository
- we pull files from a repository
- we push changes to a repository
- if many users make changes to the same files in the same lines there is a merge conflict
- we resolve conflicts by:
- a) taking changes from one user or another and discarding the rest
- b) manually editing the file and committing again a new version
Git and Mercurial
Many VC software exist, the most popular are Subversion, Mercurial and GIT.
Each has his strength and weaknesses. The most used worldwide is GIT. The one we used till now in Fab Academy is Mercurial. You should know both.
Difference between Git and Mercurial
Git is MacGyver and Mercurial is James Bond
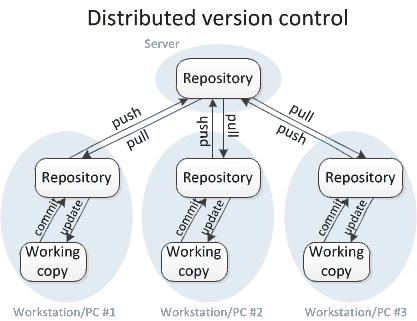
Git is distributed VCS, every user has is own private local repository then each user merges changes into a main repository, usually via pull-requests.
Mercurial is centralized, every user pulls a copy of the repository on the local computer, then pushes changes to a central repository. If anybody changed files in the meanwhile, one needs first to resolve any conflicts.
Which one is better? Up to you to decide.
Interesting Reads:
Introducing Git
Getting the software
Download GIT for OSX, Windows, Linux
Creating a (local) repository
Create a folder into your computer, cd into it and run git init
mkdir testing-git
cd testing-git
git init
You will get
Initialized empty Git repository in /private/tmp/repo/.git/
Adding files
Let’s see how some files to the repository and commit them
Create a README file with some text into your repository folder, then
git add README
git commit -m 'Initial import'
You will get
[master (root-commit) 1bcaa4d] initial import
 1 file changed, 1 insertion(+)
 create mode 100644 README
NOTE the file is committed to your local repository so you made a snapshot of it
Now you can edit it again, and look if something changed:
git status
You will get
On branch master
Changes not staged for commit:
  (use "git add <file>..." to update what will be committed)
  (use "git checkout -- <file>..." to discard changes in working directory)

	modified:   README
You will see that this file has been changed since last commit. To see what actually changed you can run:
git diff
getting
diff --git a/README b/README
index 9daeafb..2219bed 100644
--- a/README
+++ b/README
@@ -1 +1,2 @@
-test
+test is a test
+test2
At this point you can either commit your changes with git add and git commit as above, or discard them. To discard changes
git checkout -- README
will roll README back to the committed version.
Branching
Eventually you might need to work on some changes for a long time. And maybe you’re not sure these changes should make it into the main version of your repository. Consider you want to add a feature to your software but are not sure of it.
This is the perfect scenario for using a branch. When you create a repository the branch you’re using is called master.
You can create a new branch i.e. new_feature using:
git branch new_feature
And list what is your current branch using
git branch
In our case we’ll get:
git branch
* master
  new_feature
Meaning we are currentyl using master. To access the new_feature
git checkout new_feature
Getting
Switched to branch 'new_feature'
Now we can make edits in the new branch, and commit them without affecting files in master. Edit the README, add and commit some changes to it. Then switch back to the master branch. You can easily import the changes you made into the “new_feature” branch using the merge command.
git merge new_feature
You will get:
Updating 1bcaa4d..27efb70
Fast-forward
 README | 3 +++
 1 file changed, 3 insertions(+)
Now the master branch will have all the changes you made in the other branch. Each time you want to sync the two you can merge changes this way.
Remote repositories
The cool thing about Git is that it works not only locally but also via Internet. We can use it without a server. But we can also use it on remote repositories to collaborate with other people and keep our data safe.
You can install Git on any internet server. Most of people use the GitHub service as a repository for open source projects.
Let’s now register an account to GitHub and create a new repository on it. The we can add it as a remote for our local git project. We can have many different remote repository for our project, each with a symbolic name. In our case we use the origin name.
git remote add origin https://github.com/fibasile/repo.git
The last link is the one GitHub gives you for your new repository. You can use different transport mechanism for talking with remote repository HTTP, SSH, etc. More on this in the GitHub help.
At this point we can send our project branch to this remote, we push
git push origin master
Once the branch has been pushed, other people or we ourselves can get a copy of the repository for local edits. This is called cloning. Go into another folder on your computer, and write:
git clone https://github.com/fibasile/repo.git
This will create a local copy where you can work, edit files, commit changes and so on. Once you did that, you can push again your changes. Now go back to the original folder. In order to synchronize with the changes you made just now, you now pull the remote repository.
git pull origin master
Now both of your local folders are in sync. This is also a very convenient way of keeping folders synchronized among different computers.
Interesting Reads:
Introducing Mercurial
Getting the software
You can download Mercurial for Windows, OSX, Linux.
Getting started
As with Git we can work on a local folder and enable it for versioning.
The basic tool for Mercurial is called hg, taking the name from the chemical symbol of mercury. Typing hg on his own gets us the list of supported commands.
hg
Mercurial Distributed SCM

basic commands:

 add           add the specified files on the next commit
 annotate      show changeset information by line for each file
 clone         make a copy of an existing repository
 commit        commit the specified files or all outstanding changes
 diff          diff repository (or selected files)
 export        dump the header and diffs for one or more changesets
 forget        forget the specified files on the next commit
 init          create a new repository in the given directory
 log           show revision history of entire repository or files
 merge         merge working directory with another revision
 pull          pull changes from the specified source
 push          push changes to the specified destination
 remove        remove the specified files on the next commit
 serve         start stand-alone webserver
 status        show changed files in the working directory
 summary       summarize working directory state
 update        update working directory (or switch revisions)

use "hg help" for the full list of commands or "hg -v" for details
We can now create a folder and init it as a Mercurial repository
hg init
Now go on and create a new README with some text, then add it to the repository and commit the change.
hg add README
hg commit -m 'Initial import' -u fiore
Note you need to specify a user name on the commit line. You can setup a default one with hg config –edit Now we can check everything is fine, checking the mercurial log which shows the history of changes committed to the repository
hg log
We’ll get
changeset:   0:a2f0ef1e4c12
tag:         tip
user:        fiore
date:        Wed Jan 14 13:52:23 2015 +0100
summary:     Initial import
Now try and edit the README file adding some text. Next step is committing it. First difference with git is that we don’t need to add README before running the commit. As long as we don’t add/remove any file, Mercurial will know what has changed since last commit. This is convenient, as long as you want to commit every file you changed!!
hg commit -m 'Another edit'
Checking the log again we know that all is fine:
changeset:   1:6d8acdcc1429
tag:         tip
user:        fiore
date:        Wed Jan 14 13:57:20 2015 +0100
summary:     Some text added

changeset:   0:a2f0ef1e4c12
user:        fiore
date:        Wed Jan 14 13:52:23 2015 +0100
summary:     Initial import
Now imagine we add a new file to the repository. Let’s create a LICENSE file with some text. Then check the status of the folder:
hg status
? LICENSE
If we simply commit the file will stay there.
hg commit -m 'another commit'
nothing changed
We need to add the file to the versioning system. Just once, then Mercurial will track it’s changes forever. There’s a convenient command you should use for this.
hg addremove
adding LICENSE
hg commit -m 'another commit'
This will take care of both adding any new file and removing any delete file from the current version. For instance if you want to remvoe the README, you simply delete it and run addremove and commit again
rm README
 	hg addremove
removing README
Mercurial has a cool feature you can go back and forth in version history. For example we can go back to the first version committed
hg update -r0
1 files updated, 0 files merged, 1 files removed, 0 files unresolved
Where 0 in this case is the first changeset, you can see the number with hg log. If you don’t specify any value for update you will get back to the latest version.
Remote repositories
As with Git we can work with other people with Mercurial. We do this by using a remote repository.
One popular online service offering Mercurial Hosting is BitBucket. You can register a free account there and create a new Mercurial repository. Make sure you check the Mercurial checkbox for repository type.
Once you are ready you can push your current local repository to the new remote one:
hg push https://fibasile@bitbucket.org/fibasile/testrepo
This will load the project on the bitbucket repository, but Mercurial won’t remember the repository url and you would have to type it each time. You can fix this creating a file into the hg folder .hg/hgrc containing
[paths]
default = https://fibasile@bitbucket.org/fibasile/testrepo
You can set all kind of options into this file, documentation on the hgrc is available here
Same as we did with Git we can clone the repository in another folder and makes changes to it simulating some other collaborator working on the project:
  cd new_folder
  hg clone https://fibasile@bitbucket.org/fibasile/testrepo
Now let’s edit the LICENSE and add a new README with some text. Then run hg addremove and hg commit on them. Then push the changes on the remote repos.
hg addremove
hg commit -m 'Added new README and updated LICENSE'
hg push
This time we don’t need to update the hgrc since we cloned the repository from the remote one. In fact there’s already an hgrc in the .hg folder!
Fixing conflicts
Now we can pull the changes into our previous folder. But first let’s edit the LICENSE again deleting all the contents, so we can see what happens if there’s a conflict. In the initial folder:
hg addremove
hg commit -m 'Removed LICENSE text'
hg push
We get something like
pushing to https://fibasile@bitbucket.org/fibasile/testrepo
warning: bitbucket.org certificate with fingerprint 45:ad:ae:1a:cf:0e:73:47:06:07:e0:88:f5:cc:10:e5:fa:1c:f7:99 not verified (check hostfingerprints or web.cacerts config setting)
searching for changes
remote has heads on branch 'default' that are not known locally: 4c3851b23038
abort: push creates new remote head 7f93695a6e1f!
(pull and merge or see "hg help push" for details about pushing new heads)
Every time this happens, READ CAREFULLY WHAT MERCURIAL SAYS, OR YOU WILL BE IN TROUBLE.
In particular the line
abort: push creates new remote head 7f93695a6e1f!
Means we are creating a new branch head, and we DON’T want this, as other people will ignore it and delete all our changes.
Luckily Mercurial gives us some hint on how to proceed:
(pull and merge or see "hg help push" for details about pushing new heads)
So we do what he tells us:
hg pull
Getting
pulling from https://fibasile@bitbucket.org/fibasile/testrepo
searching for changes
adding changesets
adding manifests
adding file changes
added 1 changesets with 2 changes to 2 files (+1 heads)
(run 'hg heads' to see heads, 'hg merge' to merge)
Then we can merge, and commit. Please notice that we MUST commit and push again our merged version in order to bring back order to the repository.
hg merge
hg commit -m 'Merged my changes'
hg push
In most cases if we edited different files there should be no further action. Otherwise we might have to solve the merge manually with some tool.
At the end you can check the log to see what happened:
changeset:   6:61f4b120ec71
tag:         tip
parent:      4:7f93695a6e1f
parent:      5:4c3851b23038
user:        fiore
date:        Wed Jan 14 14:57:11 2015 +0100
summary:     merging my changes
Here you notice that the latest changeset has two different parents, each created during the last two pushes to the repository.
LESSON LEARNED: Always read error messages, and take the advice from mercurial
Interesting Reads
Assignments
- Register on GitHub and BitBucket
- Create repositories for some of your existing projects on one or the other
- Upload projects to the remote repositories
- Use versioning for keeping syncronized your daily work among home and office computers
- Clone open source projects repositories rather than download the zip files when you need to install something on your computer