Networking and communication
1°
The assignment was to design and build a wired or wireless network connecting at least two processors.
As always it's been difficult to understand where to start from. I browsed among the 2015 FabAcademy Students' websites to get inspiration
. I found several examples of I2C communication managed with the Arduino Wire Library. Hence I decided to learn the I2C protocol using the Arduino Wire Library to connect two Sashtakit boards.
2°
I2Communication Protocol
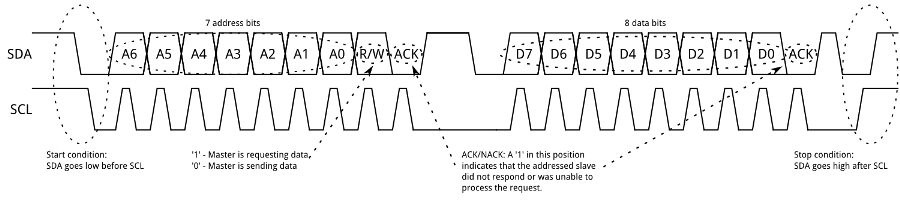
Before starting with some test I tried to understand how the I2C protocol is working. There are lots of explanations on the web, from Wikipedia to Sparkfun's tutorials. The most interesting theoretical aspect it's been to understand what it means to transmit bytes and which is the function of the clock.
3°
Sending characters by keyboard
As first test I just copied a code from the Arduino.cc website. Through this code a Satshakit board programmed as Master send another Satshakit board some bytes as characters and one byte as integer.
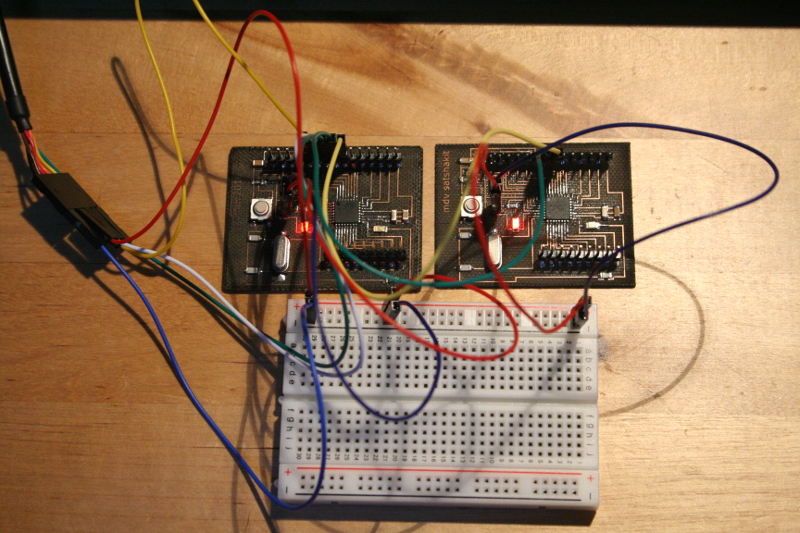
The connection is very easy. needing only two wires, one for the data and one for the clock.
I used a breadboard to share the power and ground between the two boards.
I tried to understand the code. From side of the master it quite easy. After intializing the communication (Wire.beginTransmission) the Master sends the Slaver bytes and ends transmission.
	#include <Wire.h>

void setup() {
  Wire.begin(); // join i2c bus (address optional for master)
}

byte x = 0;

void loop() {
  Wire.beginTransmission(8); // transmit to device #8
  Wire.write("x is ");        // sends five bytes
  Wire.write(x);              // sends one byte
  Wire.endTransmission();    // stop transmitting

  x++;
  delay(500);
}
From side of the slaver there's something I never met before. Untill now I only knew two voidfunction in the Arduino IDE, that is void setup and void loop. Here there's another void function, void receiveEvent. It has taken some time to understand what it means. Then I realized that it's always posssible to define a new function. The receive Event function is used as argoment during the setup, but it's defined out of the setup and auto of the loop.
	#include <Wire.h>

void setup() {
  Wire.begin(8);                // join i2c bus with address #8
  Wire.onReceive(receiveEvent); // register event
  Serial.begin(9600);           // start serial for output
}

void loop() {
  delay(100);
}

// function that executes whenever data is received from master
// this function is registered as an event, see setup()
void receiveEvent(int howMany) {
  while (1 < Wire.available()) { // loop through all but the last
    char c = Wire.read(); // receive byte as a character
    Serial.print(c);         // print the character
  }
  int x = Wire.read();    // receive byte as an integer
  Serial.println(x);         // print the integer
}
3°
Sending characters by pressing a button
As second test I wanted to send the slaver two different strings of characters by pressing a button on the master. I connected a button to the Pin 8 of the master and wrote the code in order to send the string LOW
or HIGH
depending on the state of the button.
	int switchState=0;
#include <Wire.h>

void setup() {
pinMode (8,INPUT);
Wire.begin();
}

void loop() {
switchState = digitalRead (8);
if (switchState == LOW) {
  Wire.beginTransmission(8);
  Wire.write("LOW ");
  Wire.endTransmission();
}
else {
  Wire.beginTransmission(8);
  Wire.write("HIGH ");
  Wire.endTransmission();
}
  delay(500);
}
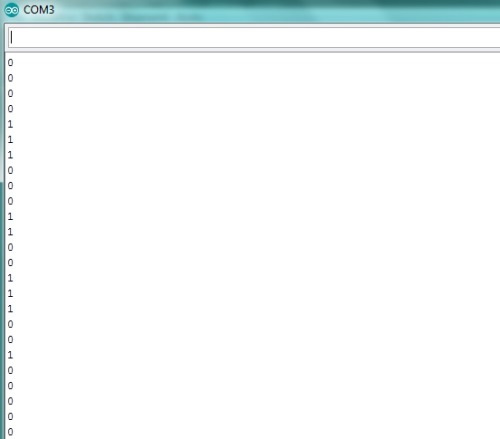
The slaver has only to receive the characters and print them on the serial monitor. Nothing is changing in comparaison with the previous example.

4°
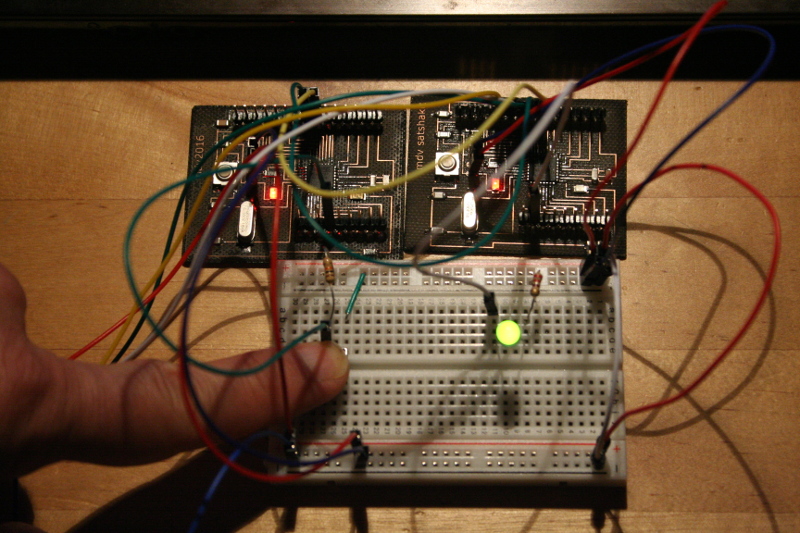
Toggling an LED on the slaver by pressing a button on the master
As upgrade of the previous test I wanted to turn on and to turn off an LED connected with the slaver by pressing a button connected with the master. The messages sent by the button were 0
and 1
instead of LOW and HIGH in order to let the slaver receive an integer instead of a string of characters.
int switchState=0;
#include <Wire.h>

void setup() {

pinMode (8,INPUT);
Wire.begin();
}

void loop() {

switchState = digitalRead (8);
if (switchState == LOW) {
  Wire.beginTransmission(8);
  Wire.write('0');
  Wire.endTransmission();
}
else {
  Wire.beginTransmission(8);
  Wire.write('1');
  Wire.endTransmission();
}
  delay(500);
}
In the code of the slaver I added an if statement
in order to turn on or to turn off the LED depending on the received integer (1 or 0).
I don't know if it's the best way, but it's working!
#include <Wire.h>>

void setup() {
pinMode(6,OUTPUT);
  Wire.begin(8);
  Wire.onReceive(receiveEvent);
  Serial.begin(9600);
}

void loop() {
  delay(100);
}

// function that executes whenever data is received from master
// this function is registered as an event, see setup()
void receiveEvent(int howMany) {
  while ( Wire.available()) {
    char c = Wire.read();
    Serial.println(c);
    if (c == '0') {
      digitalWrite (6, LOW);

      }
else if (c == '1') {
  digitalWrite (6, HIGH);

  }


  }
}
5°
Display LCD 16x2 - I2C
As further investigation on the I2C protocol communication I tested an LCD display I got for the my final project. This display it's a regular 16 characters for 2 rows LCD display that thanks to an IC called PCF8574T is communicating with a microcontroller through the I2C protocol. This means that you just need for wires (power, ground,SDA, SCL) saving a lot of your board's pins. Saving pins has been the reason of the choice to use this display.
I have to say that is very easy tu use. It's enough to download and install the LiquidCrystal_I2C library from the Arduino website and look for some tutorial for the code.
Warning - The only one problems you can have (as happened to me) is that the display is printing just the first character of a string. I found the solution in this topic from Arduino Forum. It's necessary to change a value inside the .ccp file you should have downloded with the library.
                inline size_t LiquidCrystal_I2C::write(uint8_t value) {
 send(value, Rs);
 return 0;
}
Instead of return 0;
you have to write return 1;
.
     #include
#include

LiquidCrystal_I2C lcd(0x27,16,2);  // set the LCD address to 0x27 for a 16 chars and 2 line display

void setup()
{
  lcd.init();                      // initialize the lcd

  // Print a message to the LCD.
  lcd.backlight();
  lcd.print("Test Display I2C");
  lcd.setCursor(0,1);
  lcd.print("Hello!");

}

void loop()
{
}
6°
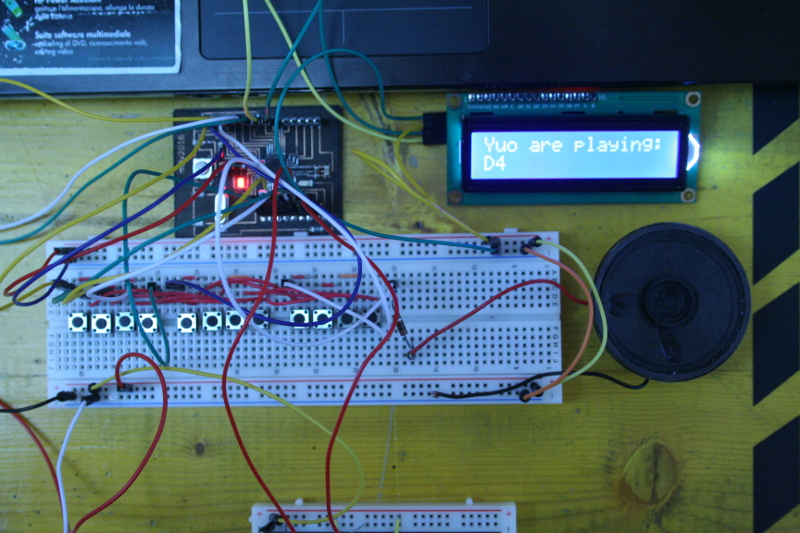
To display the note you are playing
I my final project the display is used to show the note you are plaiyng. I connected the dispaly to the Satchakit and to the 12 keys keyboard I'm prototyping for the final project. The code is aimed to play a chromatic scale made by twelve tones. I added the code for the display.
To show the name of the being played I added an array of strings. It's been interesting because you have to use the char* function.
p>
              #include
#include

LiquidCrystal_I2C lcd(0x27,16,2);  // set the LCD address to 0x27 for a 16 chars and 2 line display

const int numRows = 4;
const int numCols = 3;
const int debounceTime = 20;

//notes in the melody:
int melody[] = {
  0,NOTE_C4,NOTE_CS4,NOTE_D4,NOTE_DS4,NOTE_E4,NOTE_F4,NOTE_FS4,NOTE_G4,NOTE_GS4,NOTE_A4,NOTE_AS4,NOTE_B4,NOTE_C5,NOTE_CS5,NOTE_D5,NOTE_DS5,NOTE_E5,NOTE_F5,NOTE_FS5,NOTE_G5,NOTE_GS5,NOTE_A5,NOTE_AS5,NOTE_B5
};
char* note [] = {
  "0","C4","CS4","D4","DS4","E4","F4","FS4","G4","GS4","A4","AS4","B4","C5","CS5","D5","DS5","E5","F5","FS5","G5","GS5","A5","AS5","B5"
};
The assignment was to design and build a wired or wireless network connecting at least two processors.
As always it's been difficult to understand where to start from. I browsed among the 2015 FabAcademy Students' websites to get inspiration
. I found several examples of I2C communication managed with the Arduino Wire Library. Hence I decided to learn the I2C protocol using the Arduino Wire Library to connect two Sashtakit boards.
I2Communication Protocol
Before starting with some test I tried to understand how the I2C protocol is working. There are lots of explanations on the web, from Wikipedia to Sparkfun's tutorials. The most interesting theoretical aspect it's been to understand what it means to transmit bytes and which is the function of the clock.
Sending characters by keyboard
As first test I just copied a code from the Arduino.cc website. Through this code a Satshakit board programmed as Master send another Satshakit board some bytes as characters and one byte as integer.
The connection is very easy. needing only two wires, one for the data and one for the clock.
I used a breadboard to share the power and ground between the two boards.
I tried to understand the code. From side of the master it quite easy. After intializing the communication (Wire.beginTransmission) the Master sends the Slaver bytes and ends transmission.
#include <Wire.h>
void setup() {
Wire.begin(); // join i2c bus (address optional for master)
}
byte x = 0;
void loop() {
Wire.beginTransmission(8); // transmit to device #8
Wire.write("x is "); // sends five bytes
Wire.write(x); // sends one byte
Wire.endTransmission(); // stop transmitting
x++;
delay(500);
}
From side of the slaver there's something I never met before. Untill now I only knew two voidfunction in the Arduino IDE, that is void setup and void loop. Here there's another void function, void receiveEvent. It has taken some time to understand what it means. Then I realized that it's always posssible to define a new function. The receive Event function is used as argoment during the setup, but it's defined out of the setup and auto of the loop.
#include <Wire.h>
void setup() {
Wire.begin(8); // join i2c bus with address #8
Wire.onReceive(receiveEvent); // register event
Serial.begin(9600); // start serial for output
}
void loop() {
delay(100);
}
// function that executes whenever data is received from master
// this function is registered as an event, see setup()
void receiveEvent(int howMany) {
while (1 < Wire.available()) { // loop through all but the last
char c = Wire.read(); // receive byte as a character
Serial.print(c); // print the character
}
int x = Wire.read(); // receive byte as an integer
Serial.println(x); // print the integer
}
Sending characters by pressing a button
As second test I wanted to send the slaver two different strings of characters by pressing a button on the master. I connected a button to the Pin 8 of the master and wrote the code in order to send the string LOW
or HIGH
depending on the state of the button.
int switchState=0;
#include <Wire.h>
void setup() {
pinMode (8,INPUT);
Wire.begin();
}
void loop() {
switchState = digitalRead (8);
if (switchState == LOW) {
Wire.beginTransmission(8);
Wire.write("LOW ");
Wire.endTransmission();
}
else {
Wire.beginTransmission(8);
Wire.write("HIGH ");
Wire.endTransmission();
}
delay(500);
}
The slaver has only to receive the characters and print them on the serial monitor. Nothing is changing in comparaison with the previous example.
Toggling an LED on the slaver by pressing a button on the master
As upgrade of the previous test I wanted to turn on and to turn off an LED connected with the slaver by pressing a button connected with the master. The messages sent by the button were 0
and 1
instead of LOW and HIGH in order to let the slaver receive an integer instead of a string of characters.
int switchState=0;
#include <Wire.h>
void setup() {
pinMode (8,INPUT);
Wire.begin();
}
void loop() {
switchState = digitalRead (8);
if (switchState == LOW) {
Wire.beginTransmission(8);
Wire.write('0');
Wire.endTransmission();
}
else {
Wire.beginTransmission(8);
Wire.write('1');
Wire.endTransmission();
}
delay(500);
}
In the code of the slaver I added an if statement
in order to turn on or to turn off the LED depending on the received integer (1 or 0).
I don't know if it's the best way, but it's working!
#include <Wire.h>>
void setup() {
pinMode(6,OUTPUT);
Wire.begin(8);
Wire.onReceive(receiveEvent);
Serial.begin(9600);
}
void loop() {
delay(100);
}
// function that executes whenever data is received from master
// this function is registered as an event, see setup()
void receiveEvent(int howMany) {
while ( Wire.available()) {
char c = Wire.read();
Serial.println(c);
if (c == '0') {
digitalWrite (6, LOW);
}
else if (c == '1') {
digitalWrite (6, HIGH);
}
}
}
Display LCD 16x2 - I2C
As further investigation on the I2C protocol communication I tested an LCD display I got for the my final project. This display it's a regular 16 characters for 2 rows LCD display that thanks to an IC called PCF8574T is communicating with a microcontroller through the I2C protocol. This means that you just need for wires (power, ground,SDA, SCL) saving a lot of your board's pins. Saving pins has been the reason of the choice to use this display.
I have to say that is very easy tu use. It's enough to download and install the LiquidCrystal_I2C library from the Arduino website and look for some tutorial for the code.
Warning - The only one problems you can have (as happened to me) is that the display is printing just the first character of a string. I found the solution in this topic from Arduino Forum. It's necessary to change a value inside the .ccp file you should have downloded with the library.
inline size_t LiquidCrystal_I2C::write(uint8_t value) {
send(value, Rs);
return 0;
}
Instead of return 0;
you have to write return 1;
.
#include
#include
LiquidCrystal_I2C lcd(0x27,16,2); // set the LCD address to 0x27 for a 16 chars and 2 line display
void setup()
{
lcd.init(); // initialize the lcd
// Print a message to the LCD.
lcd.backlight();
lcd.print("Test Display I2C");
lcd.setCursor(0,1);
lcd.print("Hello!");
}
void loop()
{
}
To display the note you are playing
I my final project the display is used to show the note you are plaiyng. I connected the dispaly to the Satchakit and to the 12 keys keyboard I'm prototyping for the final project. The code is aimed to play a chromatic scale made by twelve tones. I added the code for the display.
To show the name of the being played I added an array of strings. It's been interesting because you have to use the char* function.
p>
#include
#include
LiquidCrystal_I2C lcd(0x27,16,2); // set the LCD address to 0x27 for a 16 chars and 2 line display
const int numRows = 4;
const int numCols = 3;
const int debounceTime = 20;
//notes in the melody:
int melody[] = {
0,NOTE_C4,NOTE_CS4,NOTE_D4,NOTE_DS4,NOTE_E4,NOTE_F4,NOTE_FS4,NOTE_G4,NOTE_GS4,NOTE_A4,NOTE_AS4,NOTE_B4,NOTE_C5,NOTE_CS5,NOTE_D5,NOTE_DS5,NOTE_E5,NOTE_F5,NOTE_FS5,NOTE_G5,NOTE_GS5,NOTE_A5,NOTE_AS5,NOTE_B5
};
char* note [] = {
"0","C4","CS4","D4","DS4","E4","F4","FS4","G4","GS4","A4","AS4","B4","C5","CS5","D5","DS5","E5","F5","FS5","G5","GS5","A5","AS5","B5"
};