Assignment
- Write an application that interfaces with an input &/or output device that you made.
- Interpret and implement programming protocols.
- Described your process using words/images/screenshots.
- Explained the protocols you used.
- Had a fun time.
- Outlined problems and how you fixed them.
- Included original code.
This week's assignment is to write an application that interfaces with an input or output device that you made, comparing as many tool options as possible. I design an android apps developed using MIT App inventor 2. This week I interface bluetooth module HC-05 and my week 8 project board using ATtiny44 Processor. My project is control a lamp using android apps. The app and board are interfaced using the bluetooth module.
My Input DeviceFirst I solder the bluetooth module in my attiny44 board. This Attiny board I made in Embedded Week. The operation of my project is an application to be controlled a remote lamp. The mobile application and my lamp control board are communicating with the bluetooth signal. When the application send the character "1"/"0" to the lamp control board. The control board receive the character using the bluetooth module. The control board will work when a high signal receive to the input pin. The control board controls the lamp.

Make program and burn to ATtiny44 Using Arduino IDE.
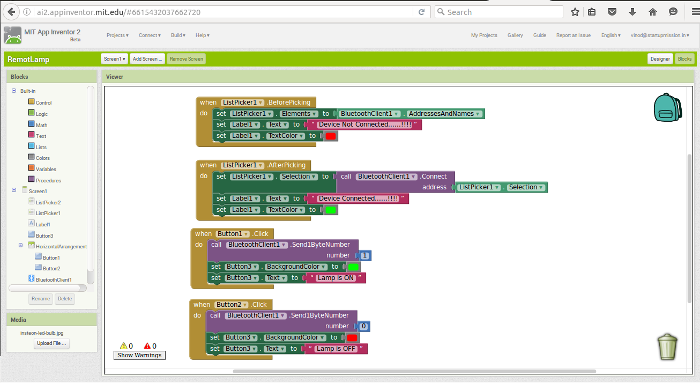
Program
This program is burned into the lamp control board using FAB ISP. The program logic is like this first bluetooth serial connection is started I am connecting my Output LED to the pin no 8 of ATtiny next it will scans for the data. If a 1 is received ("C" is equal to "1") then the LED is turned ON by sending a HIGH signal to the LED through pin no.8 in the other cases "LOW" is send to the LED and it won't glow. The program is shown above.
Android app develop using MIT App inventor 2
App InventorApp Inventor for Android is an open-source web application originally provided by Google, and now maintained by the Massachusetts Institute of Technology (MIT).
MIT App Inventor is an innovative beginner's introduction to programming and app creation that transforms the complex language of text-based coding into visual, drag-and-drop building blocks. The simple graphical interface grants even an inexperienced novice the ability to create a basic, fully functional app within an hour or less.
First go to MIT App inventor 2 and register your ID and see how to make a simple app using App Inventor Tutorialsdrop the necessary blocks for the project. I have gone through the tutorials and done all according to the tutorials. In the designer window we have buttons, checkbox, label, bluetooth client etc. Next we can go to the blocks area and from there we can connect the blocks and can add Control, logic, maths, text, codes, variables etc. Finally I completed it.
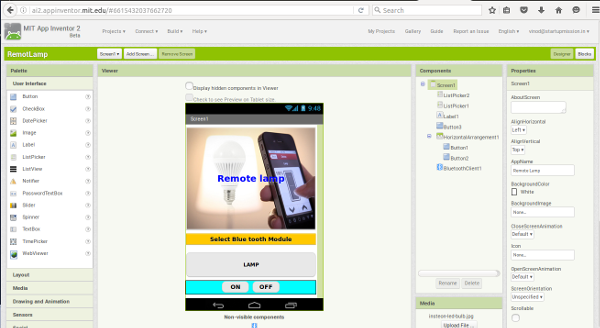
Next Making of My GUI of mobile application. Here I added a picture for the app as you can see in the figure. Completeing this now my app is ready for the installation in to the phone.
Next is build the app in my phone for that from the build drop down menu click App(provide QR code for .apk). Now it will generate a QR code, just scan the QR code with our phone the app will be installed. The below figure shows the buliding of my app to my android Mi-Note3.
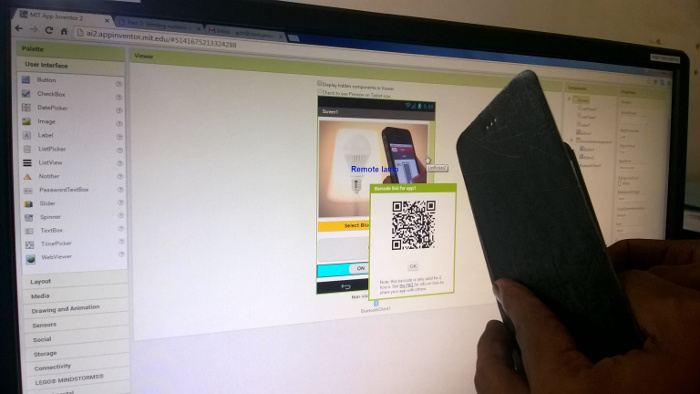
QR code

Started installing the android application.

Once the installation is complete open the Android application.


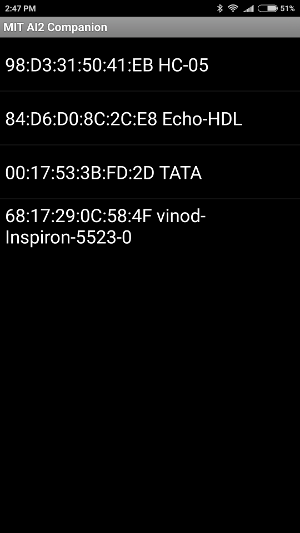
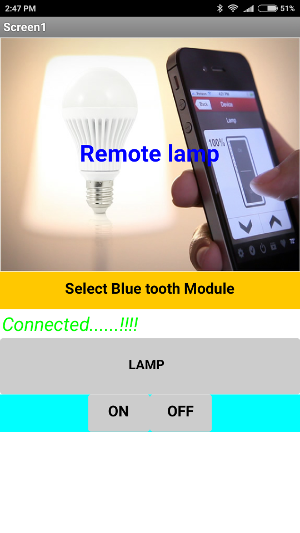
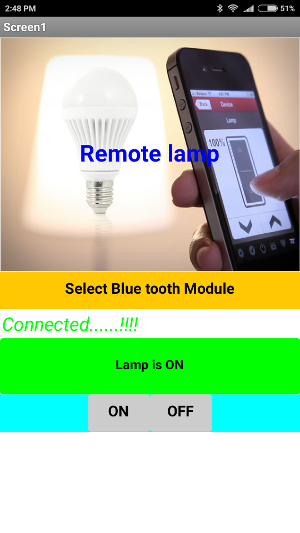
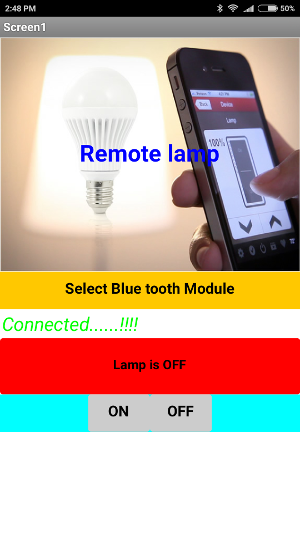
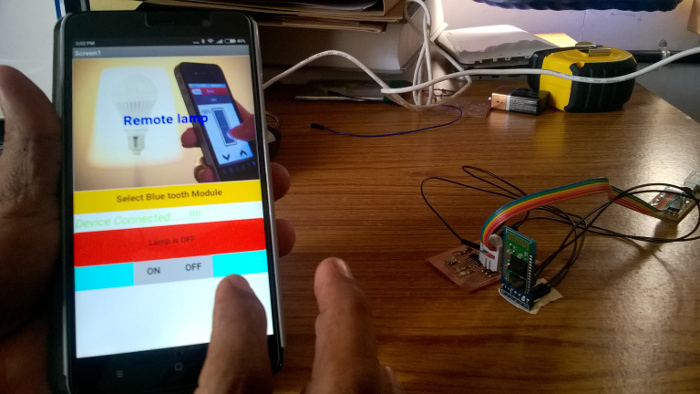
First we need to connect the device and android phone using the bluetooth connection. First we turn ON the bluetooth connection of phone, and search the bluetooth device and "pair it!". Click the select bluetooth module, it will shows the active bluetooth devices, My bluetooth device id is 98:D3:31:50:41:EB HC-05, so I selected that now the app will show connected...!!!!,. When I touches the ON button of the app the LED turned ON and the status for the lamp in app turned ON with green color, next I touched the OFF button both the LED and the status on the app turned OFF with red color on the app. These process are illustarted below.

Circuit
This is my circuit for control my lamp using mobile app. The circuit in which I connect a bluetooth module, you can see that in the figure.
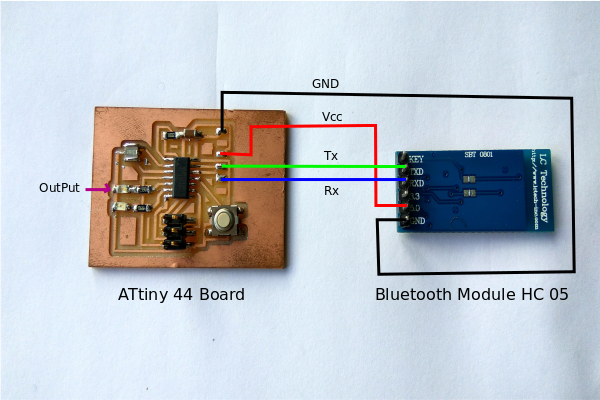
This Bluetooth Module is what I used in my Project. HC-05 module is an easy to use Bluetooth SPP (Serial Port Protocol) module, designed for transparent wireless serial connection setup.
Serial port Bluetooth module is fully qualified Bluetooth V2.0+EDR (Enhanced Data Rate) 3Mbps Modulation with complete 2.4GHz radio transceiver and baseband. It uses CSR Bluecore 04-External single chip Bluetooth system with CMOS technology and with AFH (Adaptive Frequency Hopping Feature). It has the footprint as small as 12.7mmx27mm. Hope it will simplify your overall design/development cycle.

Interfacing android app to control board.
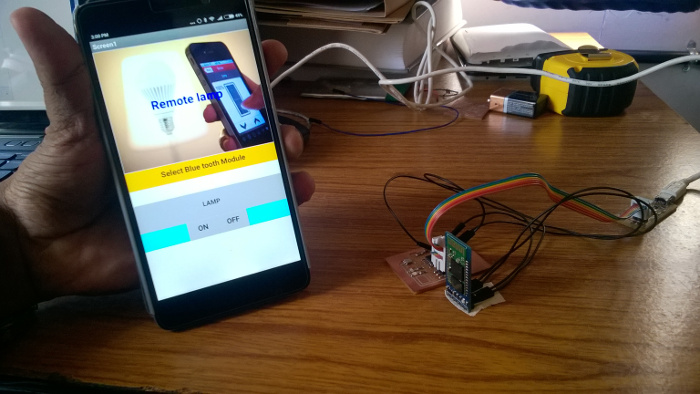
When I touch the ON button the lamp turned ON.

When I touch the off button the lamp turned OFF.
Download My Design files