Table Of Content
Web app is a very modern way to write software. Some app (like Skype chat) incorporates a “lite browser” with local storage which can work also offline and syncronizes with server online.
Native app could be more efficient but a developer must use many different frameworks: win .net, linux gtk, qt, android studio (java and c++), ios xstudio.
The evolution of web scripting: php ->python ->javascript. jquery is sort of xml for Javascript
agina html con javascript
App web makes simpler to use same software in different OS.
Phonegap
(Adobe) let you generate a build from html+ javascript (from gnome and xamarin founder). (Fusion360 is a web app)
Python has the beauty of having many modules: pyqt (many widget), pyqt4 (one of the best, GPL License), kivy (multitouch optimized), libreria pygame
Best to start from mobile app because it is easier to go from small to bigger screens
Prototyping on paper is a tool to create mockup of app navigation
To start with a static app
Ionic
is a good tool since it provides many nice views and templates (side menu, etc..) moreover it uses phonegap script to create android or iOS build
Ionic provides many graphic tools like bootstrap which provides components, header, footer, buttos…
$ sudo npm install -g cordova ionic
$ ionic start myApp tabs
$ cd myApp
$ ionic platform add ios
$ ionic build ios
$ ionic emulate ios
Javascript was invented inside Mozzilla to run code like java/c using an engine inside the browser. Now this engine that parse javascript has been moved inside the OS
Node.js is a JavaScript runtime built on Chrome’s V8 JavaScript engine. Node.js uses an event-driven, non-blocking I/O model (callbacks).
npm is Node.js package ecosystem
To install it:
sudo apt-get install nodejs
sudo apt-get install npm
sudo ln -s /usr/bin/nodejs /usr/bin/node
node -v
    v0.10.25
npm -v
    1.3.10
To run a javascript code with node just call the javascript file with “node” command.
Can also pass information into a node program via console:
$ node index.js arg1
In node code:
var name = process.argv[2];
console.log("Hello, and welcome to node," + name);
To stop the execution of a script use “ctrl+C”.
$ npm install ws
var WebSocketServer = require('ws').Server;

// new()  make a new instance of the webSocket server
var SERVER_PORT = 8081;               // port number for the webSocket server
var wss = new WebSocketServer({port: SERVER_PORT}); // the webSocket server
var connections = new Array;          // list of connections to the server
Mongoose is MongoDB object modeling for Node.js
var mongoose = require('mongoose');
mongoose.connect('mongodb://localhost/test');

var Cat = mongoose.model('Cat', { name: String });

var kitty = new Cat({ name: 'Zildjian' });
kitty.save(function (err) {
  if (err) {
    console.log(err);
  } else {
    console.log('meow');
  }
});
Johnny five is a module for robotics and interaction with Arduino
npm install johnny-five
var five = require("johnny-five");
var board = new five.Board();

board.on("ready", function() {
  var led = new five.Led(13);
  led.blink(500);
});
sudo apt-get install npm
npm install express --save
Hello world:
var express = require('express');
var app = express();

app.get('/', function (req, res) {
  res.send('Hello World!');
});

app.listen(3000, function () {
  console.log('Example app listening on port 3000!');
});
Copyng the hello world in a “index.js” file and opening it with “node index.js”, then open in a browser “localhost:3000”. “get” to read “put” or “post” to send
$ npm install serialport
Socket.IO enables real-time bidirectional event-based communication.
$ npm install socket.io
There are modules also to use Telegram ChatBots
npm install node-telegram-bot-api
npm install telegram-bot-api
There is a module also gor Google APIs
npm install --save google
Here an hello world:
var google = require('google')

google.resultsPerPage = 25
var nextCounter = 0

google('node.js best practices', function (err, res){
  if (err) console.error(err)

  for (var i = 0; i < res.links.length; ++i) {
    var link = res.links[i];
    console.log(link.title + ' - ' + link.href)
    console.log(link.description + "\n")
  }

  if (nextCounter < 4) {
    nextCounter += 1
    if (res.next) res.next()
  }
})
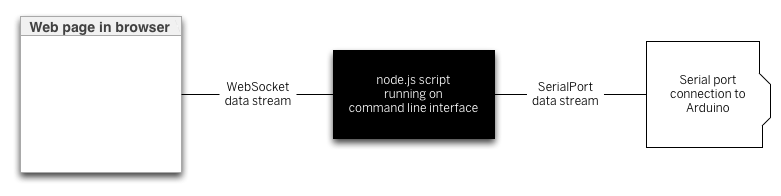
To open a serial port in node, include the library at the beginning of the script, and make a local instance of the library in a variable.
var serialport = require('serialport'); // include the library
   SerialPort = serialport.SerialPort;  // make a local instance of it
   // get port name from the command line:
   portName = process.argv[2];
Then open the port using new() like so:
var myPort = new SerialPort(portName, {
   baudRate: 9600,
   // look for return and newline at the end of each data packet:
   parser: serialport.parsers.readline("\n")
 });

myPort.on('open', showPortOpen);    //when the serial port is opened, the showPortOpen function will get called
myPort.on('data', sendSerialData);  //when new data arrives, the sendSerialData function will get called
myPort.on('close', showPortClose);
myPort.on('error', showError);
If the event generates any parameters (for example a new data event will have the data as a parameter), those parameters will get passed to the callback function. see this article about
callbacks
.
These are “callback functions” this means that they will be called when the execution of the previouslly called function is done:
function showPortOpen() {
   console.log('port open. Data rate: ' + myPort.options.baudRate);
}

function sendSerialData(data) {
   console.log(data);
}

function showPortClose() {
   console.log('port closed.');
}

function showError(error) {
   console.log('Serial port error: ' + error);
}
Using the Basics->AnalogWriteSerial example can test that the node javascript correctly reads values
$ node readserial.js /dev/ttyACM0
port open. Data rate: 9600
3
294
292
291
293
294
...
With a simple serial echo made with Arduino IDE can test 2 way communication:
/* Use a variable called byteRead to temporarily store
   the data coming from the computer */
byte byteRead;

void setup() {
// Turn the Serial Protocol ON
  Serial.begin(9600);
}

void loop() {
   /*  check if data has been sent from the computer: */
  if (Serial.available()) {
    /* read the most recent byte */
    byteRead = Serial.read();
    /*ECHO the value that was read, back to the serial port. */
    Serial.write(byteRead);
  }
}
Telegram released on 2015
APIs
to develop “ChatBots”
To create a chatbot use the “BotFather”:
Diego:
/start

[07:31:36] BotFather:
They call me the Botfather, I can help you create and set up Telegram bots. Please read this manual before we begin:
https://core.telegram.org/bots

You can control me by sending these commands:

/newbot - create a new bot
/token - generate authorization token
/revoke - revoke bot access token
/setname - change a bot's name
/setdescription - change bot description
/setabouttext - change bot about info
/setuserpic - change bot profile photo
/setinline - change inline settings
/setinlinegeo - toggle inline location requests
/setinlinefeedback - change inline feedback settings
/setcommands - change bot commands list
/setjoingroups - can your bot be added to groups?
/setprivacy - what messages does your bot see in groups?
/deletebot - delete a bot
/cancel - cancel the current operation
[09:00:55] Diego:
/newbot

[09:00:55] BotFather:
Alright, a new bot. How are we going to call it? Please choose a name for your bot.
[09:19:41] Diego:
FabStudents

[09:19:41] BotFather:
Good. Now let's choose a username for your bot. It must end in `bot`. Like this, for example: TetrisBot or tetris_bot.
[09:20:07] Diego:
FabStudentsBot

[09:20:07] BotFather:
Done! Congratulations on your new bot. You will find it at telegram.me/FabStudentsBot. You can now add a description, about section and profile picture for your bot, see /help for a list of commands.

Use this token to access the HTTP API:
<BOT-TOKEN>

For a description of the Bot API, see this page: https://core.telegram.org/bots/api
One can access bot info and messages at following API-links:
-
https://api.telegram.org/
-
https://api.telegram.org/
There are also node js modules to use Telegram APIs:
npm install node-telegram-bot-api
npm install --save telegram-node-bot
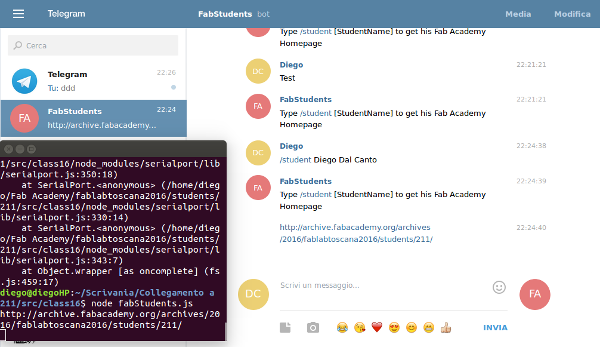
I developed a simple chatbot to get the homepage link of Fab Academy students
var TelegramBot = require('node-telegram-bot-api');
var google = require('google')

google.resultsPerPage = 1
var nextCounter = 0

var token = '<BOT-TOKEN>';
// Setup polling way
var bot = new TelegramBot(token, {polling: true});

// Matches /echo [whatever]
bot.onText(/\/echo (.+)/, function (msg, match) {
  var fromId = msg.from.id;
  var resp = match[1];
  bot.sendMessage(fromId, resp);
});

// Matches /student [whatever]
bot.onText(/\/student (.+)/, function (msg, match) {
  var fromId = msg.from.id;
  var resp = match[1];

google(resp + ' Fab Academy', function (err, res){
  if (err) console.error(err)

  for (var i = 0; i < res.links.length; ++i) {
    var link = res.links[i];
    bot.sendMessage(fromId, link.href);
        console.log(link.href)}})
});

// Any kind of message
bot.on('message', function (msg) {
  var chatId = msg.chat.id;
  bot.sendMessage(chatId, 'Type /student [StudentName] to get his Fab Academy Homepage');
});
Heroku is a cloud platform to run web app. First register on the website, then install the Heroku Toolchain (requires NodeJS, NPM, Ruby):
wget -O- https://toolbelt.heroku.com/install-ubuntu.sh | sh
Can clone an example project (with a JSON file):
git clone https://github.com/heroku/node-js-getting-started.git
cd node-js-getting-started
Then create, run locally, deploy and open the app
heroku create //Create the app
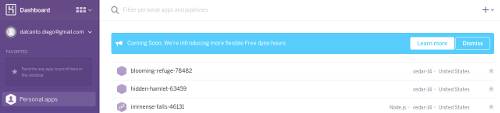
Creating app... done, ⬢ blooming-refuge-78482
https://blooming-refuge-78482.herokuapp.com/ | https://git.heroku.com/blooming-refuge-78482.git
heroku git:remote -a hidden-hamlet-63459 //associate git with the app
set git remote heroku to https://git.heroku.com/hidden-hamlet-63459.git
npm install //locally install dependancies
heroku local web //run the app locally (http://localhost:5000 close with ctrl+C)
git add .
git commit -m "Demo"
git push heroku master //Deploy the app
heroku ps:scale web=1 //Check it is running
heroku open web //Open it

Set the number of “Dynos” and check the log
heroku logs --tail // See logs (ctrl+C to stop)
heroku ps           //See how many Dynos the app is using
heroku ps:scale web=0   //Scale to zero or more Dynos
Heroku recognizes an app as Node.js by the existence of a package.json file in the root directory.
npm init --yes      //Create a Json file from an index.js
npm install --save --save-exact node-telegram-bot-api
npm install --save --save-exact google //Add a dependancy (var cool = require('google');)
The Json file looks like this:
{
  "name": "fabstudentsbot",
  "version": "0.0.0",
  "description": "Telegram Bot to get Fab Academy student homepage",
  "main": "index.js",
  "scripts": {
    "test": "echo \"Error: no test specified\" && exit 1"
  },
  "author": "Diego Dal Canto",
  "license": "ISC",
  "dependencies": {
    "google": "2.0.0",
    "node-telegram-bot-api": "0.21.1"
  }
}
Heroku addons
heroku addons:create papertrail //Install an addon
All applications created with heroku can be handled via heroku dashboard
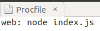
To push the application including only index.js, package.json and Procfile without any dependencies (heroku will install required modules by itself):
git remote show
    heroku
    origin
git remote show heroku
* remote heroku
  Fetch URL: https://git.heroku.com/hidden-hamlet-63459.git
  Push  URL: https://git.heroku.com/hidden-hamlet-63459.git
  branch HEAD: (unknown)
rm -rf .git
git init
    Inizializzato un repository Git in /home/diego/Fab Academy/fablabtoscana2016/students/211/src/class16/heroku/fabstudentsbot/.git/
git remote add heroku  https://git.heroku.com/hidden-hamlet-63459.git
git add index.js package.json Procfile
vi .gitignore
git status
    Sul branch master
    Commit iniziale
    Changes to be committed:
    (use "git rm --cached <file>..." to unstage)
    new file:   Procfile
    new file:   index.js
    new file:   package.json
    Untracked files:
    (use "git add <file>..." to include in what will be committed)
    .gitignore

git add .gitignore
git commit -m 'initial import'
    [master (root-commit) 6b2ebbf] initial import
    4 files changed, 76 insertions(+)
    create mode 100644 .gitignore
    create mode 100644 Procfile
    create mode 100644 index.js
    create mode 100644 package.json
git push heroku master
    Counting objects: 6, done.
    Delta compression using up to 2 threads.
    Compressing objects: 100% (4/4), done.
    Writing objects: 100% (6/6), 1.16 KiB | 0 bytes/s, done.
    Total 6 (delta 0), reused 0 (delta 0)
    remote: Compressing source files... done.
    remote: Building source:
    ......
    remote: Verifying deploy... done.
    To https://git.heroku.com/hidden-hamlet-63459.git
    * [new branch]      master -> master
heroku open
Serial Communication
Phonegap
Prototyping on paper
Callbacks
Serial callbacks
Tutorial ITP
Telegram api module
Heroku