Table Of Content
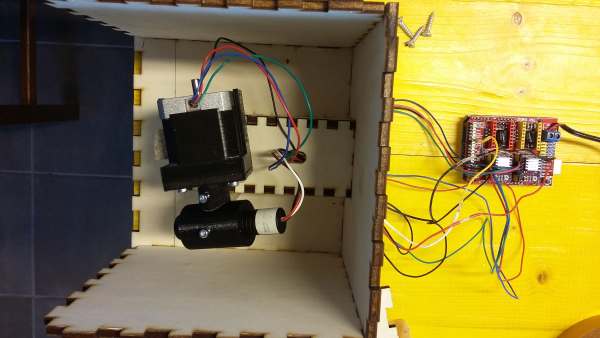
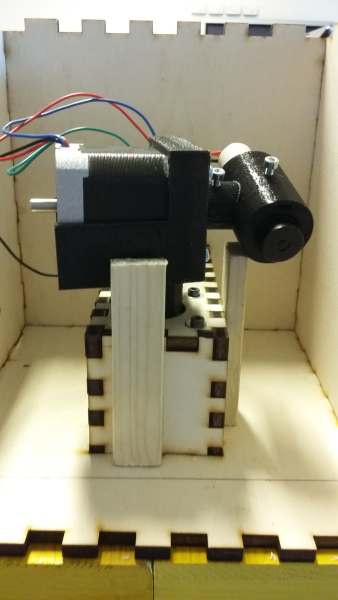
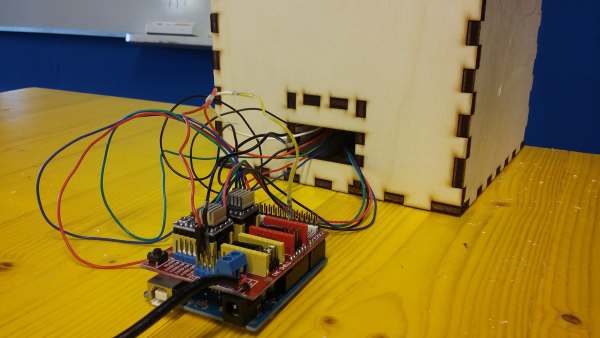
Our machine assembled with all its parts looks like this:

In this assignment we had to automate our machine. To do this first we downloaded GRBL Master . Then we extracted the “grbl” folder and copied it to the Arduino libraries folder:
sudo cp -R grbl /usr/share/arduino/libraries/

Then we ploaded GRBL firmware to our Arduino compatible board, then we tried to send some simple G-Code commands via serial terminal and finally we wrote a couple of Python application to control nicely the machine.
Eggbot
can draw on curved objects using a proprietary firmware (Arduino sketch) integrated with an Inkscape plugin (written in Python) which opens serial port. It is a simple and well documented application that could be taken as starting point for other projects. The firmware basically controls steppers and interprets serial port commands ](
https://github.com/cocktailyogi/EggDuino
)
The firmware runs on Arduino Uno. Marlin, the firmware thar runs on 90% of 3D printers in much more complex requires Arduino Mega.
To communicate with GRBL:
Can use many software to upload G-code to the firmware:
How to use Python (can use Kivy ):
python simple_stream.py
Simple_stream.py
import serial
import time

# Open grbl serial port
s = serial.Serial('/dev/ttyUSB0',115200)

# Open g-code file
f = open('grbl.gcode','r');

# Wake up grbl
s.write("\r\n\r\n")
time.sleep(2)   # Wait for grbl to initialize
s.flushInput()  # Flush startup text in serial input

# Stream g-code to grbl
for line in f:
    l = line.strip() # Strip all EOL characters for consistency
    print 'Sending: ' + l,
    s.write(l + '\n') # Send g-code block to grbl
    grbl_out = s.readline() # Wait for grbl response with carriage return
    print ' : ' + grbl_out.strip()

# Wait here until grbl is finished to close serial port and file.
raw_input("  Press <Enter> to exit and disable grbl.")

# Close file and serial port
f.close()
s.close()
Configuration of GRBL can be edited via serial terminal:
$$ (view Grbl settings)
$# (view # parameters)
$G (view parser state)
$I (view build info)
$N (view startup blocks)
$x=value (save Grbl setting)
$Nx=line (save startup block)
$C (check gcode mode)
$X (kill alarm lock)
$H (run homing cycle)
~ (cycle start)
! (feed hold)
? (current status)
ctrl-x (reset Grbl)
Type $$ to see settings (they stay in EEprom). We use the terminal to make a fine tuning of the machine, then we change the configuration file of GRBL.
$0=10 (step pulse, usec)
$1=25 (step idle delay, msec)
$2=0 (step port invert mask:00000000)
$3=6 (dir port invert mask:00000110)
$4=0 (step enable invert, bool)
$5=0 (limit pins invert, bool)
$6=0 (probe pin invert, bool)
$10=3 (status report mask:00000011)
$11=0.020 (junction deviation, mm)
$12=0.002 (arc tolerance, mm)
$13=0 (report inches, bool)
$20=0 (soft limits, bool)
$21=0 (hard limits, bool)
$22=0 (homing cycle, bool)
$23=1 (homing dir invert mask:00000001)
$24=50.000 (homing feed, mm/min)
$25=635.000 (homing seek, mm/min)
$26=250 (homing debounce, msec)
$27=1.000 (homing pull-off, mm)
$100=314.961 (x, step/mm)
$101=314.961 (y, step/mm)
$102=314.961 (z, step/mm)
$110=635.000 (x max rate, mm/min)
$111=635.000 (y max rate, mm/min)
$112=635.000 (z max rate, mm/min)
$120=50.000 (x accel, mm/sec^2)
$121=50.000 (y accel, mm/sec^2)
$122=50.000 (z accel, mm/sec^2)
$130=225.000 (x max travel, mm)
$131=125.000 (y max travel, mm)
$132=170.000 (z max travel, mm)
GCode is an ISO standard see below some commands :
We created a simple G-Code to set-up all parameters about units speed and acceleration and the draw a simple picture (a square 30°x30°).
$100=17.77      // steps (microsteps) / mm (degree)
$101=17.77
$130=60         // absolute limit [mm] (for us it in in degree)
$131=60
$110=36000      // max speed in mm/min -> degree/min
$111=36000
$120=10000      // acceleration mm/s^2 -> degree/s^2
$121=10000

M4              // enable CCW rotation (PinDir goes to 5V and enable our laser which is TTL controlled)
G00X0Y0F10000   // fast move to X0Y0 with 10000 degree/min speed -> 2.7 rpm (it looks big but it is small...)
G00X0Y30F10000
G00X30Y30F10000
G00X30Y0F10000
G00X0Y0F10000
A demonstration of the laser pointer drawing a square of 30°x30°
We could also draw some PNG picture and send it to Fab Modules to generate G-Code to feed our machine

First install pip which willbe useful to install other packages. To Install pip I downloaded and ran get-pip.py:
sudo python get-pip.py
Then it is time to install other packages:
pip install Cython --install-option="--no-cython-compile"
And finally we are ready to install
Kivy
.
Another way is to add a new repository with everything togheter:
$ sudo add-apt-repository ppa:kivy-team/kivy
$ sudo apt-get update
$ sudo apt-get install python-kivy
$ sudo apt-get install kivy-examples
We wrote a simple code to control the laser pointer with the mouse moving inside a small window:
#!/usr/bin/env python
"""\
Simple g-code streaming script for grbl

---------------------
"""
from Tkconstants import *
import Tkinter as tk
import serial
import time

# Open grbl serial port
s = serial.Serial('/dev/ttyACM0',115200)

# Open g-code file
#f = open('grbl.gcode','r');

# Wake up grbl
s.write("\r\n\r\n")
s.write("$100=17.77")
s.write("$101=17.77")
s.write("$130=60")
s.write("$131=60")
s.write("$110=36000")
s.write("$111=36000")
s.write("$120=36000")
s.write("$121=36000")

time.sleep(2)   # Wait for grbl to initialize
s.flushInput()  # Flush startup text in serial input

# Stream g-code to grbl
#for line in f:

root = tk.Tk()

def motion(event):
    x, y = event.x, event.y
    x=x*60/200
    y=abs(y*60/200-60)
    print('{}, {}'.format(x, y))
    #l = line.strip() # Strip all EOL characters for consistency
    #print 'Sending: ' + l,
    s.write('G00X' + str(x) + 'Y' + str(y) + 'F10000\n') # Send g-code block to grbl
    grbl_out = s.readline() # Wait for grbl response with carriage return
    print ' : ' + grbl_out.strip()
    #root.textbox.insert(tkinter.END,'X' + str(x) + 'Y' + str(y))

def laser_off(event):
    s.write('M3\n')
    grbl_out = s.readline() # Wait for grbl response with carriage return
    print ' : ' + grbl_out.strip()

def laser_on(event):
    s.write('M4\n')
    grbl_out = s.readline() # Wait for grbl response with carriage return
    print ' : ' + grbl_out.strip()

root.bind('<Button-1>', laser_off) #left click off
root.bind('<Button-3>', laser_on) #right click on
root.bind('<Motion>', motion)
root.mainloop()

# Wait here until grbl is finished to close serial port and file.
raw_input("  Press <Enter> to exit and disable grbl.")

# Close file and serial port
# f.close()
s.close()
And here a demonstration of the laser pointer controlled by the mouse
“_” has the value of last expression:
>>> tassa = 12.5 / 100
>>> prezzo = 100.50
>>> prezzo * tassa
12.5625
>>> prezzo + _
113.0625
>>> parola = Aiuto + A
>>> parola
AiutoA
>>> < + parola*5 + >
<AiutoAAiutoAAiutoAAiutoAAiutoA>
>>> parola[4]
o
>>> parola[0:2]
Ai
>>> parola[2:4]
ut
Returns a list of numbers in a given interval (useful in combination with For)
>>> range(5, 10)
[5, 6, 7, 8, 9]
>>> range(0, 10, 3)
[0, 3, 6, 9]
While structure runs until a condition becomes false
>>> # La serie di Fibonacci:
... # la somma di due elementi definisce l'elemento successivo
... a, b = 0, 1         # multiple assignment
>>> while b < 10:
...     print b
...     a, b = b, a+b   # there are no brackets, code is grouped by tab
...                     # empty line means end of code
1
1
2
3
5
8
Another example:
>>> a, b = 0, 1
>>> while b < 1000:
... print b,        #comma avoid End Of Line
... a, b = b, a+b
...
1 1 2 3 5 8 13 21 34 55 89 144 233 377 610 987
If decision structure:
>>> x = int(raw_input("Introdurre un numero: "))
>>> if x < 0:
...     x = 0
...     print 'Numero negativo cambiato in zero'
... elif x == 0:
...     print 'Zero'
... elif x == 1:
...     print 'Uno'
... else:
...     print 'Più di uno'
...
For can be used to sort a series of elements of a list
>>> # Misura la lunghezza di alcune stringhe:
... a = ['gatto', 'finestra', 'defenestrare']
>>> for x in a:
...     print x, len(x)
...
gatto 5
finestra 8
defenestrare 12
For in a list. len() gives the number of elements of the list
>>> a = ['Mary', 'had', 'a', 'little', 'lamb']
>>> for i in range(len(a)):
...     print i, a[i]
...
0 Mary
1 had
2 a
3 little
4 lamb
For in a range with given boudaries:
>>> for n in range(2, 10):
...     for x in range(2, n):
...         if n % x == 0:
...             print n, 'è uguale a', x, '*', n/x
...             break
...         else:
...         # Il ciclo scorre la sequenza senza trovare il fattore
...         print n, 'è un numero primo'
...
2 è un numero primo
3 è un numero primo
4 è uguale a 2 * 2
5 è un numero primo
Pass don’t do anything
>>> while True:
...     pass # wait for keyboard interrupt
...
“def” is used to declare a function definition
>>> def fib2(n): # returns Fibonacci series until n
...     """Restituisce una lista contenente la serie di Fibonacci fino a n"""   # documentation string printed with help
...     result = []
...     a, b = 0, 1
...     while b < n:
...         result.append(b) # vedi sotto
...         a, b = b, a+b
...     return result
...
>>> f100 = fib2(100)    # function call
>>> f100                # writes the result
[1, 1, 2, 3, 5, 8, 13, 21, 34, 55, 89]
...
def ask_ok(prompt, retries=4, complaint='Sì o no, grazie!'): #specifica valore predefinito
    while True:
        ok = raw_input(prompt)
        if ok in ('s', 'si', 'sì'): return True # verifica se una sequenza contiene o meno un certo valore.
        if ok in ('n', 'no', 'nop', 'nope'): return False
        retries = retries - 1
        if retries < 0: raise IOError, 'refusenik user'
        print complaint
>>> def make_incrementor(n):
...     return lambda x: x + n
...
>>> f = make_incrementor(42)
>>> f(0)
42
>>> f(1)
43
First text lines of a function between “”” are used to document what the function does.
>>> def my_function():
... """Non fa nulla, ma lo documenta.
...
... Davvero, non fa proprio nulla.
... """
... pass
...
>>> print my_function.__doc__
Non fa nulla, ma lo documenta.
Davvero, non fa proprio nulla.
Some examples on how to manipulate lists (vectors).
>>> a = [66.6, 333, 333, 1, 1234.5]
>>> print a.count(333), a.count(66.6), a.count('x') # returns the index of a given element
2 1 0
>>> a.insert(2, -1)     # insert a new element after a given "i" position
>>> a.append(333)       # append a new element to the end of the list
>>> a
[66.6, 333, -1, 333, 1, 1234.5, 333]
>>> a.index(333)        # returns the index of an element
1
>>> a.remove(333)       # remove the first occurrance of the element
>>> a
[66.6, -1, 333, 1, 1234.5, 333]
>>> a.reverse()         # reverse the list
>>> a
[333, 1234.5, 1, 333, -1, 66.6]
>>> a.sort()            # sort the list from min to max
>>> a
[-1, 1, 66.6, 333, 333, 1234.5]
Making Things Move DIY Mechanisms for Inventors, Hobbyists, and Artists - Dustyn Roberts
Python Xlib