Exercise 13 Output Devices
Requirement
- add an output device to a microcontroller board you've designed and program it to do something
Introduction
As my final project needs a mechanism to rotate and flip, I was really looking forward to this week's assignment so that though the process of doing it, I would have a better idea of how to proceed for my final project. In my mind, I know I would be working with some kind of motors, but exactly what type, I was not so certain until this week. I was reading this book called Making things move and I was able to have a better understanding of what different motors do.
- DC Motors: Also called a DC toy motor, this motor has only two electrical connections, so all you need to do to make a 9V DC motor turn is hook it up to a 9V battery. To reverse the direction, reverse the connections to the battery. If you lower the voltage, it will still work over a certain range, but spin slower. If you raise the voltage, it will spin faster.2 DC toy motors usually need between 1.5V and 12V. They spin at speeds anywhere from 1,000 to 20,000 rpm or more.
- DC Gearhead Motors: This is just a standard DC motor with a gearhead on it. A gearhead is just a box of gears that takes the output shaft of the standard DC motor and “gears it up” to a second output shaft that has higher torque, but turns slower. Here, we’re trading speed for torque: a 100:1 gearhead ratio will give us 100 times more torque than without the gears, but also will be 100 times slower. DC gearhead motors usually range from about 3V to 30V and run at speeds from less than 1 rpm to a few hundred rpm.
- Hobby Servo Motors: There are two types of hobby servo motors: standard and continuous rotation. Standard servos are by far the more popular. They are usually found in radio-controlled models like planes and boats. Standard hobby servo motors are just little DC gearhead motors with some smarts in them. When you give the smarts a certain kind of pulse — basically just turning the power on and off in a specific pattern — you’re actually telling the servo motor where to point the shaft. Instead of having just two wires you attach to a power source like the DC motors described earlier, these motors have three wires and are controlled by pulses. Standard servos have ranges between 60° and 270° (typically 180°), so they are most useful for pointing and positioning tasks. They also typically use 4.8V to 6V.
- Continuous Rotation Hobby Servos: A continuous rotation servo is a modification of the standard servo motor. Instead of determining position, the pulses tell the motor how fast to go. You give up knowing he position of the servo arm here, but you gain speed control and 360° movement. A continuous rotation servo is a great option if you have something that needs to spin continuously but you want an easy way to control the speed
- Stepper Motors: The stepper motor combines the precise positioning of standard hobby servos and the continuous rotation of DC toy and gearhead motors. The central shaft of a stepper has a series of magnets on it in the shape of a gear, and there are several wire coils surrounding this gear magnet on the inside of the motor housing. Steppers work by moving in a bunch of little increments, or steps. If you step them fast enough, it looks like continuous motion. Each time one of the coils is energized, it pulls one of the teeth on the shaft toward it to complete one step. For example, a 200-step motor moves in a full 360° circle at 1.8° per step. These motors have four to eight wires you need to use to control the pulses to make the shaft step continuously, so they’re more complicated to control than the previously described motors. They are squatter looking than the rest of the DC motor family, and have less torque than you might expect for their size and weight. However, they’re also the fastest way to integrate both speed and position control into a project. Printers and scanners use stepper motors to control the speed and location of the print head with the ink and rotate the paper through them.
- AC Motors: You’ll find AC motors in many household appliances, like blenders and fans, because they are continuously rotating and use the AC from the wall to drive them. However, attempting to control AC motors can be dangerous. You’re playing with 120V from the wall, which is much higher than the voltages needed by the DC motors. An AC motor can draw as much current as it wants from the wall supply, up to about 15A before it trips a breaker in your house. The combination of high voltage and high current is enough to seriously hurt you if something goes wrong.
- Rotary Solenoids: Rotary solenoids are good for quick rotary movements through a short range of motion. They are really just modified linear solenoids that force the plunger into a guide that makes it rotate.
SG90 Micro Servo Motors
I will be trying to drive 2 x 9G micro servo with a microcontroller board, not because they are special but because they are available in the lab. The datasheet of the motors states the following specifications:
- Weight: 9 g
- Dimension: 22.2 x 11.8 x 31 mm approx.
- Stall torque: 1.8 kgf·cm
- Operating speed: 0.1 s/60 degree
- Operating voltage: 4.8 V (~5V)
- Dead band width: 10 µs
- Temperature range: 0 ºC – 55 ºC
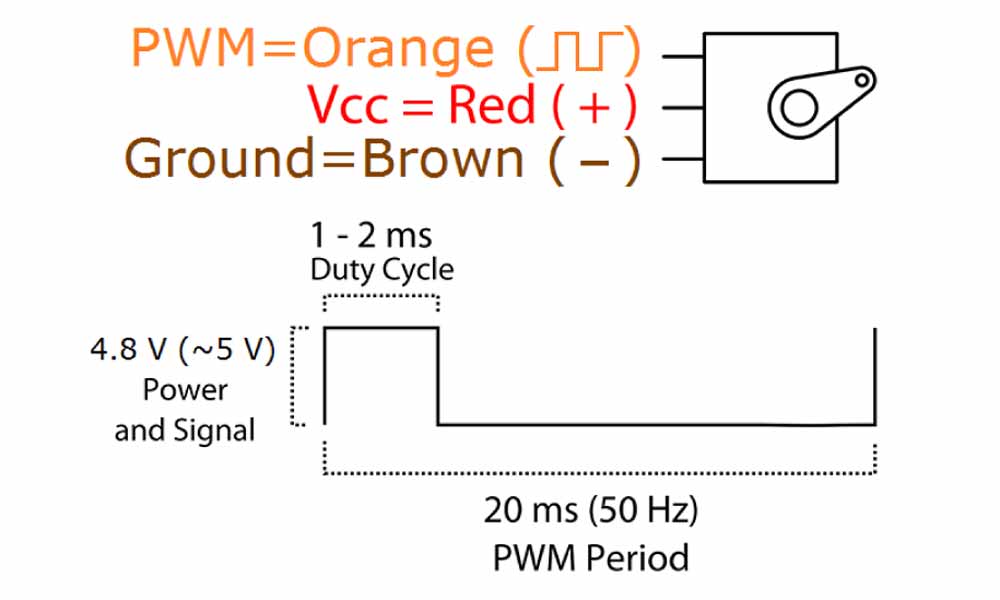
- PWM: orange
- VCC: red
- GND: brown
- Position "0" (1.5 ms pulse) is middle, "90" (~2 ms pulse) is all the way to the right. "-90" (~1 ms pulse) is all the way to the left.
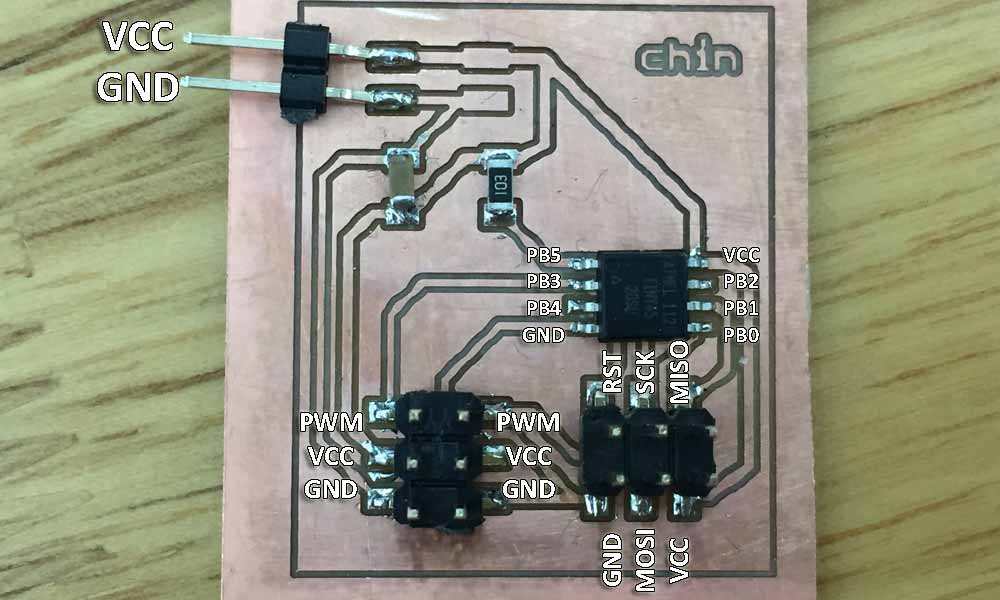
Designing the board
The sample board on our class page looks like this:
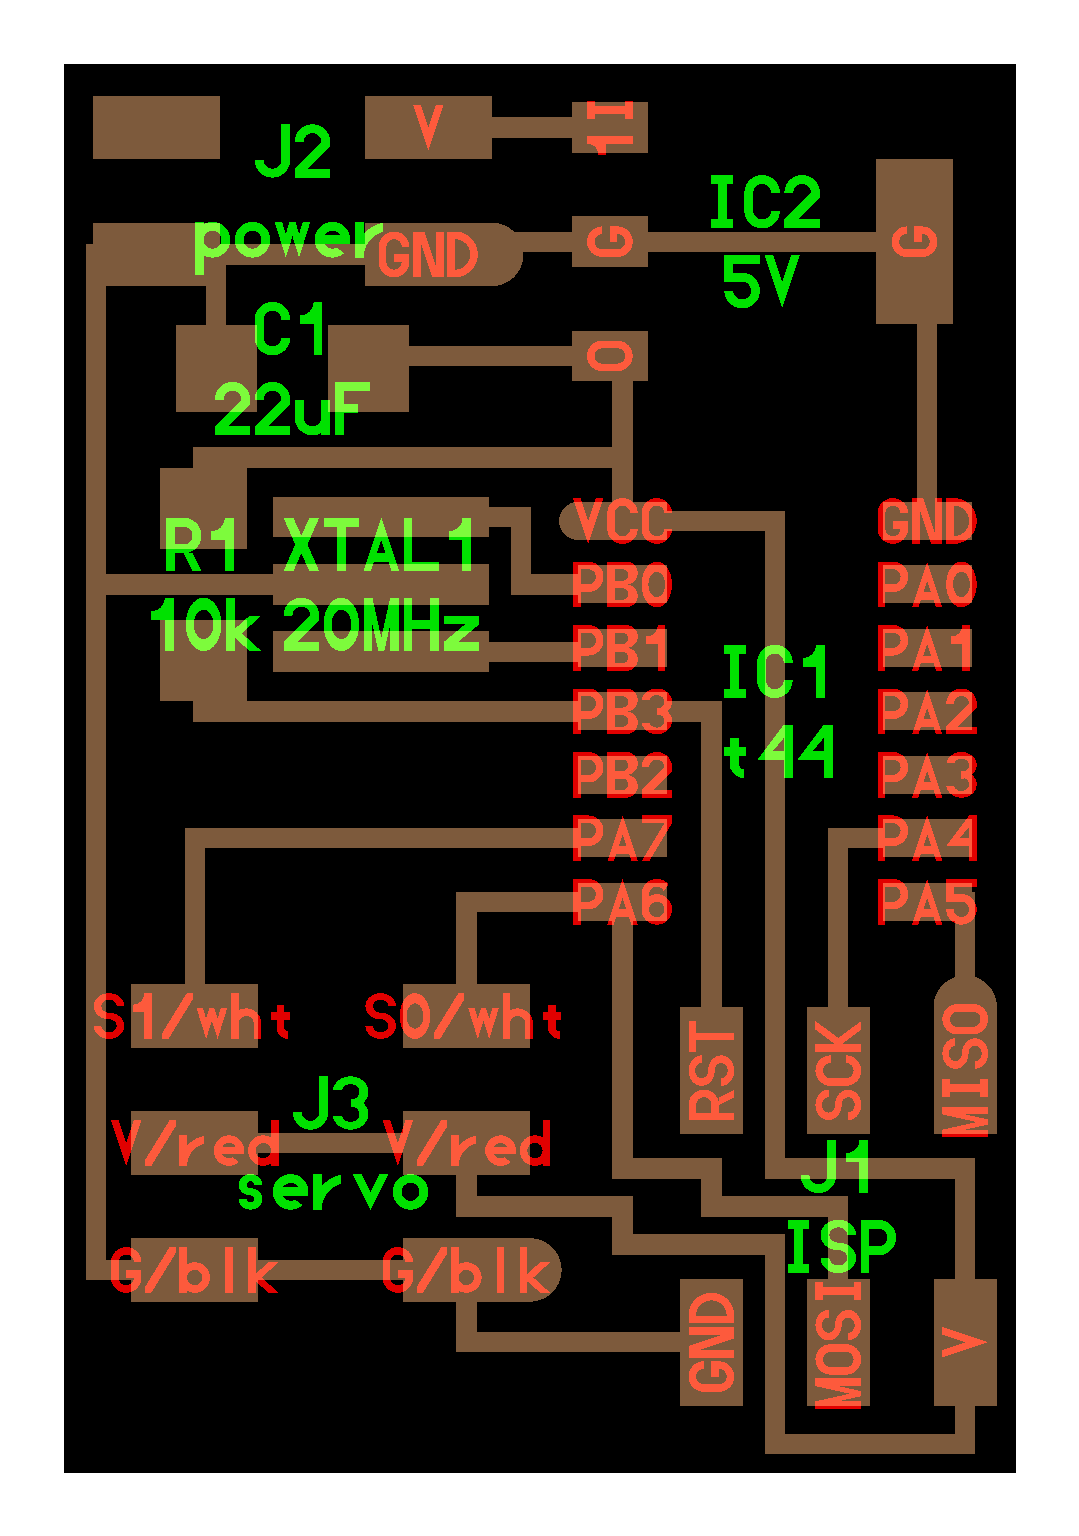
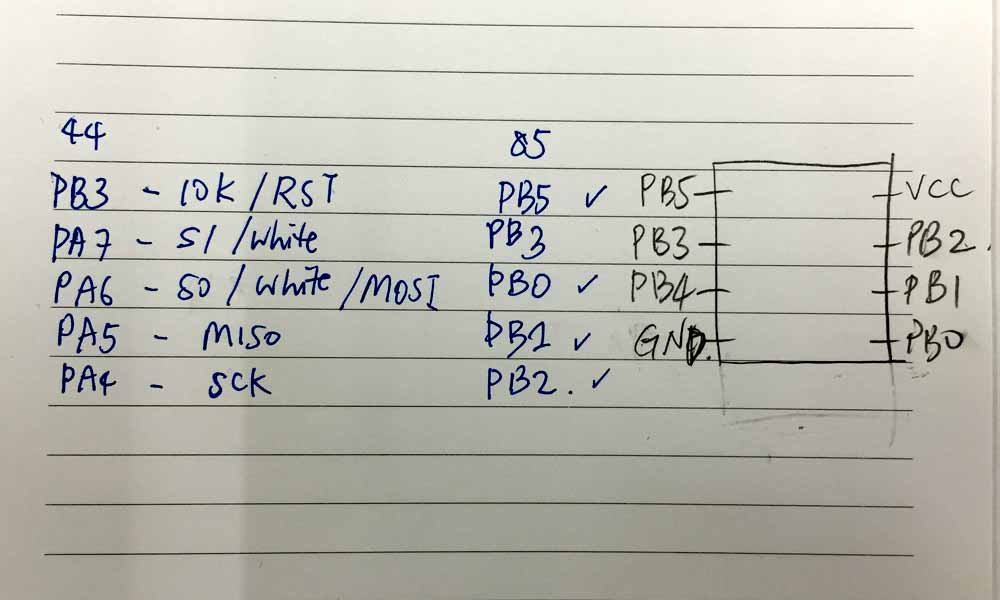
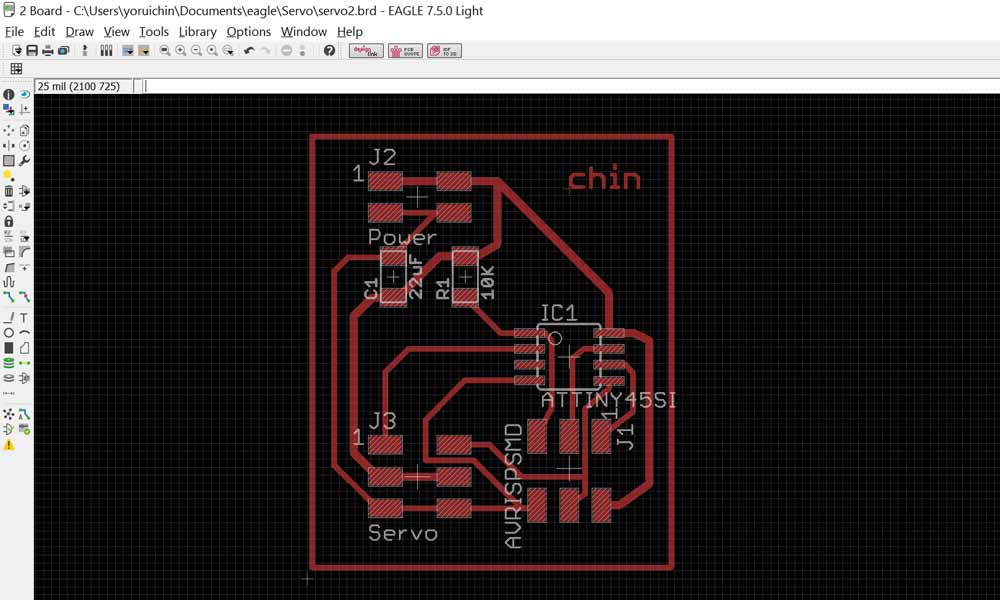
After discussing with the local instructor, we were advised to redesign the board using another microcontroller chip, the ATtiny45, and also to build the board without a 5V regulator and a 20MHz crystal. Referring to the datasheet of ATtiny45, and comparing the pins assignment with the t44, I made some notes on my memo pad. Scribbling down and drawing the diagram really helped, and I found myself referring to this scribble ever so often when I was working in Eagle to design the schematic and the board.
Component List
- 2 x 9G MICRO SERVOS
- 1 x
ATTINY44ATTINY45 MICROCONTROLLER - 1 x 2x2 HEADER (POWER)
- 2 x 3X2 PIN HEADER (AVRISP & SERVO)
- 1 x CAPACITOR 1 uf
- 1 x 10 k Ohm RESISTOR RES-US1206FAB
1 x 5V REGULATOR1 x 20MHz RESONATOR


Programming with Arduino
I soon realised that ATtiny85 microcontroller is not compatible with the "servo.h" library in Arduino because ATtiny85 only has 8 bit counters, whereas Servo-library relies on having a 16-bit timer available. If I were using the ATtiny44, it would pose no issue because ATtiny44 has a 16 bit counters. I tried to workaround this by trying out two other libraries "servo8bit.h" and "SoftwareServo.h". It seems that SoftwareServo.h is okay to use.
Sweeping the servos back and forth
#includeSoftwareServo myServo1; SoftwareServo myServo2; int angle = 0; void setup() { myServo1.attach(0); myServo2.attach(3); } void loop(){ for(angle = 1; angle < 180; angle++) { myServo1.write(angle); delay(20); myServo2.write(angle); delay(10); SoftwareServo::refresh(); } for(angle = 180; angle > 1; angle--) { myServo1.write(angle); delay(20); myServo2.write(angle); delay(10); SoftwareServo::refresh(); } }
Programming the firmware with WinAVR
I was only able to document the WinAVR programming process in week 13 when in fact, this topic has been covered as early as week 4. At that time I didn't understand C programming and was trying very hard to avoid avrdude which I couldn't understand. So all the while, I have been using Arduino IDE to flash my chip. It is only now that I am a little more ready to face the challenge and try to understand about AVR programming. I think this is a huge leap for me and I am happy to have a better understanding about AVR programming. For windows users, we need to download WinAVR.
The 3 most important commands to know are:
  1.    cp hello.servo.44.2.make makefile   // compiling the c program into a "makefile"

  2.    make        // generate 2 files; the .hex file and the .out file

  3.    avrdude -P com4 -c stk500v1 -b 19200 -p t45 -U flash:w:hello.servo.44.2.c.hex   //stk500v1 is my arduino programmer;
                                                                                        //t45 is the ATtiny45 chipset;
                                                                                        //hello.servo.44.c.hex is the hex file you want to flash
Because of the changes to my board and the change of chipset to ATtiny45, the following modifications to the C programme is essential:
  #define PWM_port PORTB        // ATtiny45 only has PortB
  #define PWM_direction DDRB    // Data Direction Registers B
  #define PWM_pin_0 (1 << PB0)  // PortB Pin0
  #define PWM_pin_1 (1 << PB3)  // PortB Pin3
Changes required in the make file:
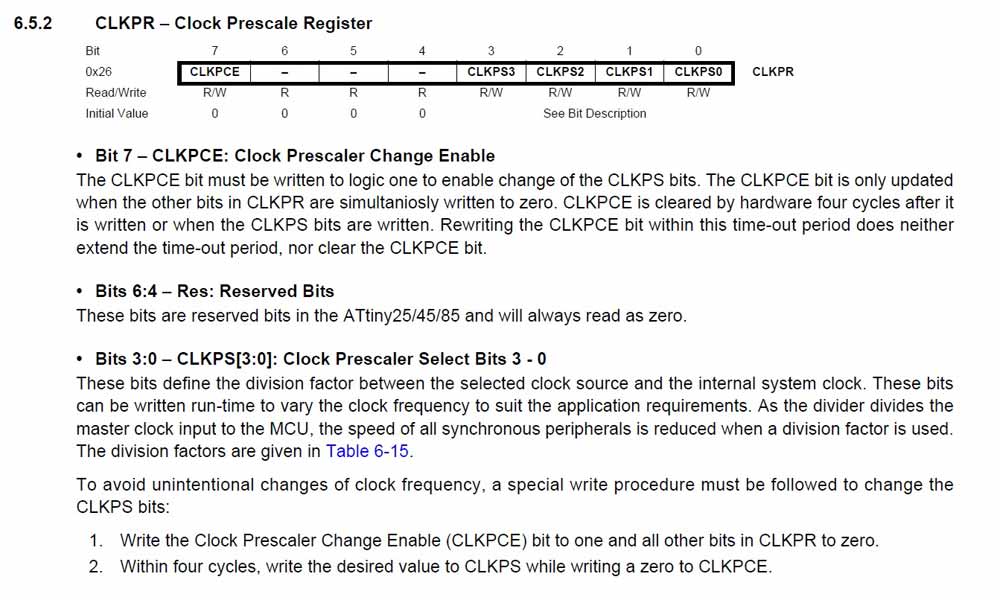
  MMCU=ATtiny45       // and all occurrence of t44 will be replaced by t45
  F_CPU = 8000000     // Instead of an 20MHz external crystal, we are using 8MHz internal clock
Successfully flashing the microchip set:
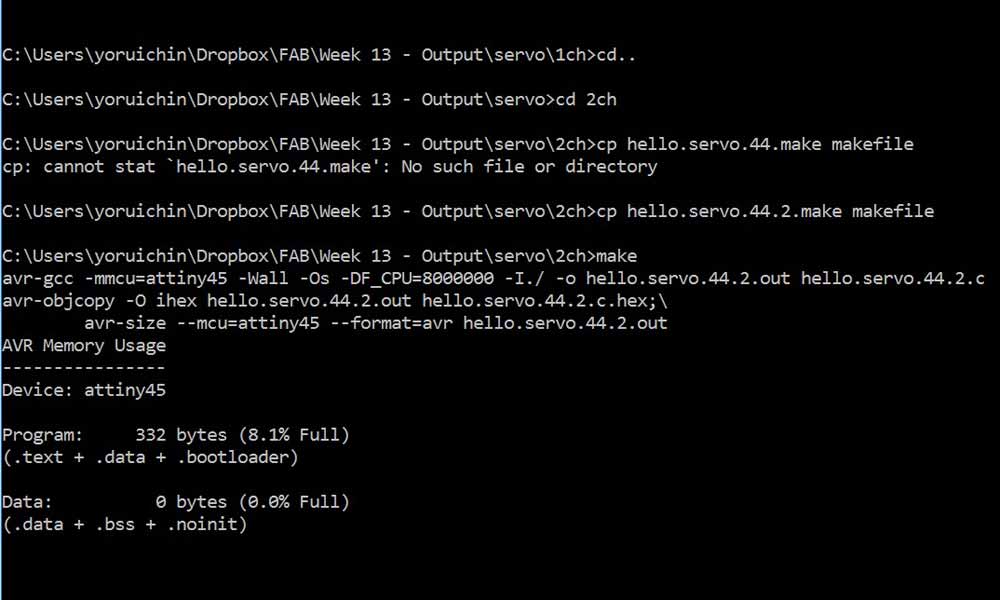
C:\Users\yoruichin\Dropbox\FAB\Week 13 - Output\servo\2ch>cp hello.servo.44.2.make makefile
C:\Users\yoruichin\Dropbox\FAB\Week 13 - Output\servo\2ch>make
avr-gcc -mmcu=attiny45 -Wall -Os -DF_CPU=9600 -I./ -o hello.servo.44.2.out hello.servo.44.2.c
avr-objcopy -O ihex hello.servo.44.2.out hello.servo.44.2.c.hex;\
avr-size --mcu=attiny45 --format=avr hello.servo.44.2.out
AVR Memory Usage
----------------
Device: attiny45
Program: 312 bytes (7.6% Full)
(.text + .data + .bootloader)
Data: 0 bytes (0.0% Full)
(.data + .bss + .noinit)
C:\Users\yoruichin\Dropbox\FAB\Week 13 - Output\servo\2ch>
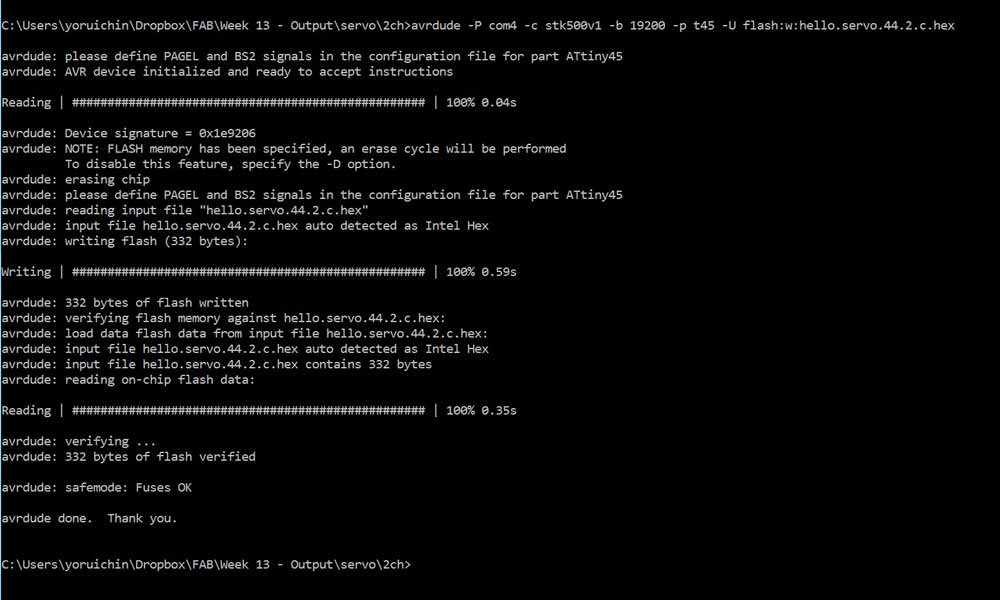
C:\Users\yoruichin\Dropbox\FAB\Week 13 - Output\servo\2ch>avrdude -P com4 -c stk500v1 -b 19200 -p t45 -U flash:w:hello.servo.44.2.c.hex
avrdude: please define PAGEL and BS2 signals in the configuration file for part ATtiny45
avrdude: AVR device initialized and ready to accept instructions
Reading | ################################################## | 100% 0.03s
avrdude: Device signature = 0x1e9206
avrdude: NOTE: FLASH memory has been specified, an erase cycle will be performed
To disable this feature, specify the -D option.
avrdude: erasing chip
avrdude: please define PAGEL and BS2 signals in the configuration file for part ATtiny45
avrdude: reading input file "hello.servo.44.2.c.hex"
avrdude: input file hello.servo.44.2.c.hex auto detected as Intel Hex
avrdude: writing flash (332 bytes):
Writing | ################################################## | 100% 0.53s
avrdude: 332 bytes of flash written
avrdude: verifying flash memory against hello.servo.44.2.c.hex:
avrdude: load data flash data from input file hello.servo.44.2.c.hex:
avrdude: input file hello.servo.44.2.c.hex auto detected as Intel Hex
avrdude: input file hello.servo.44.2.c.hex contains 332 bytes
avrdude: reading on-chip flash data:
Reading | ################################################## | 100% 0.27s
avrdude: verifying ...
avrdude: 332 bytes of flash verified
avrdude: safemode: Fuses OK
avrdude done. Thank you.
C:\Users\yoruichin\Dropbox\FAB\Week 13 - Output\servo\2ch>

Download work files
References
- Making Things Move by Dustyn Roberts
- FabISP: Programming
- ATtiny85 Servo: SoftwareServo Library
- Programming an ATtiny w/ Ardurino 1.6 - ATtiny45/85 vs. an Arduino Board
- NewbieHack - Microcontroller Tutorial - A Beginners Guide
- Microcontrollers - AVR Atmega32 - Writing our first program and transferring it to the MCU
- Writing the First Program to Turn On an LED and Transferring the Program into the Microcontroller
- AVR Programming–Tutorial 2–Hands on Programmers Notepad & MAKE file creation
- Four PWM Outputs from the ATtiny85
- The Makefile
- The pinouts of the most popular AVR processors.
- Arduino Tutorial: TowerPro SG90 Micro Servo | With Sketch
- Servo Motor Control by Using AVR ATmega32 Microcontroller
- Introduction to PWM – Pulse Width Modulation
- PWM Signal Generation by Using AVR Timers
- AVR Timers – An Introduction
- Timers in Compare Mode – Part I and Timers in Compare Mode – Part II
- Arduino Code for 'Sweep'
- Arduino towerpro sg90 9g servo
- Servo library for the ATtiny45 and the ATtiny85
- Servo8Bit Library version 0.6 released
- The Software Servo Library