
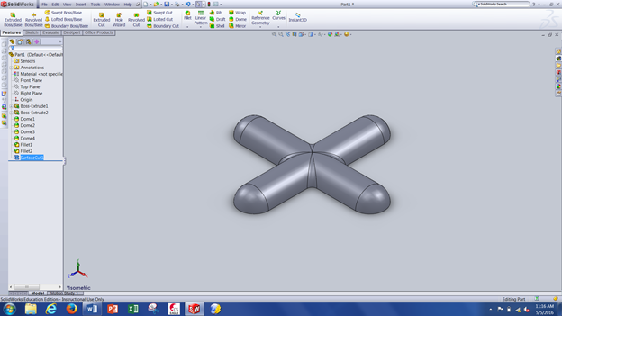
In the fourteenth week we were tasked to create a fiber composite component. I decided to create a simple 3D cross in Solidworks as my model for the layup.
Here is a list of tasks as I see them for the fourteenth week.
I decided to use a vacuum bag process to make my composite. I did not think I had the time to do a two piece mold and pressure form the composite.
The vacuum bag process uses a single one-sided mold, material to laminate and some kind of resin to bond the laminates together.
I chose burlap for my project laminate. I also chose to use an organic resin. I used Entropy Resins "CLR Epoxy & CLF Hardener". It is made from plant materials and is biodegradeable.
Using Solidworks I first created a cylinder.

I next created an identical cylinder perpendicular to the first one.

Next I added domes to the ends of the cylinders.

Then I created fillets to blend the cylinders together.

The last step in the design phase is to remove the bottom half of the part with a cutting plane.
One of the limitations of using 3-Axis CNC machines is that they are unable to undercut the part.
The end of the tool needs to be able to reach the part.
The last part of the design phase is to create the *.stl file we will use to create code.
I used Aspire to create my CNC code to machine the part using a Shopbot CNC router.
Aspire is an upgrade to the Partworks software that came with the Shopbot.
We can do all of our CNC programming from Shopbots to commercial CNC metal cutting machines.
Here is a screenshot showing the *.stl file imported into Aspire.

Here is a view of the simulation showing the mold after the roughing pass.

Here is the final simulation view in Aspire showing what the mold will look like after the finishing pass.

I chose 2 inch thick foam insulation to make my mold. It holds up quite well to the vacuum pressure.
The only problem I encountered was it tends to melt if spray painted. I decided to protect the mold during the vacuum process with a clear sheet of plastic.
To set up the material on the Shopbot I just screwed into the sacrificial MDF table on the Shopbot. I made sure to use some large wood washers to keep the foam from collapsing.
Here is a shot of the first roughing pass. I used a 1/2" flat endmill.

Here is a shot with the roughing passes completed.

I then changed to a 1/2" ballnose endmill for finishing. I used a .050" stepover for the finishing passes. Here is the beginning of the finishing passes.

Here is a view of the finishing about halfway done.

Here is a photo of the finished mold.

The making of a composite part is very similar to a choreographed event. There is only about 30 minutes of pot life for the resin I am using.
Here is the resin I am using. Entropy Super Sap CLR. The
mixture is 2 parts resin to 1 part hardener.
Here is a list of the steps to prepare the materials for the project
Here are some photos of the materials ready to use.


The first thing to do is mix up a batch of resin. Chris Rohal and I decided to work together to prepare our composites.
We each assembled our own materials and the other one helped to mix resin or whatever else could speed up the process.
It is very difficult to both mix the resin and apply it to the stack. Remember,there is only about 30 minutes total of pot time.
Here is a picture of our setup to mix the resins and apply the materials.

Here is a shot of the completed stack as I seal the bag to the table.

Here is the completed assembly with the vacuum hose attached. I had a few leaks to deal with during my setup.
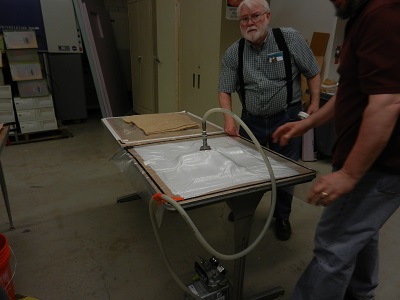
Here is a final photo of the vacuum process as I leave for the night. I left the vacuum on all night long and removed the part in the morning.

The next morning with quite a bit of effort I unpacked my composite from the bag and the mold. Here is a photo (right to left) of my mold, the part and the cured batting that was on the top of the part.

There were a few problems or concerns I encountered during this lab.
1st - The design could not have any undercuts in the part. A 3-axis CNC can olny access surfaces that are visible from overhead.
2nd - I tried using spray paint to coat my model during the build up and vacuuming phase. I tested some clear and primer paint on a sample piece of foam and it melted. I decided to use a clear plastic sheet to keep the mold from sticking to the resin.
3rd - It took quite a bit of time to machine molds this large. My finishing pass took over 2-1/2 hours to complete.
4th - I was not as careful as I should have been when attaching the final plastic sheet to the table. I had to search out and repair quite a few air leaks. In the end everything worked out okay and we were successful.