Week.04 Electronics Production
To complete this assignment we all worked on the FabISP, an in-system programmer for AVR microcontrollers. With this tiny device we will be able to "talk" to other devices and to programme them using a USB cable and 6 pin IDC to 6 pin IDC cables. It is based on the USBtiny and V-USB firmwares.
The steps to be followed are:
Milling a PCB board
First we need to choose the board files, I chose Neil's board and we can customize with our personal logo.
Get the FabISP files to be sent to the milling machine. You can download the files from the FabISP Ferdi Page
Fab modules
Open fab modules from Fab Modules Sending circuit board traces and board outline to mill: 1-Select the input format (.png) 2- Select the output format (in this case Roland SRM-20 mill) 3-Process for traces: PCB traces (1/64)
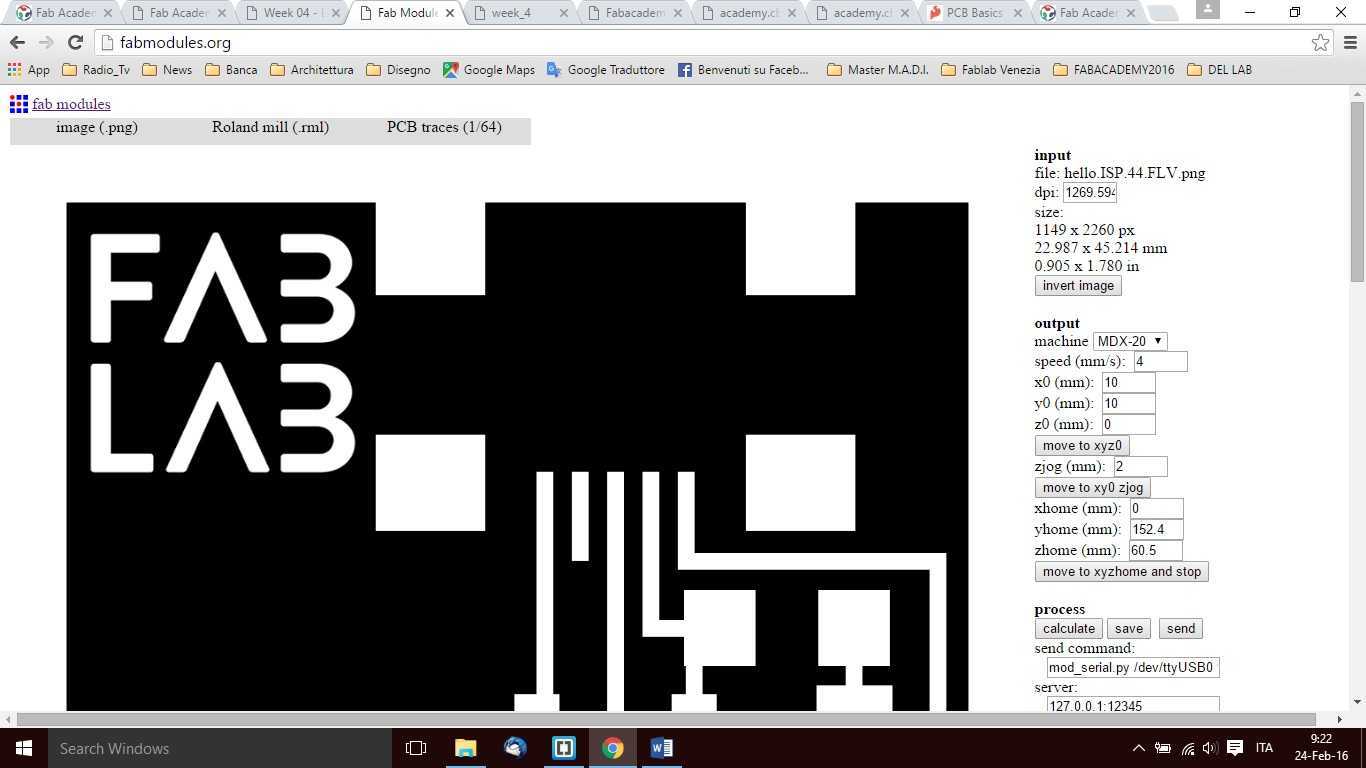
Go to the fabmodules.org and upload the image. Then select Roland mill. Select PBC traces with the 1/64 inches tool. Output machine MDX-20. Speed will be automatically set to 4, and all you need to change is the number of offsets to 2.
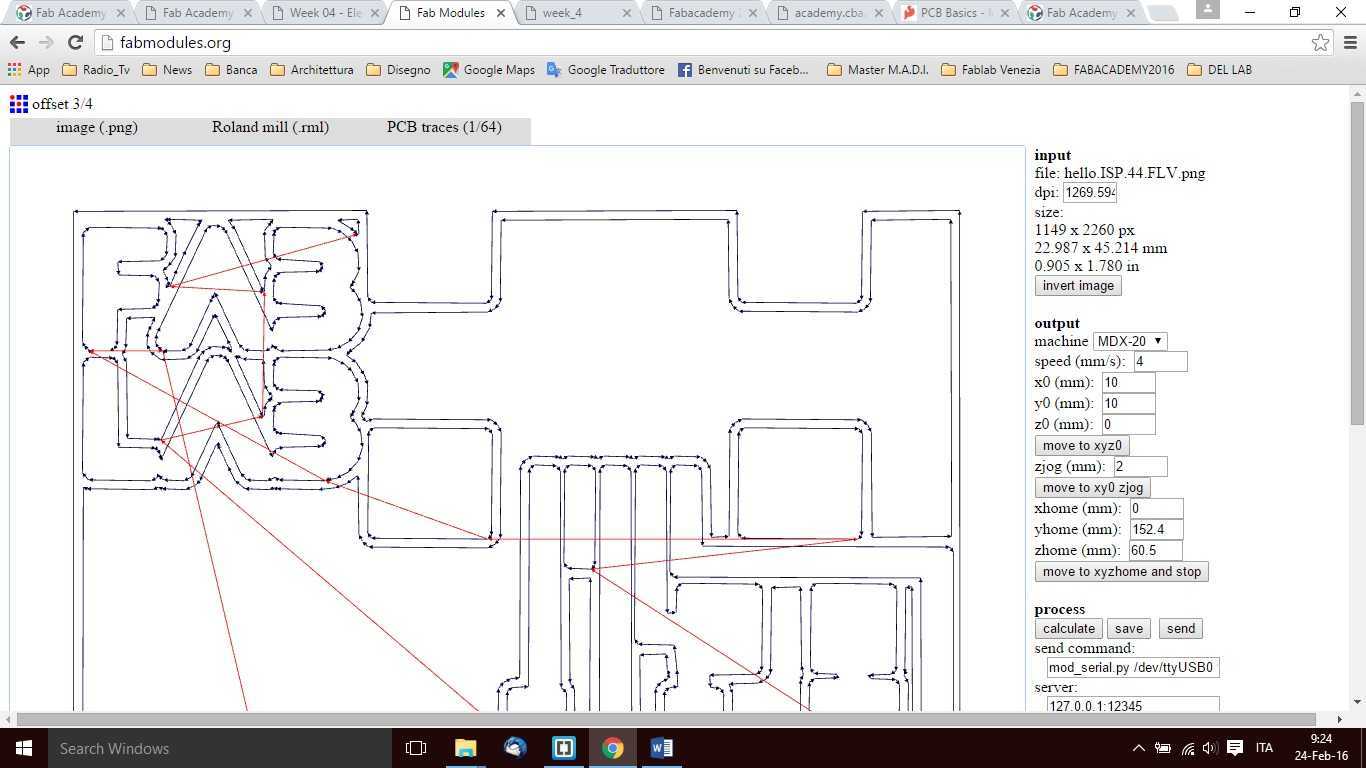
If you click on “calculate”, the fabmodule online programme will show a toolpath. If everything is ok, save the file.
The Machines Roland MDX20
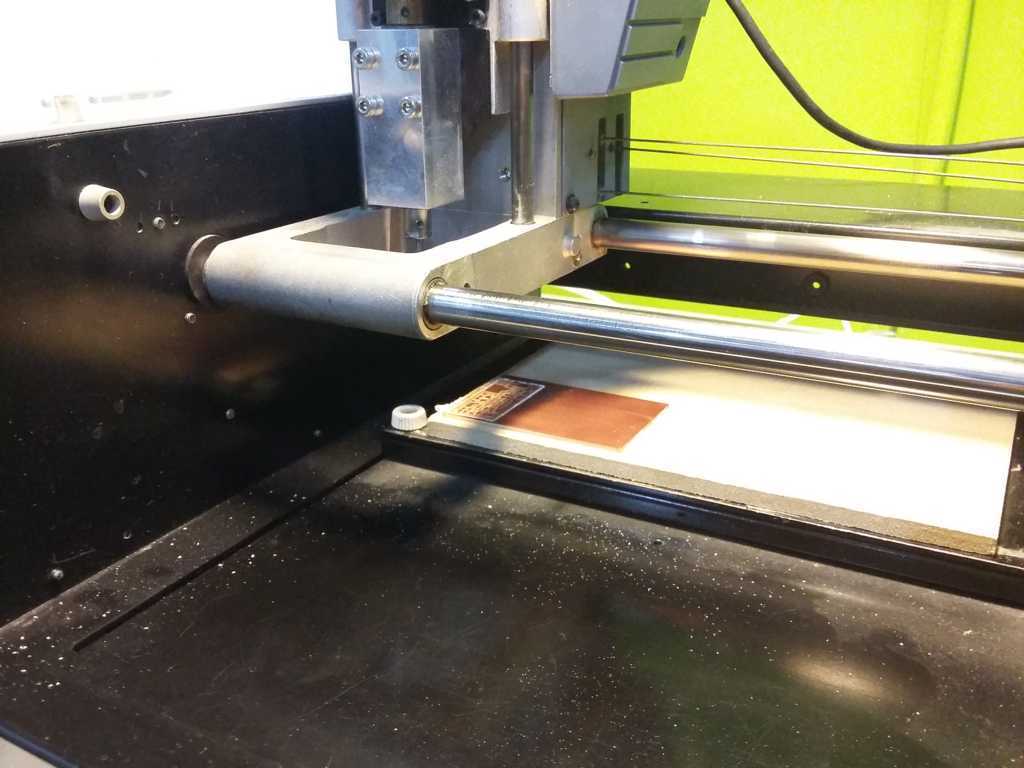
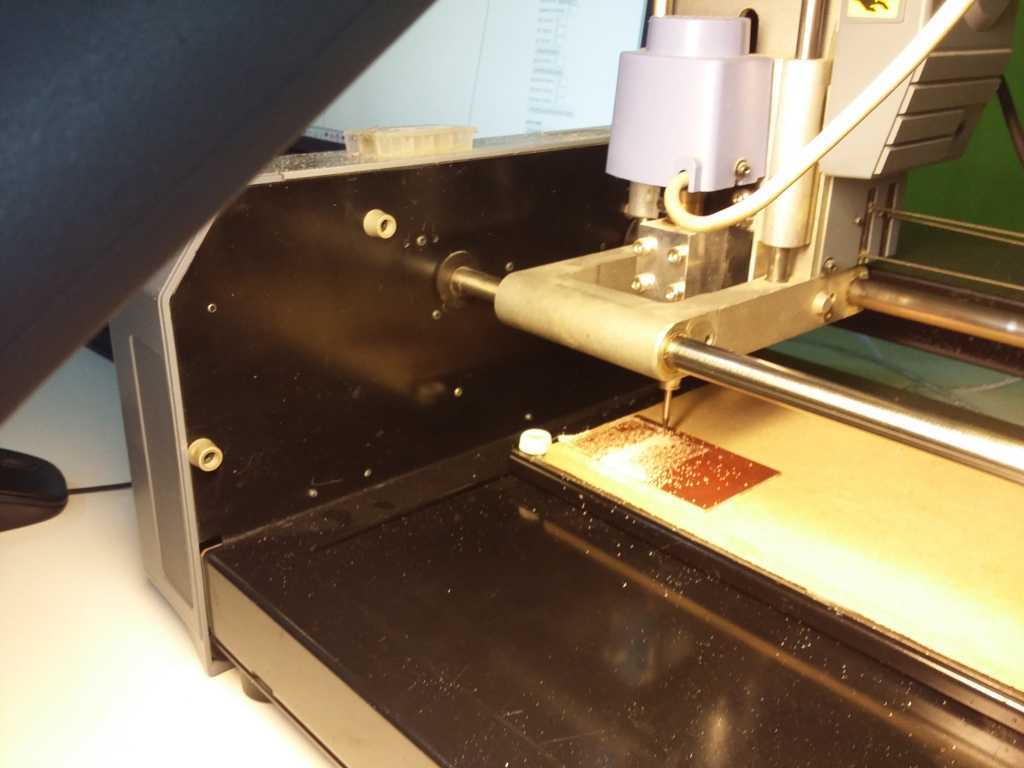
and the result is my first PCB
my first PCB ;)#fabacademy2016 Fablab Venezia
Pubblicato da Elia De Tomasi su Lunedì 22 febbraio 2016
Soldering
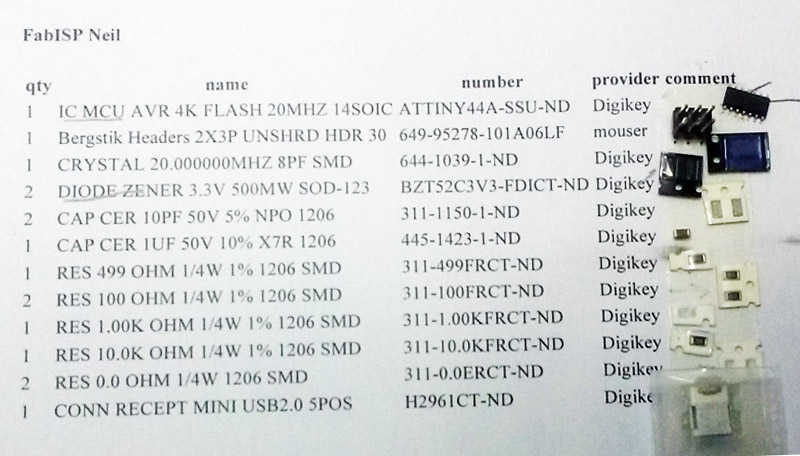
First of all I gathered all the components, that were all available at the FabLab inventory. The complete list with names, quantity, number and providers is in Ferdi's FabAcademy 2016 site.
FabISP: Electronics Production
The first time you solder, you should practice using old boards that your fab lab has for sure. Have a look at this video recommended by Ferdi:
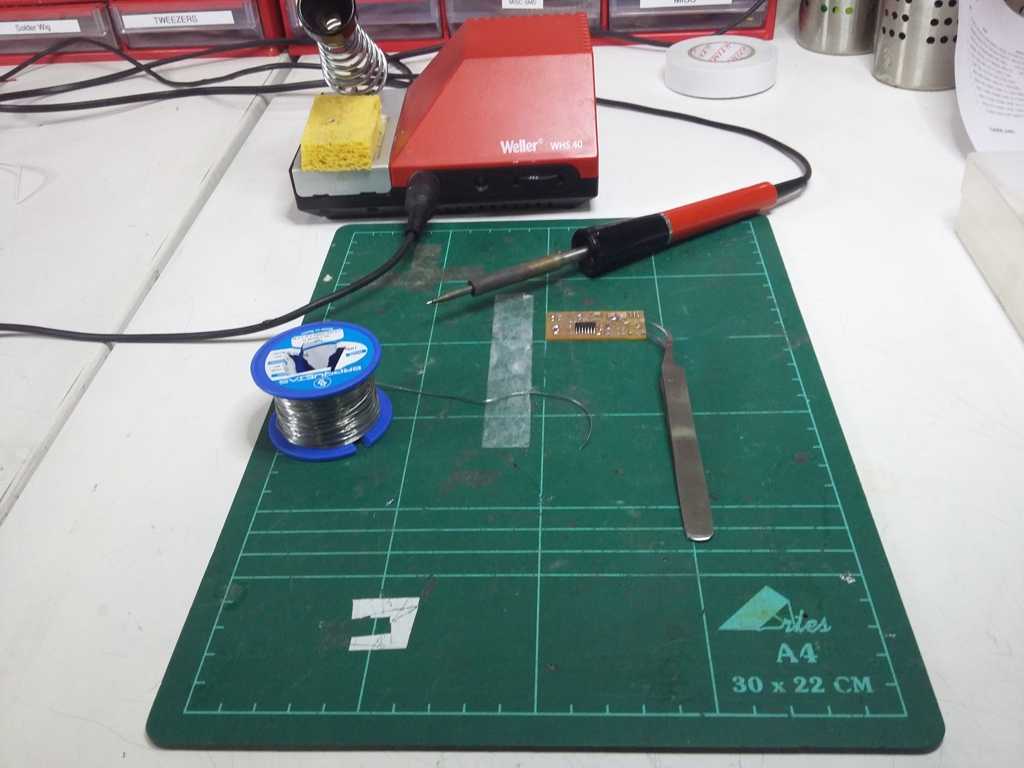
Let's start soldering
It is better to start with the smaller components. We have to pay attention to the direction of some components:
The most difficult part is the ultra-tiny legs from the USB connector.
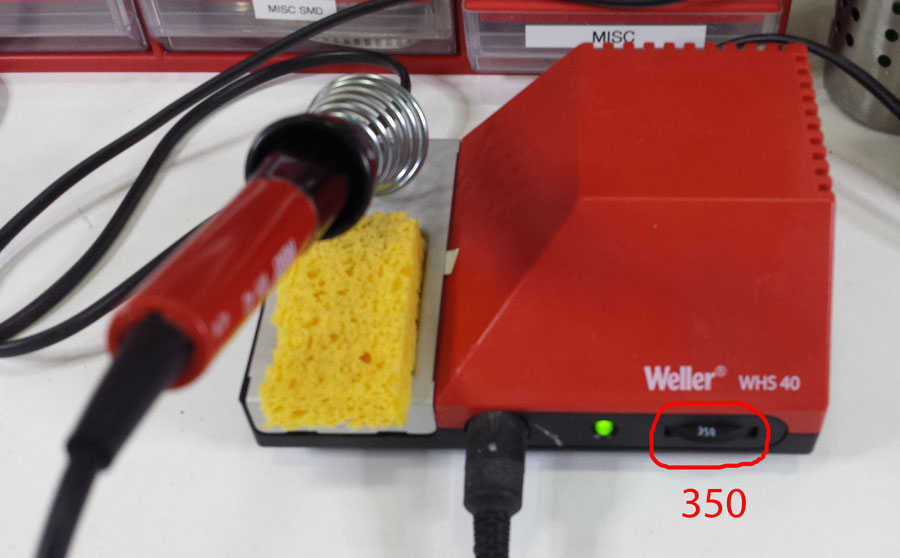
The WHS40 WELLER - Soldering station have to be set at 350°C
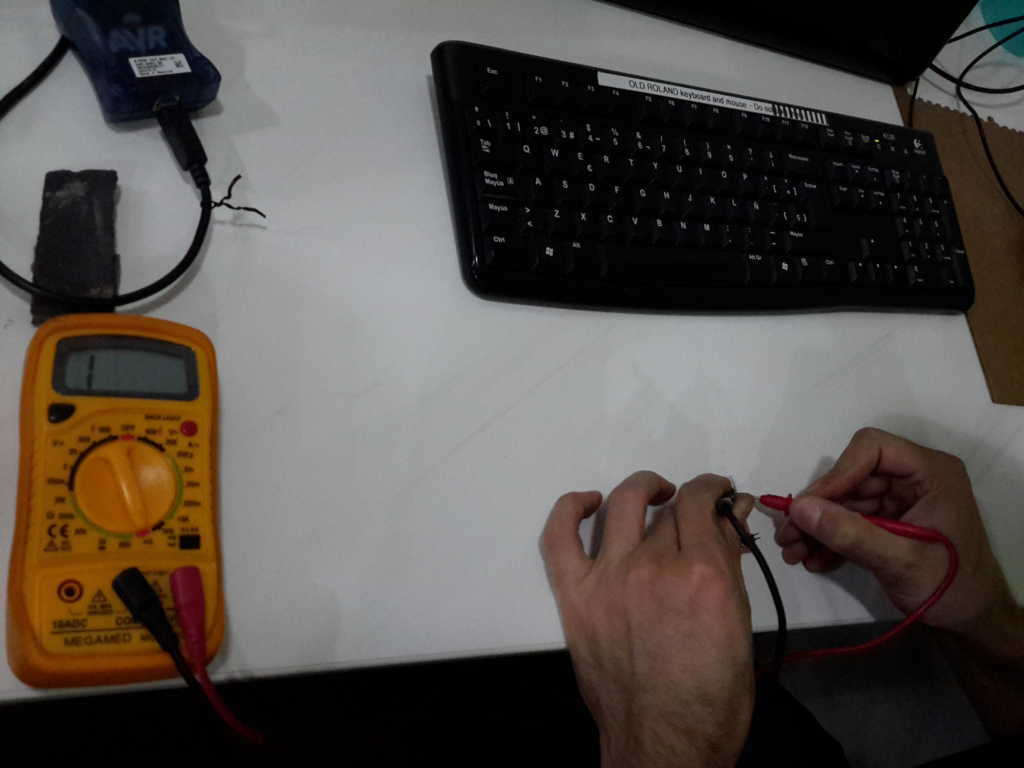
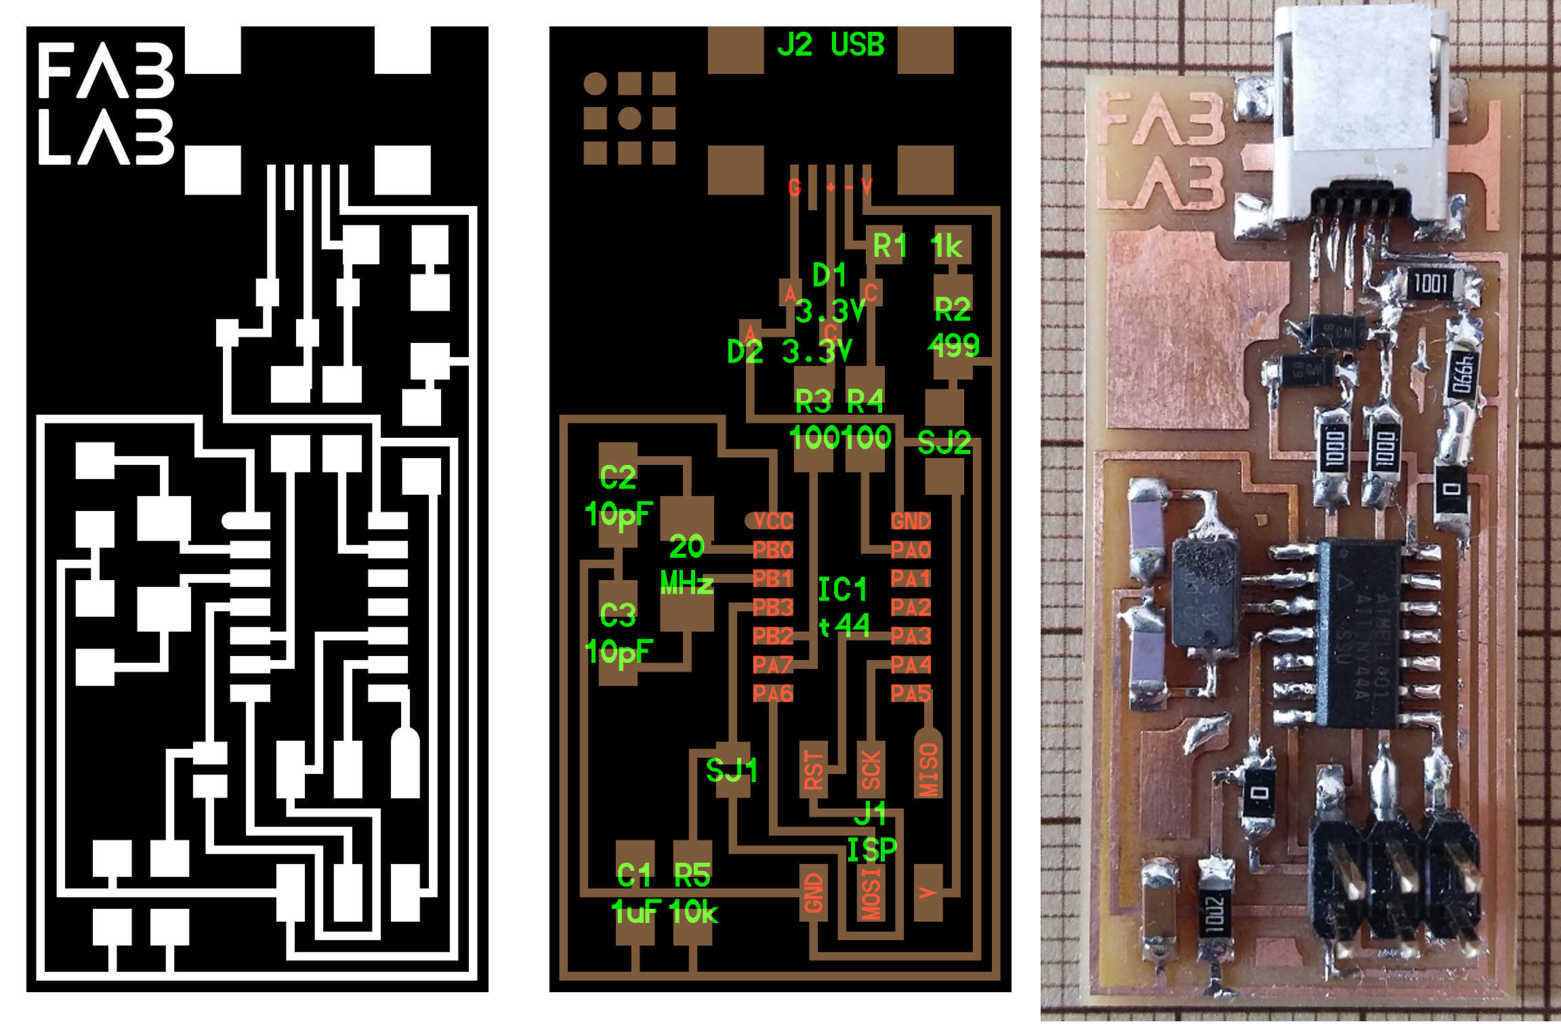
After that, you need to check in all the connections with the voltmeter following the FabISP labeled board diagram. If you hear a "beep" that means they are properly connected, if you don't they are not, the ground and the voltage don't have to be connected, neither the + and the -
Everything is ok...
the result is a firs PCB
Pubblicato da Elia De Tomasi su Martedì 23 febbraio 2016
Programming
Ubuntu Software
FabISP: Programming. Get and install avrdude / GCC software and dependencies: Open Terminal and type:sudo apt-get install flex byacc bison gcc libusb-dev avrdudeThen type:
sudo apt-get install gcc-avr
- type "y" when asked to do so by your system
Then type:
sudo apt-get install avr-libcThen type (may already be installed):
sudo apt-get install libc6-devDownload and Unzip the Firmware: Move to the desktop
cd ~/DesktopDownload the firmware from the Fab Academy Electronics Production page.
wget http://academy.cba.mit.edu/classes/embedded_programming/firmware.zipUnzip the firmware
unzip firmware.zip
Program the FabISP
cd Desktop/firmware
make clean
if all is ok:
Elia:~/Desktop/firmware$ make clean
rm -f main.hex main.lst main.obj main.cof main.list main.map main.eep.hex
main.elf *.o usbdrv/*.o main.s usbdrv/oddebug.s usbdrv/usbdrv.s
make hex
if all is ok:
Elia:~/Desktop/firmware$ make hex
avr-gcc -Wall -Os -DF_CPU=20000000	 -Iusbdrv -I. -DDEBUG_LEVEL=0
-mmcu=attiny44 -c usbdrv/usbdrv.c -o usbdrv/usbdrv.o
avr-gcc -Wall -Os -DF_CPU=20000000	 -Iusbdrv -I. -DDEBUG_LEVEL=0
-mmcu=attiny44 -x assembler-with-cpp -c usbdrv/usbdrvasm.S -o usbdrv/usbdrvasm.o
avr-gcc -Wall -Os -DF_CPU=20000000	 -Iusbdrv -I. -DDEBUG_LEVEL=0
-mmcu=attiny44 -c usbdrv/oddebug.c -o usbdrv/oddebug.o
avr-gcc -Wall -Os -DF_CPU=20000000	 -Iusbdrv -I. -DDEBUG_LEVEL=0
-mmcu=attiny44 -c main.c -o main.o
avr-gcc -Wall -Os -DF_CPU=20000000	 -Iusbdrv -I. -DDEBUG_LEVEL=0
-mmcu=attiny44 -o main.elf usbdrv/usbdrv.o usbdrv/usbdrvasm.o usbdrv/oddebug.o
main.o
rm -f main.hex main.eep.hex
avr-objcopy -j .text -j .data -O ihex main.elf main.hex
avr-size main.hex
   text	   data	    bss	    dec	    hex	filename
      0	   2020	      0	   2020	    7e4	main.hex
make fuse
Elia:~/Desktop/firmware$ sudo make fuse
avrdude -c usbtiny -p attiny44  -U hfuse:w:0xDF:m -U lfuse:w:0xFF:m

avrdude: AVR device initialized and ready to accept instructions

Reading | ################################################## | 100% 0.01s

avrdude: Device signature = 0x1e9207
avrdude: reading input file "0xDF"
avrdude: writing hfuse (1 bytes):

Writing | ################################################## | 100% 0.00s

avrdude: 1 bytes of hfuse written
avrdude: verifying hfuse memory against 0xDF:
avrdude: load data hfuse data from input file 0xDF:
avrdude: input file 0xDF contains 1 bytes
avrdude: reading on-chip hfuse data:

Reading | ################################################## | 100% 0.00s

avrdude: verifying ...
avrdude: 1 bytes of hfuse verified
avrdude: reading input file "0xFF"
avrdude: writing lfuse (1 bytes):

Writing | ################################################## | 100% 0.01s

avrdude: 1 bytes of lfuse written
avrdude: verifying lfuse memory against 0xFF:
avrdude: load data lfuse data from input file 0xFF:
avrdude: input file 0xFF contains 1 bytes
avrdude: reading on-chip lfuse data:

Reading | ################################################## | 100% 0.00s

avrdude: verifying ...
avrdude: 1 bytes of lfuse verified

avrdude: safemode: Fuses OK

avrdude done.  Thank you.
make program
Elia:~/Desktop/firmware$ sudo make program
[sudo] password for Elia:
avrdude -c usbtiny -p attiny44  -U flash:w:main.hex:i

avrdude: AVR device initialized and ready to accept instructions

Reading | ################################################## | 100% 0.01s

avrdude: Device signature = 0x1e9207
avrdude: NOTE: FLASH memory has been specified, an erase cycle will be performed
         To disable this feature, specify the -D option.
avrdude: erasing chip
avrdude: reading input file "main.hex"
avrdude: writing flash (2020 bytes):

Writing | ################################################## | 100% 5.68s


avrdude: 2020 bytes of flash written
avrdude: verifying flash memory against main.hex:
avrdude: load data flash data from input file main.hex:
avrdude: input file main.hex contains 2020 bytes
avrdude: reading on-chip flash data:

Reading | ################################################## | 100% 3.36s


avrdude: verifying ...
avrdude: 2020 bytes of flash verified

avrdude: safemode: Fuses OK

avrdude done.  Thank you.

avrdude -c usbtiny -p attiny44  -U hfuse:w:0xDF:m -U lfuse:w:0xFF:m

avrdude: AVR device initialized and ready to accept instructions

Reading | ################################################## | 100% 0.01s

avrdude: Device signature = 0x1e9207
avrdude: reading input file "0xDF"
avrdude: writing hfuse (1 bytes):

Writing | ################################################## | 100% 0.00s

avrdude: 1 bytes of hfuse written
avrdude: verifying hfuse memory against 0xDF:
avrdude: load data hfuse data from input file 0xDF:
avrdude: input file 0xDF contains 1 bytes
avrdude: reading on-chip hfuse data:

Reading | ################################################## | 100% 0.00s

avrdude: verifying ...
avrdude: 1 bytes of hfuse verified
avrdude: reading input file "0xFF"
avrdude: writing lfuse (1 bytes):

Writing | ################################################## | 100% 0.00s

avrdude: 1 bytes of lfuse written
avrdude: verifying lfuse memory against 0xFF:
avrdude: load data lfuse data from input file 0xFF:
avrdude: input file 0xFF contains 1 bytes
avrdude: reading on-chip lfuse data:

Reading | ################################################## | 100% 0.00s

avrdude: verifying ...
avrdude: 1 bytes of lfuse verified

avrdude: safemode: Fuses OK

avrdude done.  Thank you
Copyright © Elia De Tomasi 2016