Diego Rivera, Detroit Industry Murals, 1932
Machine Design and Presentation
Note: My code and files can be found here in the Shopbot Folder. I am only posting low resolution photos on this page. Fab Academy Files
Machine Programing and Fabrication
This week we took our Machine we built last week added the electronics and worked on coding the software so it would work as a yeast aggitator
The week started poorly, as I met with Terrence to go over the programs and software we would need, in hopes that I could then teach the team what it needed to know to progress. I respect the idea in practice ,but I being the lowest rung on the electronics design and software team ladder, was going to try to educate the rest of the group. Needless to say, they are far more educated in this particular subject than me. It was a "Trickle Up" model of education and the doubt in the majority of my team was palpable. Thier mistrust was well founded as I was not able to assimilate the information, process it, and then teach it in the time allowed. I do think however, that given more time, I could have pulled off the task. At the end of the day, as I was floundering with instruction, I was called away to teach class (quite literally, I was saved by the bell.) and Terrence had to re-teach David Taylor the information he had just gone over with me. Together, David and I helped the rest of the group get set for the up coming week. David diffinitely caught the team up to speed.
Here are my notes with Terence.
First we needed to get Python on my computer, but luckily found it already installed on my MacBook Pro. There were some other files I needed to download.
1. The first was Pyserial
To Install PySerial
Whatever your operating system, download the .tar.gz install package for PySerial 2.6 from
pyserialThis will give you a zipped file called: pyserial-2.6.tar.gz
To unzip pyserial in terminal type:

The rest of the procedure is the same whatever your operating system. Use comand in the terminal window and “cd” into the pyserial-2.6 folder, then run this command:
sudo python setup.py install
2.PyGestalt_Master
They can be found here. Week 10, Getting Started With Gestalt NodesDown near the Bottom you will find the link to Nadya's page whereI went to get the Pyserial and Pygestalt zip files.
pygestalt zip files.I followed her tutorial. It was excellent.
1.On the Mac you'll need to hardcode the name of your FTDI cable (they all have unique IDs when they enumerate).
Tom was able to find the correct port name by opening up Arduino and finding the correct open port. It ended up being named:
portName = '/dev/FTZ56Q37'
I chose Brackets to work on the python code, but the rest of my team used Sublime, which is meant specifically for Python.
2. In Brackets I went to File>open>Desktop>Pygestault-Master>Examples>Machines>HTMAA>single_node.py
In Brackets I changed line 25 to the correct port name listed above.

3.Now we are ready to power it up.To do this type the following command in the terminal window.
python single_node.py
4. We changed line 77 to get the machine to move to the specific coordinates. To do this you change the values on line 77.

Here is the video of our first node working and experimenting with line 77 co-ordinates.
Adding our Second Machine
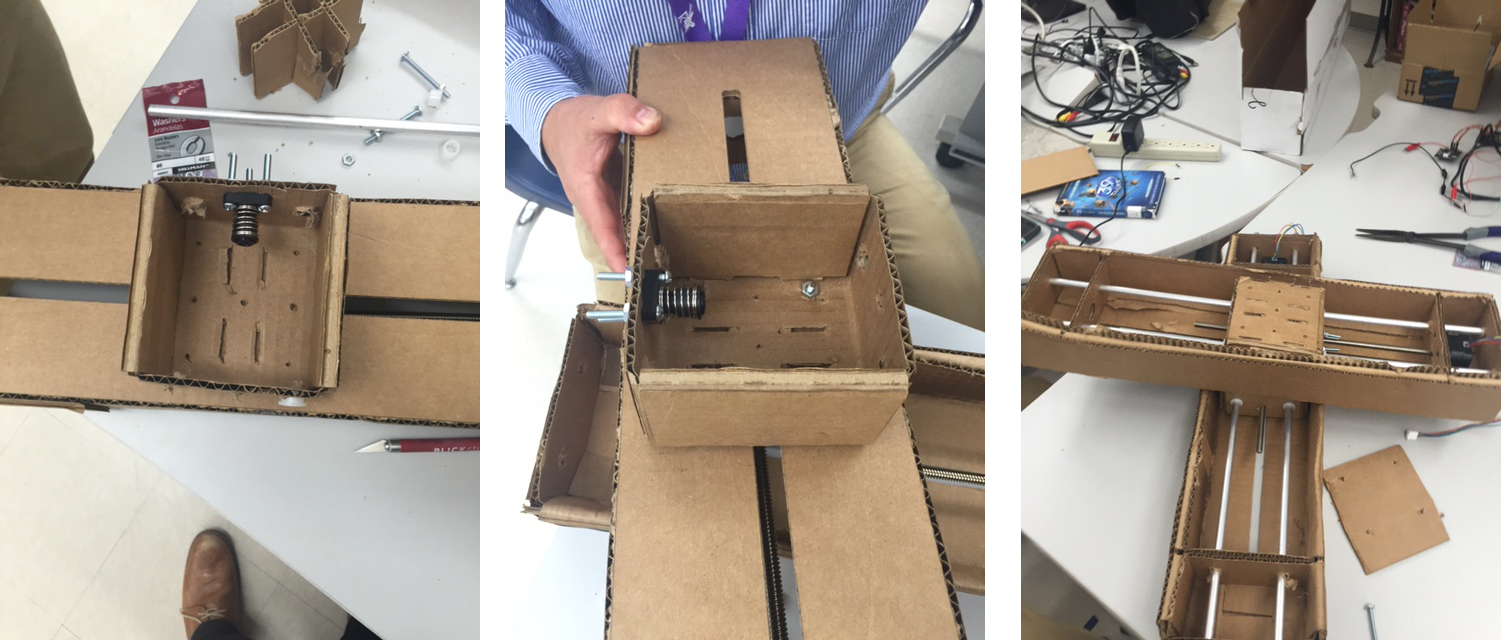
To set up the second machine we connected the side jumper pins. Diagrams of this connection can be found here.
Week 10, Getting Started With Gestalt NodesIt is important that the boards are connected correctly, so that the second machine will function. Tom Dubick was assigned this job.
***Important***
When the program is run a VM file will be created. This file has to be removed when connecting the second gestault board. If you do do not remove the VM file, the second gesault board will not be able to join the network and the machine will not work. We removed the vm file and restarted the two motor program. After pressing the two blue buttons on the Gestault boards. The second gestalt board was able to communicate with the network.
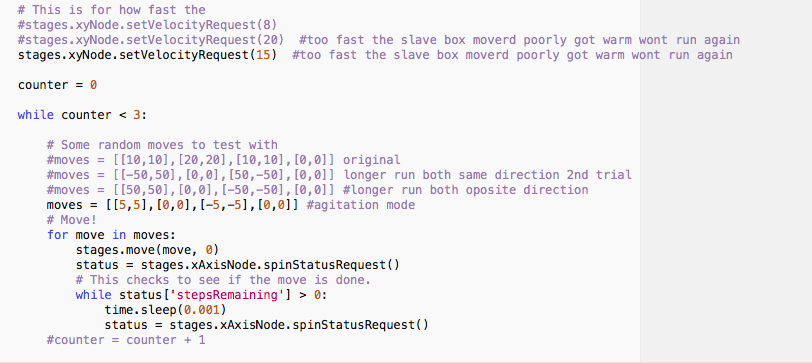
Experimenting with Motor Performance
1.To get our motors working better we added some weights to offset the weight of the motor that was on the far side of the cardboard boxes. This but our machine in better balance.
2. We had adjusted the xy axis earlier to get the first gestault node working and moving the correct distances. We adjusted the code in the second motor the same way.
3. Next, the velocity was set to in line 83 to 15, because, we found that at 20 velocity it was too high and it was malfunctioning. To work as an agitator we needed short choppy motions. However, we discovered that by making the steppers run with slightly less jerking , we could make the liquid mix better. The values = [[5,5],[0,0],[-5,-5],[0,0] were set after a process of some trial and error and now adequately agitated the liquid in the test tubes. The values above controlled the acceleration and the coordinates on the axis.
4. The test tubes were then filled with water and food coloring for our test. We poked holes in the box to accomidate the mixing test tubes and added different colors of food coloring. The boxes were attached with velcro to hold them together. I was suprised the bond held as well as it did.
I have attached the single_nodes code to show the practice we did building up towards the agiator xy_plotter code. Below you will find a video of the agitator working, images and a zip file of the code: Below you will find a video of the agitator working and an image of our experimentation code: