Exercise 5: 3D Printing and scanning
Using 123 Design
11/26/2016
I started working on my 3D printing today. At first I was a little nervous about not being able to use Tinkercad. I started working with 123 Design and I felt a little more at ease when I realized that it was at least similar to Tinkercad.
My goal was to make a brain slicer for a sheep brain. I wanted to build this because when I teach the anatomy of the brain in my neuroscience class it is really hard to get regular sections of the brain and to cut the brain in a straight cross section. I wanted to build a device that could cut the sheep brain in regular slices so that students can get better perspective of the relationship between the dorsal and ventral position of structures. Knowing the relative relationship position of slices is essential to being able to identify structures in the brain and understanding their function.
I have come to appreciate that one of the lessons of digital design is that it must be exact so that it is buildable and reproducible. I found this took real discipline to not just pull or pull objects but rather use tools that move object at exact intervals.
My Idea: Brain Slicer
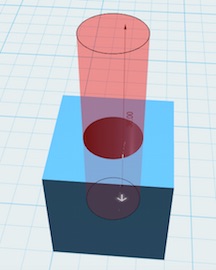
My first idea was to create a box that would use a plunger to hold the brain in place against a wall and then to designed set wires hold slice the brain. The box would lay on its side and a wedge would push the brain through the wires. To build this I would have the box sides open on all sides except the top and the bottom.
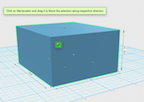
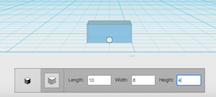
I measured the size of the sheep brain I wanted to cut. The brains averaged about 5 cm long, 3 cm tall and 4 cm wide. I first created a box and set the length as 10 cm so that I would have room for the plunger and handle.
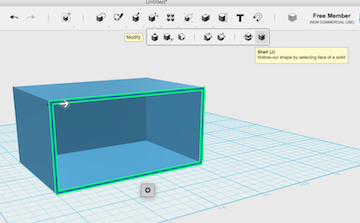
I first tried to create a box by cutting out a center with another box. However I realized it was much better to make a shell because it is a faster and more exact way to ensure that all the walls are exactly the same size.
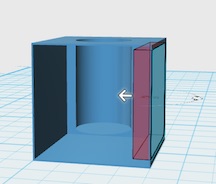
I next tried to open up the other sides by extruding a sketch rectangle under the primitive shape. This was a little confusing. One of the things that I came to appreciate about working in the 123 Design is that you always have to be really aware of what structure you have selected and it matters what side of structure you have selected and what part of the structure you have selected, such as the face or edge. With this in mind I found it more and more important to constantly use the orbit tool. To do this I created a rectangle and 1 CM and then clicked on the arrow and pulled it in the opposite directions from the direction it pointed. This might sound counterintuitive to extrude in order to cut a hole but in 123d if you click on the top face of object and pull the arrow down opposite from the direction it is pointing.
Next I wanted to make the plunger handle as my nested object. The first time I tried to “eyeball” a column to cut out a hole. I found that it was impossible to get the column directly centered. I found a much better approach was to create a 2 cm column and snap the column to the face I wanted to cut out.
I then created another column and snapped it to the top, which put it in the center of the hole. I then extruded it in the positive direction by clicking on the top of the column. I did this by clicking on the arrow and typing in 10cm. I then made sphere and snapped it to the top of the column.
I then created a square and snapped it to the other end of the column. I then tried to create a wedge that would push the brain and hold it against the bottom of the box. I did this by clicking on the bottom outside edge of the square so that it was highlighted and I pulled the edge in to create a wedge.
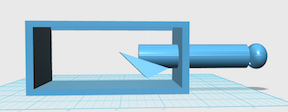
Once I built this I realized that it was a really bad design. First there was no good way to create the cutting device and the plunger would be pointless. I suppose that is the power of digital design. I have been thinking of a way to make such a device long before I even knew about this class. The whole time I was thinking of something that worked basically as described above. However once I got to see my design in 3D it was clear how it was unworkable.
I next decided to move to an upright design that pushed the brain down onto blades. I created another box and handle with the same dimensions except it would only have one open face this time. I would create blades from the plastic onto which the plunger would push the brain.
I used the following dimensions:
A few differences I made to the plunger were that set the sphere into the column then merge the sphere with the column. The bottom of the plunger was different as well. I created a box and then created a circle that I extruded through the box. My goal was to create a curve that would push down the brain without smashing it.
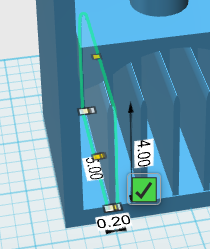
I then set out to make the blades. I used the following dimensions:
I then set the blade into the box by setting the blade slightly into the base and the back so that the blade would be part of the box.
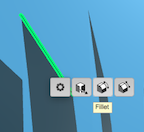
I then created a fillet on the top edge by clicking on the object and then clicking on the edge. This brings up a box that has an icon with an icon in it
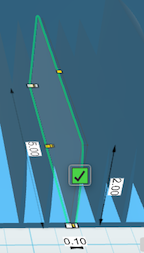
I then selected the second middle icon to fillet the edge, which I then did so by 20 degrees. I was hoping that this would then create an edge sharp enough to cut the brain. I then set up the first blade and copied and pasted the blade by command C then command V. It is a little confusing but it puts the pasted object on top of the original so it is not clear that you have actually created a new object. I then moved the object 0.5cm by clicking on the object and then the arrow and then typing in the distance. I created 11 blades.
I then saved the file as a .stl. To get the file for 123 design ( click here.) for the stl ( click here.)
Printing my Object
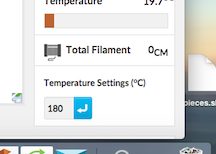
I was then ready to print. First I created a Polar Cloud account and joined the CLS polar cloud club. I then uploaded the .stl file to the Polar Cloud website. I then loaded it to the selected printer and set the filament temperature to 180 c and waited for it to warm up. While it was warming up I sprayed the polar base with hairspray. Once it hit 180 C and double checked that the hair spray had dried enough to be tacky and I hit print. It started printing the base and everything was looking great.

I first noticed a problem when it started to bring the block at the base of the plunger. The filament strands were not holding together but they seemed to be overall holding in place.
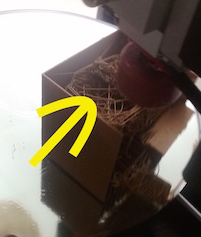
It went bad however soon after that. The base of the plunger popped out so I stopped the print job.
Looking at the print job it was immediately clear that it would not have worked anyway. The box was too thin and was too flimsy to take any force.
1/27/2016
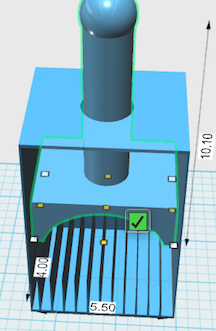
I went back to 123 Design and first thickened the walls by clicking the outside face of the wall and adding .5 cm to the wall. I did this by clicking on the outer wall and then clicked again on the arrow. I then set the thickness
I also redesigned the blades. I made the blades to the dimensions below:
I decided to try using wires as an edge to the blades. I wanted to use 1 mm wire that I would glue to the top of the blade and then file down to create an edge. To accomplish this I created a 1mm wide cylinder that I snapped to the top of the blade then set it 0.3 mm down into the blade then subtracted the cylinder. I was hoping that this would create a ridge into which I could put the wire.
I then placed the blade in the box setting and set in the back and the base so as to integrate it to the blade. Next I placed it next the left wall and then moved it 1 cm from the wall. I then copied and pasted a total of five blades. After my last build I realized my last build was a more realistic cut.
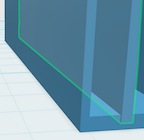
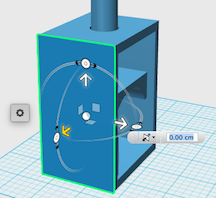
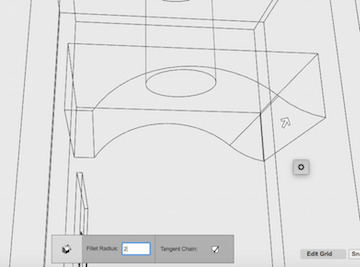
I also redesigned of the base of the plunger. I did not like the sharp edges of the plunger because I was afraid that cut into the brain when I pushed down on it. To address this I filleted the inside edges of the bottom block to smooth out the lines. In the picture you can see I changed the edge on the right.
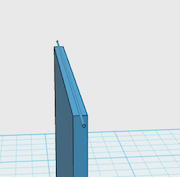
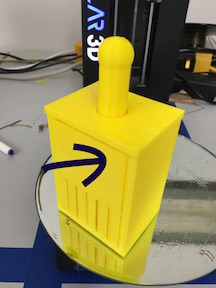
I really like my final design of my brain cutter. Here is the 3d rendering of my brain slicer. Click on the 3D view to rotate the image.
1/29/2016
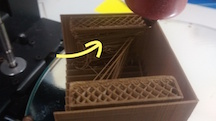
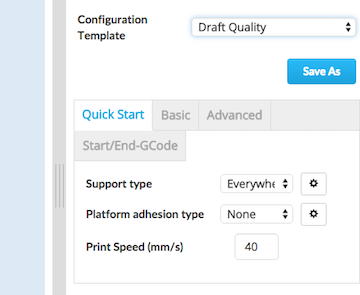
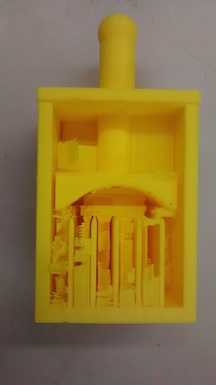
First thing in the morning I set out to print my redesigned brain plunger. One major difference is that I set it to print with supports. To do this in Polar 3d I went to the cura settings and selected it to support fully.
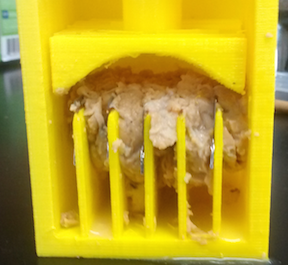
As a result of the support the box built up without the problems of the previous print. As compared to last time, you can see in the picture how the printer included filler in the in-between the blades. When it was done, the handle and the blades were completely supported and did not move.

3/1/2006
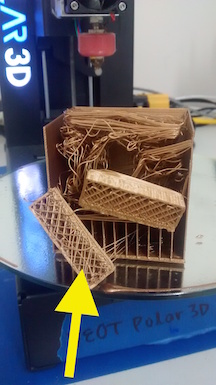
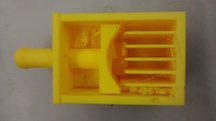
Once it was finished printing I set to work pulling out all of the fill. I was really nervous that I was going to break the print but the filler came out very easily. Once I got all the filler out I was able to move the handle up and down. I then realized that the printer had shifted the handle during printing.

I think it was because it was too tall for the printer thus causing to jump off its post and making the printer shift over. Next time I will print the box on its side so that it will not be too tall
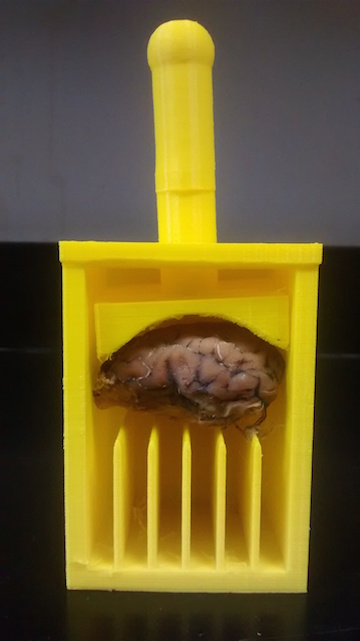
I put the brain into the cutter and it fit perfectly .
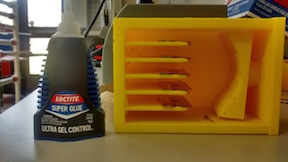
I next tried to glue the wires to the tops of my blades. One problem that immediately became clear was that it was very difficult to get set wire in a straight line. Also even though I designed ridges in the blades into which the wires would sit, the ridges clearly required a higher level of resolution than the printer was capable. I did glue the wires on anyway.
I soon realized that my next problem was filing the wires down. It was clear that this was not going to work. So I tried to cut a brain just with the wires as is. This did not work.
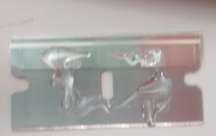
Next I set to work gluing razor blades to the sides of the blades. This worked, finally some success!

Testing it out
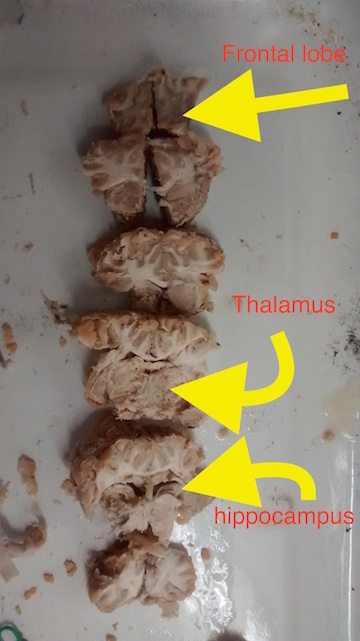
With the razor blades I was able to cut slices of the brain. It was good enough that I was able to identify the different parts of the brain and the sections were consistent (see labeled parts). One problem I did have was that the brain was very mushy so when I pushed the plunger down it tended to just squish down rather than cut. I think chilling the brain to make it firmer would help a lot.
Conclusions
My biggest takeaway from the 3D printing is that it is very easy to create something with more precision than the tool, in this case the 3D printer.
3D Scanning
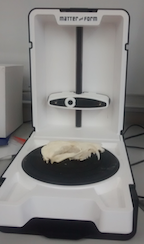
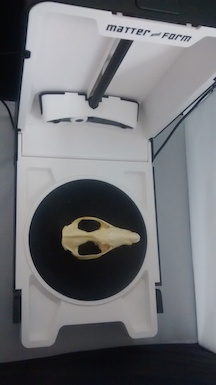
3d scanning using Matter and Form scanner was one of the most straight forward things we have done in the class. I chose to do a opposum skull because it was the biggest skull that was still small enough to fit on the stage of the scanner.
\
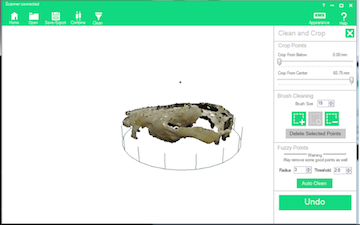
I first started out by scanning the opposum skull. The fist scan produces a picture that has a lot of extraneous dots.
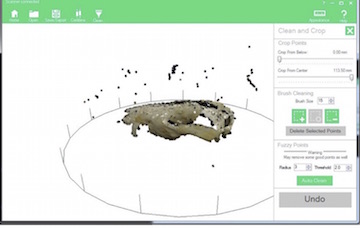
Selecting the clean option produces a skull that gets rid of the extranious points but still has several gaps that should not be there
The gaps can largely be fixed by meshing
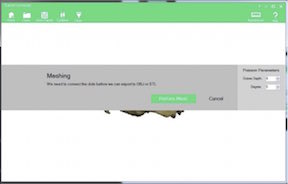
However even with meshing it can leave gaps
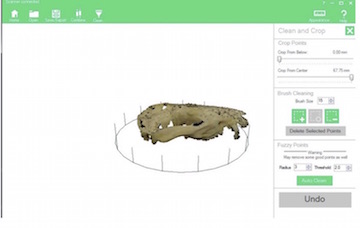
Here is a 3d version of the single scan of the oposum skull. As can been seen there are still several gaps in in the sagital crest of the oposum skull.
To fixed this I scanned the skull again going through the same process so that I could merge mutliple scans. It is worth noting that you do need to have the skull in the exact same spot. Ater merging the scan it improved the quality of the scan and I am sure merging it with another scan would improve it even more.
To get the file for 123 Design ( click here.) for the stl ( click here.)
One last note, here is a good review of 3D scanning click here .
Conclusion
3d Scanning is very easy. The biggest problem is that it is limited by size. The stage on the Matter and Form is pretty small and so for example scanning a human sized skull would not be possible. I know there other 3d scanning programs out there that actually use an Ipad and are not limited by size. These may be worth looking into for the future.