Interface
This week's assignment is to create an interface
To be able to create an interface, I had to start with serial communication and decided to just start with getting readings on the serial moniter on the arduino ide since this is what i am using.
to be able to communicate with my circuit I am using an FTDI. this is the code I am using. It is hugly based on this tutorial and code
#include < SoftwareSerial.h >
#defineing RX    PA1
#defineing TX    PA0
 const int buttonPin = PA2
SoftwareSerial Serial(RX, TX);
void setup()
{
  // ***
  // *** Initialize the Serial port
  // ***
  Serial.begin(9600);
  Serial.print("Initializing...");
  pinMode(buttonPin, INPUT);
}
void loop() {
  // read the state of the pushbutton value:
  int buttonState = digitalRead(buttonPin);

  // check if the pushbutton is pressed.
  // if it is, the buttonState is HIGH:
  if (buttonState == LOW) {
    // turn LED on:
    Serial.print("B");
    //delay(500);
    digitalWrite(PA3,LOW);
  } else {
    digitalWrite(PA3,HIGH);
  }
}
I am using FTDI to communicate. I started by declaring my TX and RX pins according to my circuit.
Unfortunitly its kind of been a fail. I made the code to display text whenever the button was pressed. It is posting something. just not what i actually want.
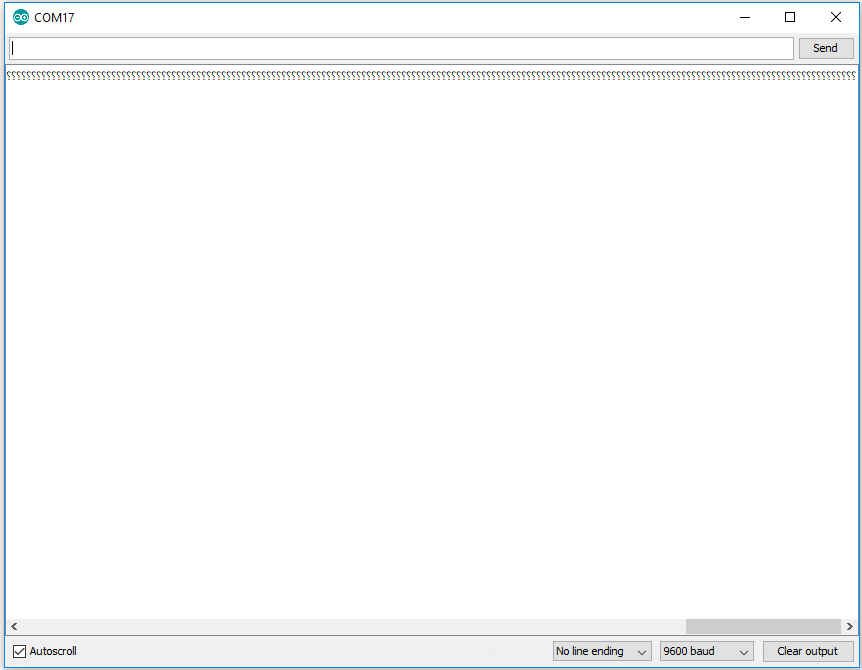
As you can see, all i am getting are question marks. They are being displayed when I click the button so thats something. I am currently checking the possible reasons and what could be wrong. When I had this problem before it was the baud rate. I am not sure whats wrong as the baud rate is correct here. I checked with 4800 baud rate with no luck.
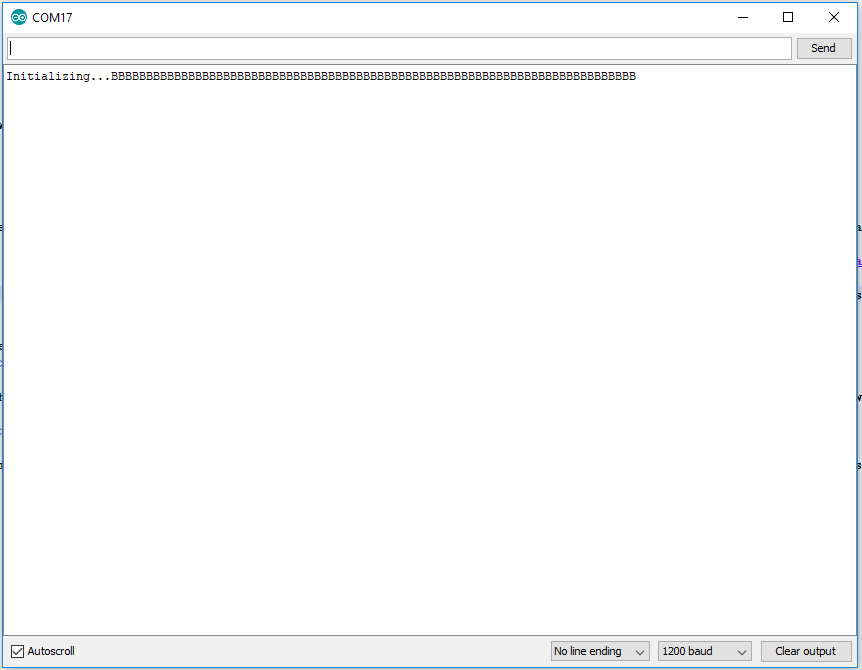
but when changing the baud rate of the serial moniter to 1200 (without changing the code) I got the readings I expected. This indicates there is a timing issue, which was confirmed when i set the LED to blink for one second and it took longer than that to do so
I solved that problem by selecting burn bootloader in the arduyino ide. there is no bootloader for the attiny, but selecting to do so using the arduino ide resets the default factory fuse setting in the attiny to the selected settings (i had 20 MHz external selected)
Now that I am communicating with the board, its time to move to creating the interface.
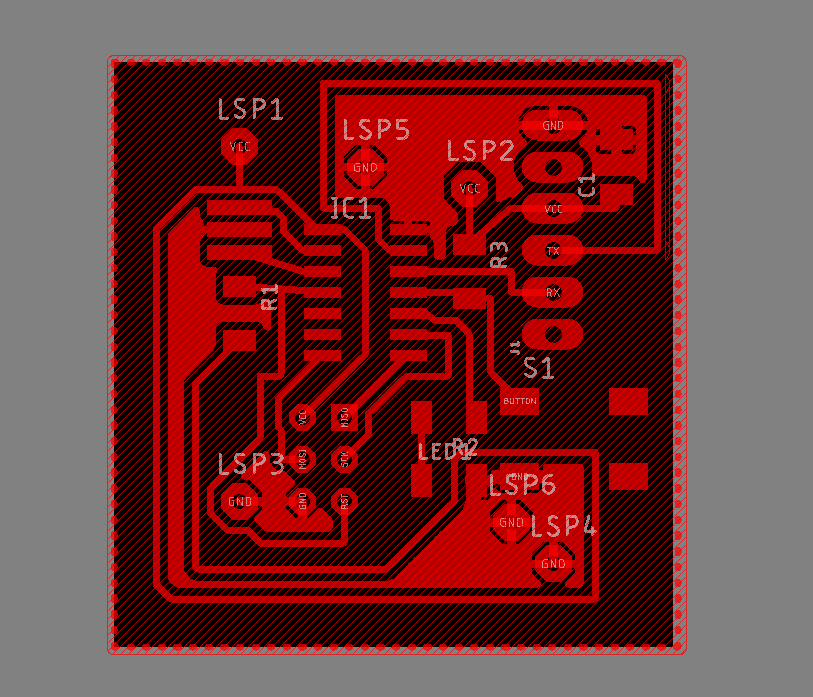
The assignment is to Write an application that interfaces with an input and/or output device that I made. I made this circuit and decided to use the button on it as my input device to the application.
I wanted to make a game that is interactive and fun. I decided to go for the endless runner type of game
I had two choices when it comes to the game programming. one was processing and the other was pygames. I decided to test out processing first becuase Niel recomended it during the lecture to anyone familiar with the arduino IDE which I am.
Processing is an open-source computer programming language and integrated development environment (IDE) built for the electronic arts, new media art, and visual design communities with the purpose of teaching non-programmers the fundamentals of computer programming in a visual context.
I want to create an endless game that can be conrolled using the button on my circuit and possibly embed it on my circuit. what better game that the most famous one button game probably ever, flappy birds!
There are many versions of flappy bird game already made on processing. i decided to select one and adjust it to be controlled using my circuit.
I chose this very minimal design one. I figured since the design was minimal it would be easy to adjust according to my needs. This game was an ongoing competetion for getting the game running with as little code as possible. They managed to cut it down to 687 charchters eventually!
Flappy Bird
The game is playable by clicking on the mouse or the space bar. I am adding my own controller, my circuit. Using the code above, I am sending the Char 'B' through serial everytime the button is clicked. What I have to do in processing is detect every time I recieve 'B' on the serial monitor and use that as a trigger to click. I added the processing serial library and defined my port and my port number. I am using the same baud rate I used in arduino 9600. I monitor the port and whenever data is available I read it. If the data I am recieving is equal to 'B', that means the button is clicked on my circuit which should trigger a click or a jump in my game "buttonjump()" function.
The full game code is below:
/* @pjs preload="file1.png","file2.png","file3.jgp"; */
import processing.serial.*;
Serial myPort;  // Create object from Serial class
//Flappy Code
bird b = new bird();
pillar[] p = new pillar[3];
boolean end=false;
boolean intro=true;
int score=0;
void setup(){
String portName = Serial.list()[1]; //1 is my port
myPort = new Serial(this, portName, 9600);
size(500,800);
for(int i = 0;i<3;i++){
p[i]=new pillar(i);
}
}

void draw(){
while (myPort.available() > 0) {
char inByte = myPort.readChar();
if (inByte == 'B'){
buttonjump();}
}
background(0);
if(end){
b.move();
}
b.drawBird();
if(end){
b.drag();
}
b.checkCollisions();
for(int i = 0;i<3;i++){
p[i].drawPillar();
p[i].checkPosition();
}
fill(0);
stroke(255);
textSize(32);
if(end){
rect(20,20,100,50);
fill(255);
text(score,30,58);
}else{
rect(150,100,200,50);
rect(150,200,200,50);
fill(255);
if(intro){
text("Serial flappy",155,140);
text("Click to Play",155,240);
}else{
text("game over",170,140);
text("score",180,240);
text(score,280,240);
}
}

}
class bird{
float xPos,yPos,ySpeed;
bird(){
xPos = 250;
yPos = 400;
}
void drawBird(){
stroke(255);
noFill();
strokeWeight(2);
ellipse(xPos,yPos,20,20);
}
void jump(){
ySpeed=-10;
}
void drag(){
ySpeed+=0.4;
}
void move(){
yPos+=ySpeed;
for(int i = 0;i<3;i++){
p[i].xPos-=3;
}
}
void checkCollisions(){
if(yPos>800){
end=false;
}
for(int i = 0;i<3;i++){
if((xPosp[i].xPos-10)&&(yPosp[i].opening+100)){
end=false;
}
}
}
}
class pillar{
float xPos, opening;
boolean cashed = false;
pillar(int i){
xPos = 100+(i*200);
opening = random(600)+100;
}
void drawPillar(){
line(xPos,0,xPos,opening-100);
line(xPos,opening+100,xPos,800);
}
void checkPosition(){
if(xPos<0){
xPos+=(200*3);
opening = random(600)+100;
cashed=false;
}
if(xPos<250&&cashed==false){
cashed=true;
score++;
}
}
}
void reset(){
end=true;
score=0;
b.yPos=400;
for(int i = 0;i<3;i++){
p[i].xPos+=550;
p[i].cashed = false;
}
}
void mousePressed(){
buttonjump();
}
void buttonjump(){
b.jump();
intro=false;
if(end==false){
reset();
}
}
This is a demonstration of me playing the game with my circuit as a controller. Circuit is connected to the pc through an ftdi 5 volt cable
Embedding the game on a web page
Lets start by embedding the game on a webpage for anyone that visits the website to be able to play. Lets start by embedding this game and then doing it again with my modified version.
There are several guides online on embedding a processing code on a web page. It is very straight forward. This is a really good source.
first you must place a copy of the processing.js library file you used into the same folder as the HTML file of your website.
second you must place the processing sketch in the same folder (.pde format)
Call the processing library at the head of the HTML website. (which i am doing if you check the source code of this page).
< script type="text/javascript" src="processing.js" >< / script >
Call the PDE file in the body of the HTML website.
< canvas data-processing-sources="myProgram.pde">< / canvas >
And with that I have the game embedded on my website (might not work on some browsers like chrome, try a different browser if it isnt appearing). Have fun playing it! My high score was 25. Try to beat it.
Light Sensor Interface
Beside being an output device, an LED can be used as a light sensor! That is something I had no idea was possible before but it is. A LED is simply a diode that has been doped specifically for efficient light emission and has been packaged in a transparent case. Therefore, if inserted into a circuit in the same way as a photodiode, which is essentially the same thing, the LED will perform the same function.
I thought that was super interesting and decided to expirement with it. My circuit I created in electronis design week Details here contains an LED so I expiremented with that. I just treated the LED pin as a sensor and declared it as an input and started reading data from it using the Analog to digital convertor function. I displayed the values I am getting on the serial monitor to see how it responds to light changes.
 #include < SoftwareSerial.h >
#define RX PA1
#define TX PA0
SoftwareSerial mySerial(RX, TX);
int sensePin = PA3;  //attiny led pin
int sensorInput;    //The variable we will use to store the sensor input
void setup() {

mySerial.begin(9600);
pinMode (sensePin, INPUT);
}
void loop() {
// put your main code here, to run repeatedly:
sensorInput = analogRead(sensePin);    //read the analog sensor and store it
mySerial.println(sensorInput);
//delay(1000); I uncomment this when I want to view the data on the serial monitor
}
This was the output I got on the serial monitor responding to the light changes.
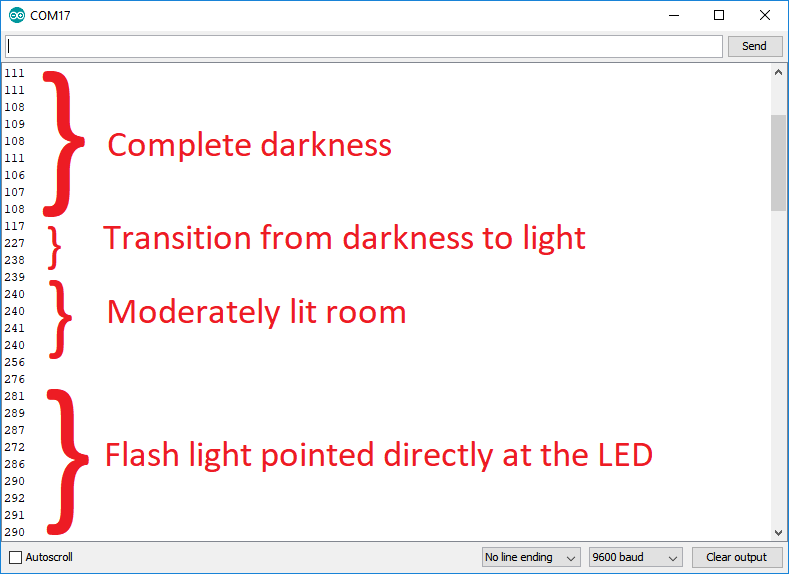
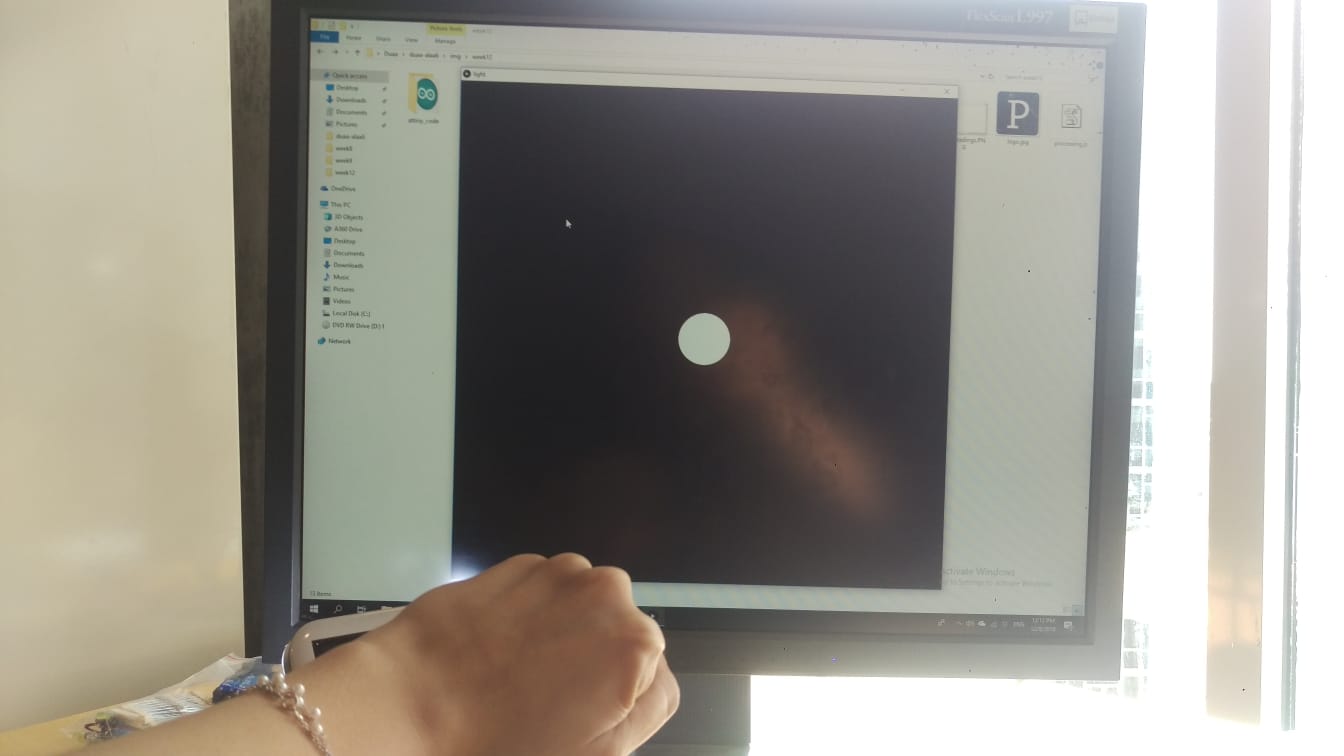
As you can see from the data above, I was getting different readings at different light levels. It was around 105 - 110 at darkness (I covered it with my hand), around 240 in a lit room and around 285 - 290 with a flkash light pointed directly at it. So it is clear that it is responding to light change and that it was ranging from 100 to 300 from total darkness to the brightest conditions. I used the data above to create a visual rpresentation in processing.
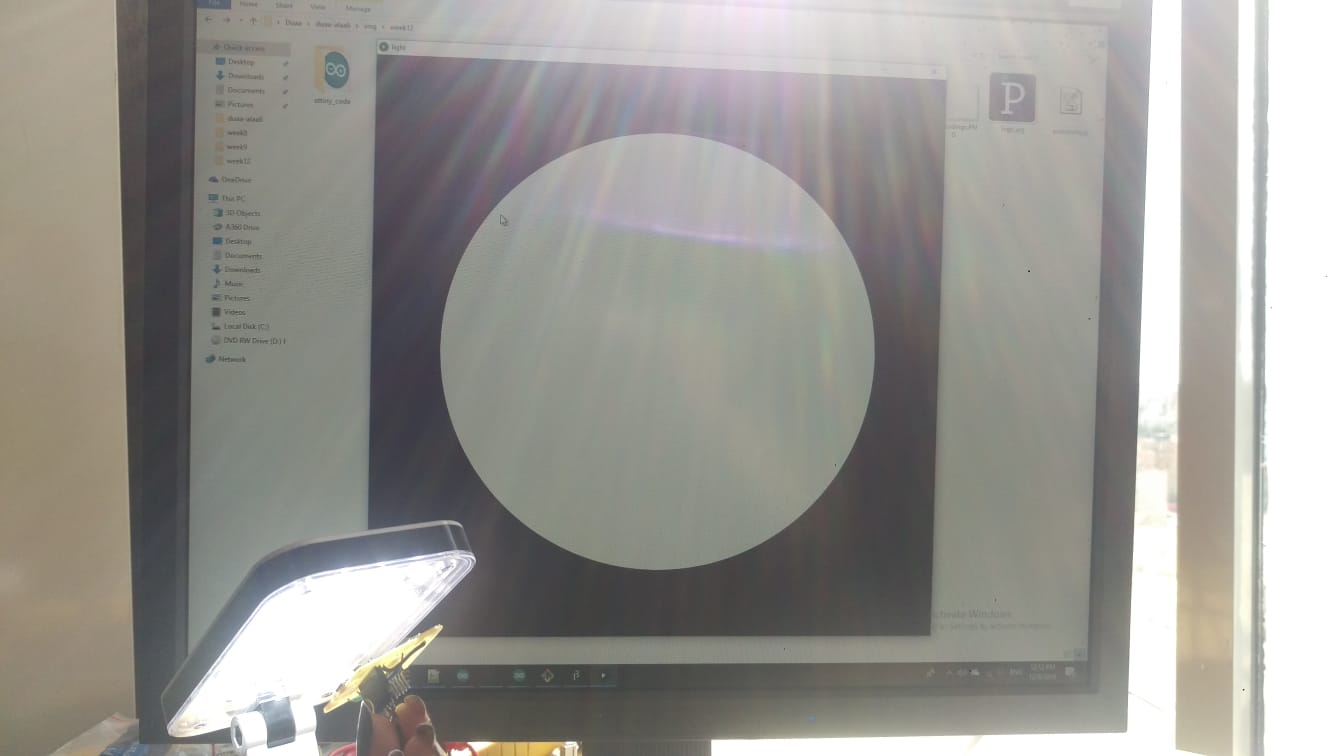
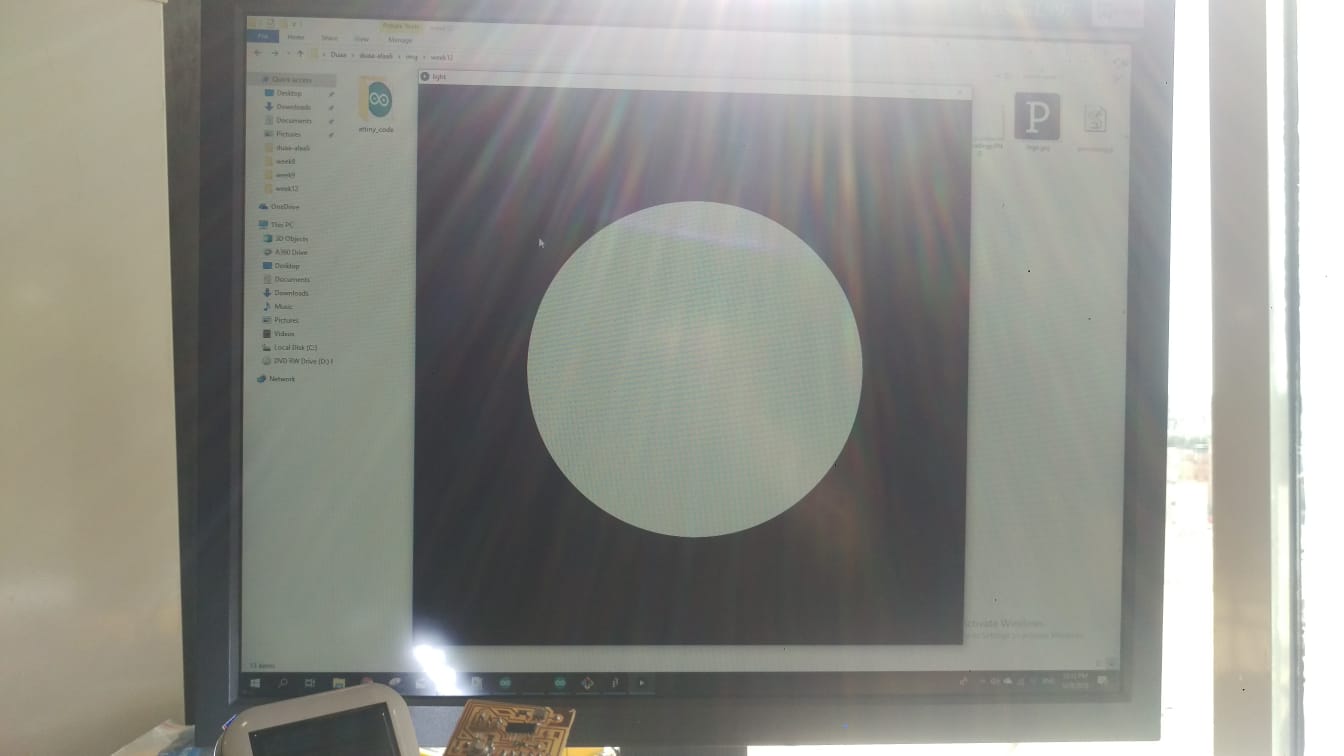
I decided to make a very simple visual represntation of it on processing. Just an ellipse shape that changes size along with the change in light. What I am doing here that I have the arduino code above running and sending the sensor (LED) data serially. My processing code reads that data as a string, converts to integer and maps that data from 0 to 850 instead of keeping it in the range of 100 to 300. The ellipse size changes accordingly.
 import processing.serial.*;
Serial myPort;  // Create object from Serial class
String val;
int y=0; //giving y an initial value
void setup(){
String portName = Serial.list()[0]; //0 is my port, change to yours
myPort = new Serial(this, portName, 9600);
size(1000,1000); //screen size
}
void draw(){
while (myPort.available() > 0) {
val = myPort.readStringUntil(13); //until the line break (13 in asccii)
if (val != null) { //if its recieving a value
try {
y =Integer.parseInt(val.trim()); //string to integer
println(val); //printing to verify
println("val");
println(y);
} catch (NumberFormatException npe){
// Not an integer so disregard it
}
}
}
//println("val");
background(0); //black
float m = map(y , 100, 300, 0, 850); /* my led values range from 100 to 300
which I know by testing different light intensities.
I'm mapping those values from 0 to 850 to represent them visually */
ellipse(500, 500 , m , m);    /*placing the circuit in the center of my screen
at (500,500) and giving it the size based on my light value */
}
A demonstration video in which i struggle to cover the circuit with one hand and film with the other
The circuit is connected to the PC through an ftdi 5 volt cable

Android studio
Other than processing, I expiremented with making an interface using Android studio.

Android Studio is the official integrated development environment for Google's Android operating system, built on JetBrains' IntelliJ IDEA software and designed specifically for Android development. It is available for download on Windows, macOS and Linux based operating systems.
I am using android studio to create an android application to control a buzzer and a neopixcel strip connected to a metamotion R board. I am not using it with my circuit that I designed.
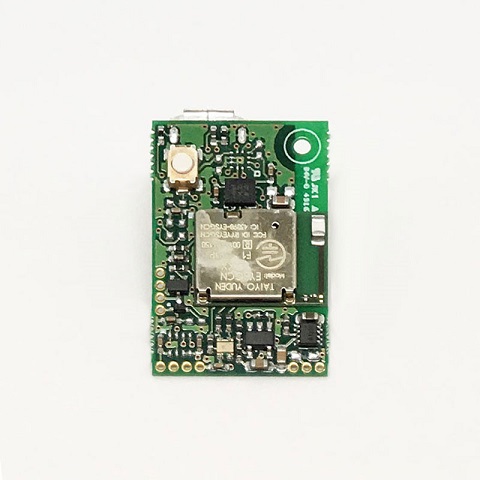
The metamotion R is a board by mbientlab. It is a small board that comes with Bluetooth Low Energy, an ARM M4 MCU, a button, an LED, GPIOs and multiple sensors. The cool part about it is that there is a lot of documentation online for it and an android studio library for interacting with the board.
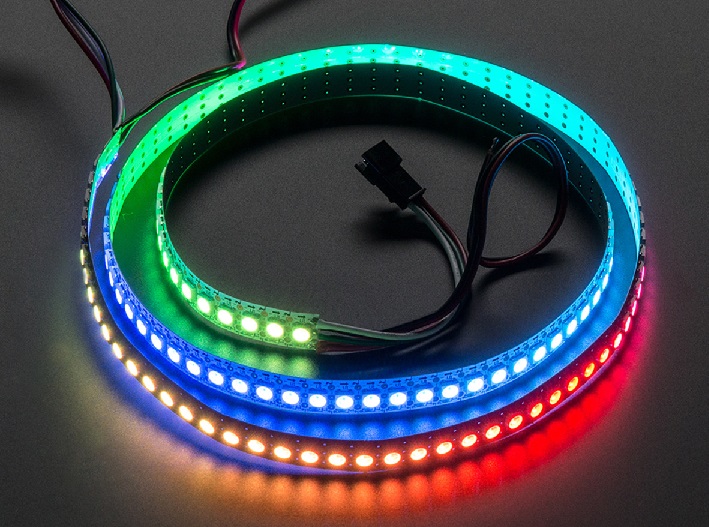
A neopixel light strip is is Adafruit's brand for individually-addressable RGB color pixels and strips based on the WS2812, WS2811 and SK6812 LED/drivers, using a single-wire control protocol. I have it connected to one of the GPIO pins of the metamotion board with a current limiting resistor.
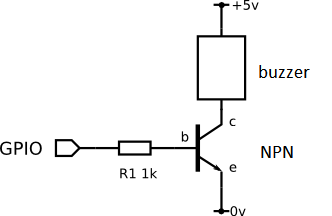
I also have a buzzr connected to another metamotion gpio pin through an npn transistor
The metawear creators released a blank version of an android app on android studio that only connects to the metamotion or metawear board (whichever it is). I am basing my app off of that
Link to starter app here
Unlike most coding platofrms I am used to, Android studio devideds the project to quite a few different parts. It is not all centerlized in one long piece of code. The main ‘code’ will be the Java file that has the same name as the activity. By default, this is MainActivity.Java. and the layout of the app is handled in another piece of code entirely. This code is the file called activity_main.xml. XML is a markup language that defines the layout of a document.
Additonally, A fragment represents a behavior or a portion of user interface in a FragmentActivity which can be combined with multiple other fragments to build a multi-pane UI and a fragment can be reused in multiple activities.
I highly reccomend watching the following video series on youtube to grasp the idea of how android studio works. Here
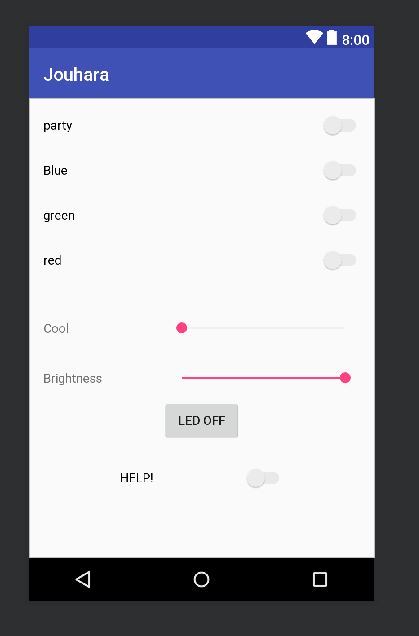
I am basing my code on the metawear starter app. I kept the mainActivity the same where it prompts connecting with the correct board, and made all my changes in a fragament. The DeviceSetUpFragement and in the fragment_device_setup.XML file. Starting with the XML file, I added multiple switches and seekbars to control the brightness and the colors of the LED strip, a button to turn the LEDs off and a single switch to control the buzzer (labeled 'HELP') which triggers the buzzer on and off. The fragment layout code is blew
< RelativeLayout xmlns:android="http://schemas.android.com/apk/res/android"
xmlns:tools="http://schemas.android.com/tools"
android:layout_width="match_parent"
android:layout_height="match_parent"
android:paddingBottom="@dimen/activity_vertical_margin"
android:paddingLeft="@dimen/activity_horizontal_margin"
android:paddingRight="@dimen/activity_horizontal_margin"
android:paddingTop="@dimen/activity_vertical_margin"
tools:context="com.mbientlab.metawear.tutorial.starter.DeviceSetupActivityFragment"
tools:showIn="@layout/activity_device_setup" >


< Switch
android:layout_width="wrap_content"
android:layout_height="wrap_content"
android:text="party"
android:id="@+id/led_ctrl"
android:layout_alignParentTop="true"
android:layout_alignParentStart="true"
android:layout_alignParentEnd="true"
android:checked="false" / >
< Switch
android:layout_width="wrap_content"
android:layout_height="wrap_content"
android:text="Blue"
android:id="@+id/led_ctrl1"
android:layout_marginTop="50dp"
android:layout_alignParentTop="true"
android:layout_alignParentStart="true"
android:layout_alignParentEnd="true"
android:checked="false" / >
< Switch
android:layout_width="wrap_content"
android:layout_height="wrap_content"
android:text="green"
android:id="@+id/led_ctrl2"
android:layout_marginTop="100dp"
android:layout_alignParentTop="true"
android:layout_alignParentStart="true"
android:layout_alignParentEnd="true"
android:checked="false" / >


< Switch
android:id="@+id/led_ctrl3"
android:layout_width="wrap_content"
android:layout_height="wrap_content"
android:layout_alignParentEnd="true"
android:layout_alignParentStart="true"
android:layout_alignParentTop="true"
android:layout_marginTop="150dp"
android:checked="false"
android:text="red" / >


< SeekBar
android:id="@+id/led_bar"
android:layout_width="214dp"
android:layout_height="wrap_content"
android:layout_alignEnd="@+id/led_ctrl"
android:layout_alignTop="@+id/text2"
android:checked="false"
android:max="9"
android:text="LED"
android:progress="0"/ >


< TextView
android:id="@+id/text2"
android:layout_width="wrap_content"
android:layout_height="wrap_content"
android:layout_alignStart="@+id/led_ctrl"
android:layout_centerVertical="true"
android:text="Cool" / >
< SeekBar
android:id="@+id/led_bar3"
android:layout_width="214dp"
android:layout_height="wrap_content"
android:layout_alignEnd="@+id/led_ctrl"
android:layout_alignTop="@+id/text3"
android:layout_centerVertical="true"
android:checked="false"
android:max="255"
android:min="30"
android:text="LED"
android:progress="255" / >


< TextView
android:id="@+id/text3"
android:layout_width="wrap_content"
android:layout_height="wrap_content"
android:layout_alignParentBottom="true"
android:layout_alignStart="@+id/led_ctrl"
android:layout_marginBottom="175dp"
android:text="Brightness" / >


< Button
android:id="@+id/button_id"
android:layout_width="wrap_content"
android:layout_height="wrap_content"
android:layout_alignParentBottom="true"
android:layout_centerHorizontal="true"
android:layout_marginBottom="113dp"
android:text="LED OFF" / >


< Switch
android:id="@+id/led_ctrl5"
android:layout_width="181dp"
android:layout_height="78dp"
android:layout_alignParentBottom="true"
android:layout_centerHorizontal="true"
android:layout_marginBottom="34dp"
android:checked="false"
android:text="HELP!" / >

 <  / RelativeLayout >
The layout buttons, switches and seekbars control elements of the DeviceSetupActivityFragment. Each switch and button has a unique name and ID that I can refer to. I imported the switch, seekbar and button widget libraries first and then refered to each of the switches and seekbars and assigned them unique functions. The cool seek bar can only give a value of 0 to 9, Each of which coorisponds to a case that gives the RGB LEDs spicific vcalues going from the coolest (White - all 255 ) to the least cool which yeilds a yellow-ish light ( Blue = 255;
Red = 200;
Green = 50; ) with the values in between ranging from white to yellow. The point of this is to use the LED strip as a functional Flashlight. Sometimes you would want a white flash light and sometimes a yellow warmer color is better to use.
The second seek bar "brightness" changes the brightness of the LED strip lights. The value of the seekbar ranges from 30 to 255. it controls the brigtness of the LED strip by using the value of the seekbar to assign an incremint (increment = 255 / value of seekbar) and dividing the value of the R , G and B values of the RGB strip by that increment. Meaning that at highest brigtness it would be divided by 1 so it would not be affected.
The part mode switch assigns different colors to the led strip leds. The green, red and blue switches turn the lights into the color they represent.
The led off button just turns off all the lights
The buzzer switch Just produces a voltage on the GPIO pin.
The activity code:
package com.mbientlab.metawear.tutorial.starter;
import android.app.Activity;
import android.bluetooth.BluetoothDevice;
import android.content.ComponentName;
import android.content.Context;
import android.content.Intent;
import android.content.ServiceConnection;
import android.os.IBinder;
import android.support.v4.app.Fragment;
import android.os.Bundle;
import android.view.LayoutInflater;
import android.view.View;
import android.view.ViewGroup;
import com.mbientlab.metawear.MetaWearBoard;
import com.mbientlab.metawear.android.BtleService;
import com.mbientlab.metawear.module.NeoPixel;
import com.mbientlab.metawear.module.NeoPixel.*;
import com.mbientlab.metawear.AnonymousRoute.*;
import com.mbientlab.metawear.AnonymousRoute;
import com.mbientlab.metawear.AsyncDataProducer;
import com.mbientlab.metawear.AsyncDataProducer.*;
//import com.mbientlab.metawear.AsyncOperation.CompletionHandler;
import com.mbientlab.metawear.module.Led;
import android.widget.Switch;
import android.widget.AbsSeekBar;
import android.widget.SeekBar;
import android.widget.SeekBar.OnSeekBarChangeListener;
import android.widget.SeekBar;
import android.widget.SeekBar.OnSeekBarChangeListener;
import com.mbientlab.metawear.DeviceInformation;
import android.widget.Button;
import com.mbientlab.metawear.module.Gpio;
import android.os.RemoteException;
import android.os.Bundle;
import android.util.Log;
import android.view.Menu;
import android.view.MenuItem;
import org.altbeacon.beacon.*;
import java.util.Collection;
/**
* A placeholder fragment containing a simple view.
*/
public class DeviceSetupActivityFragment extends Fragment implements ServiceConnection {
public static final String TAG = "BeaconsEverywhere";
private BeaconManager beaconManager;
int RR, G, B, Bright, increment, Rnew, Bnew, Gnew, cool;
public interface FragmentSettings {
BluetoothDevice getBtDevice();
}
private MetaWearBoard metawear = null;
private FragmentSettings settings;
public DeviceSetupActivityFragment() {
}
@Override
public void onCreate(Bundle savedInstanceState) {
super.onCreate(savedInstanceState);
Activity owner= getActivity();
if (!(owner instanceof FragmentSettings)) {
throw new ClassCastException("Owning activity must implement the FragmentSettings interface");
}
settings= (FragmentSettings) owner;
owner.getApplicationContext().bindService(new Intent(owner, BtleService.class), this, Context.BIND_AUTO_CREATE);
}
@Override
public void onDestroy() {
super.onDestroy();
///< Unbind the service when the activity is destroyed
getActivity().getApplicationContext().unbindService(this);
}
@Override
public View onCreateView(LayoutInflater inflater, ViewGroup container, Bundle savedInstanceState) {
setRetainInstance(true);
return inflater.inflate(R.layout.fragment_device_setup, container, false);
}
@Override
public void onServiceConnected(ComponentName name, IBinder service) {
metawear = ((BtleService.LocalBinder) service).getMetaWearBoard(settings.getBtDevice());
}
@Override
public void onServiceDisconnected(ComponentName name) {
}
/**
* Called when the app has reconnected to the board
*/
public void reconnected() { }
@Override
public void onViewCreated(View view, Bundle savedInstanceState) {
increment = 1;
super.onViewCreated(view, savedInstanceState);
SeekBar bar =  view.findViewById(R.id.led_bar);
((Switch) view.findViewById(R.id.led_ctrl)).setOnCheckedChangeListener((buttonView, isChecked) -> {
//Strand npStrand = neoPixel.lookupStrand((byte) 2);
// initialize memory for a strand #2 that operates at 800KHz (fast), has 60 leds,
// uses rbg color order, and has a data wire connected to gpio pin 1
NeoPixel neoPixel = metawear.getModule(NeoPixel.class);
Strand npStrand = neoPixel.initializeStrand((byte) 2, ColorOrdering.MW_WS2811_RBG, StrandSpeed.FAST, (byte) 0, (byte) 20);
if (isChecked) {
npStrand.hold();
npStrand.setRgb((byte) 1, (byte) 255, (byte) 0, (byte) 0);
npStrand.setRgb((byte) 3, (byte) 0, (byte) 255, (byte) 0);
npStrand.setRgb((byte) 5, (byte) 0, (byte) 0, (byte) 255);
npStrand.setRgb((byte) 7, (byte) 255, (byte) 0, (byte) 0);
npStrand.setRgb((byte) 9, (byte) 0, (byte) 255, (byte) 0);
npStrand.setRgb((byte) 11, (byte) 255, (byte) 0, (byte) 0);
npStrand.setRgb((byte) 13, (byte) 0, (byte) 255, (byte) 0);
npStrand.setRgb((byte) 15, (byte) 0, (byte) 0, (byte) 255);
npStrand.setRgb((byte) 17, (byte) 255, (byte) 0, (byte) 0);
npStrand.setRgb((byte) 19, (byte) 0, (byte) 255, (byte) 0);
npStrand.setRgb((byte) 2, (byte) 255, (byte) 0, (byte) 0);
npStrand.setRgb((byte) 4, (byte) 0, (byte) 255, (byte) 0);
npStrand.setRgb((byte) 6, (byte) 0, (byte) 0, (byte) 255);
npStrand.setRgb((byte) 8, (byte) 255, (byte) 0, (byte) 0);
npStrand.setRgb((byte) 10, (byte) 0, (byte) 255, (byte) 0);
npStrand.setRgb((byte) 12, (byte) 255, (byte) 0, (byte) 0);
npStrand.setRgb((byte) 14, (byte) 0, (byte) 255, (byte) 0);
npStrand.setRgb((byte) 16, (byte) 0, (byte) 0, (byte) 255);
npStrand.setRgb((byte) 18, (byte) 255, (byte) 0, (byte) 0);
// Disable hold, which will now update the strand with any state changes
npStrand.release();
} else {
// turn off leds from index [0, 59] (60 leds)
npStrand.clear((byte) 0, (byte) 59);
// free
//npStrand.free();
}
});
final Button button = view.findViewById(R.id.button_id);
button.setOnClickListener(new View.OnClickListener() {
public void onClick(View v) {
NeoPixel neoPixel = metawear.getModule(NeoPixel.class);
Strand npStrand = neoPixel.initializeStrand((byte) 2, ColorOrdering.MW_WS2811_RBG, StrandSpeed.FAST, (byte) 0, (byte) 20);
npStrand.clear((byte) 0, (byte) 59);
}
});
((Switch) view.findViewById(R.id.led_ctrl5)).setOnCheckedChangeListener((buttonView, isChecked) -> {
if (isChecked) {
final Gpio gpio = metawear.getModule(Gpio.class);
gpio.pin((byte) 1).setOutput();
} else {
final Gpio gpio = metawear.getModule(Gpio.class);
gpio.pin((byte) 1).clearOutput();
}
});
((Switch) view.findViewById(R.id.led_ctrl1)).setOnCheckedChangeListener((buttonView, isChecked) -> {
//Strand npStrand = neoPixel.lookupStrand((byte) 2);
// initialize memory for a strand #2 that operates at 800KHz (fast), has 60 leds,
// uses rbg color order, and has a data wire connected to gpio pin 1
NeoPixel neoPixel = metawear.getModule(NeoPixel.class);
;
Strand npStrand = neoPixel.initializeStrand((byte) 2, ColorOrdering.MW_WS2811_RBG, StrandSpeed.FAST, (byte) 0, (byte) 20);
if (isChecked) {
npStrand.hold();
npStrand.setRgb((byte) 1, (byte) 0, (byte) 255, (byte) 0);
npStrand.setRgb((byte) 3, (byte) 0, (byte) 255, (byte) 0);
npStrand.setRgb((byte) 5, (byte) 0, (byte) 255, (byte) 0);
npStrand.setRgb((byte) 7, (byte) 0, (byte) 255, (byte) 0);
npStrand.setRgb((byte) 9, (byte) 0, (byte) 255, (byte) 0);
npStrand.setRgb((byte) 11, (byte) 0, (byte) 255, (byte) 0);
npStrand.setRgb((byte) 13, (byte) 0, (byte) 255, (byte) 0);
npStrand.setRgb((byte) 15, (byte) 0, (byte) 255, (byte) 0);
npStrand.setRgb((byte) 17, (byte) 0, (byte) 255, (byte) 0);
npStrand.setRgb((byte) 19, (byte) 0, (byte) 255, (byte) 0);
npStrand.setRgb((byte) 2, (byte) 0, (byte) 255, (byte) 0);
npStrand.setRgb((byte) 4, (byte) 0, (byte) 255, (byte) 0);
npStrand.setRgb((byte) 6, (byte) 0, (byte) 255, (byte) 0);
npStrand.setRgb((byte) 8, (byte) 0, (byte) 255, (byte) 0);
npStrand.setRgb((byte) 10, (byte) 0, (byte) 255, (byte) 0);
npStrand.setRgb((byte) 12, (byte) 0, (byte) 255, (byte) 0);
npStrand.setRgb((byte) 14, (byte) 0, (byte) 255, (byte) 0);
npStrand.setRgb((byte) 16, (byte) 0, (byte) 255, (byte) 0);
npStrand.setRgb((byte) 18, (byte) 0, (byte) 255, (byte) 0);
// Disable hold, which will now update the strand with any state changes
npStrand.release();
} else {
// turn off leds from index [0, 59] (60 leds)
npStrand.clear((byte) 0, (byte) 59);
// free
//npStrand.free();
}
});
((Switch) view.findViewById(R.id.led_ctrl2)).setOnCheckedChangeListener((buttonView, isChecked) -> {
//Strand npStrand = neoPixel.lookupStrand((byte) 2);
// initialize memory for a strand #2 that operates at 800KHz (fast), has 60 leds,
// uses rbg color order, and has a data wire connected to gpio pin 1
NeoPixel neoPixel = metawear.getModule(NeoPixel.class);
;
Strand npStrand = neoPixel.initializeStrand((byte) 2, ColorOrdering.MW_WS2811_RBG, StrandSpeed.FAST, (byte) 0, (byte) 20);
if (isChecked) {
npStrand.hold();
npStrand.setRgb((byte) 1, (byte) 255, (byte) 0, (byte) 0);
npStrand.setRgb((byte) 3, (byte) 255, (byte) 0, (byte) 0);
npStrand.setRgb((byte) 5, (byte) 255, (byte) 0, (byte) 0);
npStrand.setRgb((byte) 7, (byte) 255, (byte) 0, (byte) 0);
npStrand.setRgb((byte) 9, (byte) 255, (byte) 0, (byte) 0);
npStrand.setRgb((byte) 11, (byte) 255, (byte) 0, (byte) 0);
npStrand.setRgb((byte) 13, (byte) 255, (byte) 0, (byte) 0);
npStrand.setRgb((byte) 15, (byte) 255, (byte) 0, (byte) 0);
npStrand.setRgb((byte) 17, (byte) 255, (byte) 0, (byte) 0);
npStrand.setRgb((byte) 19, (byte) 255, (byte) 0, (byte) 0);
npStrand.setRgb((byte) 2, (byte) 255, (byte) 0, (byte) 0);
npStrand.setRgb((byte) 4, (byte) 255, (byte) 0, (byte) 0);
npStrand.setRgb((byte) 6, (byte) 255, (byte) 0, (byte) 0);
npStrand.setRgb((byte) 8, (byte) 255, (byte) 0, (byte) 0);
npStrand.setRgb((byte) 10, (byte) 255, (byte) 0, (byte) 0);
npStrand.setRgb((byte) 12, (byte) 255, (byte) 0, (byte) 0);
npStrand.setRgb((byte) 14, (byte) 255, (byte) 0, (byte) 0);
npStrand.setRgb((byte) 16, (byte) 255, (byte) 0, (byte) 0);
npStrand.setRgb((byte) 18, (byte) 255, (byte) 0, (byte) 0);
// Disable hold, which will now update the strand with any state changes
npStrand.release();
} else {
// turn off leds from index [0, 59] (60 leds)
npStrand.clear((byte) 0, (byte) 59);
// free
//npStrand.free();
}
});
((Switch) view.findViewById(R.id.led_ctrl3)).setOnCheckedChangeListener((buttonView, isChecked) -> {
//Strand npStrand = neoPixel.lookupStrand((byte) 2);
// initialize memory for a strand #2 that operates at 800KHz (fast), has 60 leds,
// uses rbg color order, and has a data wire connected to gpio pin 1
NeoPixel neoPixel = metawear.getModule(NeoPixel.class);
;
Strand npStrand = neoPixel.initializeStrand((byte) 2, ColorOrdering.MW_WS2811_RGB, StrandSpeed.FAST, (byte) 0, (byte) 20);
if (isChecked) {
npStrand.hold();
npStrand.setRgb((byte) 1, (byte) 0, (byte) 0, (byte) 255);
npStrand.setRgb((byte) 3, (byte)0, (byte) 0, (byte) 255);
npStrand.setRgb((byte) 5, (byte) 0, (byte) 0, (byte) 255);
npStrand.setRgb((byte) 7, (byte) 0, (byte) 0, (byte) 255);
npStrand.setRgb((byte) 9, (byte) 0, (byte) 0, (byte) 255);
npStrand.setRgb((byte) 11, (byte) 0, (byte) 0, (byte) 255);
npStrand.setRgb((byte) 13, (byte) 0, (byte) 0, (byte) 255);
npStrand.setRgb((byte) 15, (byte)0, (byte) 0, (byte) 255);
npStrand.setRgb((byte) 17, (byte) 0, (byte) 0, (byte) 255);
npStrand.setRgb((byte) 19, (byte) 0, (byte) 0, (byte) 255);
npStrand.setRgb((byte) 2, (byte) 0, (byte) 0, (byte) 255);
npStrand.setRgb((byte) 4, (byte)0, (byte) 0, (byte) 255);
npStrand.setRgb((byte) 6, (byte) 0, (byte) 0, (byte) 255);
npStrand.setRgb((byte) 8, (byte) 0, (byte) 0, (byte) 255);
npStrand.setRgb((byte) 10, (byte) 0, (byte) 0, (byte) 255);
npStrand.setRgb((byte) 12, (byte) 0, (byte) 0, (byte) 255);
npStrand.setRgb((byte) 14, (byte) 0, (byte) 0, (byte) 255);
npStrand.setRgb((byte) 16, (byte)0, (byte) 0, (byte) 255);
npStrand.setRgb((byte) 18, (byte) 0, (byte) 0, (byte) 255);
// Disable hold, which will now update the strand with any state changes
npStrand.release();
} else {
// turn off leds from index [0, 59] (60 leds)
npStrand.clear((byte) 0, (byte) 59);
// free
//npStrand.free();
}
});
final SeekBar birthdaySlider = (SeekBar) view.findViewById(R.id.led_bar);
birthdaySlider.setOnSeekBarChangeListener(new SeekBar.OnSeekBarChangeListener() {
@Override
public void onProgressChanged(SeekBar seekBar, int progress, boolean fromUser) {
cool = progress;
}
@Override
public void onStartTrackingTouch(SeekBar seekBar) {
}
@Override
public void onStopTrackingTouch(SeekBar seekBar) {
switch(cool){
case 0:
B = 255;
RR = 255;
G = 255;
break;
case 1:
B = 255;
RR = 255;
G = 255;
break;
case 2:
B = 255;
RR = 255;
G = 255;
break;
case 3:
B = 255;
RR = 200;
G = 200;
break;
case 4:
B = 255;
RR = 255;
G = 200;
break;
case 5:
B = 255;
RR = 255;
G = 180;
break;
case 6:
B = 255;
RR = 255;
G = 150;
break;
case 7:
B = 255;
RR = 255;
G = 100;
break;
case 8:
B = 255;
RR = 250;
G = 50;
break;
case 9:
B = 255;
RR = 200;
G = 50;
break;
}
updateTotal();
}
});
final SeekBar birthdaySlider3 = (SeekBar) view.findViewById(R.id.led_bar3);
birthdaySlider3.setOnSeekBarChangeListener(new SeekBar.OnSeekBarChangeListener() {
@Override
public void onProgressChanged(SeekBar seekBar, int progress, boolean fromUser) {
Bright = progress;
}
@Override
public void onStartTrackingTouch(SeekBar seekBar) {
}
@Override
public void onStopTrackingTouch(SeekBar seekBar) {
if (Bright < 1) {
Bright =  1; //so we dont divide by zero
}
increment = 255 / Bright;
updateTotal();
}
});
}
private void updateTotal() {
Rnew = RR/increment;
Bnew = B / increment;
Gnew = G /increment;
NeoPixel neoPixel = metawear.getModule(NeoPixel.class);
Strand npStrand = neoPixel.initializeStrand((byte) 2, ColorOrdering.MW_WS2811_RBG, StrandSpeed.FAST, (byte) 0, (byte) 20);
npStrand.hold();
npStrand.setRgb((byte) 1, (byte) Rnew, (byte) Gnew, (byte) Bnew);
npStrand.setRgb((byte) 3, (byte) Rnew, (byte) Gnew, (byte) Bnew);
npStrand.setRgb((byte) 5, (byte) Rnew, (byte) Gnew, (byte) Bnew);
npStrand.setRgb((byte) 7, (byte) Rnew, (byte) Gnew, (byte) Bnew);
npStrand.setRgb((byte) 9, (byte) Rnew, (byte) Gnew, (byte) Bnew);
npStrand.setRgb((byte) 11, (byte) Rnew, (byte) Gnew, (byte) Bnew);
npStrand.setRgb((byte) 13, (byte) Rnew, (byte) Gnew, (byte) Bnew);
npStrand.setRgb((byte) 15, (byte) Rnew, (byte) Gnew, (byte) Bnew);
npStrand.setRgb((byte) 17, (byte) Rnew, (byte) Gnew, (byte) Bnew);
npStrand.setRgb((byte) 19, (byte) Rnew, (byte) Gnew, (byte) Bnew);
npStrand.setRgb((byte) 2, (byte) Rnew, (byte) Gnew, (byte) Bnew);
npStrand.setRgb((byte) 4, (byte) Rnew, (byte) Gnew, (byte) Bnew);
npStrand.setRgb((byte) 6, (byte) Rnew, (byte) Gnew, (byte) Bnew);
npStrand.setRgb((byte) 8, (byte) Rnew, (byte) Gnew, (byte) Bnew);
npStrand.setRgb((byte) 10, (byte) Rnew, (byte) Gnew, (byte) Bnew);
npStrand.setRgb((byte) 12, (byte) Rnew, (byte) Gnew, (byte) Bnew);
npStrand.setRgb((byte) 14, (byte) Rnew, (byte) Gnew, (byte) Bnew);
npStrand.setRgb((byte) 16, (byte) Rnew, (byte) Gnew, (byte) Bnew);
npStrand.setRgb((byte) 18, (byte) Rnew, (byte) Gnew, (byte) Bnew);
//npStrand.setRgb((byte) 1, (byte) RR, (byte) G, (byte) B);
// npStrand.setRgb((byte) 2, (byte) RR, (byte) G, (byte) B);
// npStrand.setRgb((byte) 2, (byte) RR, (byte) G, (byte) B);
npStrand.release();
}
}
This is a demonstration video of the functionality.