week 7 - computer-controlled machining
-group assignment: test runout, alignment, speeds, feeds, and toolpaths for your machine
-individual assignment: make something big
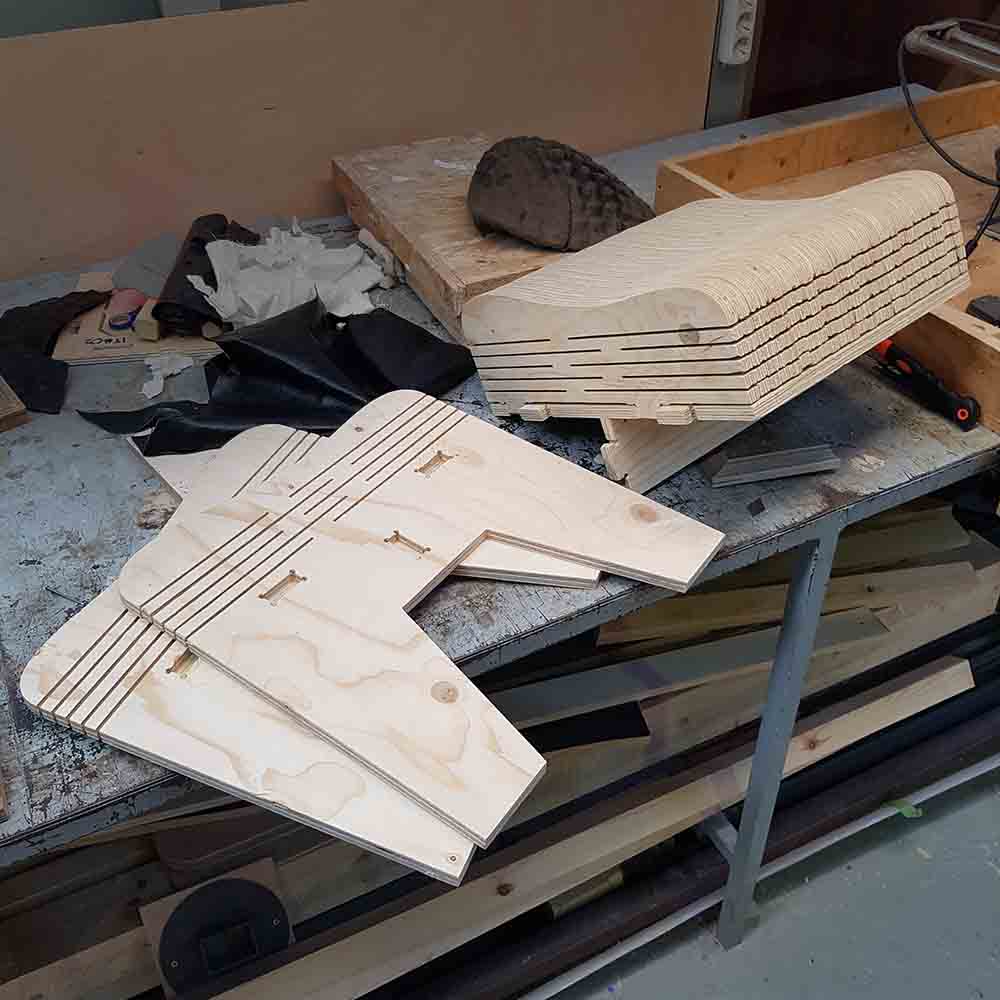
For this assignment I decided to design a stool with a flexible wood seat. You can turn wood into a more flexible material by weakening it with strategical cuts. However, this method is often used to bend the wood perpendicular to the wood plane, but not on the same plane of the wood board, like designer Aviv Shany does (1, 2) for making flexible wood furniture and objects.
For the design I used Rhino. For convenience, it's important to separate every milling strategy into different layers. Also the stock needs its own layer.

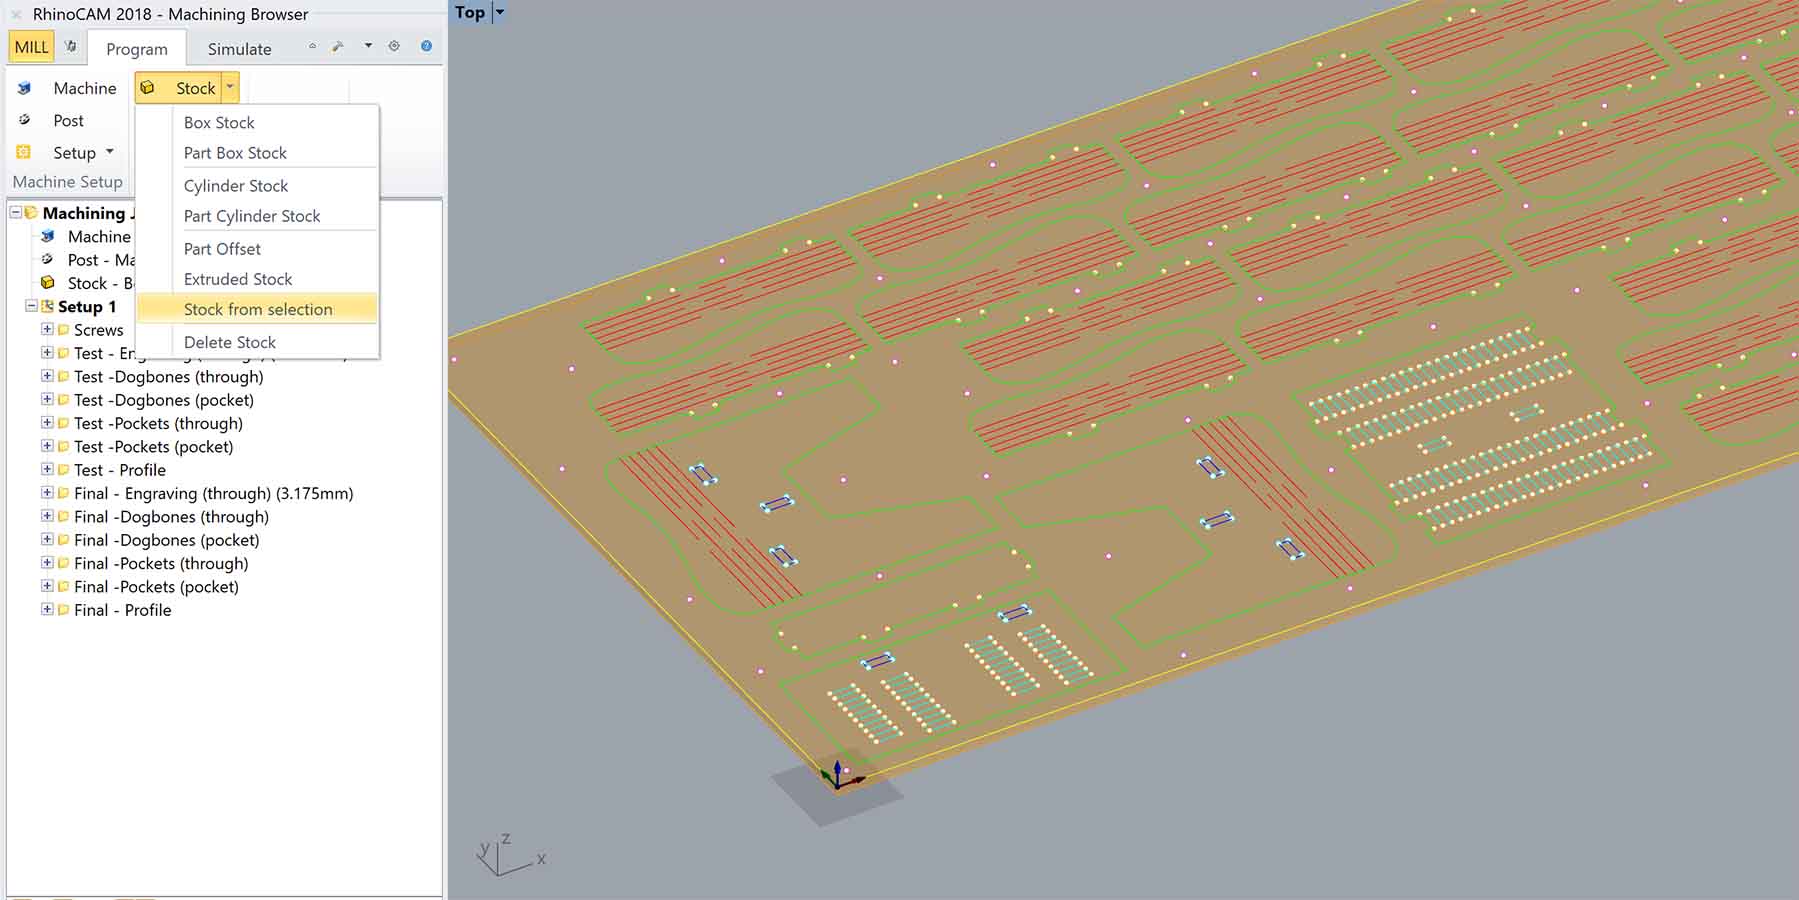
In order to generate the G-code I used RhinoCAM, first make sure you have your design with the stock's left-down corner on the [0,0] and the axis matching the axis of the milling machine.
Now we need to generate the stock for the material we are going to mill, in this case a 2500x1250x15mm plywood. You can make a solid box from the stock contour and extrude it -15mm (negative Z). Then in RhinoCAM go to "Stock">"Stock from selection" and select the solid box. Once this is done you can delete/hide the solid box.
Usually, we would prepare two G-codes:
- one for the markings of the screws that will hold the wood to the sacrificial layer of the machine
- one including the rest of strategies
However, I am using two different bits (3.175mm and 6mm) so I needed to make different G-codes for each bit. In addition, before cutting all the pieces I also needed to make a test to check which is the best pocket size for the press-fit parts joints. Therefore, these were the different G-codes I prepared on RhinoCAM for the Test:
-Markings for screws
-Test (3.175mm): Interior cuts
-Test (6mm): Dogbones (through), dogbones (pockets), pockets (through), pockets (pockets), profile cuts
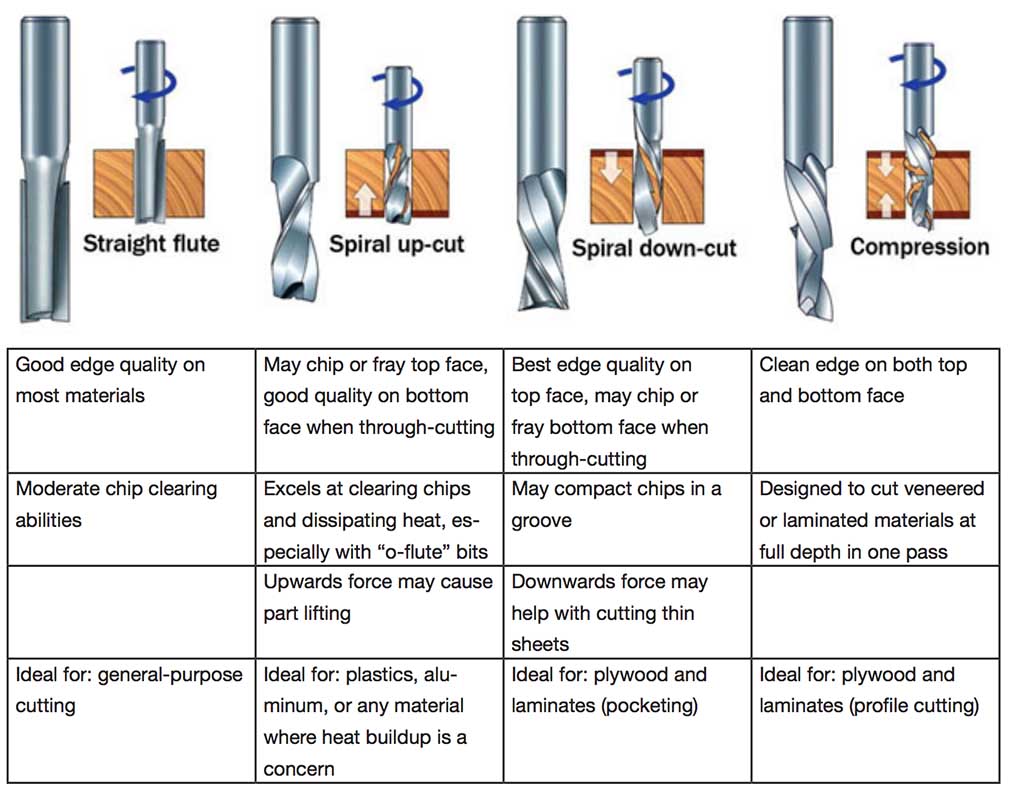
Choosing the right bit is important. There are down-cut and up-cut bits, which will make different edge quality on the upper and the lower layer of the plywood when cutting through. Here is a table summarizing the different flute types:
The 6mm bit is already set in the RhinoCAM we have in the lab, but not the 3.175mm (1/8"). To set this new tool we need to calculate the Feed Rate (the speed at which the machine moves the machining spindle across the part). We can use the Fablab Speed and Feeds Calculator or use this formula:

The Chip Load can be defined as the size or thickness of the chip that is removed with each flute per revolution. Recommended plywood chiploads can be found online, but here's the fablab calculator chart (we'll consider plywood is similar to OSB):

The Spindle Speed (RPM) can be calculated with this formula:

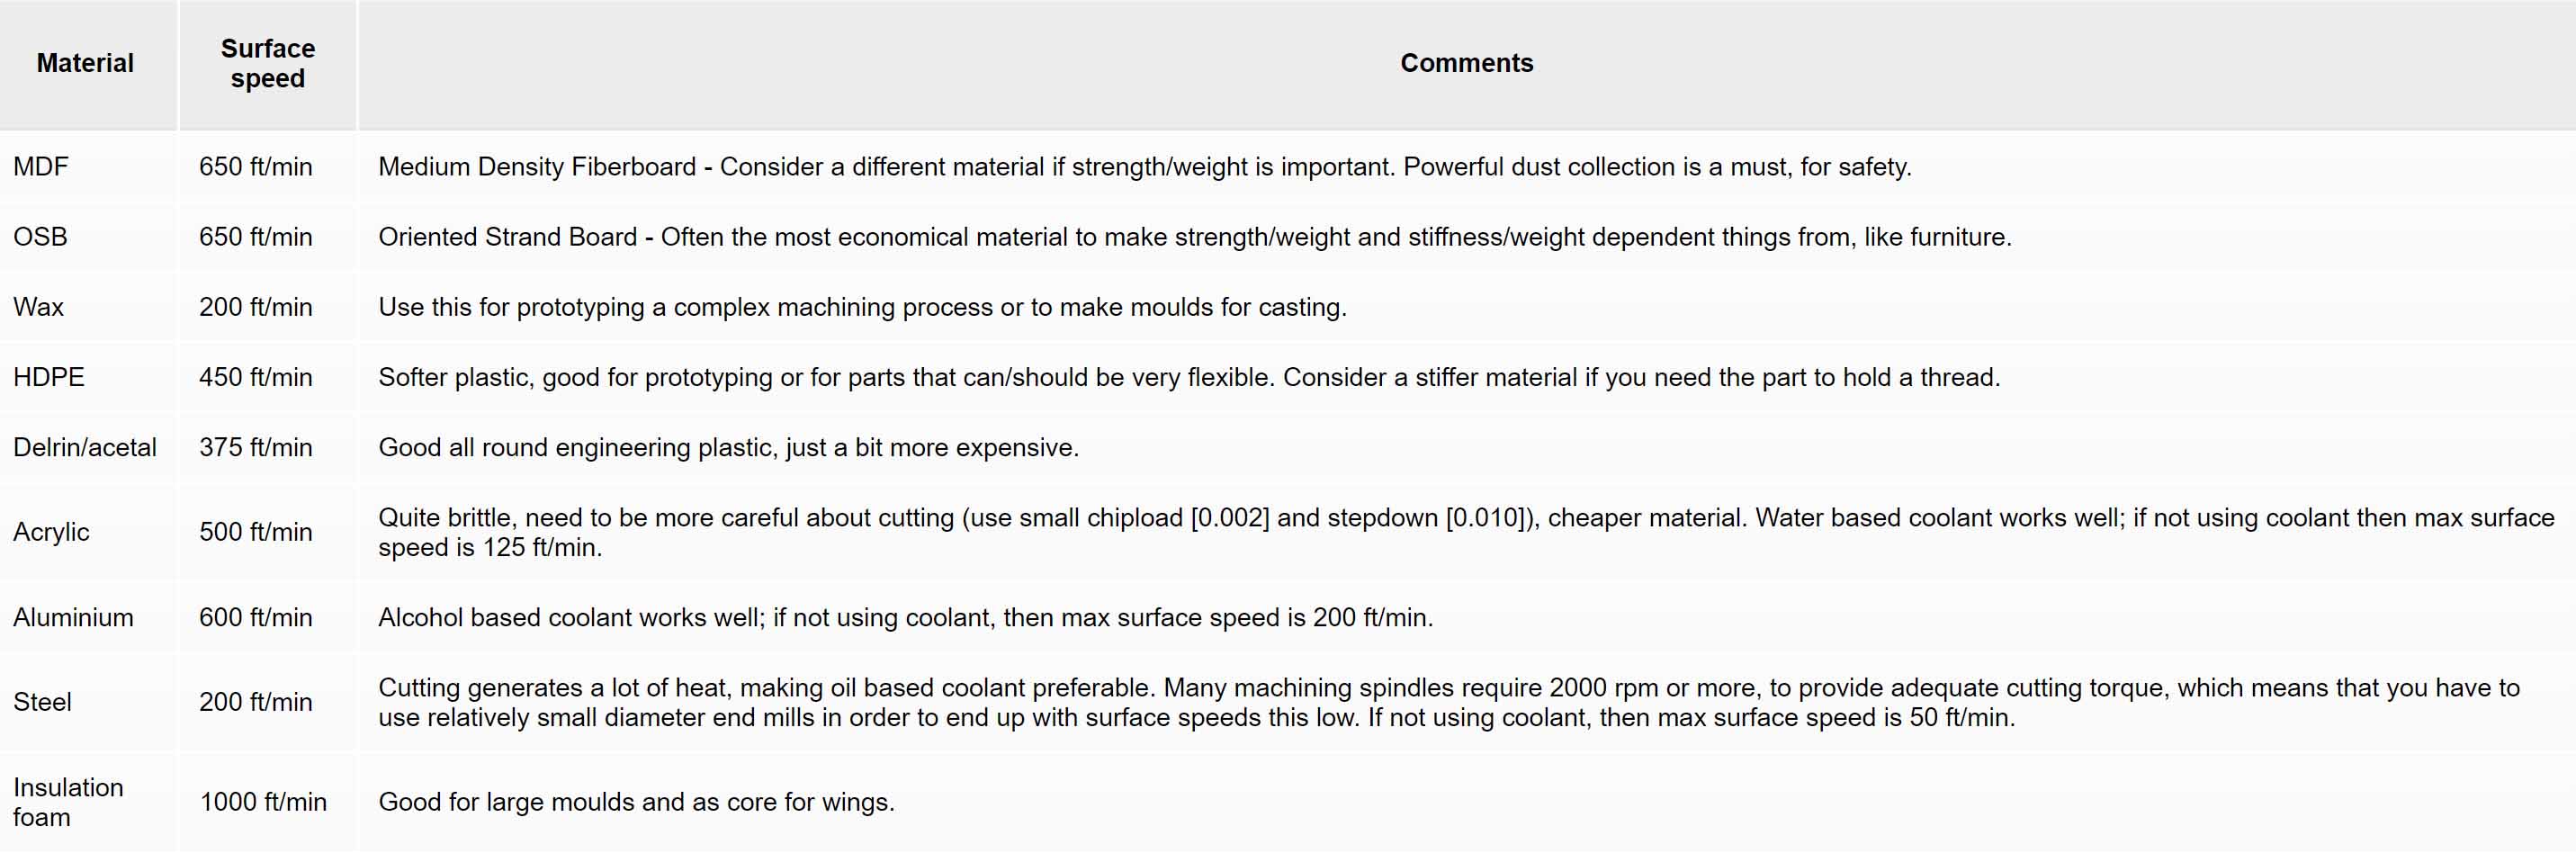
For the surface speed we can use this the fablab calculator chart:
And here are the results of the Fablab Speed and Feeds Calculator:
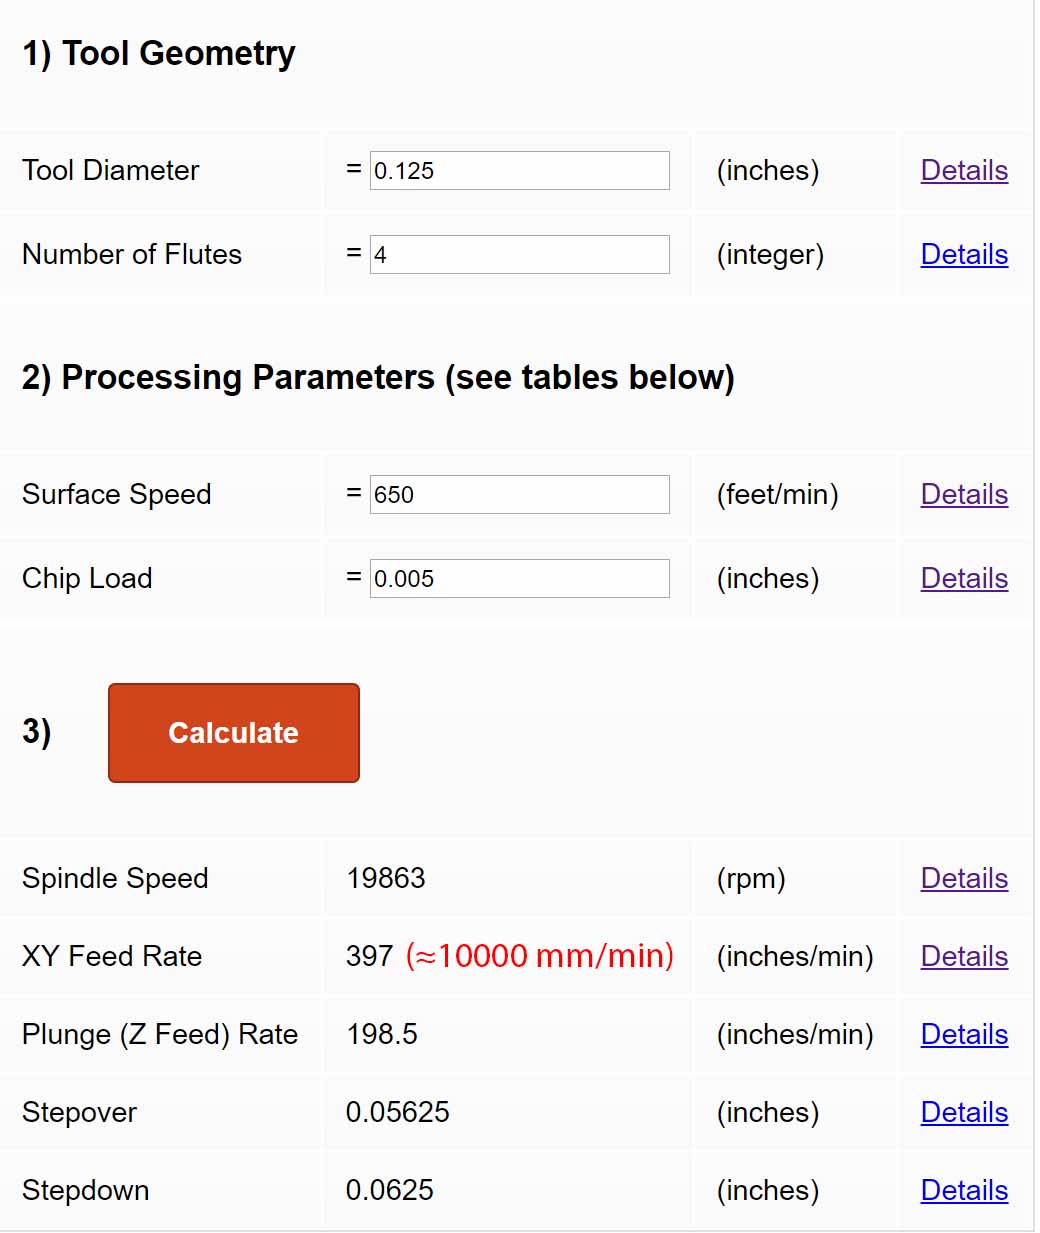
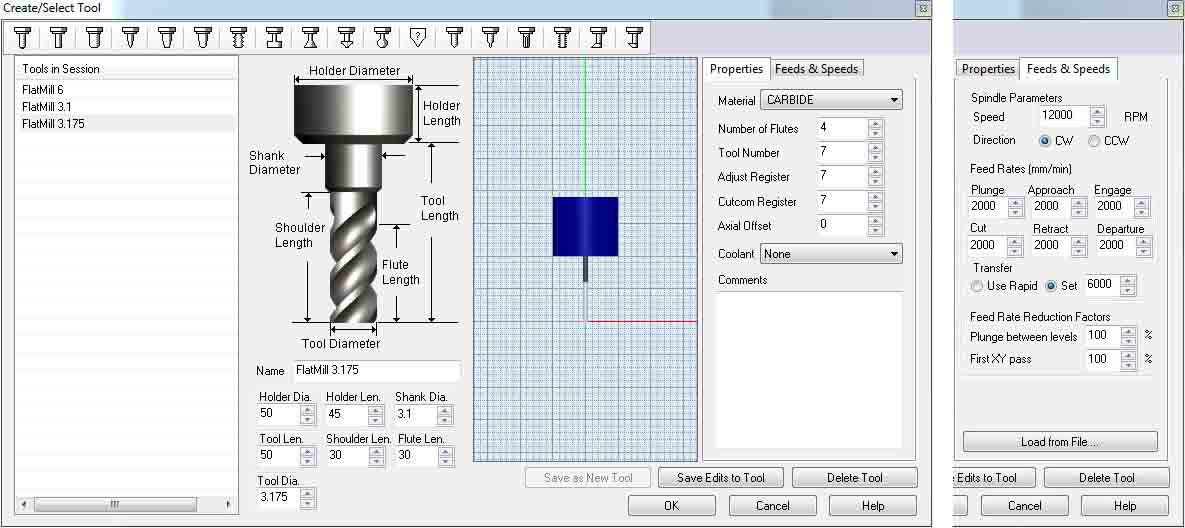
So now we can enter these results in the new tool settings and click on "Save Edits to Tool":
And now we can proceed on creating the different strategies. If we click on "Machining Operations">"2 Axis" a menu will show up. For my design, everything can be done with 2 Axis operations. In order to change the bit fewer times, I'll do the screw marks and the interior cuts with the 3.175mm (1/8") bit and the rest with the 6mm bit.

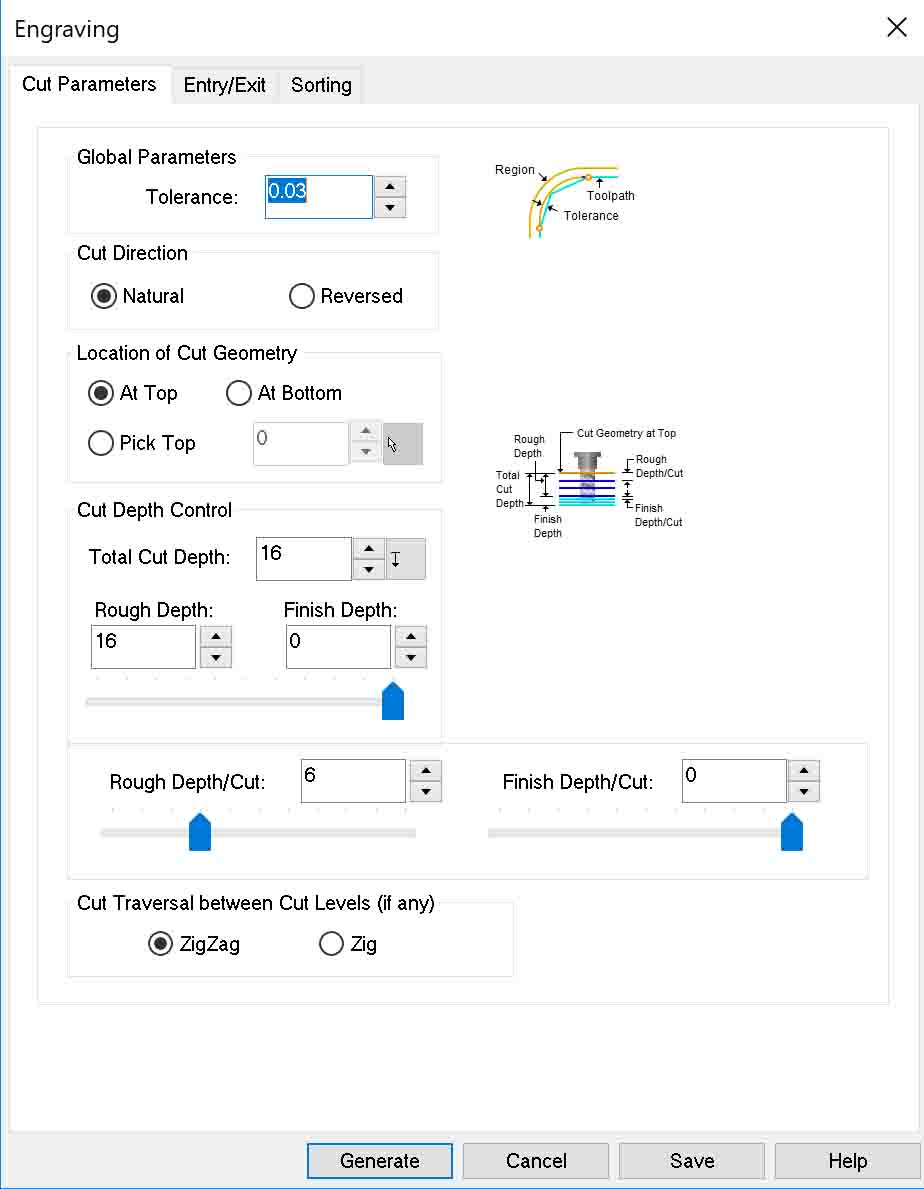
For the screws marks I chose "Engraving". I did them 5mm deep. Also chose "Minimum distance sorting" (this will be the same for all the strategies).


For the interior cuts I also chose "Engraving". This means the machine will follow the vector lines from the middle of the tool. We will choose a Total Depth of 16mm to make sure the cut goes all the way through the board (the board is actually a bit more than 15mm thick). We'll choose a Rough Depth/Cut of 3mm (this value should be no higher than the diameter of the tool).

Now, for the rest of the job I used a different bit with a 6mm diameter. I have two kind of dogbones, ones that go all the way throguh the board (left) and ones that don't (right). Both of them can also be done with "Engraving" but the Rouh Depth will be set to 16mm for one and 12mm for the other. Because now the tool is a 6mm bit, we can set the Rough Depth/Cut value to 6.

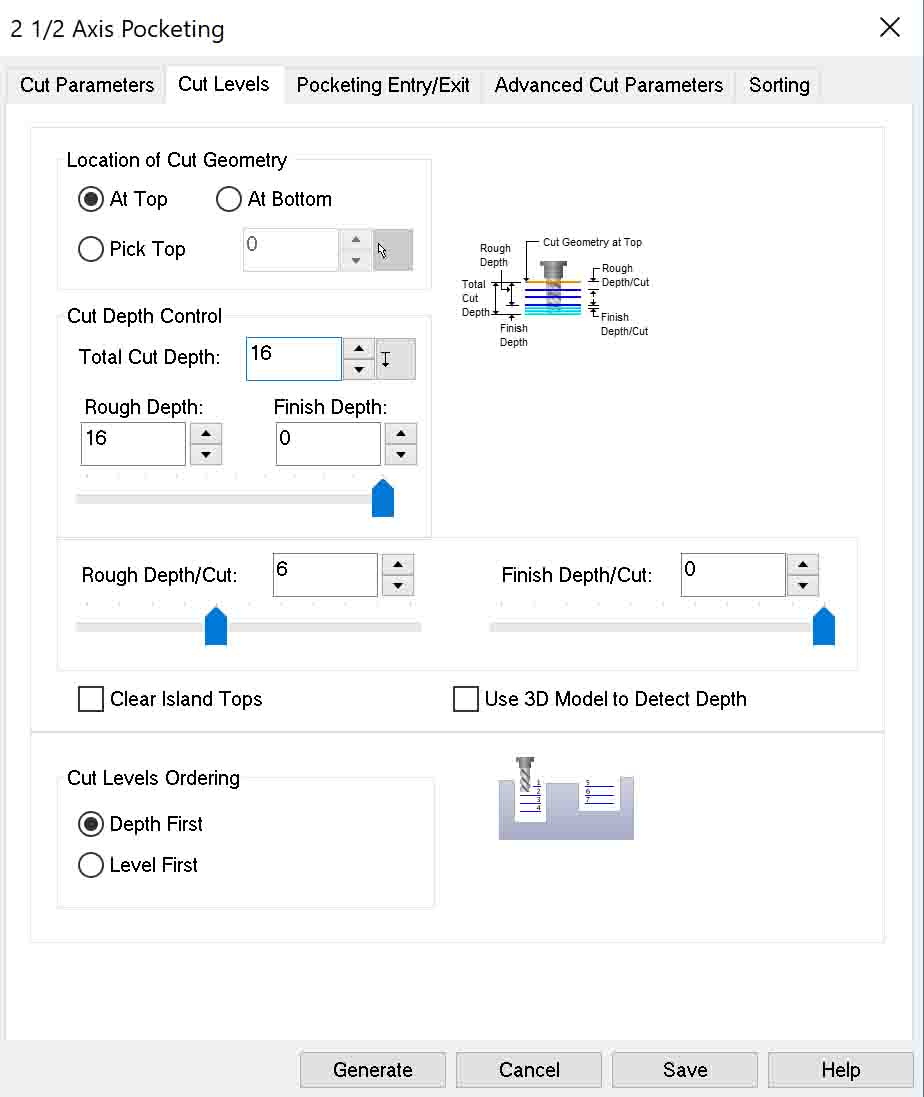
As for the pockets, I did them with the "Pocketing" operation. I chose a Stepover distance of 75% the tool's diameter and starting the pocket from the inside. I also have two kind of pockets, ones that go all the way through the board (Rouh Depth 16mm):
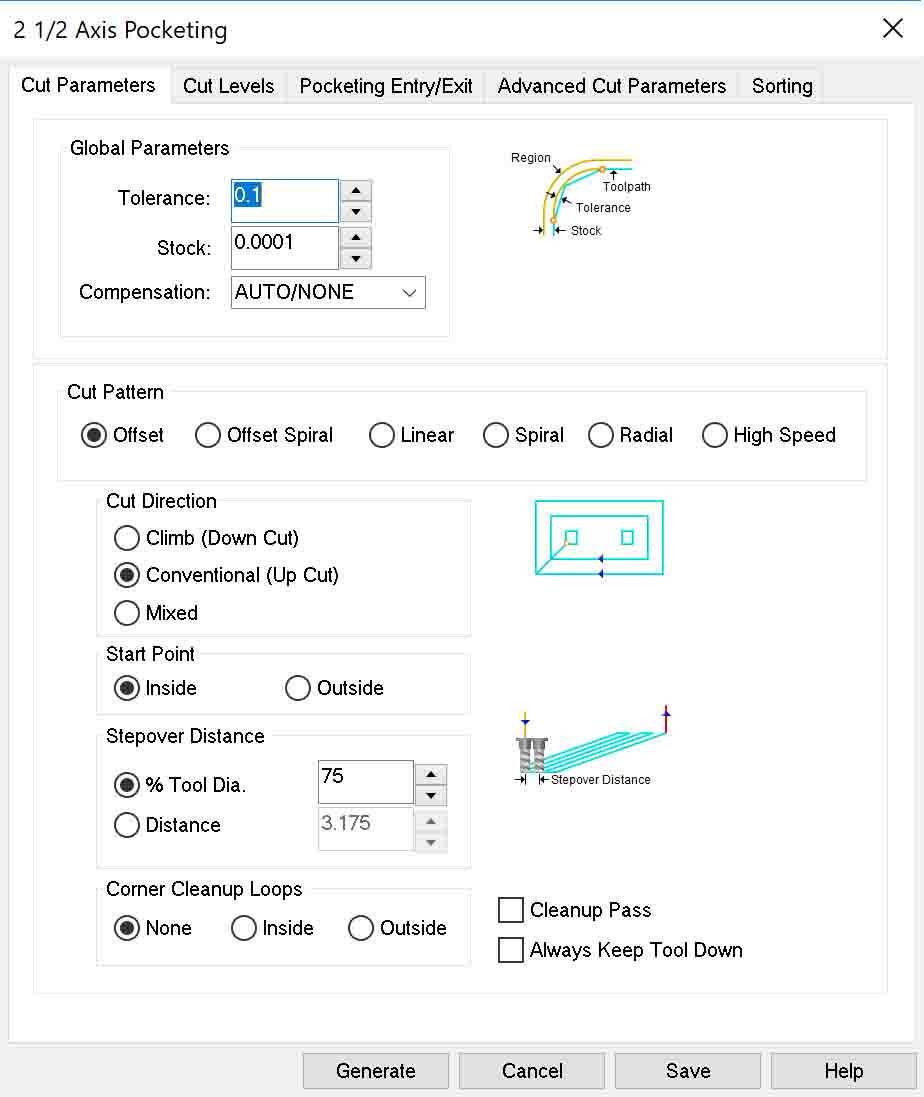
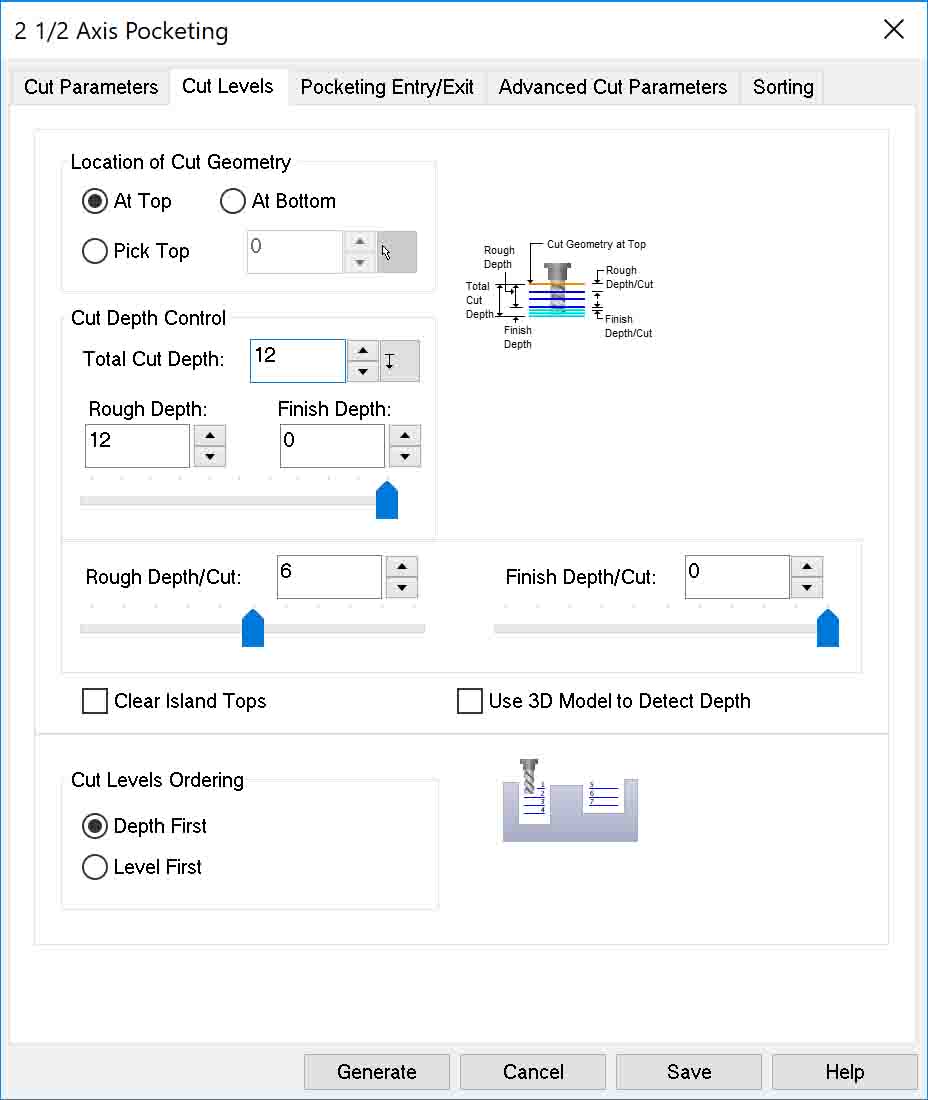
and ones that don't (Rouh Depth 12mm):
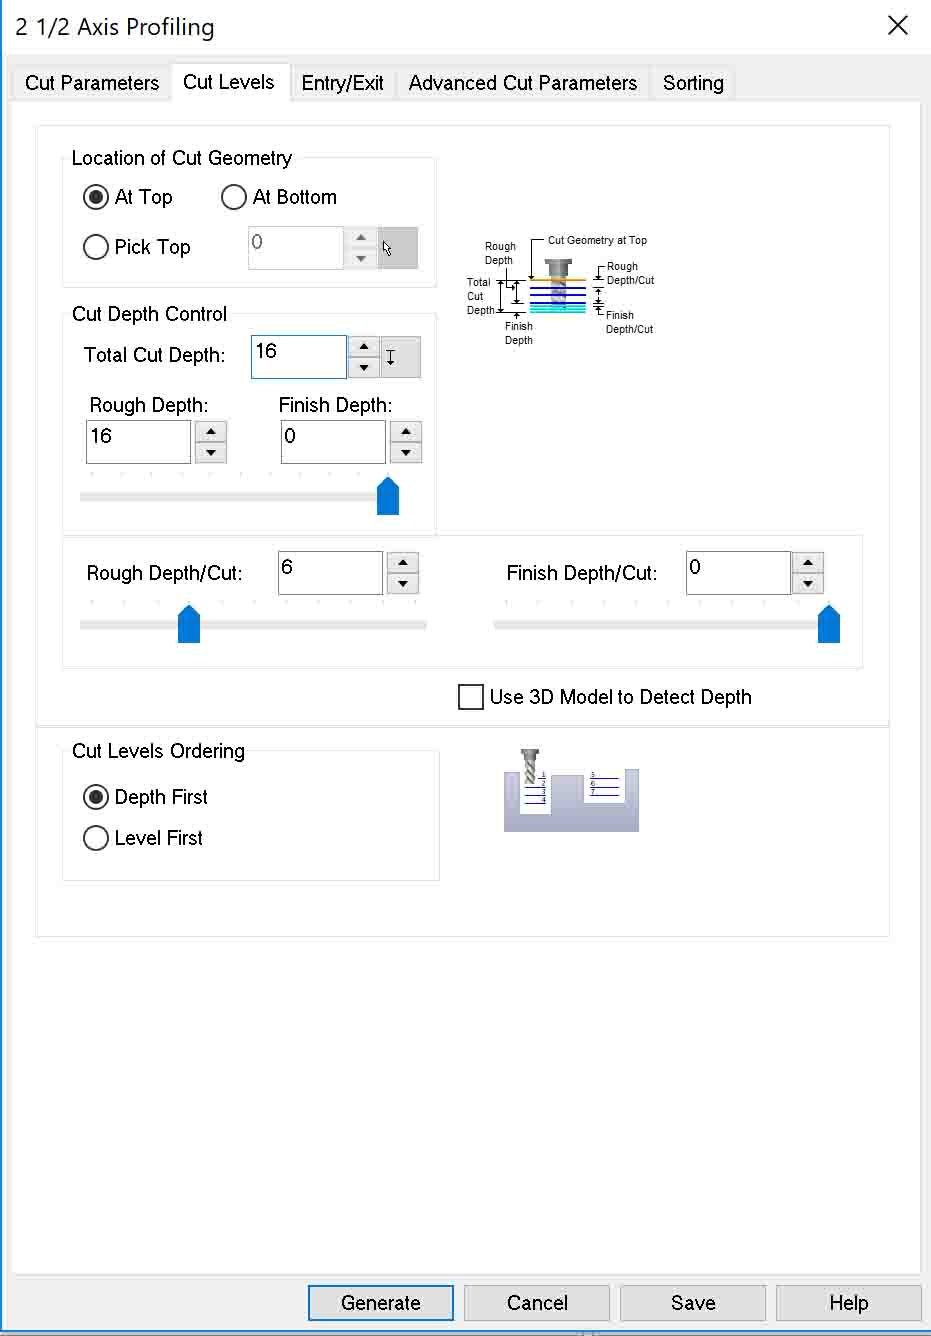
Finally, as for the outline cuts, I chose a "Profiling" operation. Profiling follows a line from the inside or outside. In my case I chose outside. Also I used bridges, which will keep the pieces in place once they are cut.


Now we have generated all the strategies (for the test pieces). We can always previsualize a simulation of the jobs on the "Simulate" tab.
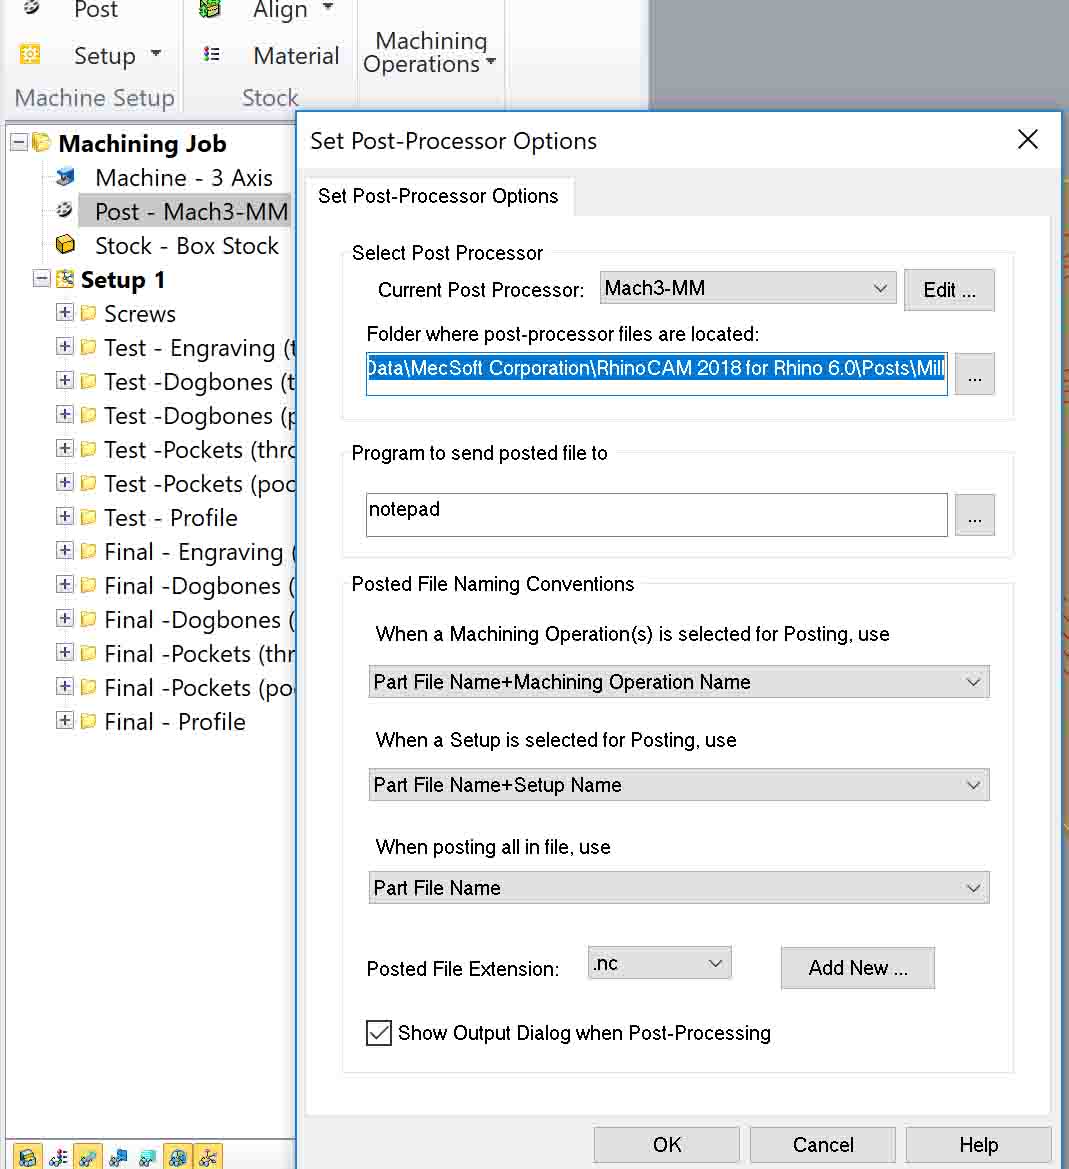
We need to choose the format for the G-code that we will generate. In the lab we have a Shopbot and a Precix milling machine. The Precix is older and has some malfunctions. The Shopot is newer, but I decided go with the Precix because it's less busy. So we click on "Post" and there we select "Mach3-MM" and ".nc" which is the format for the Precix software.
Next move is generating the G-codes. Just select all the strategies that you want to do in each G-code. Then left click and "Post". Once you have the g-codes, you can move on to the Precix machine.
First I cleaned the working area. With the air gun you can blow the smallest pieces. The sacrificial layer in the Precix was quite damaged but because the board I used is quite big, it didn't really matter. Make sure nothing remains on the working area.

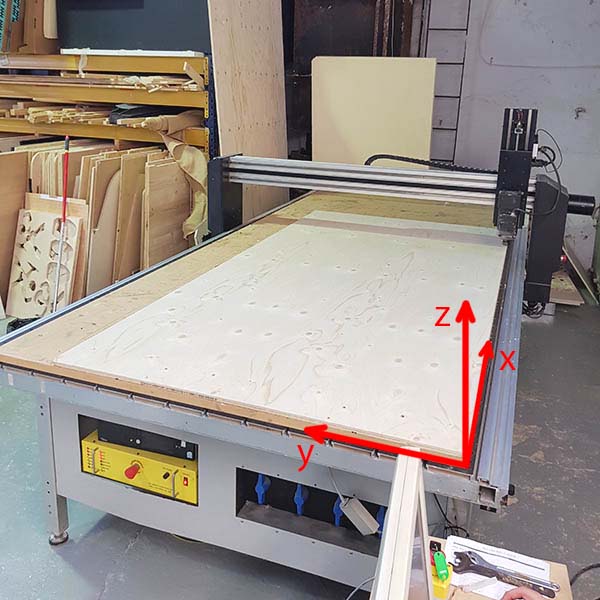
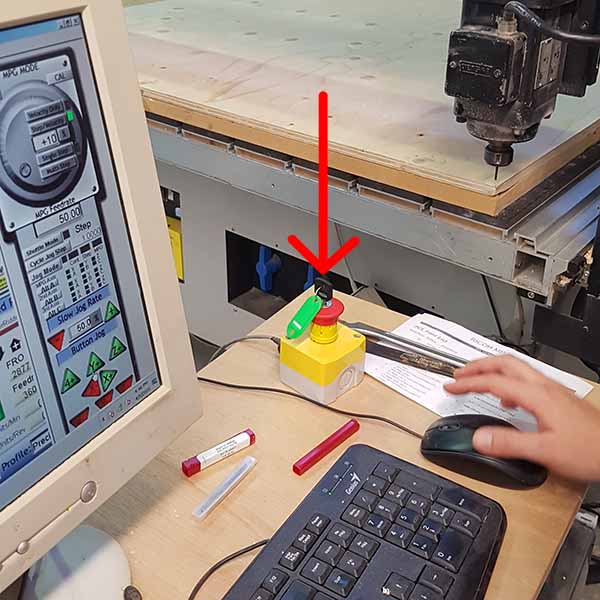
Turn on the machine (left). Open the Mach3 CNC software on the computer linked to the machine. You will find this interface (center). If you press the Tab key, a control panel will appear on the right. With the X,Y,Z control buttons, you'll bring the machine further so we can place the wood on the working area. If the machine doesn't respond, maybe you need to press the big Reset button on the left-down part of the interface. If that doesn't work you might also have to do a hard reset (right), pressing down and turning the key of the external reset button.


Place the wood on the sacrificial layer and align it to the zero corner and to the sides.
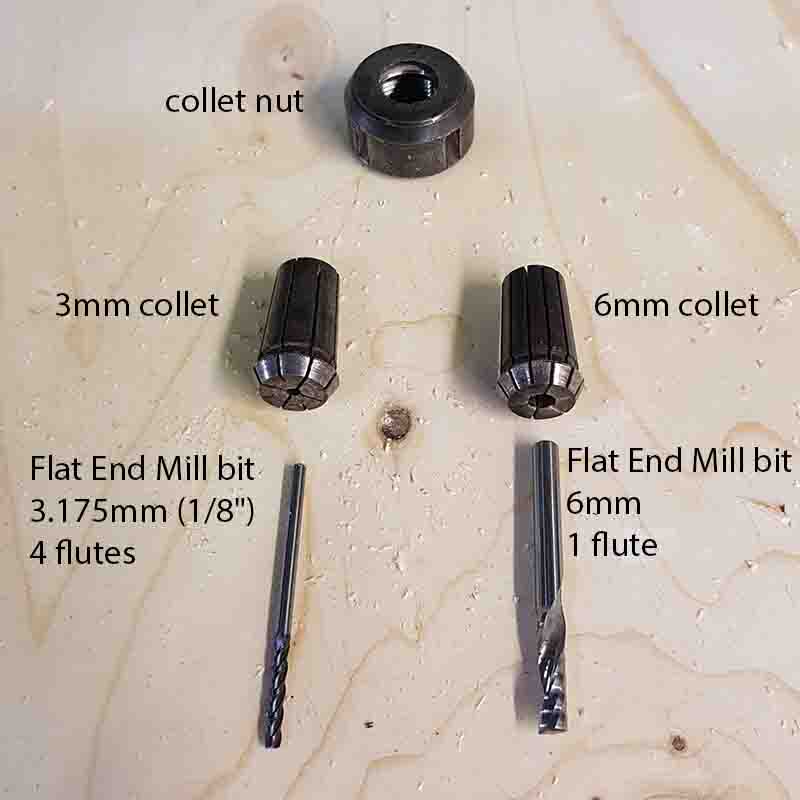
Make sure nothing but the wood remains on the cnc working area. Bring the machine closer to the origin point or to us. Now it's time to prepare the drilling bit. In order to change the collet and the bit, you'll need to take these two spanners to open/close (red/blue) the collet nut. Tool A blocks the spindle from turning, while tool B is the one that tightens or loosens the collet.


For my design I needed two different ones, 6mm and 3mm. Each bit needs a collet of its size. We didn't have a 3mm bit, so I had to use the 3.175mm(1/8"). With a little forcing, the 3mm collet can hold the 3.175mm bit (first fit the collet in the nut, then use the help of a wood block and a hammer to make the bit fit without damaging it. To take out the bit, you can wrap it in a piece of cloth and use pliers to grab it and pull it out withot damaging the flutes). When changing the bit, make sure to leave 2-4mm between the end of the flute and the collet.
Once the bit+collet+nut is set on the spindle, it's time to set the zero of your job. In the software interface, press REF ALL HOME. This will bring the spindle to the absolute zero of the machine, which is not the zero of your job. Once the machine is in the absolute zero, press zeroX, zeroY and zeroZ.

Now the zero of the machine and the zero of your job is the same. However you don't want the zero of your job here. So move the machine to where you want. Bring it down close to the material (without touching it) and move it to your X and Y. Now the coordinates are relative to the absolute zero of the machine. Write down these coordinates (you will need them in case the power goes off to find the exact same position). Now click again in ZeroX and Zero Y, which will set the new zero for X and Y.

Now you need to set the zero for Z. It's better to turn on the spindle for this, so you know exactly when the bit is sarting to scratch the material.
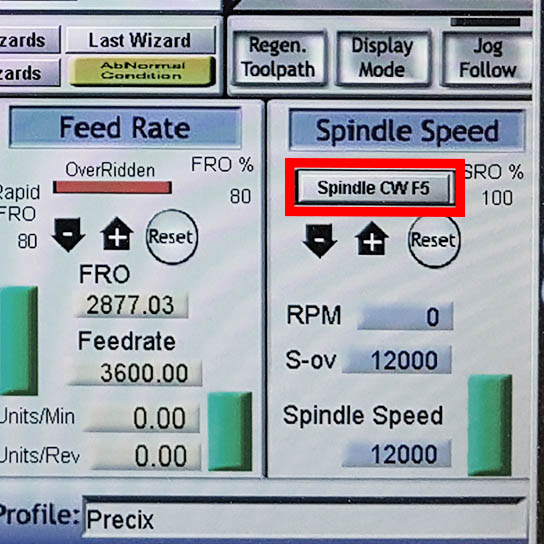
The spindle should turn on (However this Precix doesn't work well and sometimes the spindle will not turn on. To solve this it needs to be reseted both with the external reset button and with the reset button in the interface. If still it doesn't turn on. Turn off the machine, let it chill for a few minutes and try again. Apparently it has to do with the temperature of the spindle...so it needs to cool down. Also the spindle will go down a few milimeters every time the machine is restarted...a bit annoying). When the spindle is on, move it down with the control panel until it scratches the material. This will be the zero for your Z. Write down the coordinates and press ZeroZ. No you have set the zero of your job for X, Y, Z and you have the machine coordinates in case you need to go to this position again.
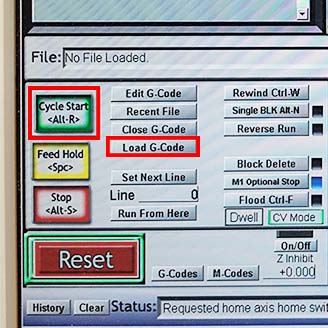
Time to load your code. In case there is anything previously loaded, click on "Close G-Code". Then clic on "Load G-code" and find your code. First, you'll need to load the code of the marks for the screws that will hold the wood to the sacrificial layer. Once loaded, check in the upper right previsualization if the path drawing makes sense. If everything is ok, make sure nothing but the wood is on the cnc working area, your hair is tied back and everyone near the machine has eye protection (Little pieces can fly while milling!) and finally click on "Cycle Start".
Once all the screw marks are done, you can screw the wood to the sacrificial layer. This helps the wood stay in place and flat throughout all of its surface. Watch out the lenght of the screws, you want to go through your wood and remain in the sacrifical layer, but not go through this last one, otherwise you will damage the machine surface.

Now that the wood is screwed to the sacrificial layer, you'll need to reset the zero for Z because the wood will have moved down. Write down the coordinates. Once this is done you can go on with the rest of the milling jobs. Remember the eye protection.
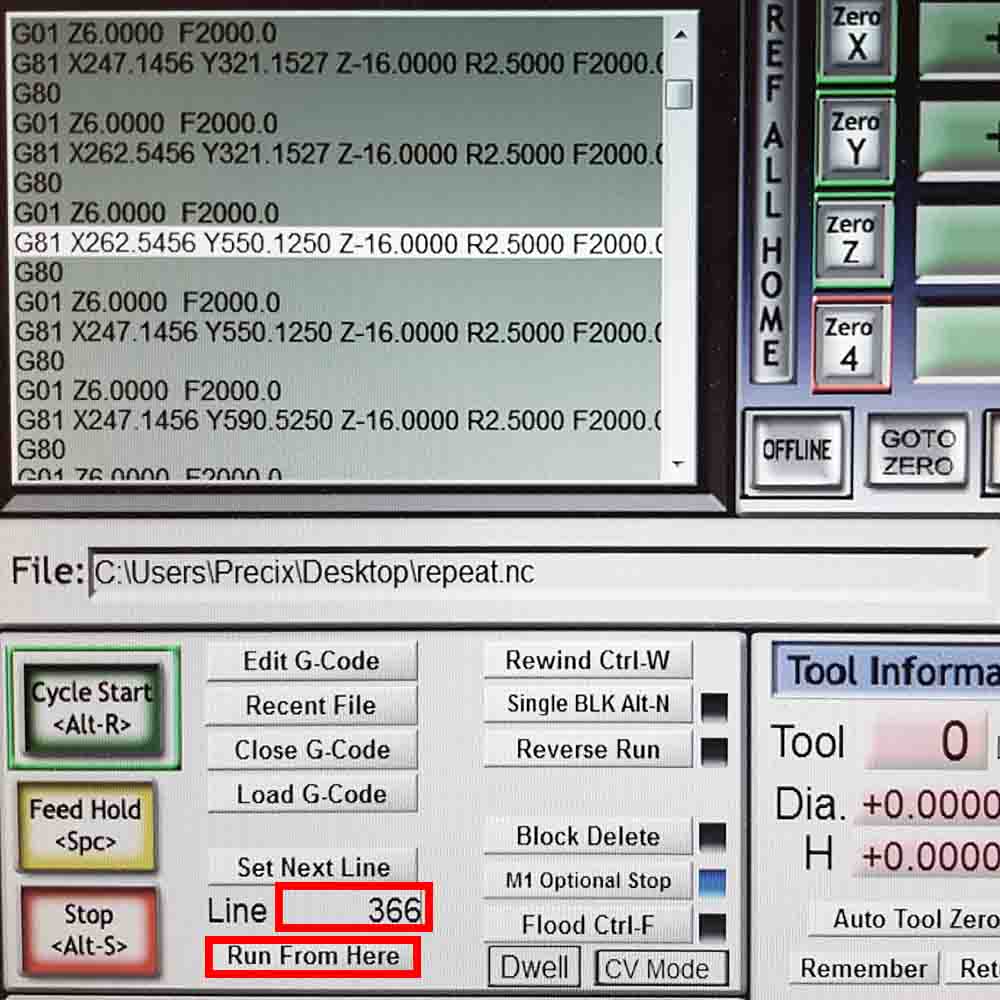
In case the machine power goes off, you can recover your job zero by going to the second tab in the interface (MDI) and typing in the box the command for moving the machine to the desired coordinates. For example, if you want to move the machine to the Y=-237.6868 youll need to type "G1 Y-237.6868". Once you have reset the zero for X, Y and Z you can load your code again. If you know which was the last line the machine did, you can also type the line number (so the machine doesn't redo everything) then "Run From Here" and then "Cycle Start". If a windows pops up just close it and clic on "Cycle Start" again.

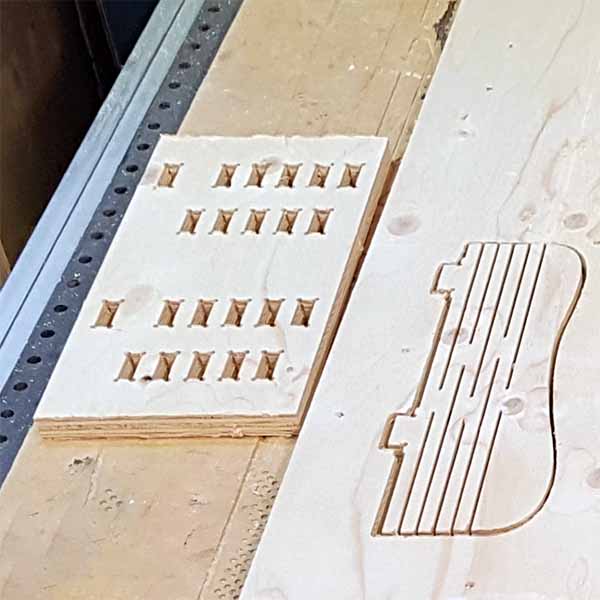
In my case I first did a test, which had two G-codes, one for the 3.175mm (interior cut lines) and one for the 6mm bit (dogbones, pocketings and cutting the pieces). Remember each time you change the bit you need to reset the zero Z. With this test I checked which is the best pocket size for the press-fit parts joints. Pockets 15.4mm wide seem to work nice for the 15mm plywood (its thickness varies from 15.0 to 15.2mm).
Once I cut the test parts, I chose the right size for the pockets and generated again the G-code for the rest of the pieces:
-Final (3.175mm): Interior cuts
-Final (6mm): Dogbones (through), dogbones (pockets), pockets (through), pockets (pockets), profile cuts (6mm)
Then loaded the g-code again, reset the zero-Z and proceeded with the rest of the job. This machine does not have built-in suction, so if you want to see how the machine is doing the job you can vacuum the dust. You can do it while the machine is on being careful of not being on the machine's path.

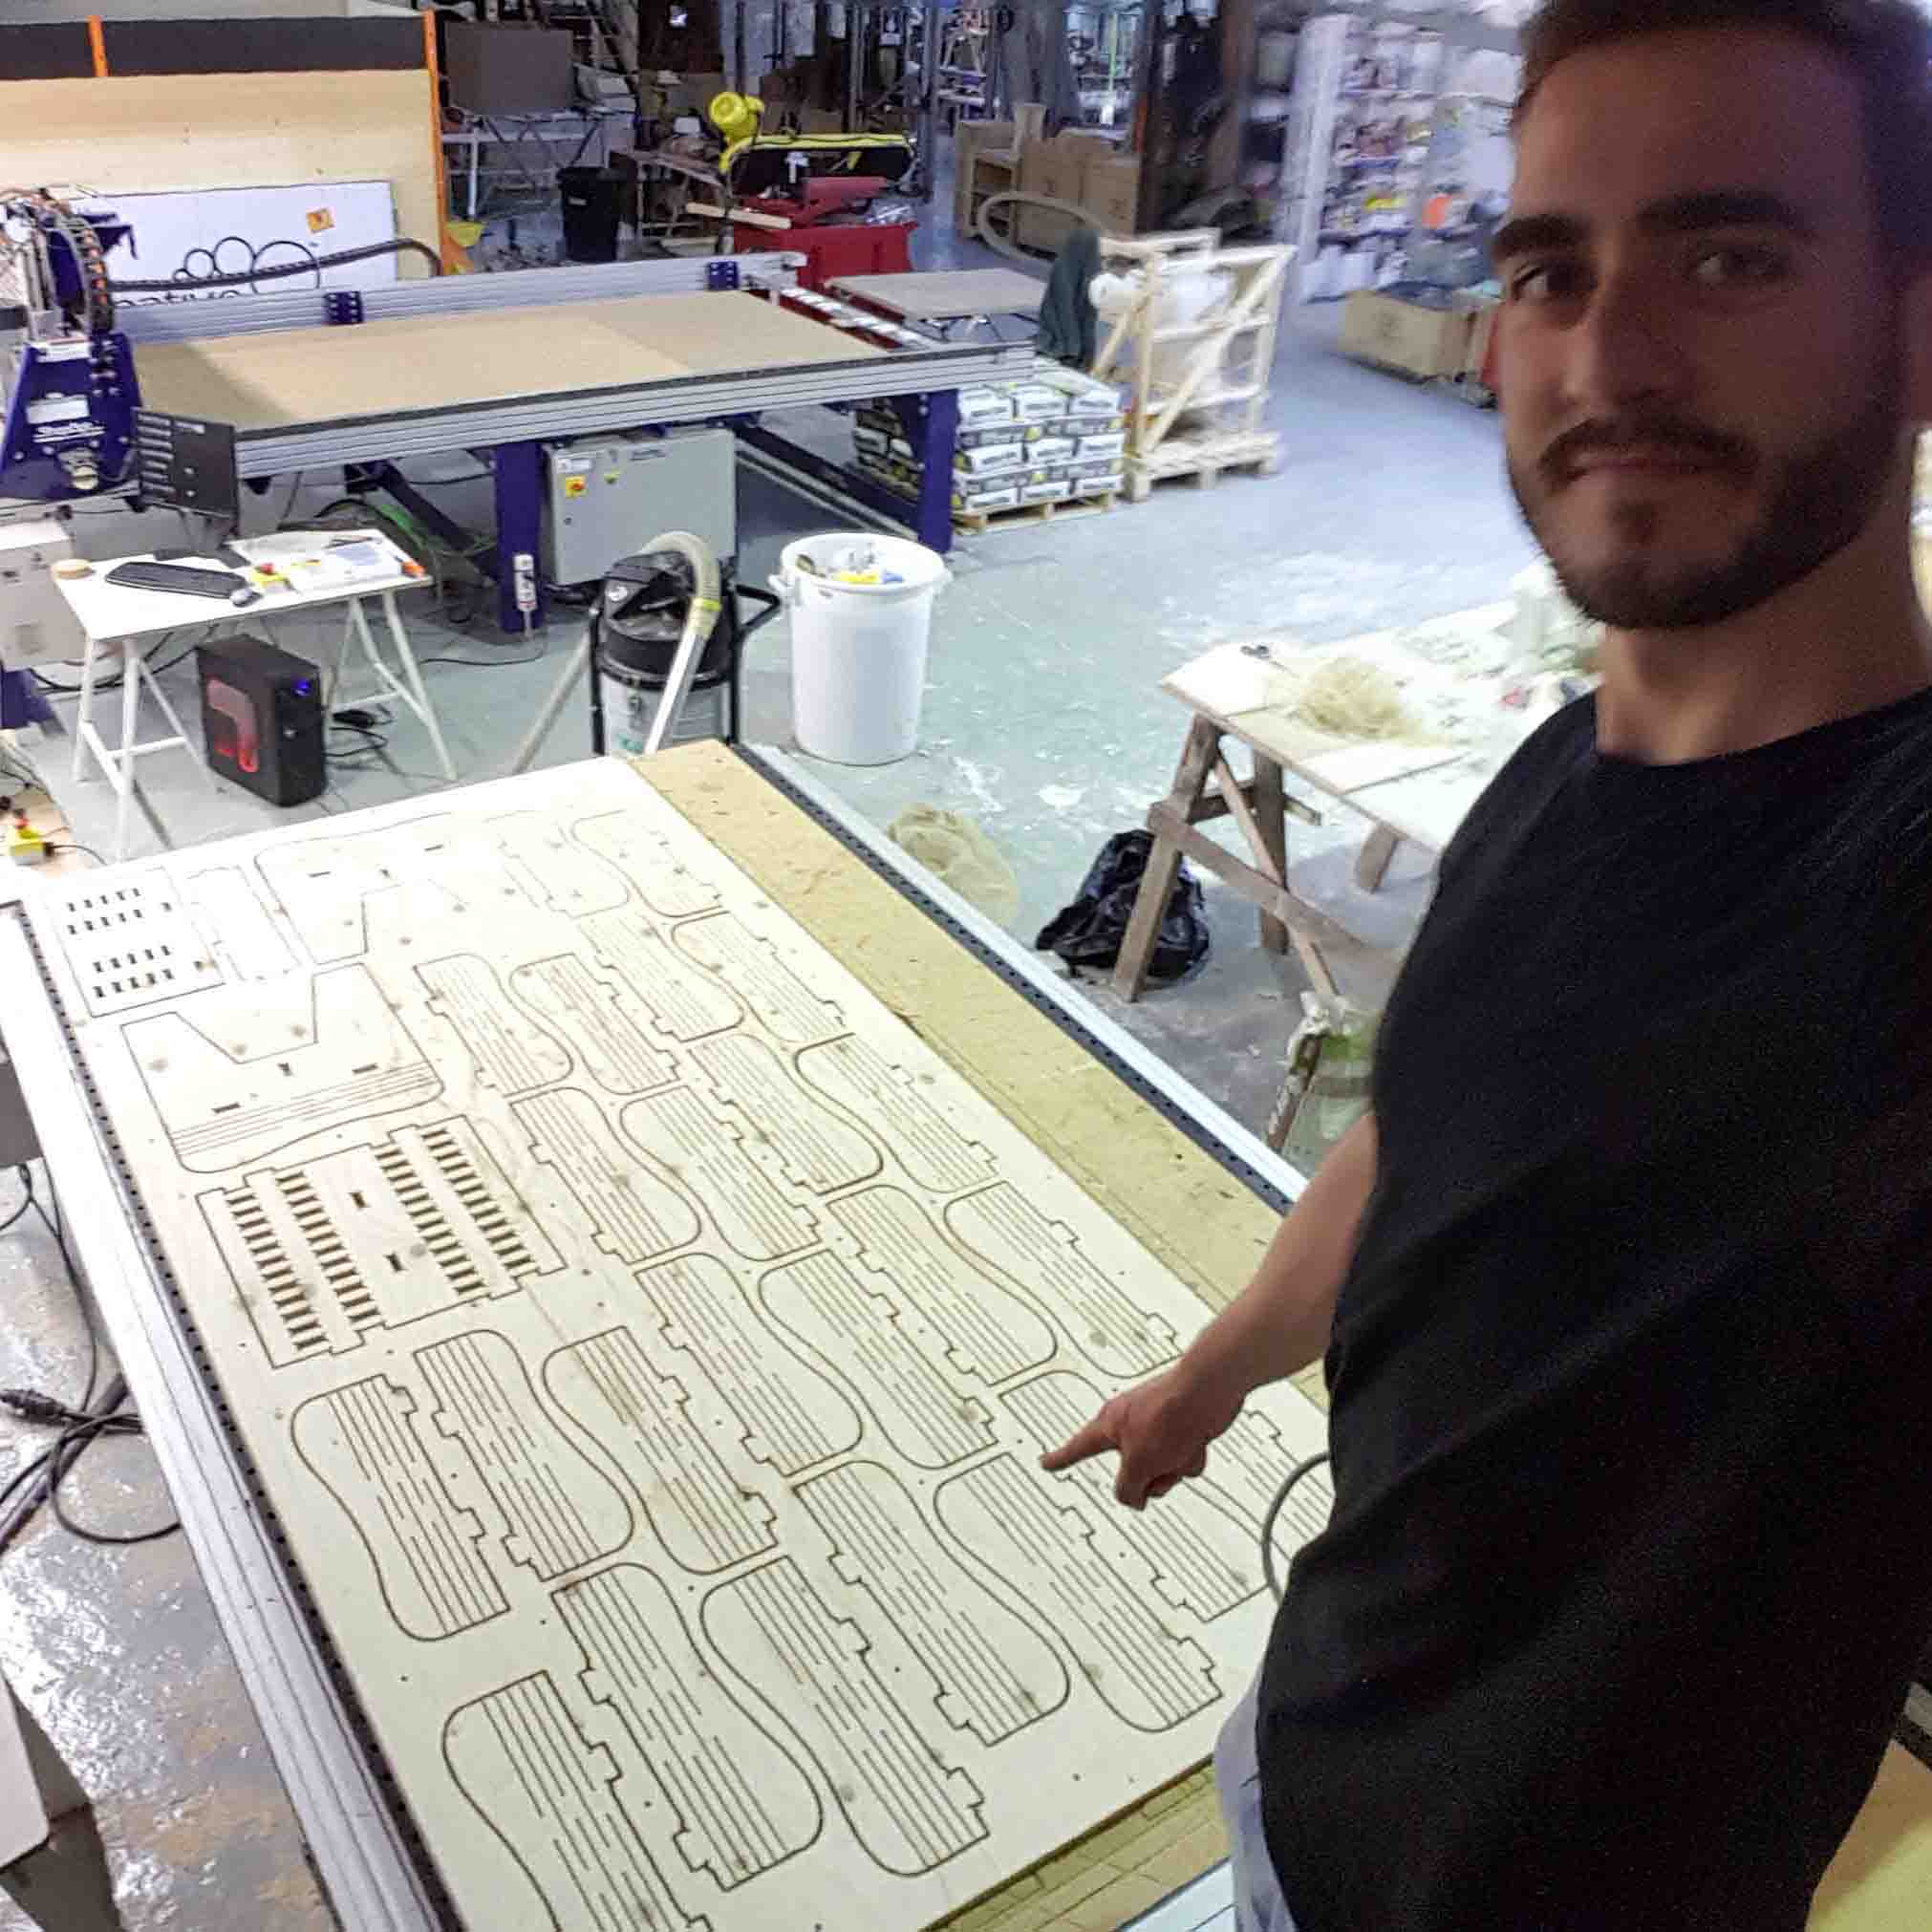
Milling job done! :)

Now you can unscrew the wood and take out all of the pieces with a chisel and a hammer or with the jigsaw (they are still joined to the wood because of the bridges). Remember to clean the cnc table and leave it ready so someone else can use it. Then sand the pieces, and assembling!


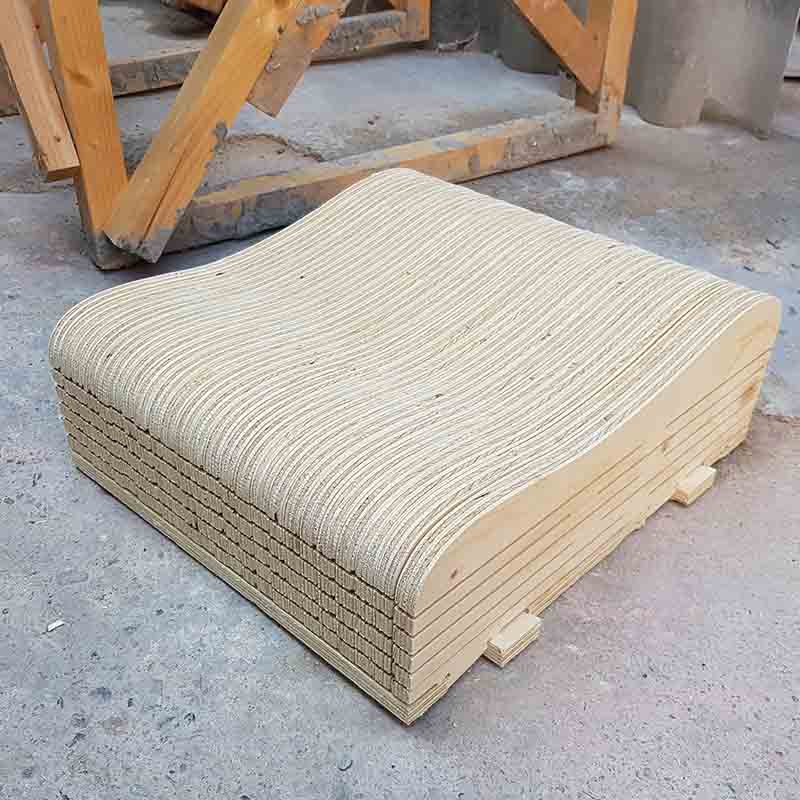
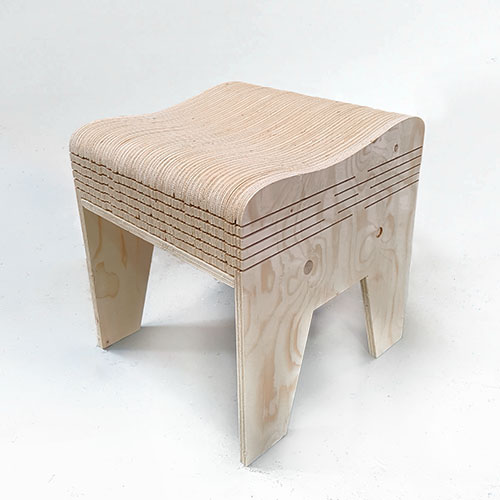
So fluffy!

download files

This work is licensed under a Creative Commons Attribution-NonCommercial-ShareAlike 4.0 International License.