Exercise 08 - Embedded Programming
Read a microcontroller data sheet, program your board to do something, with as many different programming languages and programming enviroments as possible
From data sheet of ATtiny 44 (pins layout)
The pin configuration of the ATtiny can be checked at the beginning of the data sheet.
A small dot or half dot shows the orientation.
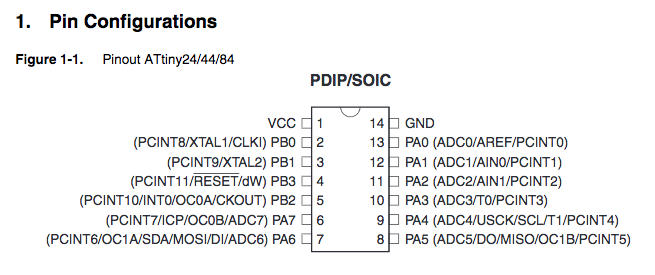
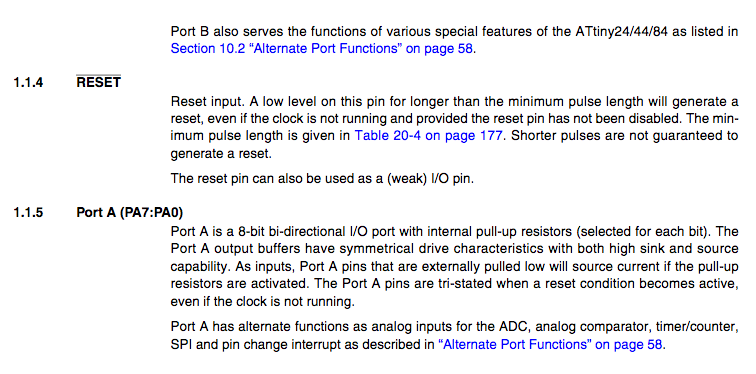
VCC and GND are only for Supply voltage and ground use.
Other pins are divided in two groups, Port A and Portb. Port B is 4-bit and Port A is 8 bit.
Each pin can be set as input or output, but each pin has specific function or functions. For exmple specific function of PB3 (Pin 3 of Port B) is RESET.
In the overview section there is an introduction to the architecture and to the main features of the microcontroller.
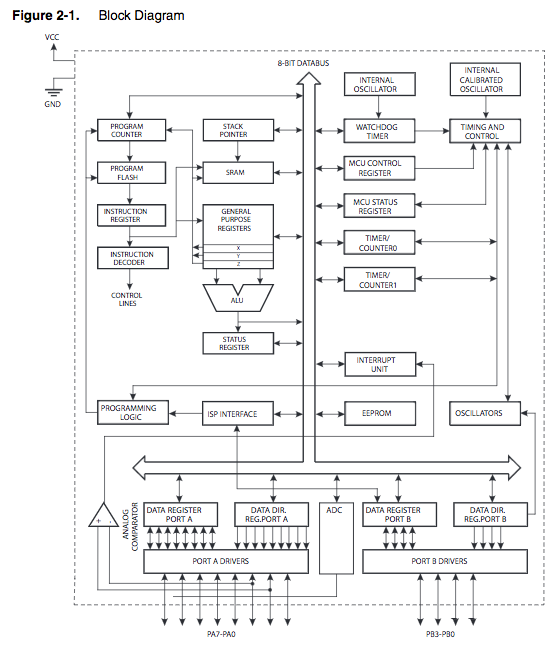
For example number and type of:
- input and output lines,
- registers,
- timers/counters,
- PWM (pulse with modulation),
- interrupts,
- ADC (analog to digital converter),
- Analog Comparator...
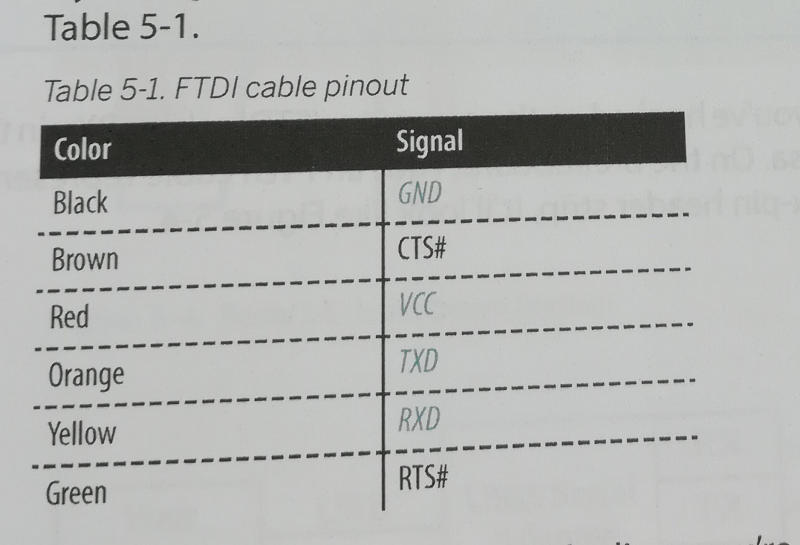
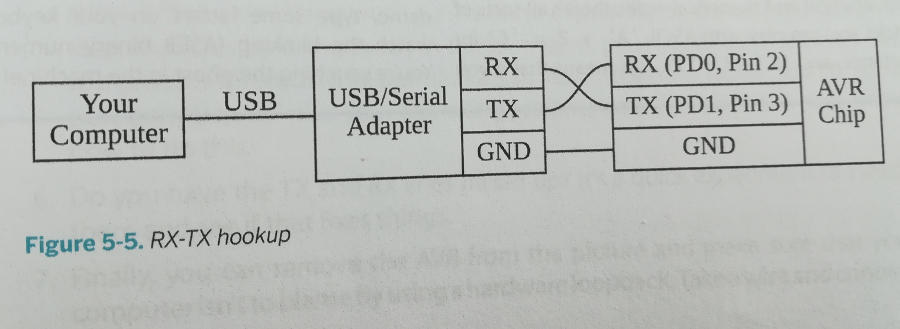
ISP header Vs FTDI cable
Isp header:
It do not need a bootloader. It reset the memory and it prepares the ATtiny to load a new program.
On the Hello Board it do not provide power but the pin V labeled tells to the ATtiny the voltage.
FTDI cable:
It needs a bootloader to flash a program. It uses serial comunication (TX RX pins).
From the book Make: AVR programming:
Programming with Arduino IDE and Arduino board as programmer
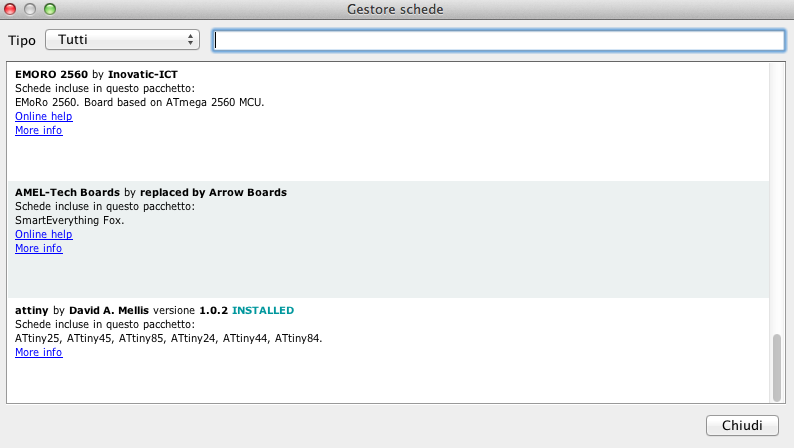
I downloaded and I installed the ATtiny support in my Arduino IDE following the first part of this tutorial.
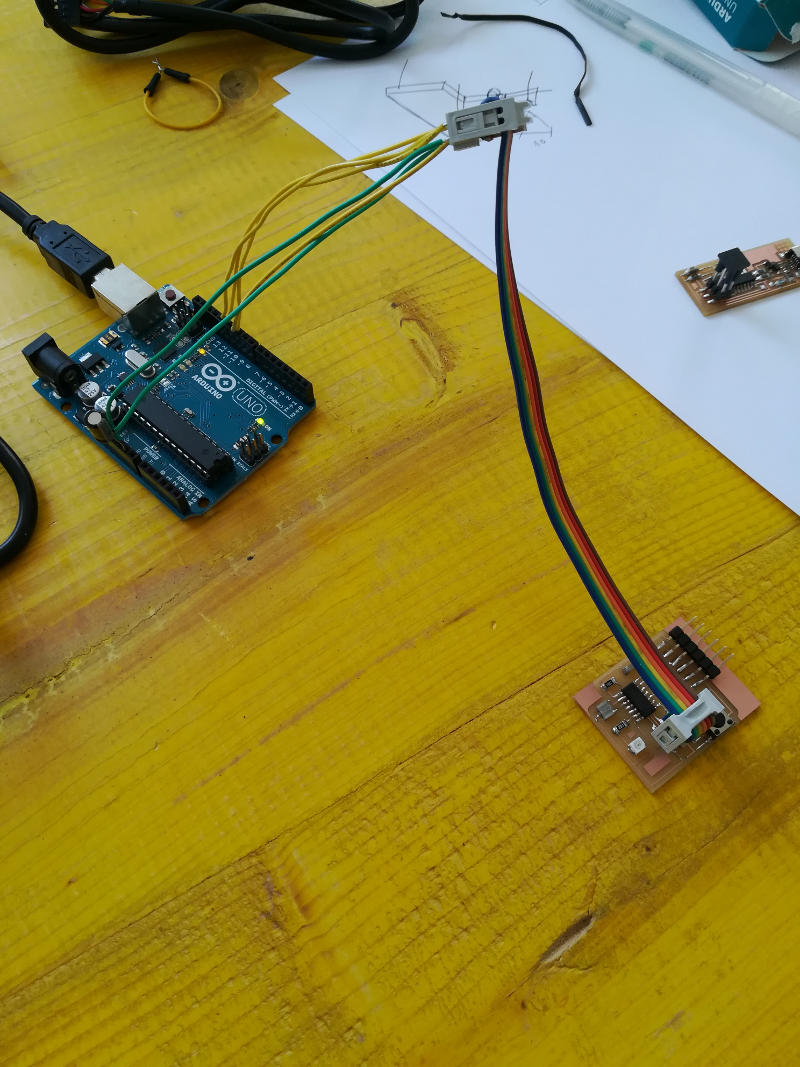
First I tried to use an Arduino Uno as a programmer.
I connected the wires to the pins following the info in the sketch ArduinoISP.
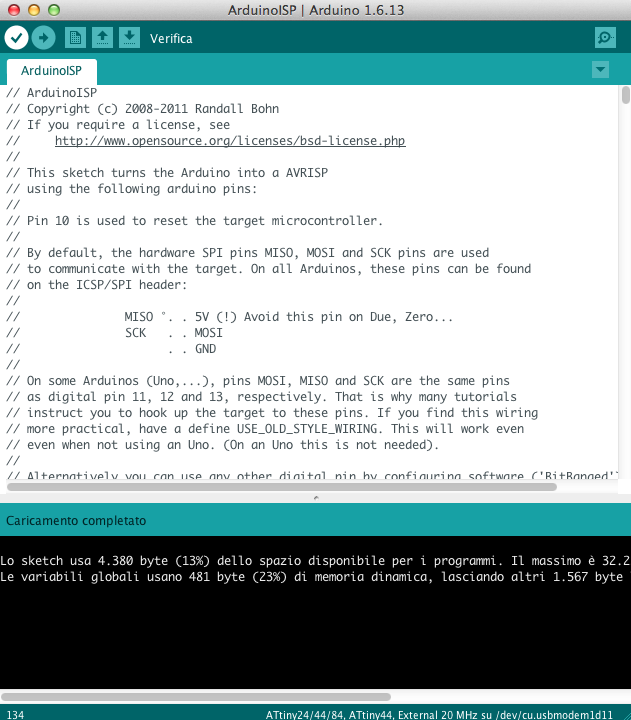
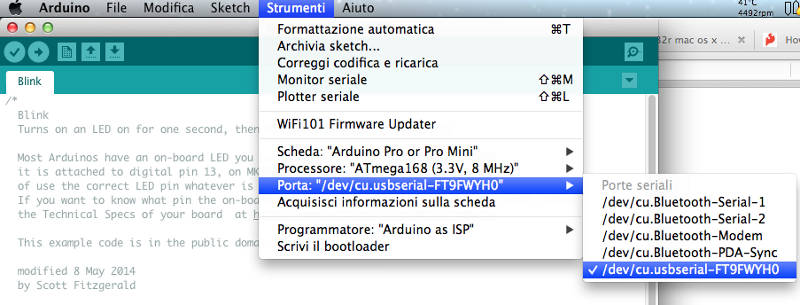
I chose in the strumenti tab the right board and the right port. So I uploaded the program on the Arduino board.
I chose the sketch blink in the tab file/esempi/01.basics/blink.
I chose the right board, processor, clock, port and programmer.
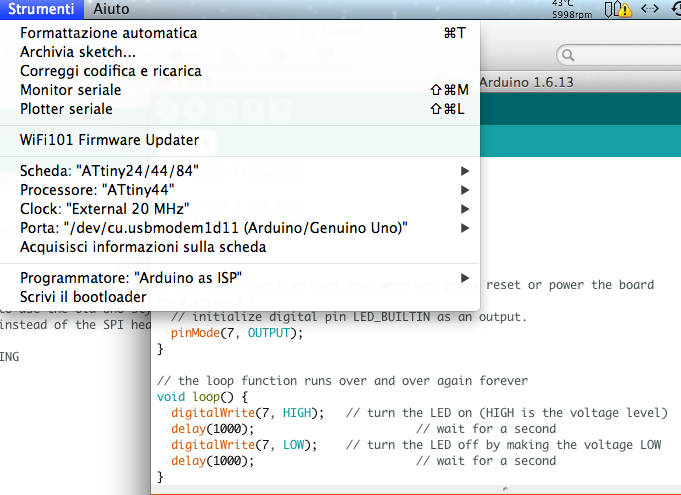
I modified the LED_BUILTIN with pin number 7.
I uploaded the program but I got error.
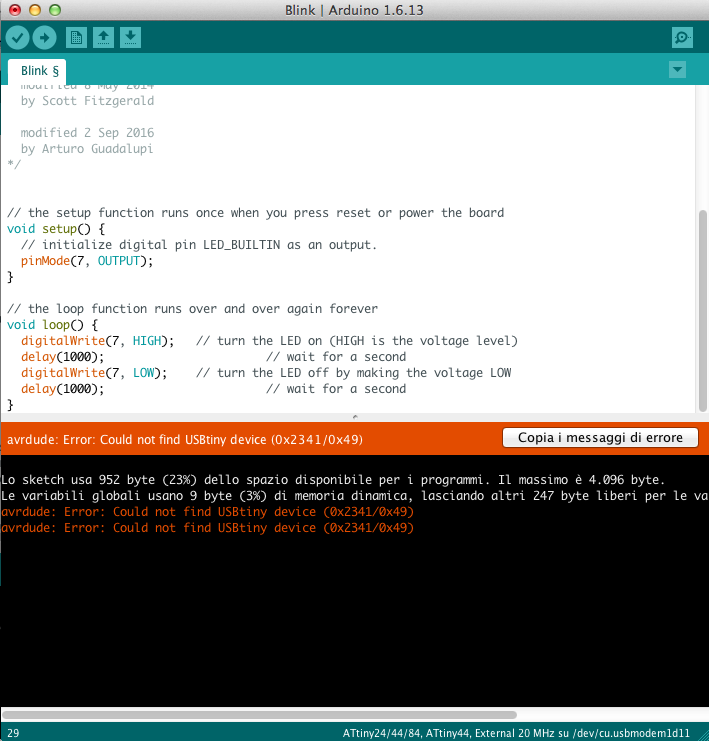
I tried to figure out what was wrong:
- I checked the wire connections,
- the traces on the board with a multimeter,
- and the settings in the Arduno IDE.
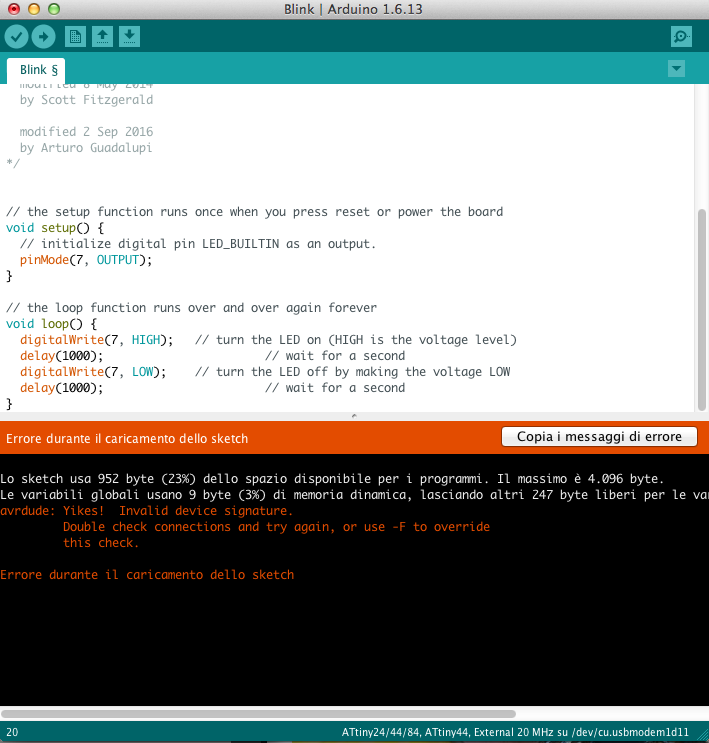
I didn't solve the problem.
At that time I didn't know yet that the ATtiny chip had been soldered in the opposite direction and probably I had also to connect the FTDI cable to provide power to the board.
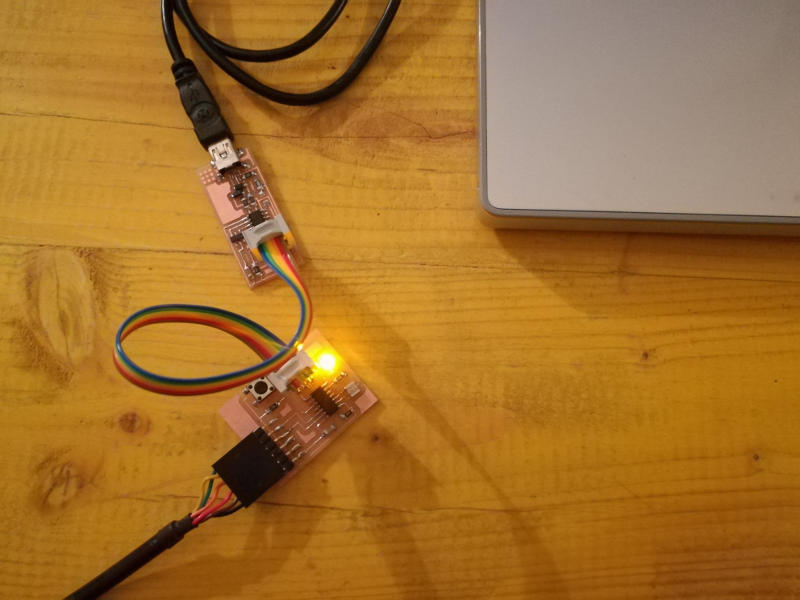
So I decided to go ahead and I tried to program the Hello World board with my FabISP instead of the Arduino board.
Programming with FabISP and Arduino IDE
Enrico Bassi discovered that the ATtiny44 on my Hello Board was probably monunted in the wrong direction. I checked the pins in the data sheet and in the layout of the board and he was right. I desoldered the chip and I soldered a new one.
At this pint I followed similar steps as before.
I had just to chose USBtinyISP as programmer and I upload the program through a programmer in the tab scketch/carica tramite un programmatore.
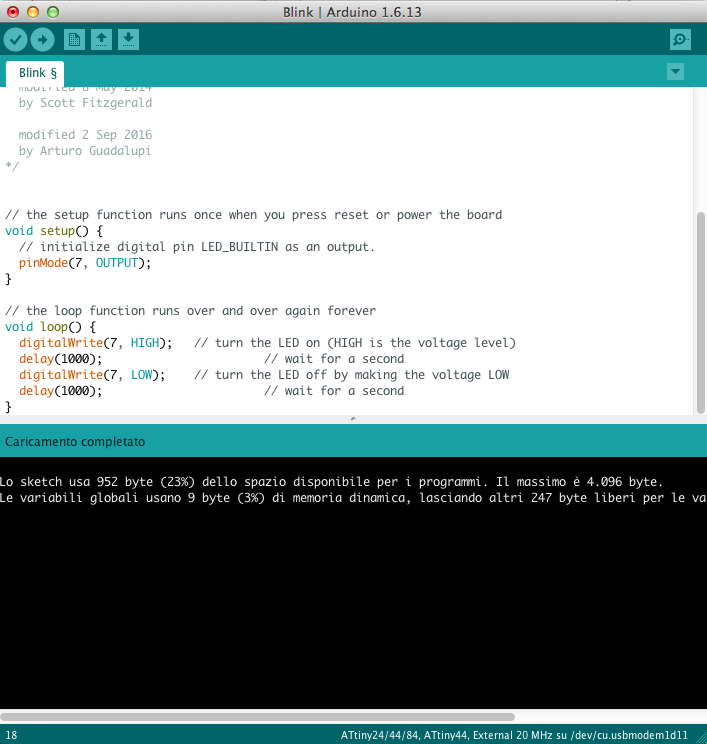
The led was blinking. Urrààà.
But the period of blinking was very long. Following the suggestion of Enrico Bassi I upload the bootloader and I upload the blink sketch again. This time the board was blinking at the right time.
Programming with C code and Makefiles
Hello.ftdi.44.echo.c.make and a bit of theory
To undersatand better what is going on with Makefiles I read the tutorial What is Make and Makefiles on the Fab Academy archive.
To program an AVR microcontroller, I need to write a C code, compile it with avr-gcc and send it to the microcontroller with avrdude. All the instructions on the Makefile (in this exercise) basically deals with almost only these two commands.
make is usefull when you have to deal with multiple configurations such as different types of programmers and you want to automate the process.
make reads automatically a Makefile file in the folder wher you launch it or you can specify it with make -f filename.
Looking inside of hello.ftdi.44.echo.c.make:
PROJECT=hello.ftdi.44.echo
SOURCES=$(PROJECT).c
MMCU=attiny44
F_CPU = 20000000

CFLAGS=-mmcu=$(MMCU) -Wall -Os -DF_CPU=$(F_CPU)

$(PROJECT).hex: $(PROJECT).out
	avr-objcopy -O ihex $(PROJECT).out $(PROJECT).c.hex;\
	avr-size --mcu=$(MMCU) --format=avr $(PROJECT).out

$(PROJECT).out: $(SOURCES)
	avr-gcc $(CFLAGS) -I./ -o $(PROJECT).out $(SOURCES)

program-bsd: $(PROJECT).hex
	avrdude -p t44 -c bsd -U flash:w:$(PROJECT).c.hex

program-dasa: $(PROJECT).hex
	avrdude -p t44 -P /dev/ttyUSB0 -c dasa -U flash:w:$(PROJECT).c.hex

program-avrisp2: $(PROJECT).hex
	avrdude -p t44 -P usb -c avrisp2 -U flash:w:$(PROJECT).c.hex

program-avrisp2-fuses: $(PROJECT).hex
	avrdude -p t44 -P usb -c avrisp2 -U lfuse:w:0x5E:m

program-usbtiny: $(PROJECT).hex
	avrdude -p t44 -P usb -c usbtiny -U flash:w:$(PROJECT).c.hex

program-usbtiny-fuses: $(PROJECT).hex
	avrdude -p t44 -P usb -c usbtiny -U lfuse:w:0x5E:m

program-dragon: $(PROJECT).hex
	avrdude -p t44 -P usb -c dragon_isp -U flash:w:$(PROJECT).c.hex

program-ice: $(PROJECT).hex
	avrdude -p t44 -P usb -c atmelice_isp -U flash:w:$(PROJECT).c.hex
If I launch simple make in the terminal, only the first part will be exectuted (untill line $(PROJECT).OUT). First four lines are for configuring the Makefile: name of the file to compile, extension of the file to compile, microcontroller to program, frequency of the board to program.
The other three lines initialize the process and compile the C script with avr-gcc.
The other part of the file can be specified after make, each secton specifies the terminal commands that will be executed for each option: in this case each option is configured for a different ISP.
Test connections
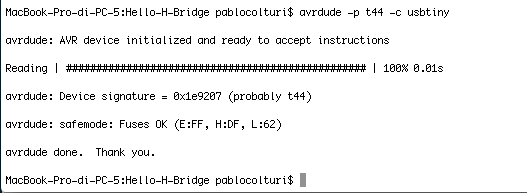
I can check connections with:
avrdude -p t44 -c usbtiny
Answer should be something like:
Hello.ftdi.44.echo.c.make programming (done)
I followed the tutorial ATtiny using C on the Fabacademy's archive which actually refers to another tutorial.
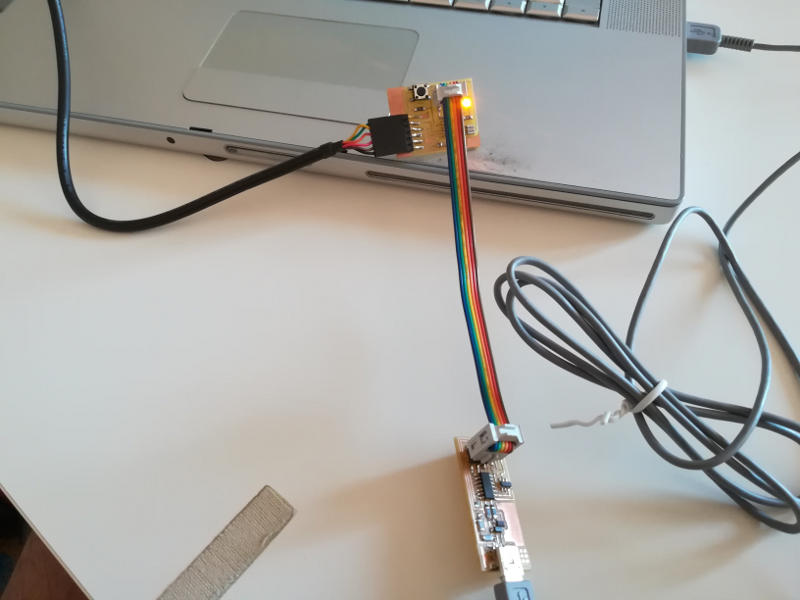
I connected to power both my FabIsp programmer and my HelloBoard through USB and FTDI cable. I also connected together the ISP pins of the two boards.
I downloaded the files hello.ftdi.44.echo.c, hello.ftdi.44.echo.c.make and I moved with Terminal in the same folder.
I have already set the fuses when I uploaded the bootloader in the previous chapter 'Programming with FabISP and Arduino IDE' so I didn't have to do it again.
In the terminal I wrote:
MacBook-Pro-di-PC-5:lesson08 pablocolturi$ sudo make -f hello.ftdi.44.echo.c.make program-usbtiny
And the answer was:
avr-gcc -mmcu=attiny44 -Wall -Os -DF_CPU=20000000 -I./ -o hello.ftdi.44.echo.out hello.ftdi.44.echo.c
avr-objcopy -O ihex hello.ftdi.44.echo.out hello.ftdi.44.echo.c.hex;\
	avr-size --mcu=attiny44 --format=avr hello.ftdi.44.echo.out
AVR Memory Usage
----------------
Device: attiny44

Program:     758 bytes (18.5% Full)
(.text + .data + .bootloader)

Data:         64 bytes (25.0% Full)
(.data + .bss + .noinit)


avrdude -p t44 -P usb -c usbtiny -U flash:w:hello.ftdi.44.echo.c.hex

avrdude: AVR device initialized and ready to accept instructions

Reading | ################################################## | 100% 0.01s

avrdude: Device signature = 0x1e9207 (probably t44)
avrdude: NOTE: "flash" memory has been specified, an erase cycle will be performed
         To disable this feature, specify the -D option.
avrdude: erasing chip
avrdude: reading input file "hello.ftdi.44.echo.c.hex"
avrdude: input file hello.ftdi.44.echo.c.hex auto detected as Intel Hex
avrdude: writing flash (758 bytes):

Writing | ################################################## | 100% 0.42s

avrdude: 758 bytes of flash written
avrdude: verifying flash memory against hello.ftdi.44.echo.c.hex:
avrdude: load data flash data from input file hello.ftdi.44.echo.c.hex:
avrdude: input file hello.ftdi.44.echo.c.hex auto detected as Intel Hex
avrdude: input file hello.ftdi.44.echo.c.hex contains 758 bytes
avrdude: reading on-chip flash data:

Reading | ################################################## | 100% 0.60s

avrdude: verifying ...
avrdude: 758 bytes of flash verified

avrdude: safemode: Fuses OK (E:FF, H:DF, L:FE)

avrdude done.  Thank you.
After the files .hex and .out were created in the folder.
I opened the terminal of the Arduino IDE, I set the baude rate to 115200 but unfortunatley I didn't get any answer to my letters when I sent them.
After some time I discovered reading Make: AVR programming that my cable may have not been installed properly on my OS.
So I downloaded the program lsusb to check if my computer was reading my FTDI cable and it was.
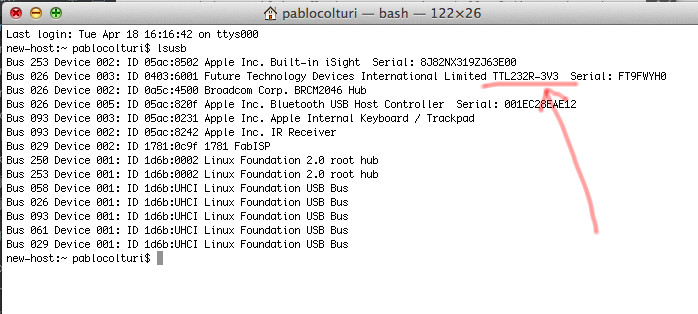
I looked for FTDI CHIP drivers for my Mac OS X 10.8 and I downloaded and installed them.

Finally my cable was properly recognised by my computer.
I flashed again the Hello.Echo program and finally I got answer on my serial terminal (Coolterm) through the serial port.

Blinking in C code (done)
I tried another simple C code from my classmate Emanuele Goldoni to try to make blink my Hello Board.
I downloaded the files hello-tiny44-blink.zip and I moved with Terminal in the folder.
I opened the C code and looking at the data sheet of the ATtiny44 I changed the pin number connected to the led to PA7.
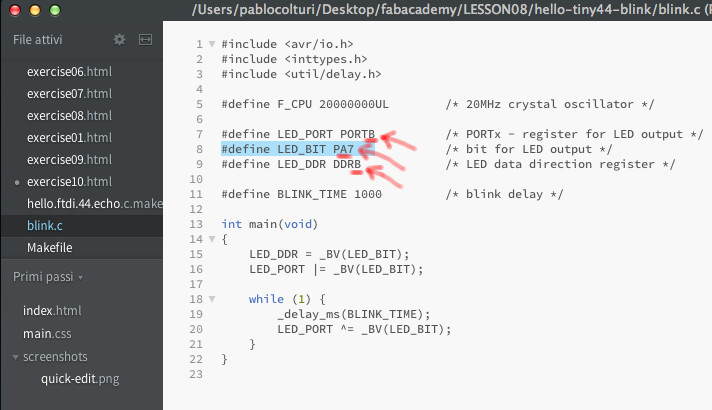
But at the beginning I forgot to change PORTB to PORTA and DDRB to DDRA, so the led didn't turn on. I discovered the problem reading the book Make : AVR Programming.

I typed simply make because the file was namede already makefile and I get this result:
avr-gcc -mmcu=attiny44 -Wall -Os -DF_CPU=20000000 -I./ -o blink.out blink.c
blink.c:5:0: warning: "F_CPU" redefined
 #define F_CPU 20000000UL        /* 20MHz crystal oscillator */

-command-line-:0:0: note: this is the location of the previous definition
avr-objcopy -O ihex blink.out blink.c.hex;\
	avr-size --mcu=attiny44 --format=avr blink.out
AVR Memory Usage
----------------
Device: attiny44

Program:      88 bytes (2.1% Full)
(.text + .data + .bootloader)

Data:          0 bytes (0.0% Full)
(.data + .bss + .noinit)
Then I typed:
MacBook-Pro-di-PC-5:blink pablocolturi$ sudo make program-usbtiny
I got:
avr-objcopy -O ihex blink.out blink.c.hex;\
	avr-size --mcu=attiny44 --format=avr blink.out
AVR Memory Usage
----------------
Device: attiny44

Program:      88 bytes (2.1% Full)
(.text + .data + .bootloader)

Data:          0 bytes (0.0% Full)
(.data + .bss + .noinit)


avrdude -p t44 -P usb -c usbtiny -U flash:w:blink.c.hex

avrdude: AVR device initialized and ready to accept instructions

Reading | ################################################## | 100% 0.01s

avrdude: Device signature = 0x1e9207 (probably t44)
avrdude: NOTE: "flash" memory has been specified, an erase cycle will be performed
         To disable this feature, specify the -D option.
avrdude: erasing chip
avrdude: reading input file "blink.c.hex"
avrdude: input file blink.c.hex auto detected as Intel Hex
avrdude: writing flash (88 bytes):

Writing | ################################################## | 100% 0.07s

avrdude: 88 bytes of flash written
avrdude: verifying flash memory against blink.c.hex:
avrdude: load data flash data from input file blink.c.hex:
avrdude: input file blink.c.hex auto detected as Intel Hex
avrdude: input file blink.c.hex contains 88 bytes
avrdude: reading on-chip flash data:

Reading | ################################################## | 100% 0.10s

avrdude: verifying ...
avrdude: 88 bytes of flash verified

avrdude: safemode: Fuses OK (E:FF, H:DF, L:FE)

avrdude done.  Thank you.
Everything looked fine and the led was blinking!