Exercise 04 - Electronics Production
Make an in-circuit programmer by milling the PCB
Show how you made and programmed the board
What is a FabISP?
The FabISP is an in-system programmer for AVR microcontrollers, designed for production within a FabLab. It will allow me to program the microcontrollers on other boards which I will make during the Fab Academy.
Before starting milling and soldering I got an idea of how FabISP really works at this page.
This is my first time doing a complete board so I do not expect to understand everything during this week. In the past I played with the Arduino starter kit and I made some circuits on breadboards reading the book Make: Electronics, both I really recommend for their common philosophy: learning by doing, which is the best in my opinion.
There are several versions of FabISP very well documented, but at the beginning of the week 04 we couldn't use the simplest and newest version because the ATTiny45 and 85 were not in stock at the time. So Enrico Bassi recommend to us an older version with an ATTiny44.
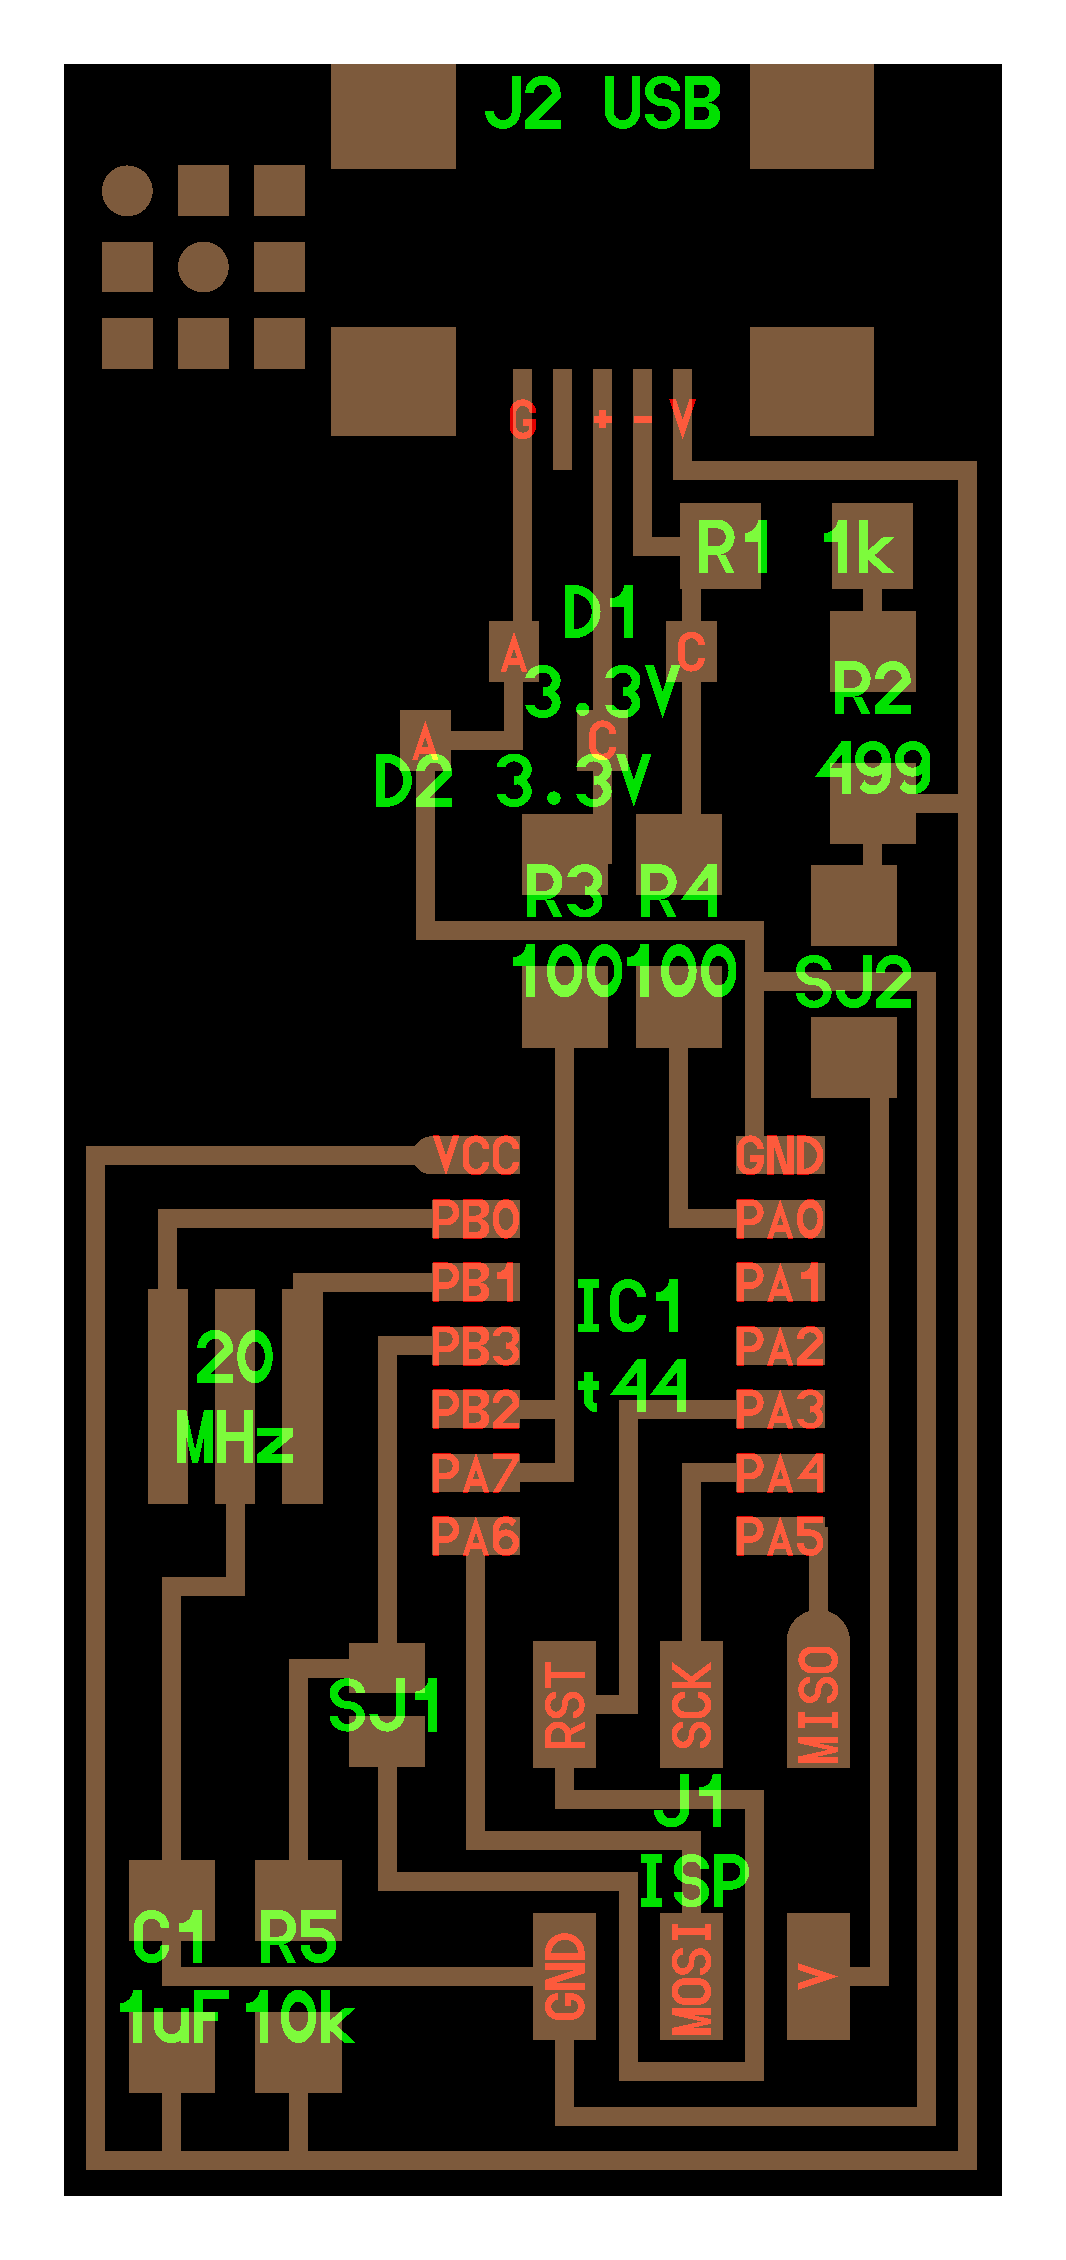
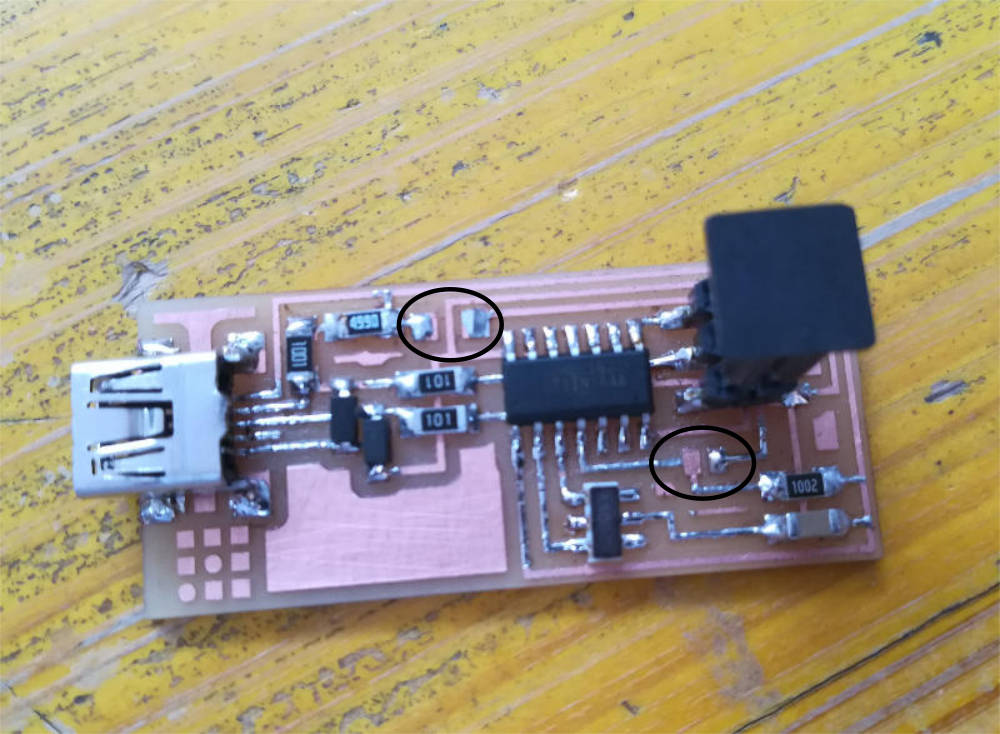
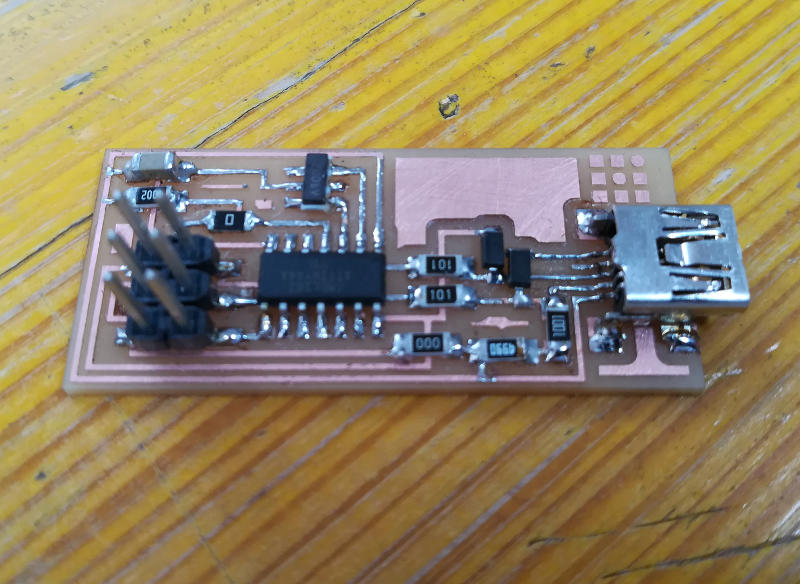
A list of the components on this board:
- 1 ATTny 44 microcontroller
- 1 Capacitor 1 microF
- 2 Resistors 100 ohm
- 1 Resistor 499 ohm
- 1 Resistor 1K ohm
- 1 Resistor 10K
- one 6 pin header
- 1 USB connector
- 2 jumpers - 0 ohm resistors
- 1 Resonator
- 2 Zender Diode 3.3 V
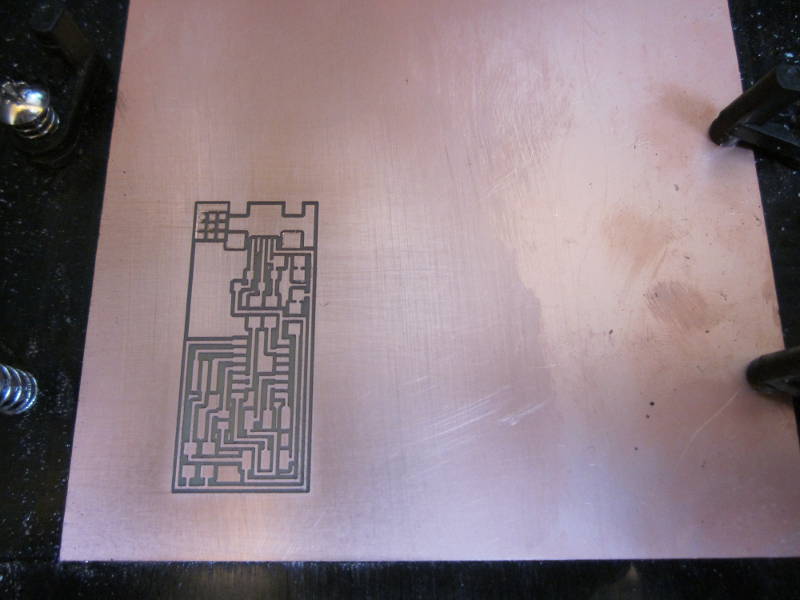
Fab modules and traces
I downloaded the png image file with the traces and the external border of the chose board.
I opened the web based Fab Modules.
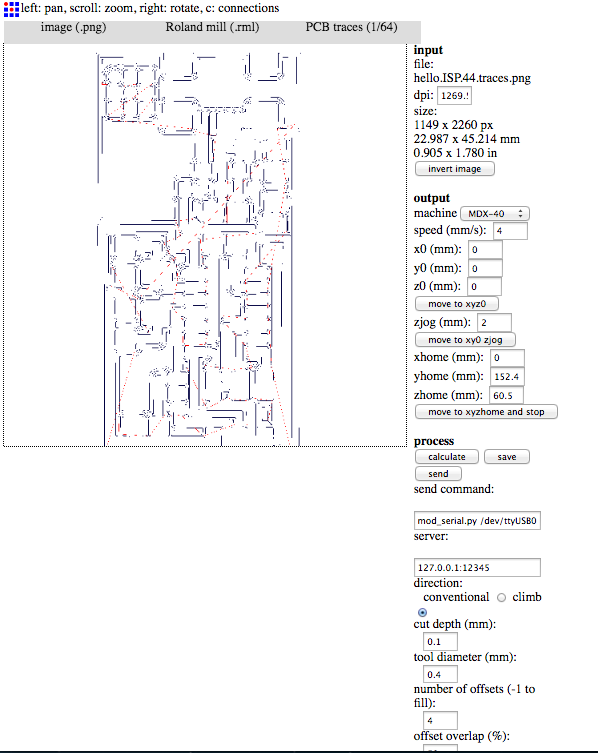
1. Traces
I opened the image of the traces, I chose in the output format the Roland mill or .rml file. In the process tab I chosed the PCB traces (1/64).
Then the following settings. Under output:
- machine = MDX-40
- speed (mm/s) = 3
- x0, y0, z0 = 0, 0, 0
- zjog (mm) = 2
Under process:
- cut depth = 0.1 mm (or for example 0.08 to enloarge life of tip)
- tool diameter (mm) = 0.4
- n. of offsets = 4
Then I clicked on calculate and on save. Now the file for the milling machine is ready.
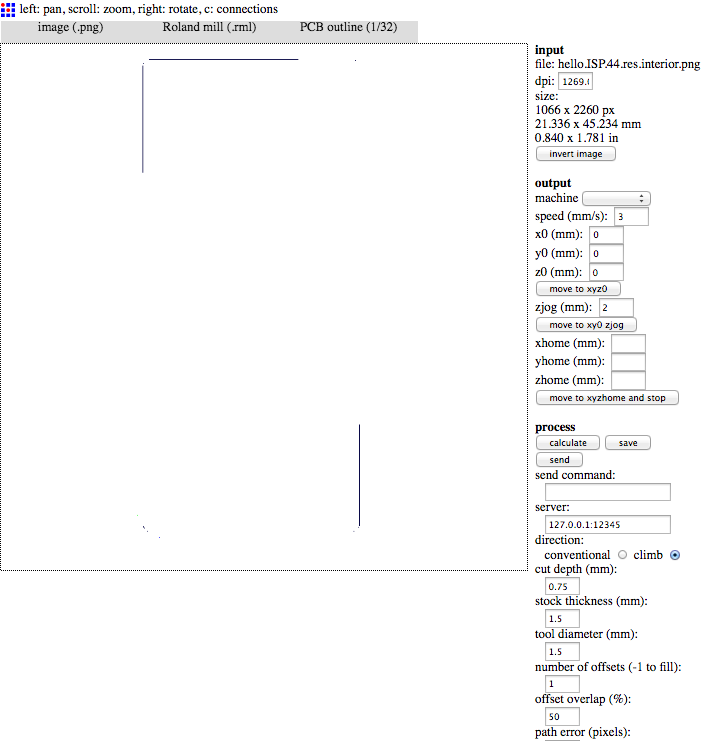
2. Border
I opened the image of the border, I chosed in the output format the Roland mill or .rml file. Same as for traces. In the process tab I chosed the PCB outline (1/32).
Then the following settings. Under output:
- machine = MDX-40
- speed (mm/s) = 3
- x0, y0, z0 = 0, 0, 0
- zjog (mm) = 2
Under process:
- cut depth = 0.75 mm (end mill will cut two layers)
- stock thickness = 1.5 mm
- tool diameter (mm) = 1.5 mm
- n. of offsets = 1
Then I clicked on calculate and on save. Now the file for the milling machine is ready.
Milling the PCB
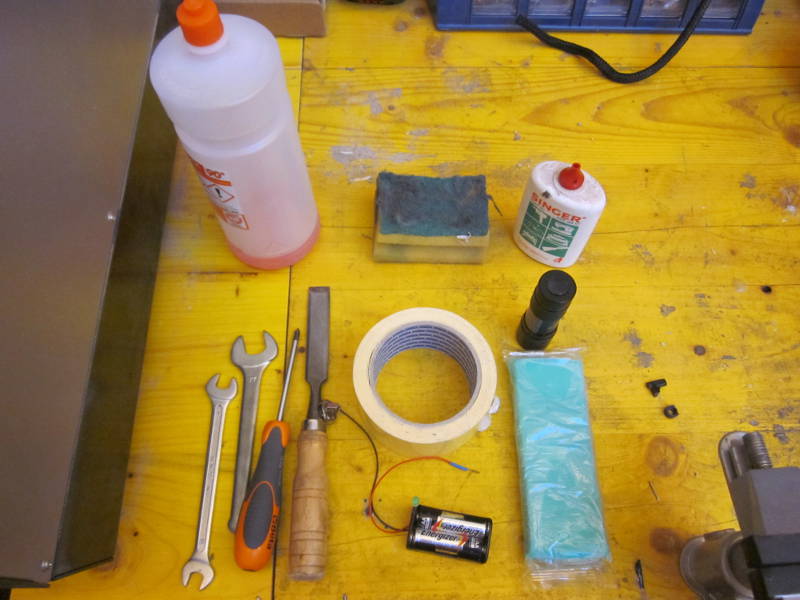
Collect what you need.
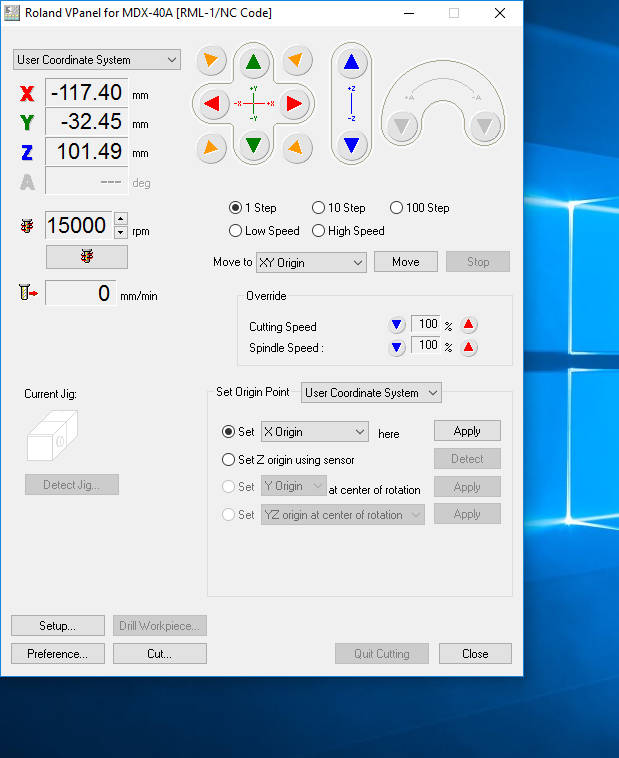
Open VPanel software.
Choose your coordinate system. Set the origin point, normally in the lower left corner of the image.
Set 15.000 rpm.
Click Add to import the .rml file.
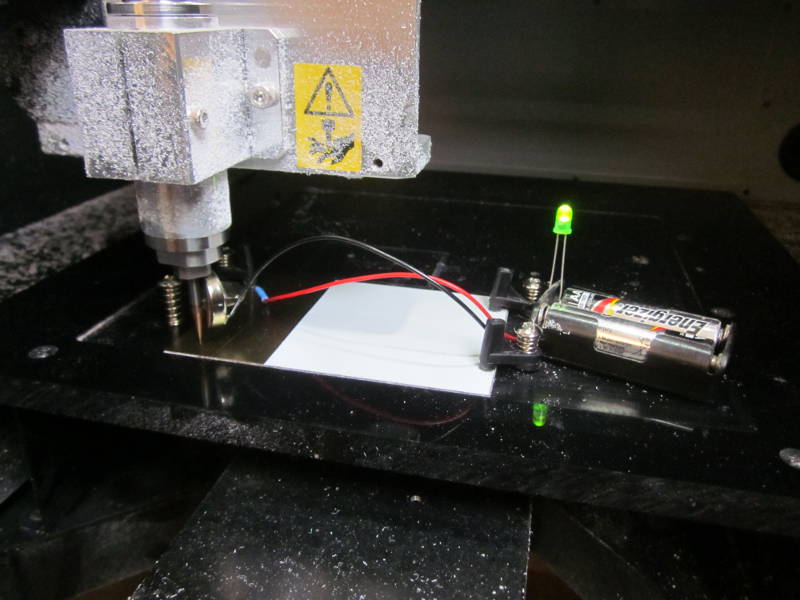
Use the led + magnet circuit to set a very precise origin point.
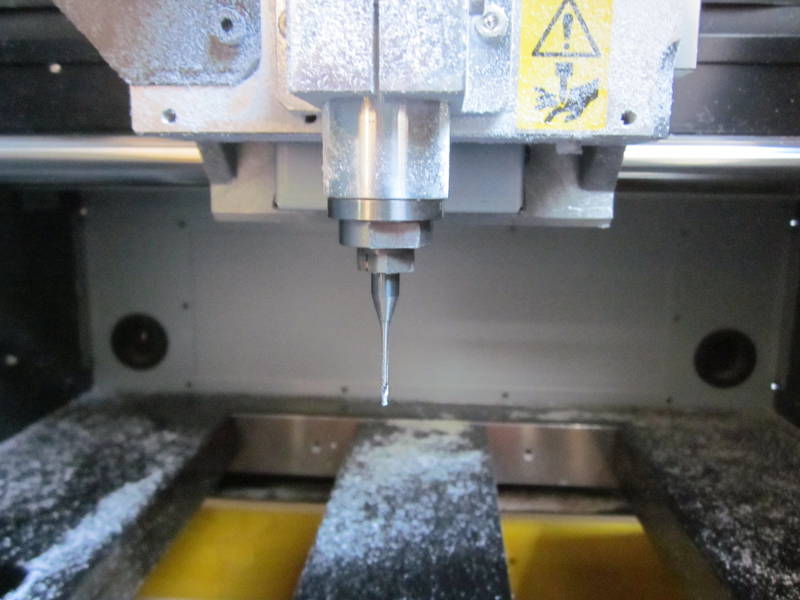
Use wrenches to fix a new 1.5 mm end mill to cut off the board.
Use a plaette knife to remove the board.
Use alcool to clean the glue from the support of the machine.
Then clean the traces with compressed air and after with glasspaper.
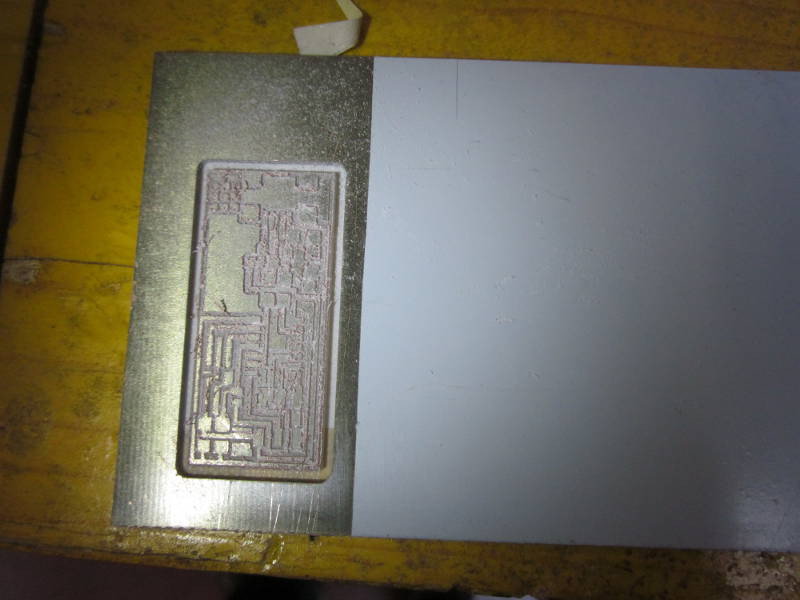
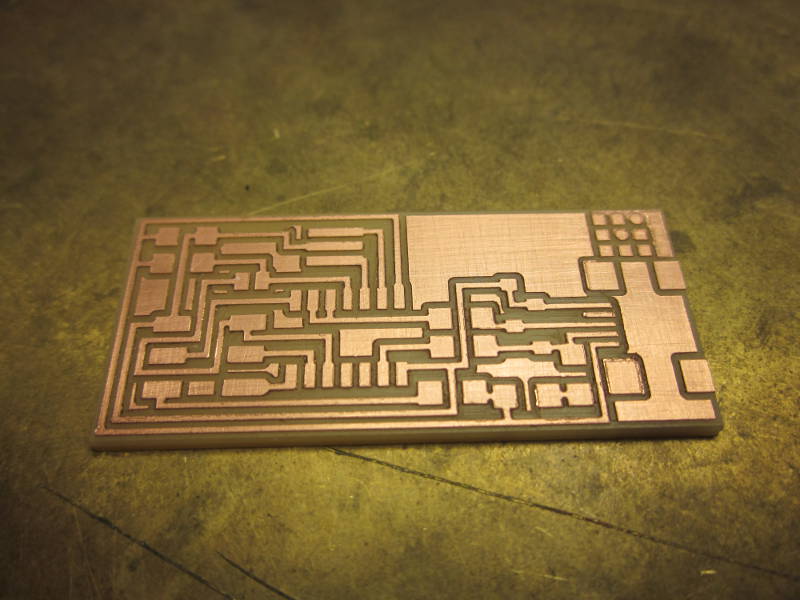
Here my first milled board, not very good job!
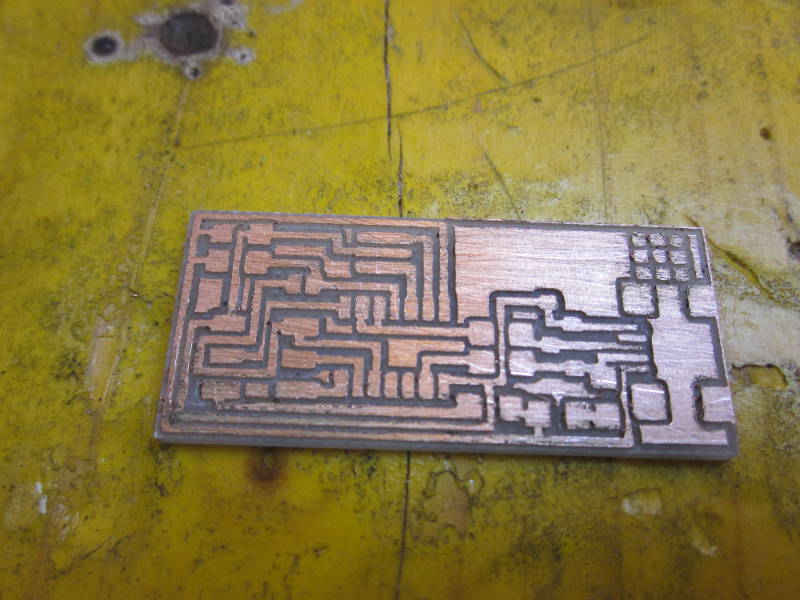
Milling again the PCB
I milled again the board. This time I set the rpm of the mill to the maximum of 15.000 and I put a new endmill.
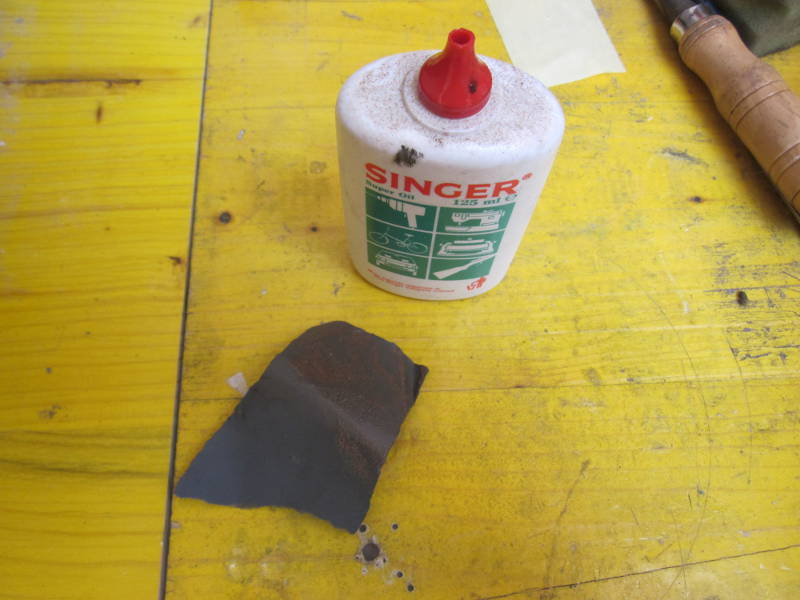
At hte end of the milling I cleaned the traces with oil and very precise sandpaper.
The final result was quite good in my opinion!
Soldering the compontents
Collect what you need.
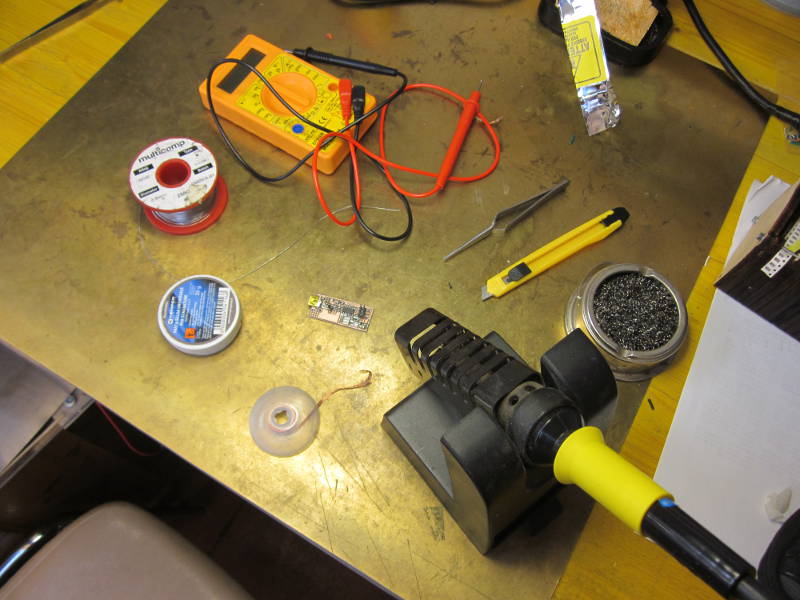
Lets solder...!
First soldered board (failed):
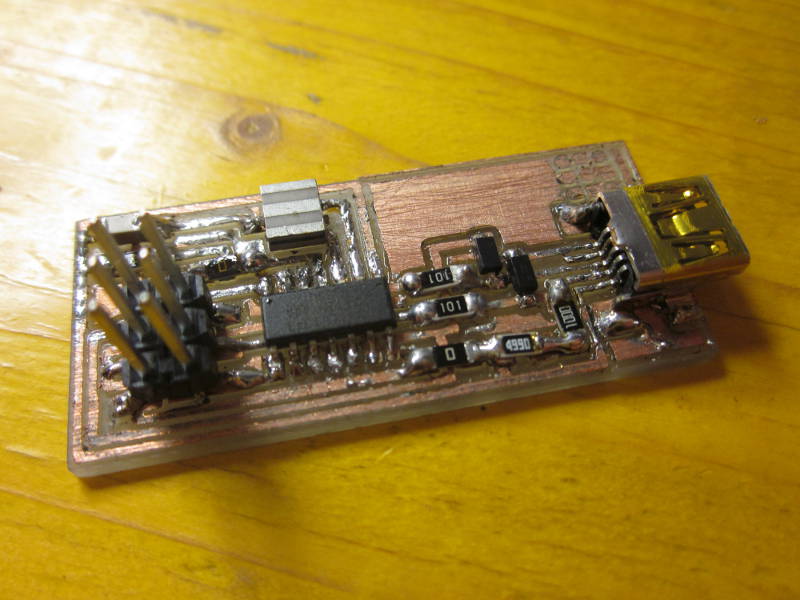
First time soldering. Everything is in position but still I can emprove this task.
I have checked the connections with a multimeter and unfortunately some traces are connected to each other. I managed to fix some but not everyone. However, I learned a lot and it was worth the time.
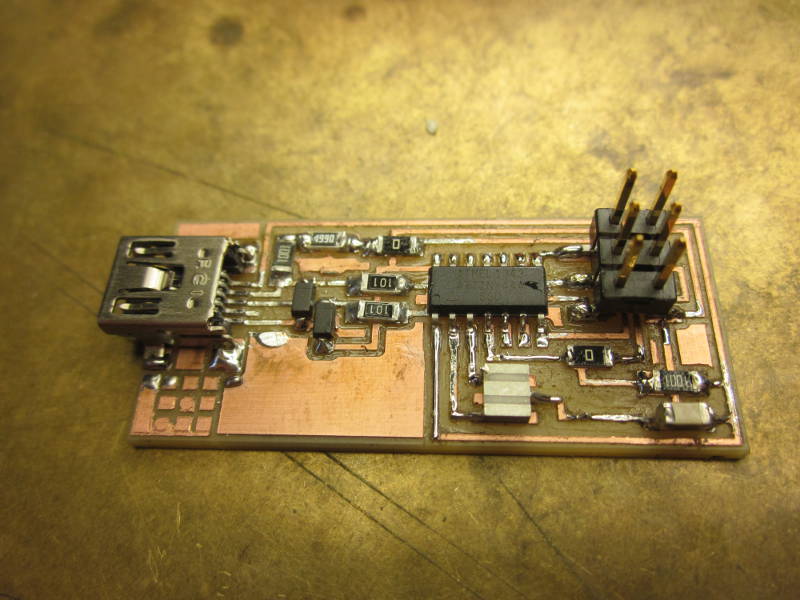
Second soldered board (better!):
Second soldered board destroied by mistake:
I was cleaning some traces when I cutted off several traces by mistake few weeks ago and it was not possible to fix them anymore. Therefore I milled again the FabISP board and I removed useful components from the old board.
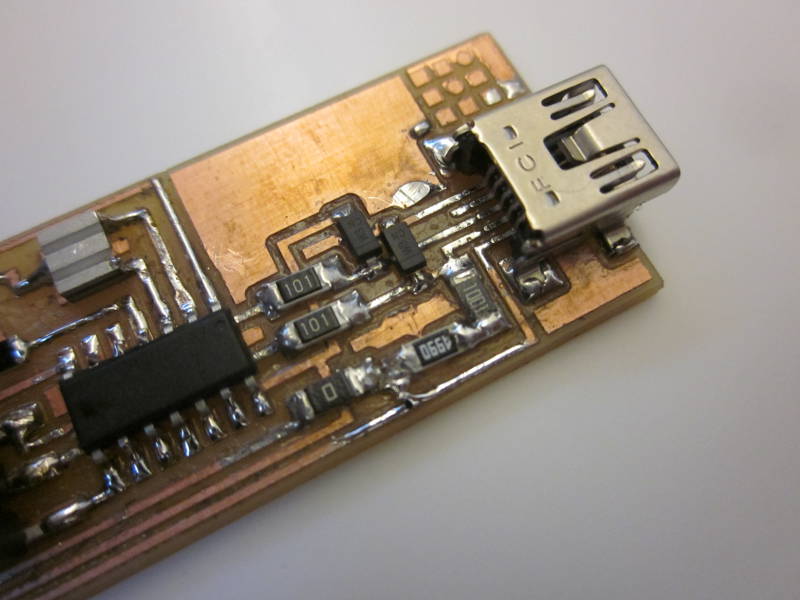
Third soldered FabISP (it works!):
I milled and soldered the board again, this time the result was quite good.
Programmming the FabISP (first try)
Without a well-functioning board I could only simulate the last programming step. But at least -I thought- I will be ready when I get a proper soldered FabISP.
I followed the instructions in the tutorial FabISP: Programming, that can be resumed:
- Install the necessary software for AVR programming (done)
- Edit the Makefile (done)
- Set the fuses and program the board (partially done)
- Verify that the board is working properly (FabISP not properly soldered)
- Open up the jumpers to make it a programmer (FabISP not properly soldered)
1. Install the software for AVR programming
I successfully download and installed Crosspack AVR and XCode.
I downloaded the FabISP firmware and I unzipped it on my desktop.
2. Edit the make file
I suppose that I will use an Arduino to program my FabISP, so in the Makefile I leave the # at the beginning of the line:
#AVRDUDE = avrdude -c usbtiny -p $(DEVICE) #
And I write avrisp instead of avrisp2 in the next line:
AVRDUDE = avrdude -c avrisp -P usb -p $(DEVICE)
3. Program the FabISP
I navigated with the Terminal to the directory where I put the firmware:
cd Desktop/firmware
Then I compiled the firmware. I typed:
make clean
and I got this successful answer:
MacBook-Pro-di-PC-5:firmware pablocolturi$ make clean
rm -f main.hex main.lst main.obj main.cof main.list main.map main.eep.hex main.elf *.o usbdrv/*.o main.s usbdrv/oddebug.s usbdrv/usbdrv.s
I typed:
make hex
and I got this answer:
MacBook-Pro-di-PC-5:firmware pablocolturi$ make hex
avr-gcc -Wall -Os -DF_CPU=20000000	 -Iusbdrv -I. -DDEBUG_LEVEL=0 -mmcu=attiny44 -c usbdrv/usbdrv.c -o usbdrv/usbdrv.o
avr-gcc -Wall -Os -DF_CPU=20000000	 -Iusbdrv -I. -DDEBUG_LEVEL=0 -mmcu=attiny44 -x assembler-with-cpp -c usbdrv/usbdrvasm.S -o usbdrv/usbdrvasm.o
avr-gcc -Wall -Os -DF_CPU=20000000	 -Iusbdrv -I. -DDEBUG_LEVEL=0 -mmcu=attiny44 -c usbdrv/oddebug.c -o usbdrv/oddebug.o
avr-gcc -Wall -Os -DF_CPU=20000000	 -Iusbdrv -I. -DDEBUG_LEVEL=0 -mmcu=attiny44 -c main.c -o main.o
main.c:88:13: warning: always_inline function might not be inlinable [-Wattributes]
 static void delay ( void )
             ^~~~~
avr-gcc -Wall -Os -DF_CPU=20000000	 -Iusbdrv -I. -DDEBUG_LEVEL=0 -mmcu=attiny44 -o main.elf usbdrv/usbdrv.o usbdrv/usbdrvasm.o usbdrv/oddebug.o main.o
rm -f main.hex main.eep.hex
avr-objcopy -j .text -j .data -O ihex main.elf main.hex
avr-size main.hex
   text	   data	    bss	    dec	    hex	filename
      0	   1968	      0	   1968	    7b0	main.hex
Next I tried to set the fuses. I typed:
make fuse
and I got this answer with error:
MacBook-Pro-di-PC-5:firmware pablocolturi$ make fuse

avrdude -c avrisp2 -P usb -p attiny44  -U hfuse:w:0xDF:m -U lfuse:w:0xFF:m

avrdude done.  Thank you.

make: *** [fuse] Error 1
Finally I tried to program the board, I typed:
make program
And the response with error:
MacBook-Pro-di-PC-5:firmware pablocolturi$ make program

avrdude -c avrisp2 -P usb -p attiny44  -U flash:w:main.hex:i

avrdude done.  Thank you.

make: *** [flash] Error 1
4. Verify that the board is working properly
5. Open up the jumpers to make it a programmer
Unfortunately I couldn't complete the programming of my FabISP because it was not properly soldered and some traces were connected where they shouldn't!
Programmming my second FabISP (second try)
This time the board was well milled and better solederd than the first one.
I followed the tutorial in the Fab Academy archive.
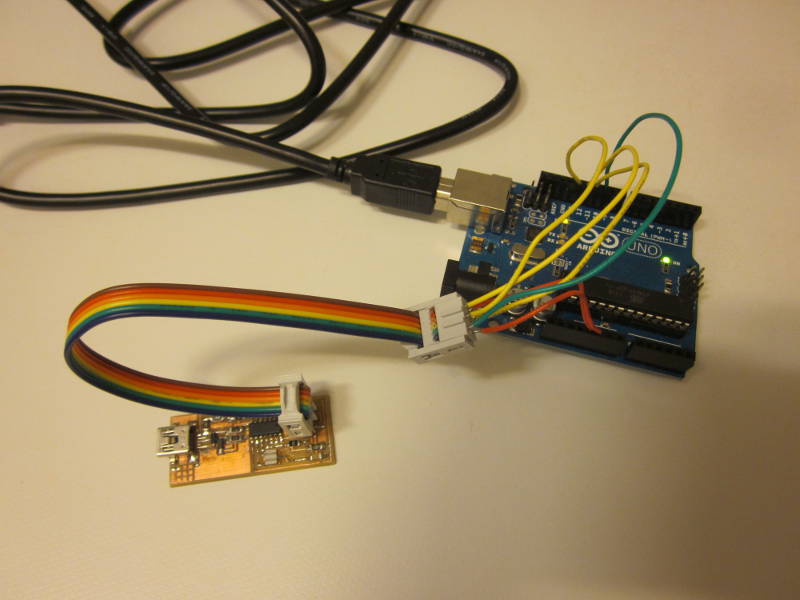
I programmed the board with Arduino, so I modified in the make file the following line:
AVRDUDE = avrdude -c stk500v1 -b19200 -P /dev/tty.usbmodem1d11 -p $(DEVICE) # edit this line for your programmer
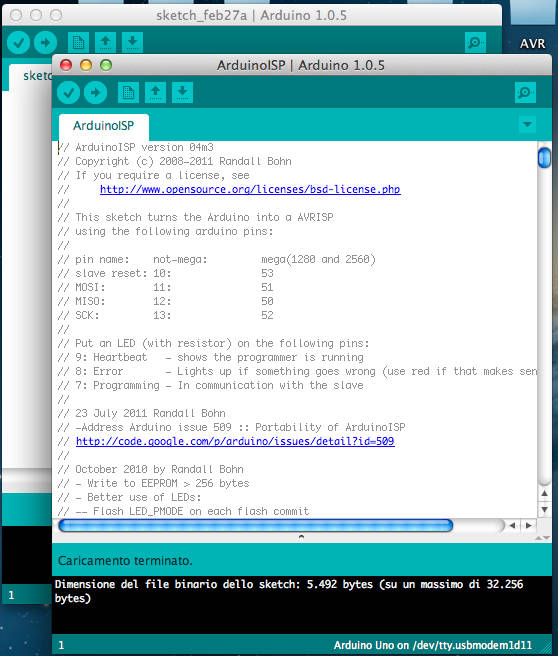
Then I uploaded the ArduinoISP example in my ArduinoUNO.
Still I get error doing make fuse.
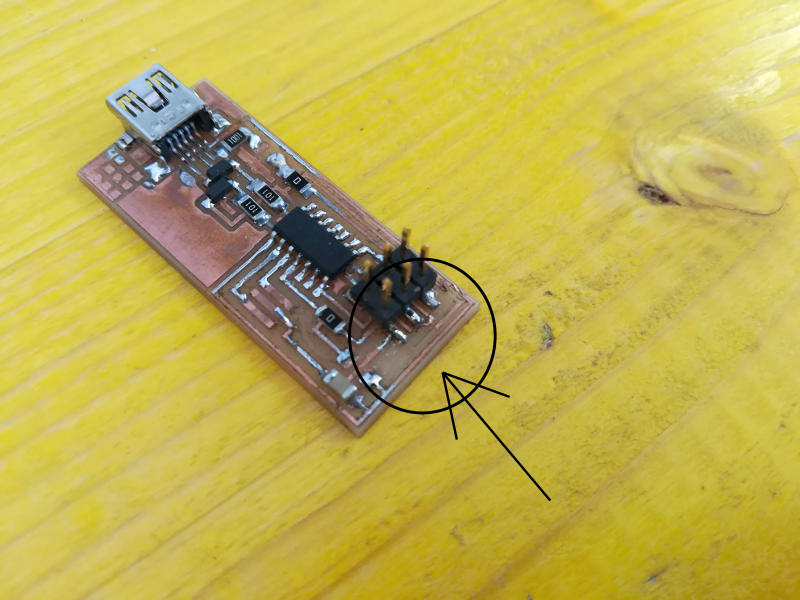
So I checked all the traces and I found that one trace was missing. I rebuild that trace with soldering.
Then I tried to program again the board and this time I get a good result.
MacBook-Pro-di-PC-5:firmware pablocolturi$ make clean

rm -f main.hex main.lst main.obj main.cof main.list main.map main.eep.hex main.elf *.o usbdrv/*.o main.s usbdrv/oddebug.s usbdrv/usbdrv.s
MacBook-Pro-di-PC-5:firmware pablocolturi$ make hex

avr-gcc -Wall -Os -DF_CPU=20000000	 -Iusbdrv -I. -DDEBUG_LEVEL=0 -mmcu=attiny44 -c usbdrv/usbdrv.c -o usbdrv/usbdrv.o
avr-gcc -Wall -Os -DF_CPU=20000000	 -Iusbdrv -I. -DDEBUG_LEVEL=0 -mmcu=attiny44 -x assembler-with-cpp -c usbdrv/usbdrvasm.S -o usbdrv/usbdrvasm.o
avr-gcc -Wall -Os -DF_CPU=20000000	 -Iusbdrv -I. -DDEBUG_LEVEL=0 -mmcu=attiny44 -c usbdrv/oddebug.c -o usbdrv/oddebug.o
avr-gcc -Wall -Os -DF_CPU=20000000	 -Iusbdrv -I. -DDEBUG_LEVEL=0 -mmcu=attiny44 -c main.c -o main.o
main.c:88:13: warning: always_inline function might not be inlinable [-Wattributes]
 static void delay ( void )
             ^~~~~
avr-gcc -Wall -Os -DF_CPU=20000000	 -Iusbdrv -I. -DDEBUG_LEVEL=0 -mmcu=attiny44 -o main.elf usbdrv/usbdrv.o usbdrv/usbdrvasm.o usbdrv/oddebug.o main.o
rm -f main.hex main.eep.hex
avr-objcopy -j .text -j .data -O ihex main.elf main.hex
avr-size main.hex
   text	   data	    bss	    dec	    hex	filename
      0	   1968	      0	   1968	    7b0	main.hex
MacBook-Pro-di-PC-5:firmware pablocolturi$ make fuse

avrdude -c stk500v1 -b19200 -P /dev/tty.usbmodem1d11 -p attiny44  -U hfuse:w:0xDF:m -U lfuse:w:0xFF:m

avrdude: AVR device initialized and ready to accept instructions

Reading | ################################################## | 100% 0.05s

avrdude: Device signature = 0x1e9207 (probably t44)
avrdude: reading input file "0xDF"
avrdude: writing hfuse (1 bytes):

Writing | ################################################## | 100% 0.02s

avrdude: 1 bytes of hfuse written
avrdude: verifying hfuse memory against 0xDF:
avrdude: load data hfuse data from input file 0xDF:
avrdude: input file 0xDF contains 1 bytes
avrdude: reading on-chip hfuse data:

Reading | ################################################## | 100% 0.02s

avrdude: verifying ...
avrdude: 1 bytes of hfuse verified
avrdude: reading input file "0xFF"
avrdude: writing lfuse (1 bytes):

Writing | ################################################## | 100% 0.06s

avrdude: 1 bytes of lfuse written
avrdude: verifying lfuse memory against 0xFF:
avrdude: load data lfuse data from input file 0xFF:
avrdude: input file 0xFF contains 1 bytes
avrdude: reading on-chip lfuse data:

Reading | ################################################## | 100% 0.02s

avrdude: verifying ...
avrdude: 1 bytes of lfuse verified

avrdude: safemode: Fuses OK (E:FF, H:DF, L:FF)

avrdude done.  Thank you.
MacBook-Pro-di-PC-5:firmware pablocolturi$ make program

avrdude -c stk500v1 -b19200 -P /dev/tty.usbmodem1d11 -p attiny44  -U flash:w:main.hex:i
avrdude: stk500_recv(): programmer is not responding
avrdude: stk500_getsync() attempt 1 of 10: not in sync: resp=0x00

avrdude: AVR device initialized and ready to accept instructions

Reading | ################################################## | 100% 0.05s

avrdude: Device signature = 0x1e9207 (probably t44)
avrdude: NOTE: "flash" memory has been specified, an erase cycle will be performed
         To disable this feature, specify the -D option.
avrdude: erasing chip
avrdude: reading input file "main.hex"
avrdude: writing flash (1968 bytes):

Writing | ################################################## | 100% 3.31s

avrdude: 1968 bytes of flash written
avrdude: verifying flash memory against main.hex:
avrdude: load data flash data from input file main.hex:
avrdude: input file main.hex contains 1968 bytes
avrdude: reading on-chip flash data:

Reading | ################################################## | 100% 2.03s

avrdude: verifying ...
avrdude: 1968 bytes of flash verified

avrdude: safemode: Fuses OK (E:FF, H:DF, L:FF)

avrdude done.  Thank you.

avrdude -c stk500v1 -b19200 -P /dev/tty.usbmodem1d11 -p attiny44  -U hfuse:w:0xDF:m -U lfuse:w:0xFF:m
avrdude: stk500_getsync() attempt 1 of 10: not in sync: resp=0x10

avrdude: AVR device initialized and ready to accept instructions

Reading | ################################################## | 100% 0.05s

avrdude: Device signature = 0x1e9207 (probably t44)
avrdude: reading input file "0xDF"
avrdude: writing hfuse (1 bytes):

Writing | ################################################## | 100% 0.02s

avrdude: 1 bytes of hfuse written
avrdude: verifying hfuse memory against 0xDF:
avrdude: load data hfuse data from input file 0xDF:
avrdude: input file 0xDF contains 1 bytes
avrdude: reading on-chip hfuse data:

Reading | ################################################## | 100% 0.02s

avrdude: verifying ...
avrdude: 1 bytes of hfuse verified
avrdude: reading input file "0xFF"
avrdude: writing lfuse (1 bytes):

Writing | ################################################## | 100% 0.02s

avrdude: 1 bytes of lfuse written
avrdude: verifying lfuse memory against 0xFF:
avrdude: load data lfuse data from input file 0xFF:
avrdude: input file 0xFF contains 1 bytes
avrdude: reading on-chip lfuse data:

Reading | ################################################## | 100% 0.02s

avrdude: verifying ...
avrdude: 1 bytes of lfuse verified

avrdude: safemode: Fuses OK (E:FF, H:DF, L:FF)

avrdude done.  Thank you.
Programmming my third FabISP (it works!)
I followed again the steps above and finally my compuer recognised the board through USB. I tried to conntect it to another computer and it also rcognised my board.

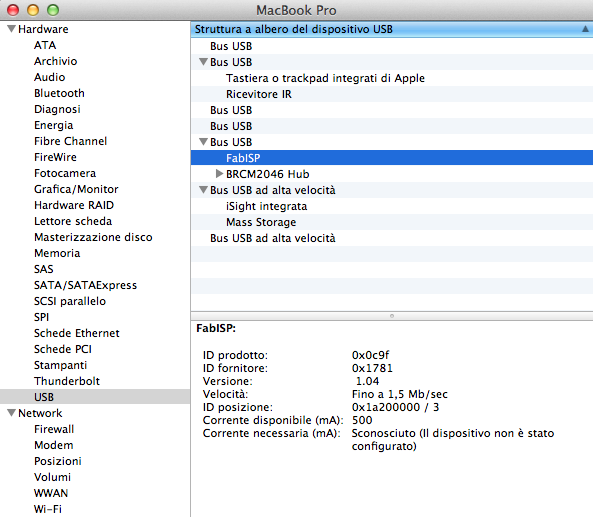
Finally to transform my board in a FabISP programmer, I removed the jumpers.