I understand Linux is a requirement in this course so, I installed Linux on my laptop as a dual boot alongside windows 8.1. To do that the first step is to create a partition by using the windows disk manager. Choose a drive which has adequate free space and use the option to shrink the volume. Allocate enough space for the Linux installation (22GB) and click shrink volume. Now you have created 22GBs free space on which you can install Linux.
Create a bootable flash drive by downloading the ubuntu 16 iso file from the website and mounting it on a flash drive. Restart the computer and boot from the flash drive. Follow the install procedure and install ubuntu on the partitioned space. Set your time and system password. Ubuntu is now installed, every time you boot, an option will be presented to you to select which OS to boot into.
Git is a distributed revision control system used to manage work flows between multiple people working on the same file. Every Git directory on every computer is a full-fledged repository with complete history and full version tracking abilities, independent of network access or a central server
Git enables us to work on the same repository from different machines. Git tracks all the changes in the file and helps sync them with all the users.
  sudo
                 apt-get install git
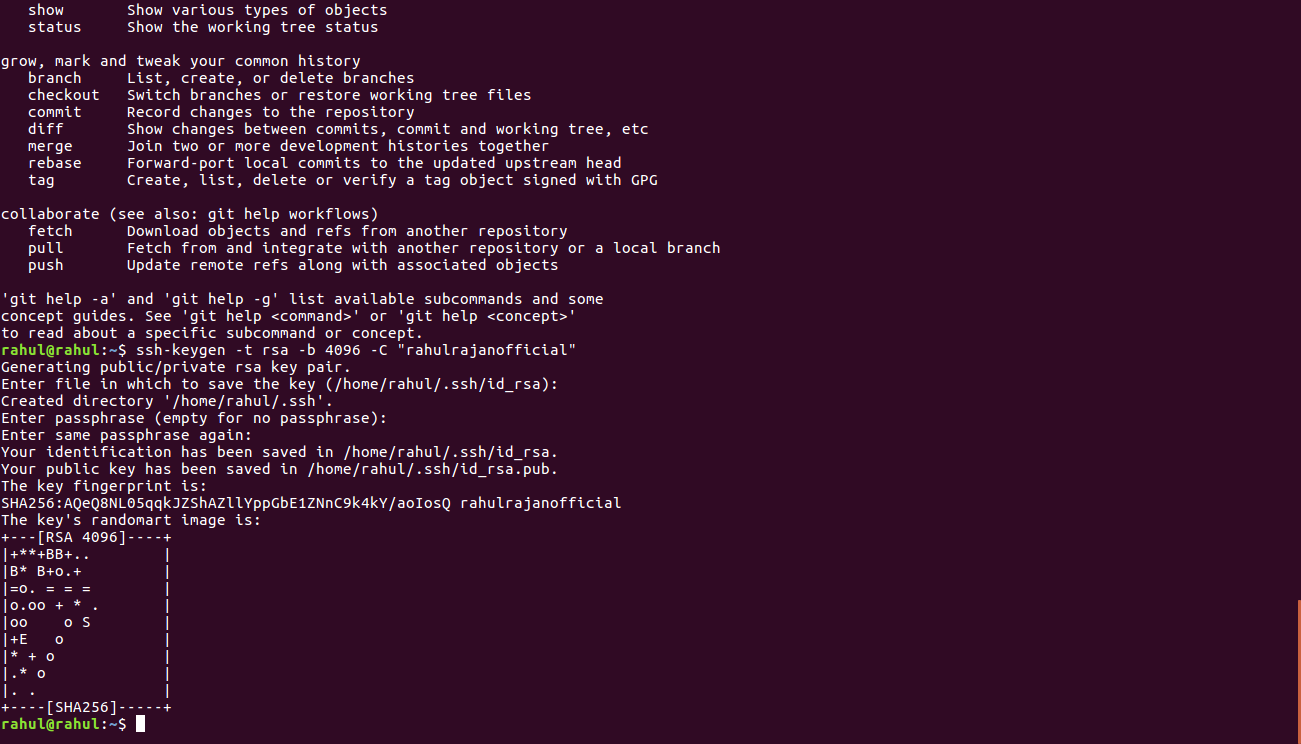
 ssh-keygen -t
                rsa -b 4096 -C "your mail id"
eval "$(ssh-agent you -s)"
ssh-add ~/.ssh/id_rsa # Add key to the agent
git config --global user.name "your username"
git config --global user.email your mail id
sudo gedit ~/.ssh/id_rsa.pub
git clone
                git@git.fabacademy.org:fabacademy2017/fablabtrivandrum.git
Git uses two commands to sync files between your local repo and the server these are the 'Pull' and ' push' commands.

I'm new to HTML design hence I watched many HTML tutorials online to learn the fundamentals. I followed video tutorials to set up my first web-page, written in basic HTML.
	<!DOCTYPE html>

	<html lang=en>

	<head>

		<meta attributes />

	<title>

		HTML Document Structure

	</title>

	</head>

	<body>

		<h1>

			HTML Document

		</h1>

		<p>

			This is a simple HTML Document

		</P>

	</body>

	</html>
Then I got to know more about CSS (Cascading Style Sheet) and tried it write it on my own. It was time consuming.
Then I got to know about bootstrap from my colleagues and decided to pursue it. I searched online to find a simple theme which I could understand. I found a clean theme and started customizing it for my need. I modified the contents of each page and only kept what I need. I created master pages, which will act as the reference page and each week, I would update the contents of the page.
This is time consuming in the beginning as you have to edit the style sheet and HTML of the pages of the template you are going to use, but once it is set, I believe the procedure will be greatly simplified.
A Followme Tool box.
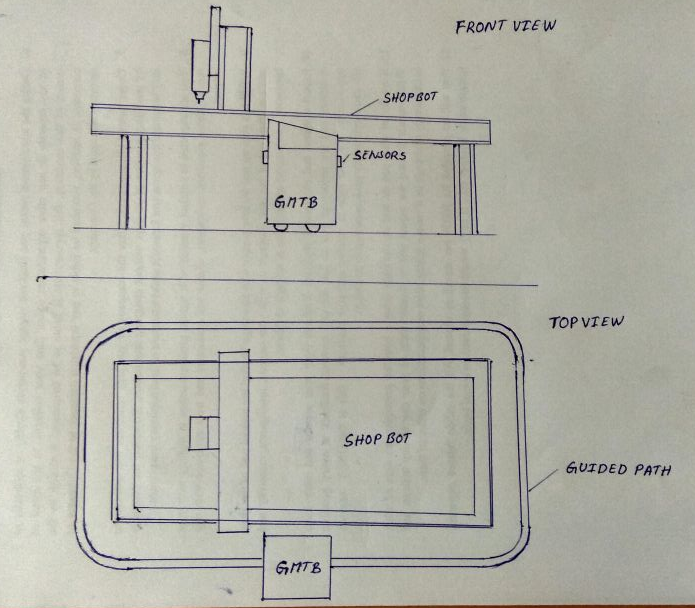
In the Fablab some of the operations are done using heavy duty machines (Shopbot). They are quite large and require some amount of manual labour in setting up for the operation. During the setting up of the machine, some hand tools are required to be used by the operator. For example-in setting up Shopbot-the operator has to fix the plywood sheet to the bed. During this process, he has to use some hand tools like Drills to make the hole and screw it in place. This will require some round trips to the tool box to get all the items like screws, drills, and clamps etc.
My Project Idea is to make the tool box come to the operator. I'm planning on building a Guided Mobile Tool Box. My origin idea was to make something that could follow the operator throughout the lab but, I have since simplified the project-as consideration for lack of time- to follow a predefined path around a specific machine (shopbot).
I was inspired the movie WALL-E, where the robots move in predefined paths and did specific functions. My plan is to make a robot that can carry the tool box and other utilities and follow the user on a fixed path around the machine. Thereby the tool box will be near the operator at all time and we can greatly reduce the complexity of the system.
I plan to use a combination of Ultrasonic sensors and Infrared sensors to sense the position of the operator and a simple line follower program to follow the predefined path. The operator will carry with him an ultrasonic beacon, and the robot will sense the relative position of the beacon and determine which direction to move and move close to it, stopping nearby the user. It would be a Guided Mobile Tool Box (GMTB). The path will be a thick line on the shop floor and the path can be customized to the individual size and contours of the machine.
rahulsrajan.com
rahulsrajan01@gmail.com
Trivandrum, Kerala ,
India.

Technopark, Kerala, India