GROUP ASSIGNMENT
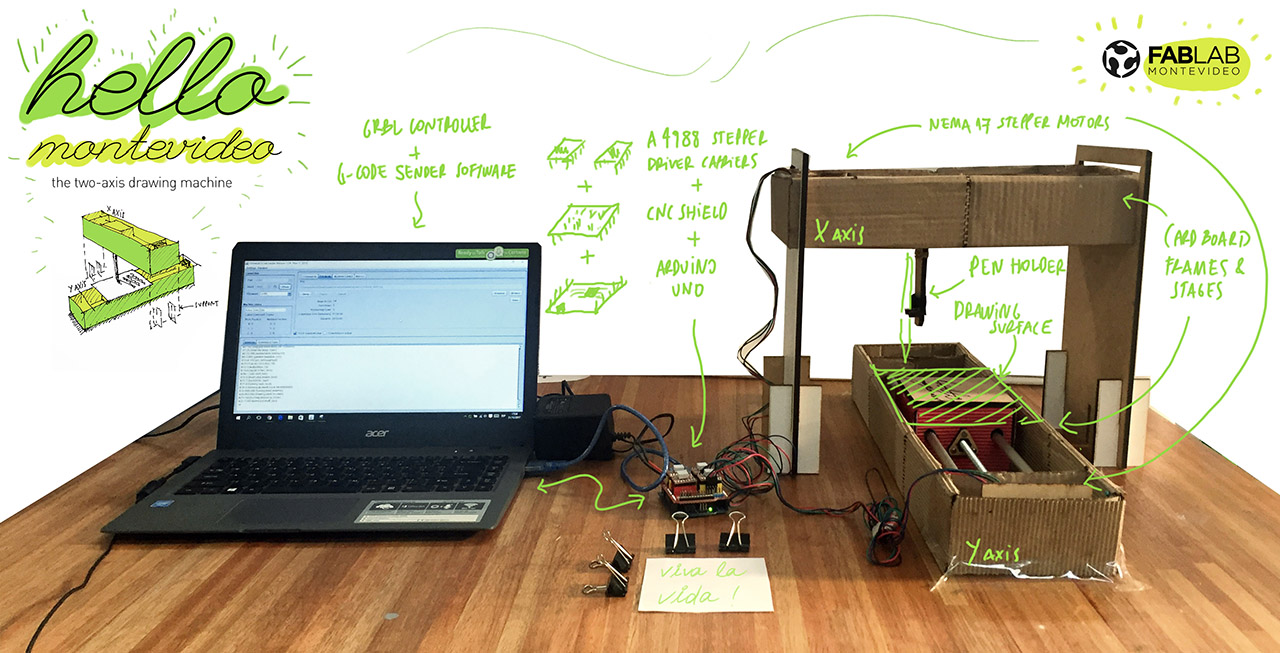
2 AXIS DRAWING MACHINE
Hi visitor. Find below the group machine assignment done in Montevideo's fablab by Santi aka: "el jipi" and Mercedes aka: McKenzie. We took Nadya and Jame'sproject as a starting point and adjusted it according to our local needs.
What's needed
Components
Materials
Ideation
The main concept of our machine takes as model Nadya and Jame's axis mechine development and create a bi axed machine (2 axis),with one of them lying the floor/table and the other one suspended perpendiculary on top of the former one. Meaning: the bottom axis (y) will hold the drawing surface and the suspended axis (X) will hold the pen/pencil.
We first edited and laser-cut carboard pieces, printed coupling pieces and reduced the threaded rod size to get a first (temporary) assmbly and be able to do tests.
X Axis
The most challenging part of the flying axis (X) since it needed a steady support to be flying and holding steadily the pen. This was succesfully achieved with a lasered cutted piece. Since this axis was shorter than the Y one the 3D-printed piece for the stepper coupling was precise enough.
Y Axis
The Y axis seemed pretty straight forward but we encountered two adjustments to be made. The first one is the coupling piece, we tryed with a 3D printed one (like in the X axis) but it did not work properly, probably because this axis is way longer than the X one and needs more stability. What we did was using a rubber rod that fixed that issue. The sencond adjustement we did was to the "Canvas box". We doubled the cardbouard dose there and used 2 nuts (one for each side of the box to get a better grip and a more firm movement.
Components and software
Lacking the Gestalt nodes we worked with a CNC Shield v3.0, an Arduino Uno, two Wantai Mini Stepper Motors 42BYGHW811 and Pololu motor driver carrer).
We programmed stepper movements with arduino IDEtanking into consideration the stepper datasheet.
A transformer was also needed (uruguayan Voltage is 220V) with an output of 12V. Note we used a 1A~ Transformer even if our stepper motor data sheet says 2A~. That's because we lacked a 12V 2A~ transformer. Bear in mind that this transformer needs to be switched to a 2A one if the machine will be frequently used.
Testing Axis
Putting both axes alltogether was the next step, not before testing at least one Axis. Below the X axis test which worked fine. Besides from the Axis itself we needed to have the Arduino UNO + Shield, the transformer and the computer with the universal GCode controller.
hello Montevideo test
Here's one of the several tests we did. The outcome looks good, the X axis is steadier than the Y one, probably because of the fact that the Y axis length is sensibly greater.
Find below our video presentation with a greater insight on the whole process.Hope you liked it and can use it as a guide. Do not hesitate to contact us, we'll be happy to help.