MECHANICAL AND MACHINE DESIGN
ASSIGNMENT
Design a machine (mechanism+automation), including the end effector
Automate your machine and document the group project and your individual contribution.
MY CONTRIBUTION
I did the programming of the 2 axis-bed, the bed interfacing with gestald nodes, prepared 3D printing files for the makerbot and wrote most part of the group documentation. I also designed the final group slide.
Konstantin and I were in charge of the design of the two axis bed of the machine. We sat down together and drew a sketch of the bed in Rhino, checking, troubleshooting and sharing ideas. Later Konstantin designed the final bed in Fusion 360 and I concentrated on the programming of the bed.
Our three other colleagues, concentrated on the second system of the machine, which was the solar tracker and upper frame for the lense.
MTM SOLAR DRAWING MACHINE

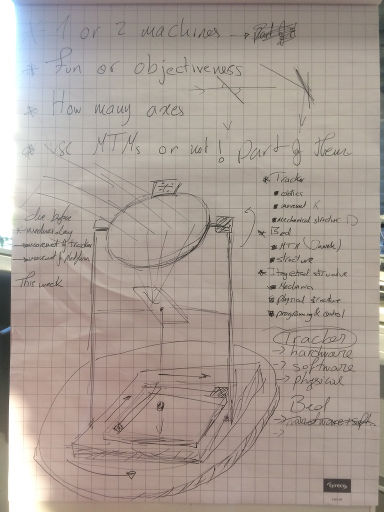
IDEA PLANNING
As a group project, we decided to make a solar tracker system, which uses the sunlight on one beam to draw 2D objects on a 2-axis bed.
Two main methods of using the sun's power are considered:
(1) - The use of a parabola collector with mirrors to redirect the beam to a focus point.
(2) - Fresnel lenses.
Both methods offer advantages and disadvantages.
Parabolic reflector's geometry offers a focus point of light. Before hitting the dish, sunlight beams are parallel to each other and upon hitting the surface of the dish, beams reflect to the focus of the parabola.
Fresnel lenses have large aperture and short focal length, they are lighter and thinner than conventional lenses, they come in a variety of forms, including flat sheets.
Fresnel lenses do not change the direction of propagation of light within a medium and are built using concentric annular sections on a curved profile. When extruded, the profile takes the shape of a conventional lens, but with better focusing properties.
Some fresnel lenses use flat survaces and are build with an array of prisms arranged in circular paths.
Fresnel lenses are used for light collection, magnification or collimation.
There are two types of fresnel lens: non-imaging which use flat cross-section segments and imaging which have segments with curved cross-sections. Imaging lenses produce sharp images, whereas, non-imaging do not.
SKETCH OF THE 2-AXIS BED IN RHYNO
Konstantin and I were in charge of the 2-axis bed design and programming, we sat together to draw a sketch on Rhyno, sharing ideas and troubleshooting possible issues. My colleague is a very skillfull designer, it took very little time to design the sketch and it was a pleasant experience to share ideas and see them quickly translated to a 3D concept.
The base consists of a two-axis system. We decided to use a modified version of the MTM machines.
First, the motor parts are measured carefully and drafted on paper:
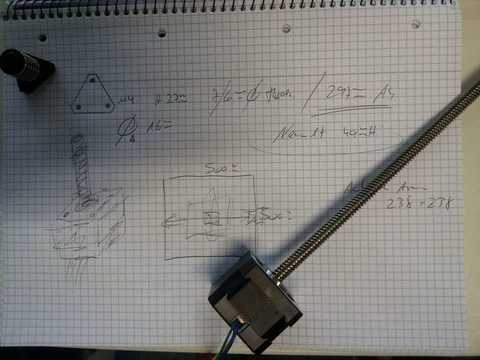
Next, Rhinoceros is used to roughly draw a draft of the design of the bed.
Outer dimensions of the bed are calculated considering the moving bed and length of the thread.
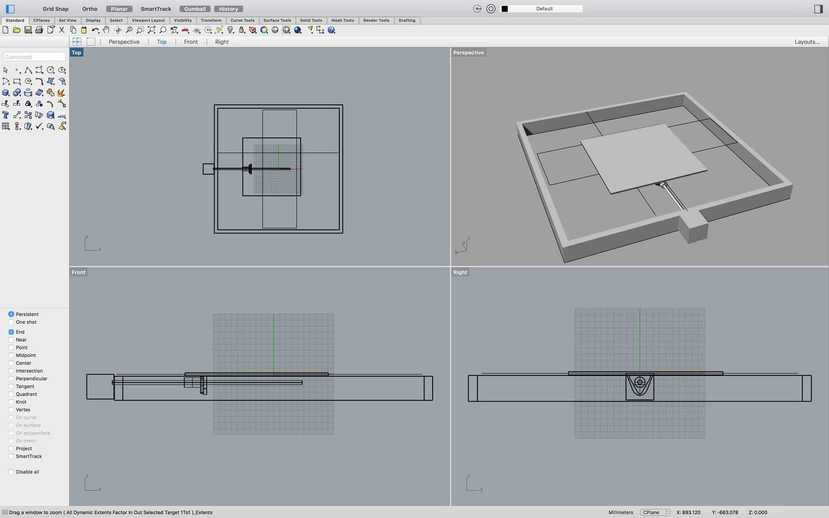
A second axis is added, to allow for the xy-movement of the bed.
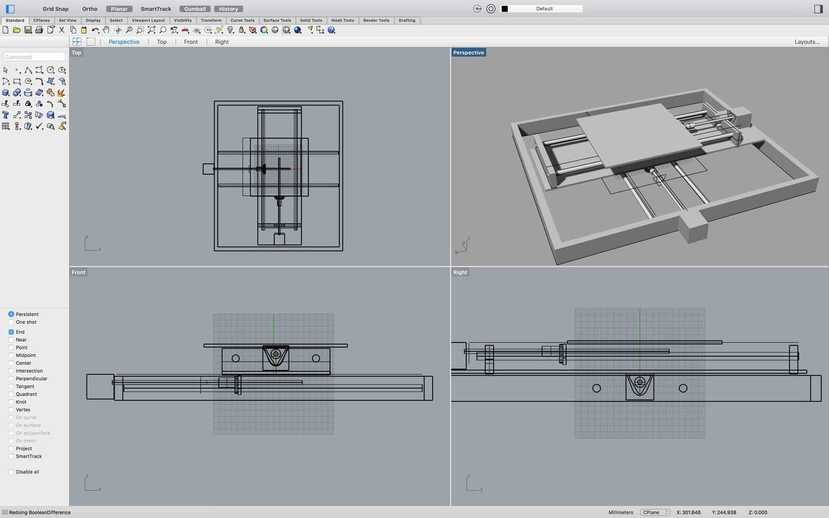
The final rough sketch looked as follows:

SETTING UP THE MACHINE
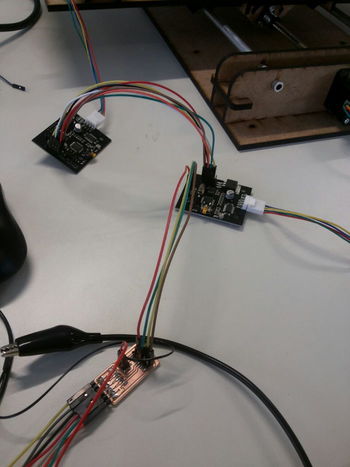
Gestalt nodes are hooked up following this guide.
As the bed is a two-axis machine, the connections are straightforward:
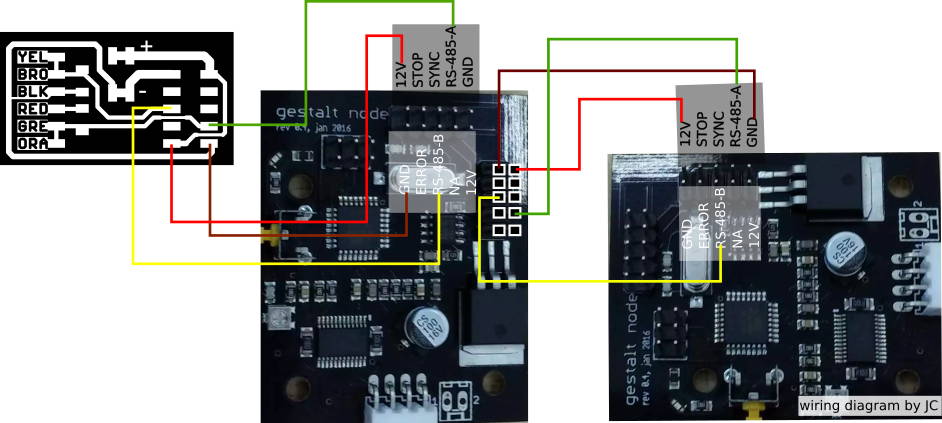
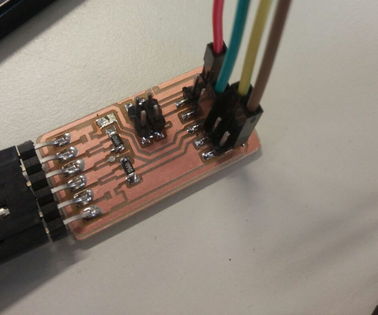
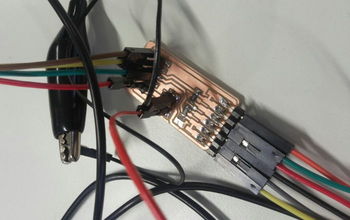
First the bridge board is wired with multi-coloured wires for easy identification.
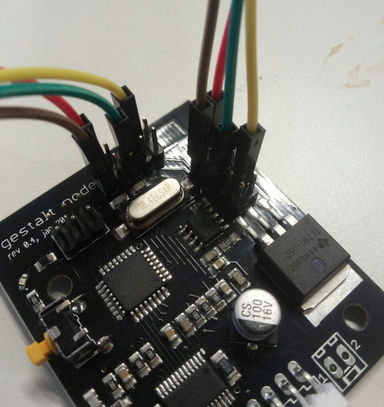
The bridge-board is connected to the first gestalt-node.

Another node is added for the other axis of the machine:
Next, using alligator clamps, power supply is connected to the bridge-board.

Final set-up:
PROGRAMMING OF BED
Gestald modules and python is used to program the bed.
CONTROLLING THE BED X-Y AXIS WITH THE MOUSE
First, mouse location must be identified and preferably, saved in coordinate values.
One way to accomplish this, is to use the pynput library.
Install the pynput library by downloading the zip in the Repository, extracting and installing in the shell:
python setup.py install
Otherwise, download the project's egg file and run:
python -m easy_install ./pynput-1.3-py3.5.egg
Make sure to install the following dependency:
sudo apt-get install python-xlib
This library allows to monitor and control user input devices.
Pynput can listen to the mouse, this code will provide with information on mouse movement:
from pynput.mouse import Listener

def on_move(x, y):
    print('Pointer moved to {0}'.format(
        (x, y)))
After experimenting with pynput, TkInter was easier to implement.
Tkinter has a window related information command called winfo. (See Documentation.)
winfo_pointerx() and winfo_pointery() return the pointer's x and y coordinates measured in pixels in the screen's root window. Position here, can also be measured in a virtual root window.
Simple test is run to test the functionality:
import Tkinter as tk
root = tk.Tk()
x_coordinate = root.winfo_pointerx()
y_coordinate = root.winfo_pointery()
abs_coord_x = root.winfo_pointerx() - root.winfo_rootx()
abs_coord_y = root.winfo_pointery() - root.winfo_rooty()
print(x_coordinate, y_coordinate)
Code above gets the x and y coordinates and prints them.
In order to save cursor coordinates, only when the mouse is moved - the code was slightly modified:
import Tkinter as tk
root = tk.Tk()
counter = 1
move = True
fh = file('/dev/input/mice')
while move == True:
    fh.read(3)
    x_coordinate = root.winfo_pointerx()
    y_coordinate = root.winfo_pointery()
    print(x_coordinate, y_coordinate)
Similarly, Tkinter can be used to create a virtual window to monitor mouse movement. Code below, prints the coordinates of the cursor:
import Tkinter as tk
root = tk.Tk()
counter = 1
move = True
fh = file('/dev/input/mice')
while move == True:
    fh.read(3)
    x_coordinate = root.winfo_pointerx()
    y_coordinate = root.winfo_pointery()
    print(x_coordinate, y_coordinate)
Having these two methods in mind; a new program is tested.
import Tkinter as tk
##Set global variables
size_bed_machine = 230.0
size_window = 500.0
scale_ratio = size_window/size_bed_machine
x_old = 0
y_old = 0
threshold = 2

if __name__ == '__main__':
    print('scale:{}',format(scale_ratio))
#set window
root = tk.Tk()

#prevent resize of window
root.resizable(width=False, height=False)

#resize window to (500x500)px
root.geometry('{}x{}'.format(500, 500))

def motion(event):
    global x_old
    global y_old
    x, y = event.x, event.y
    x_machine = x/scale_ratio
    y_machine = y/scale_ratio
    print('window{}, {}'.format(x, y))
    print('machine:{}, {}'.format(x_machine, y_machine))
    if abs(x_machine - x_old) > threshold or abs(y_machine - y_old) > threshold:
        print('go')
        x_old = x_machine
        y_old = y_machine

root.bind('', motion)
root.mainloop() #always end your script by calling the mainloop method of the root window.
Code above, first sets global variables; including, the re-scaling from pixels to the size of the bed (in our case 230mm squared).
Main function is where a floating window is defined using tk.Tk() call. Window is resized to 500x500 pixels, this area represents the actual bed of the machine.
Function motion, sets the moving coordinates of the machine using variables x_old and y_old, which will save the coordinates of the cursor (re-scaled by x_machine and y_machine values to the size of the bed)
A threshold for the mouse movement is set so the machine moves when the cursor moves a pre-specified value.
Eclipse with pydev is then used to integrate the code into the machine's program.
Gestald's MTM library is used a starting point for the control of x and y axis of the machine.
Code below illustrates the implementation of the program:
#Created on APRIL 2017
#@author: JC
from gestalt import nodes
from gestalt import interfaces
from gestalt import machines
from gestalt import functions
from gestalt.machines import elements
from gestalt.machines import kinematics
from gestalt.machines import state
from gestalt.utilities import notice
from gestalt.publish import rpc    #remote procedure call dispatcher
import time
import io
import Tkinter as tk

size_bed_machine = 220.0
size_window = 500.0
scale_ratio = size_window/size_bed_machine
x_old = 0
y_old = 0
threshold = 0.1
machine_speed = 10

def motion(event):
    global x_old
    global y_old
    global threshold
    x, y = event.x, event.y
    x_machine = x/scale_ratio
    y_machine = y/scale_ratio
    print('window{}, {}'.format(x, y))
    print('machine:{}, {}'.format(x_machine, y_machine))
    if abs(x_machine - x_old) > threshold or abs(y_machine - y_old) > threshold:
        print('go')
        x_old = x_machine
        y_old = y_machine
        move = [-x_old, y_old]
        stages.move(move, 0)
        status = stages.xAxisNode.spinStatusRequest()

class virtualMachine(machines.virtualMachine):


    def initInterfaces(self):
        if self.providedInterface: self.fabnet = self.providedInterface        #providedInterface is defined in the virtualMachine class.
        else: self.fabnet = interfaces.gestaltInterface('FABNET', interfaces.serialInterface(baudRate = 115200, interfaceType = 'ftdi', portName = '/dev/ttyUSB0'))

    def initControllers(self):
        self.xAxisNode = nodes.networkedGestaltNode('X Axis', self.fabnet, filename = '086-005a.py', persistence = self.persistence)
        self.yAxisNode = nodes.networkedGestaltNode('Y Axis', self.fabnet, filename = '086-005a.py', persistence = self.persistence)

        self.xyNode = nodes.compoundNode(self.xAxisNode, self.yAxisNode)

    def initCoordinates(self):
        self.position = state.coordinate(['mm', 'mm'])

    def initKinematics(self):
        self.xAxis = elements.elementChain.forward([elements.microstep.forward(4), elements.stepper.forward(1.8), elements.leadscrew.forward(8), elements.invert.forward(True)])
        self.yAxis = elements.elementChain.forward([elements.microstep.forward(4), elements.stepper.forward(1.8), elements.leadscrew.forward(8), elements.invert.forward(False)])
        self.stageKinematics = kinematics.direct(2)    #direct drive on all axes

    def initFunctions(self):
        self.move = functions.move(virtualMachine = self, virtualNode = self.xyNode, axes = [self.xAxis, self.yAxis], kinematics = self.stageKinematics, machinePosition = self.position,planner = 'null')
        self.jog = functions.jog(self.move)    #an incremental wrapper for the move function
        pass

    def initLast(self):
        #self.machineControl.setMotorCurrents(aCurrent = 0.8, bCurrent = 0.8, cCurrent = 0.8)
        #self.xNode.setVelocityRequest(0)    #clear velocity on nodes. Eventually this will be put in the motion planner on initialization to match state.
        pass

    def publish(self):
        #self.publisher.addNodes(self.machineControl)
        pass

    def getPosition(self):
        return {'position':self.position.future()}

    def setPosition(self, position  = [None]):
        self.position.future.set(position)

    def setSpindleSpeed(self, speedFraction):
        #self.machineControl.pwmRequest(speedFraction)
        pass

#------IF RUN DIRECTLY FROM TERMINAL------
if __name__ == '__main__':
    stages = virtualMachine(persistenceFile = "examples.vmp")
    stages.xyNode.setVelocityRequest(machine_speed)

    #move machine to initialize it
    stages.move([0.1, 0.1], 0)
    status = stages.xAxisNode.spinStatusRequest()

    # This checks to see if the move is done.
    while status['stepsRemaining'] > 0:
        time.sleep(0.001)
        status = stages.xAxisNode.spinStatusRequest()

    #global scale_ratio
    #global movement
    print('scale:{}',format(scale_ratio))
    root = tk.Tk()
    root.resizable(width=False, height=False)
    root.geometry('{}x{}'.format(500, 500))
    root.bind('', motion)
    root.mainloop() #always end your script by calling the mainloop method of the root window.
Similar logic to the previous example is used; the only difference is that coordinates of the cursor (transformed into the bed-scale) are passed onto the moving function of Gestalt's code.
It is important to note that in the main function, the machine is initialized by moving it 0.1mm diagonally.
TESTING THE CODE
Code worked as expected, the 2-axis bed moved according to the position of the cursor in the pre-defined 'capture-window'. Video below shows the machine in action:
Several tests were run and the optimal speed and threshold for the machine were set at 10 and 0.1 respectively.
The responsiveness of the movements was satisfactory. However, it can improve if buffering is added.
LESSONS LEARNED
- Input devices (Mouse) control.
- Output devices (stepper motors) control.
- Python GUI programming.
LESSONS LEARNED
- Input devices (Mouse) control.
- Output devices (stepper motors) control.
- Python GUI programming.
FILES
RESOURCES
Getting started with Gestalt nodes