Interface Application
This Week's Assignment:
- write an application that interfaces with an input and/or output device made.
- comparing as many tool options as possible.
See detail here.
Files
All files and code can be downloaded here.
FIRMATA + ControlLP5
For this week Saverio showed us a library, written by Andreas Schlegel, ControlLP5. It is a processing and java library for creating simple control GUIs, that is easy to use. Since I heard that Processing was easy to learn for designers and artists and that I saw projects online such as these ones below and I decided to choose this Programing environment to do my Interface Application Programing assignment. Below is an exemple of controlP5 slider.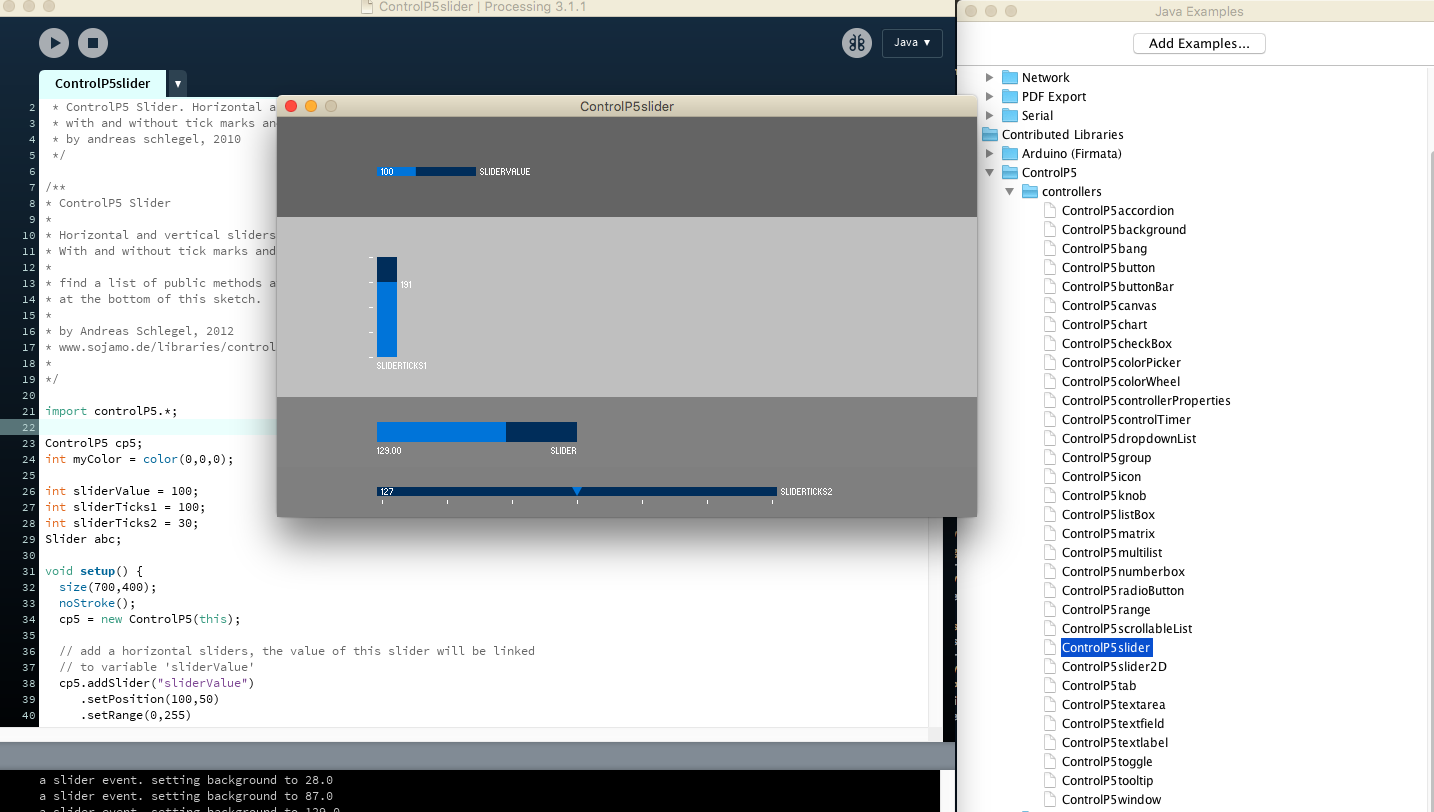
Ressources for the assignements
Installing prerequisit softwares:
- Processing software can be installed here
- Arduino Library for Processing: This library allows to control an Arduino board from Processing without writing code for the Arduino. Instead, of uploading a standard firmware (program) to the board and communicate with it using the library. The firmware is called Firmata, and is included in the Arduino software. The corresponding Processing library can be downloaded here.
- Uploading Firmata Sketch onto Arduino board in the Example Files and chose standard Firmata version example. Firmata is a protocol for communicating with microcontrollers from software on a host computer. The protocol can be implemented in firmware on any microcontroller architecture as well as software on any host computer software package. This is the Arduino FirmataStandard code exemple I have uploaded.
- controlP5 here. I have copied this elements in Processing libraries folder, in my case, on a mac, it's under >user folder > Documents > Processing > Libraies > controlP5.
I have uploaded the Firmata code and controlP5 exemple and have not been able to make it work because I have to assign the controling butons and interface to actually do something in Processing. And since I have never used it, I thought it be a good idea to start from someone else work or tutorial to better understand it.
Exemples of interesting processing projects!
Just for the sharing and research purpose:
 Generative identity software for COP15 the United Nations Climate Change Conference held in Copenhagen in 2009.
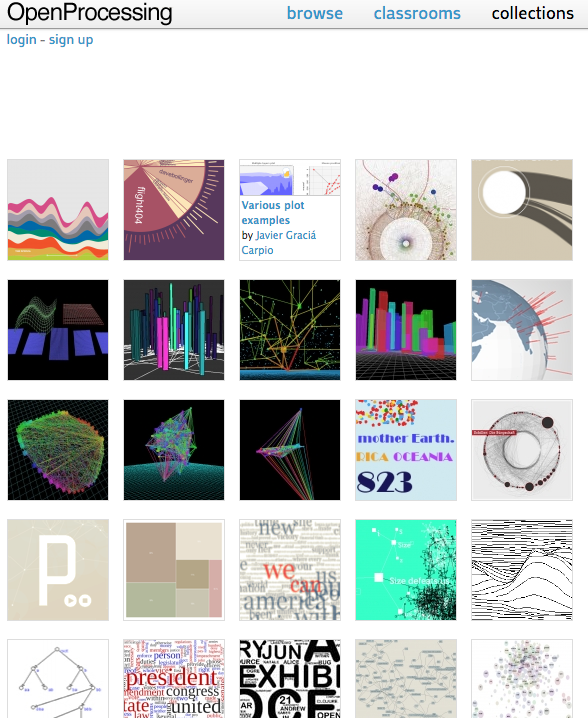 Visual representation of data : algorithms and methods using Processing Programing environment on OpenProcessing.org.
Controling a Stepper motor wired to an Arduino Uno board and Adafruit Motor Shield
Alessandro Papaleo, a 2015 fab academian student made a drawbot too and I looked at this week asignements to learn on what he did using processing and Arduino and how I may learn from his work for I too have two nema motor to control. From what I understood, the Application interface controled the two nema motors and set both distance and acceleration. What the codes does is creating a simil G-code strings to send to the Arduino, after parsing the strings, it is generating command for the controling the motors. I have uploaded his files in my repository and you may find them here: Arduino Sketch. The Arduino sketch used Adafruit library AFMotor and AccelStepper library. There are comment to explain below:
#include <AccelStepper.h>  //import AccelStepper library
#include <AFMotor.h>    // import Adafruit Motor Shield Library

//setting AccelStepper working with Adafruit Motor Sield
AF_Stepper motor1(200, 1);  // set the first motor
AF_Stepper motor2(200, 2);  // set the second motor

// setting steps for the first motor
void forwardstep1() {
  motor1.onestep(FORWARD, SINGLE);
}
void backwardstep1() {
  motor1.onestep(BACKWARD, SINGLE);
}


// and for the second motor!
void forwardstep2() {
  motor2.onestep(FORWARD, SINGLE);
}
void backwardstep2() {
  motor2.onestep(BACKWARD, SINGLE);
}

AccelStepper Stepper1(forwardstep1, backwardstep1);
AccelStepper Stepper2(forwardstep2, backwardstep2);
// end settings for Adafruit


void setup()
{
  Serial.begin(9600);        //start serial at 9600 baudrate

  // satting some basic motor parameters for the first stepper
  Stepper1.setMaxSpeed(600);
  Stepper1.setAcceleration(200);
  Stepper1.setSpeed(0);

  // satting some basic motor parameters for the second stepper
  Stepper2.setMaxSpeed(600);
  Stepper2.setAcceleration(200);
  Stepper2.setSpeed(0);


 long x = 0L;          //x home
 long y = 0L;          // y home
 void SetPosition (long x, long y);  //set home

}
void loop()
{
       // set some variables
       int TiltSpeed = 0;
       int PanSpeed = 0;
       String IncomingByte;

       int gox = 0;
       int goy = 0;


       String dummy="#";

       Stepper1.runSpeed();
       Stepper2.runSpeed();


      String readString;                    // prepare the string
      while (Serial.available()) {          //loop
         delay(10);
         if (Serial.available() >0) {       // check is there is a serial connection
           char c = Serial.read();          //gets one byte from serial buffer
           readString += c;                 //makes the string readString
           Serial.println(readString);      //print on screen
         }
       }

      //readString = "#A1750B1750X1011Y1461";

      IncomingByte = readString.substring(0, 1);              //read the first character

      if (IncomingByte==dummy)                                //if is a # start reading
      {
             TiltSpeed=readString.substring(2, 6).toInt();    // jump a char (A), read next 4 chars, record it on a variable
             Serial.println(TiltSpeed);                       // print the variable value
             PanSpeed=readString.substring(7, 11).toInt();    // jump a char (B), read next 4 chars, record it on a variable
             Serial.println(PanSpeed);                        // print the variable value
             gox=readString.substring(12, 16).toInt();        // jump a char (X), read next 4 chars, record it on a variable
             Serial.println(gox);                             // print the variable value
             goy=readString.substring(17, 21).toInt();        // jump a char (Y), read next 4 chars, record it on a variable
             Serial.println(goy);                             // print the variable value
             SetSpeed(&Stepper1, TiltSpeed);                  // set the speed af the first motor
             SetSpeed(&Stepper2, PanSpeed);                   // set the speed af the second motor
             SetPosition(gox, goy);                           // move to point
      }

}

// function used to set the speed of the motor
void SetSpeed(AccelStepper* pStepper, int MotorSpeed)
{

 pStepper->setSpeed(MotorSpeed*30);          // adjust the motor speed

}


 // function that move the motors
void SetPosition(int x, int y)
{
       x=x*100;    //multiply for pulley or for simulate
       y=y*100;    //multiply for pulley or for simulate
       Stepper1.moveTo(x);
       Stepper2.moveTo(y);


       // trick that make fluid the movement
       while (abs(x - Stepper1.currentPosition()) > 0)
       {
              Stepper1.run();
              Stepper2.run();
       }

}
The Processing file, at first, I was unable to test drive it. Processing verboase alway gave me this error code while when I press "Play" to run the sketch and show the interface.
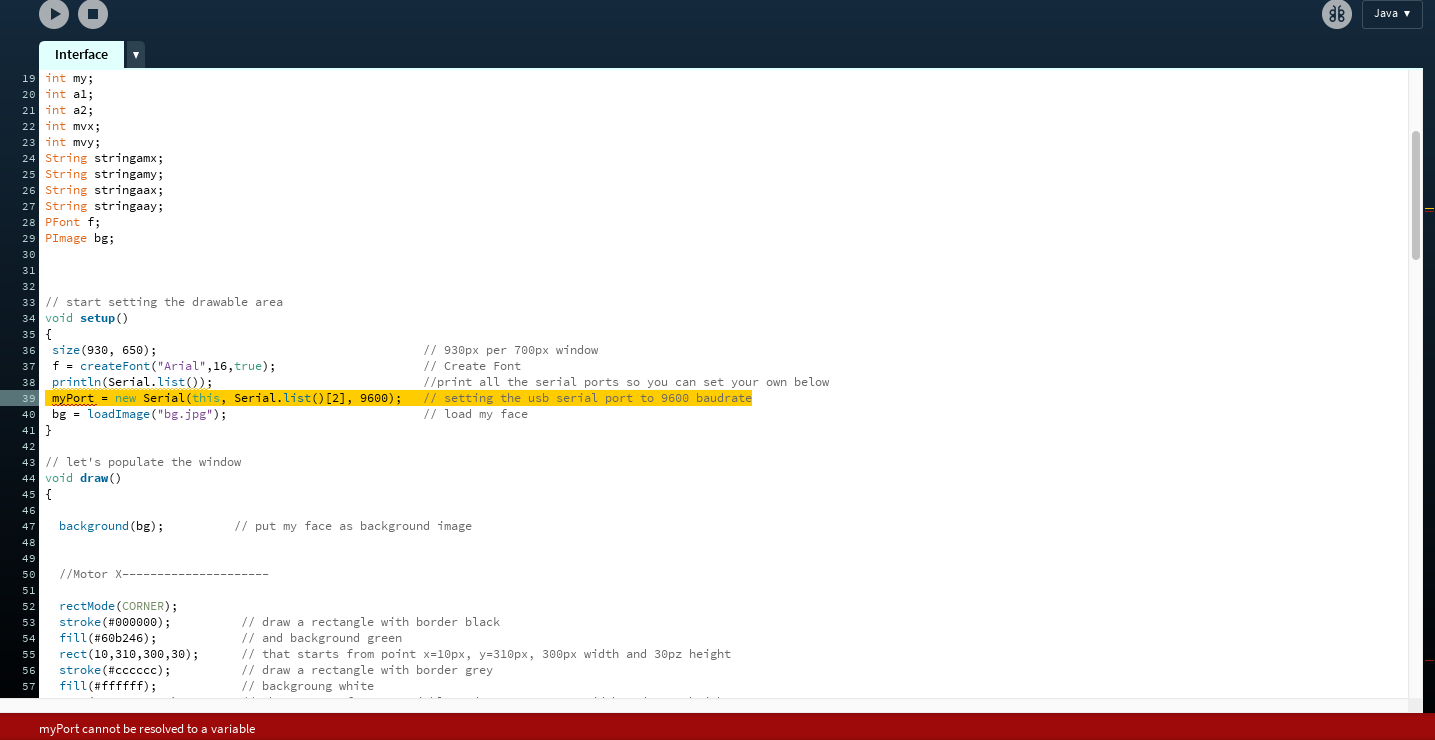
I looked on Procesing reference library on declaring serial port and this is what I have learned:
I have to declare my serial port according to what this println(Serial.list()); printed a list all the available serial ports:. I learned that my port is /dev/tty.usbmodemFA141 so I updated the code to be the one below
myPort = new Serial(this, "/dev/tty.usbmodemFD131", 9600);
I added in the import cc.arduino.*; // This import the Arduino Library for it to work since we do not use FIRMATA in this case and it looked like this:
     import processing.serial.*;
import cc.arduino.*; // This import the Arduino Library


int x=11; // start from x zero
int x2=750;  //start A from center
int y=461;  // start from y zero
int y2=750;  //start B from center

// some variables: nothing to  explain
int x1;
int x3;
int y1;
int y3;
int vel;
int acx;
int acy;
int mx;
int my;
int a1;
int a2;
int mvx;
int mvy;
String stringamx;
String stringamy;
String stringaax;
String stringaay;
PFont f;
PImage bg;
Serial myPort;


// start setting the drawable area
void setup()
{
 size(930, 650);                                      // 930px per 700px window
 f = createFont("Arial",16,true);                     // Create Font
 println(Serial.list());                              //print all the serial ports so you can set your own below
 myPort = new Serial(this, "/dev/cu.usbmodemFA141", 9600);   // setting the usb serial port to 9600 baudrate
 bg = loadImage("bg.jpg");                            // load my face
}

// let's populate the window
void draw()
{

  background(bg);          // put my face as background image


  //Motor X---------------------

  rectMode(CORNER);
  stroke(#000000);          // draw a rectangle with border black
  fill(#60b246);            // and background green
  rect(10,310,300,30);      // that starts from point x=10px, y=310px, 300px width and 30pz height
  stroke(#cccccc);          // draw a rectangle with border grey
  fill(#ffffff);            // backgroung white
  rect(x,310,20,30);        // that starts from x variable and y=310px, 20px width and 30px height
  textFont(f,16);           // Specify font to be used
  fill(255);                  // Specify font color
  text("X Motor Movement",100,300);  // Display fixed text in right position
  text(mvx,160,370);          // Display variable text in right position
  String xm = nf(x-11, 4);
  stringamx = 'X' + xm;
  if(mouseX>10 && mouseX<290 && mouseY > 310 && mouseY< 340 && mousePressed)
  {                         // listen when user press the mouse button inside the main rectangle area
    x=mouseX;                 // x variable is where the mouse is (inside the area)
    mx=constrain(x,10,290);   // record the mouse position inside the max x mouvement inside the area
    mvx=abs(x-11);           // to obtain a real value, I substract the x starting point.
    xm = nf(mvx, 4);   // to obtain always 4 digit (is useful for parsing)
    stringamx = 'X' + xm;     // record the value in a string putting an X ahead.
    println(stringamx);       // print the value
    delay(500);            // wait 500ms

  }


// FROM THIS POINT I COMMENT ONLY NEW CODE

 //motor Y --------------------------

 rectMode(CORNER);
  stroke(#000000);
  fill(#60b246);
 rect(450, 180, 30, 300);
 stroke(#cccccc);
  fill(#ffffff);
 rect(450, y, 30, 20);
  textFont(f,16);
  fill(255);
  text("Y Motor Movement",393,150);
  text(mvy,455,500);
  String ym = nf(abs(y-461), 4);
  stringamy = 'Y' + ym;
 if (mouseX>450 && mouseX<480 && mouseY > 180 && mouseY< 460 && mousePressed)
 {
   y=mouseY;
   my=constrain(y, 180, 461);
   mvy=abs(y-461);  // i want an high value up and low value down
   ym = nf(mvy, 4);
   stringamy = 'Y' + ym;
   println(stringamy);
   delay(500);            // wait 500ms

 }


 //X motor acceleration ---------------------

  rectMode(CORNER);
  stroke(#000000);
  fill(#60b246);
  rect(610,250,300,30);
  stroke(#cccccc);
  fill(#ffffff);
  rect(x2,250,20,30);
  textFont(f,16);
  fill(255);
  text("X Motor Acceleration",690,240);
  a2 = x2-610;
  text(a2,580,270);
  String ax = nf(abs(x2-610), 4);
  stringaax = 'A' + ax;
  if(mouseX>610 && mouseX<891 && mouseY > 250 && mouseY< 280 && mousePressed)
  {
    x2=mouseX;
    acx=constrain(x2,610,891);
    a2=abs(acx-610);
    ax = nf(a2, 4);
    stringaax = 'B' + ax;
    println(stringaax);
    delay(500);            // wait 500ms
  }


 //Y motor acceleration--------------------------

  rectMode(CORNER);
  stroke(#000000);
  fill(#60b246);
  rect(610,310,300,30);
  stroke(#cccccc);
  fill(#ffffff);
  rect(y2,310,20,30);
  textFont(f,16);
  fill(255);
  text("Y Motor Acceleration",690,305);
  a1 = y2-610;
  text(a1,580,330);
  String ay = nf(abs(y2-610), 4);
  stringaay = 'B' + ay;
 if (mouseX>610 && mouseX<891 && mouseY > 310 && mouseY< 340 && mousePressed)
 {
   y2=mouseX;
   acy=constrain(y2, 610, 891);
   a1=abs(acy-610);
   ay = nf(a1, 4);
   stringaay =  'B' + ay;
   println(stringaay);
   delay(500);            // wait 500ms

 }


  //BUTTON---------------

  rectMode(CORNER);
  stroke(#60b246);
  fill(#000000);
  rect(820,370,90,30);
  textFont(f,16);
  fill(255);
  text("START",840,392);
  if(mouseX>820 && mouseX<910 && mouseY > 370 && mouseY< 400 && mousePressed)
  {
  String gcode='#' + stringaax + stringaay + stringamx + stringamy ;  // join all the sctring and put at the begin
  myPort.write(gcode);  // write on serial port
  println(gcode);        // print on screen
  delay(500);            // wait 500ms
  }
}
Result and conclusion
I had the motor working with lots of noise and vibration so I rewired everyting, add another power cable to the arduino and the motor started to spin properly. For some reason, I was not able to manipulate the accelerator and speed properly for the motor on the right. I think it is starting to fade away from (guess: it was from overheating because it was generating lots of heats)
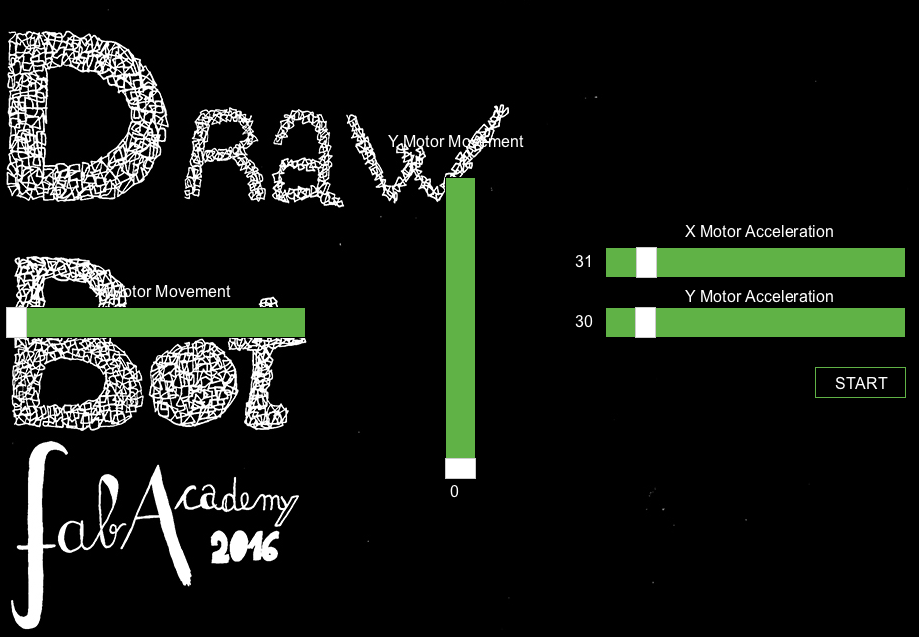
The image below explains the Applications Interface, each end of the X and Y slide, directs the speed and directions of the motor going FORWARD AND BACKWARD and the right end slide controls the acceleration:
Back to FIRMATA + controlP5
Now that I have gone through Alessandro codes and worked successfully, it did helped make my own code for controling a servo motor. I have used a FIRMATA sketch to test and control a servo motor. The Servo example sketch has been uploaded onto my Arduino Uno Board and the below processing file has been used.
Wiring servo motor
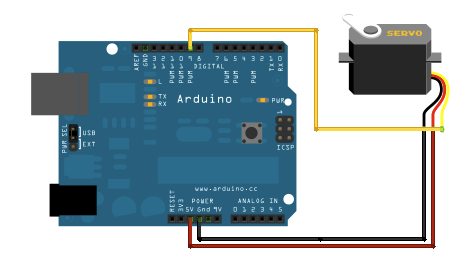
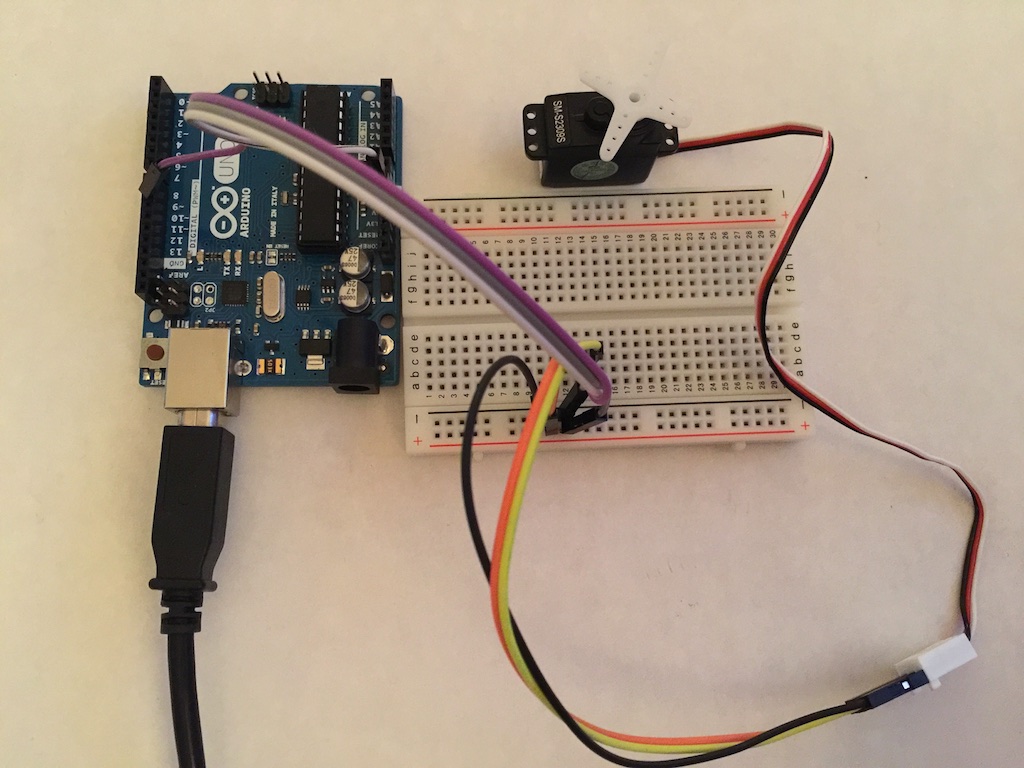

Processing code design
/*
arduino_servo
/**
 * ControlP5 Slider. Horizontal and vertical sliders, * *
* by Andreas Schlegel
*Processing code by Fabian Winkler
*Modified by Phonesavanh Thongsouksanoumane/
*/

import processing.serial.*;
import cc.arduino.*;
import controlP5.*;
ControlP5 cP5;
Arduino arduino;
Textarea text;
int servoAngle = 90;
PImage bg;
void setup() {

 size(560,400);
  // Prints out the available serial ports.
  println(Arduino.list());

  // Modify this line, by changing the [0] to the index of the serial
  // port corresponding to your Arduino board (as it appears in the list
  // printed by the line above).
  arduino = new Arduino(this, "/dev/tty.usbserial-A700Q73L", 57600);

 for (int i = 0; i <= 13; i++)
 arduino.pinMode(i, Arduino.OUTPUT);

 cP5 = new ControlP5(this);
 cP5.addSlider("servoAngle",0,180,servoAngle,20,10,180,20);


text = cP5.addTextarea("text1")
                       .setPosition(320,15)
                       .setSize(300,50)
                       .setLineHeight(14)
                       .setColor(color(255))
                       ;
          text.setText("PHONESAVANH'S MOTOR CONTROL");

}
void draw() {
 background(constrain(mouseX / 2, 0, 180));
 arduino.analogWrite(9, servoAngle);
//delay(15);
}
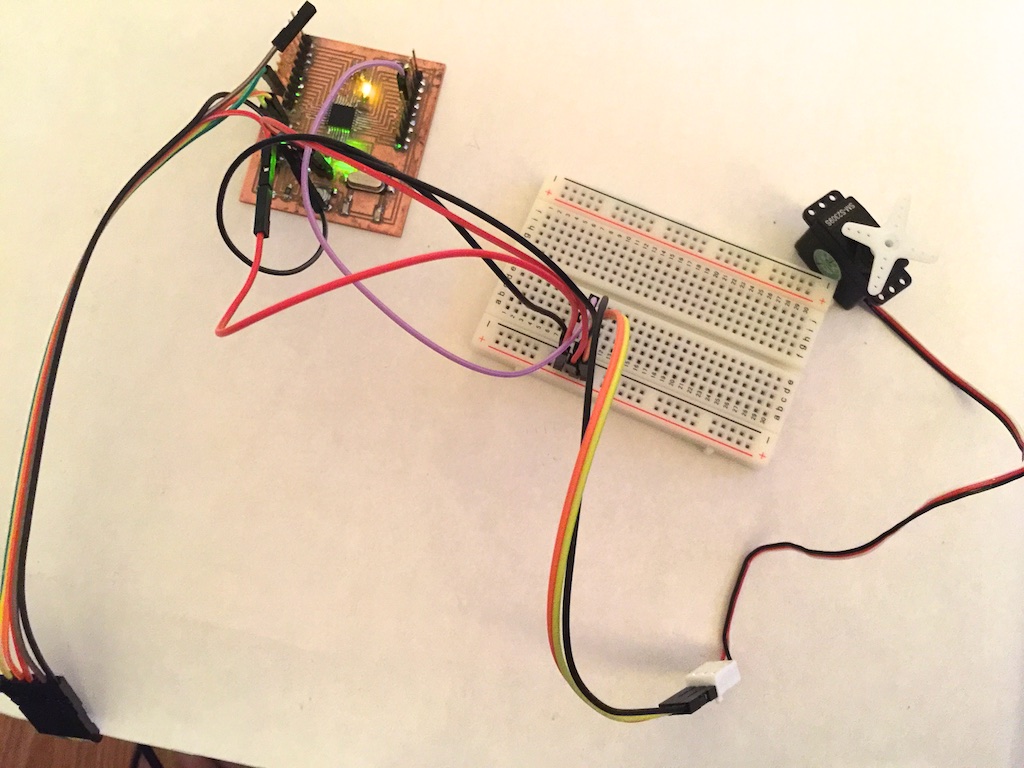
Results and conclusions
It worked well with my Arduino Uno board but somehow nothing moves on my Satshakit. I have done the same thing uploading my code isung the FTDI cable and set my port to /dev/cu.usbserial-A700Q73L, which is the FTDI port. I have changed wires and breadboard holes. Saddly, after a few hours of trying, nothing moves! Over all though, I am happy I learned a lot in this short amount of time. I liked using processing and it was great fun!
Big huge thanks to Alessandro Papaleo for the great learnings and helps! I learned how to add acceleration codes for the nema stepper motors in Arduino IDE that I did not know before and to generate g-Code in Processing.
Reference :
Slider example file
Arduino and Processing
SingleServoExample