Design and build a wired &/or wireless network connecting at least two processors
Introduction
For this assiggnment, I decided to implement a Master - Slave net using I2C protocol. I2C (Inter Integrated Circuit) or TWI (Two Wired Interface) is a protocol typically used for attaching lower-speed peripherical to processors and microcontrollers in short-distance, intra-board communication. TWI uses at least two wires for comunication: SDA (data) and SCL (clock signal). In next picture you can see a schematic of this network.
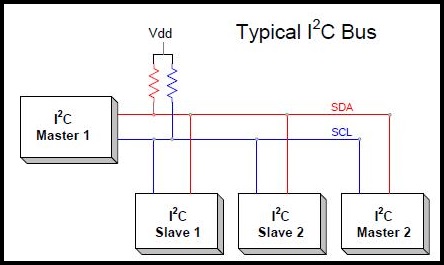
Is important to put pull up resistors on each wire.
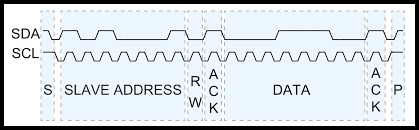
The typical message protocol is showed in next picture.
PCB design
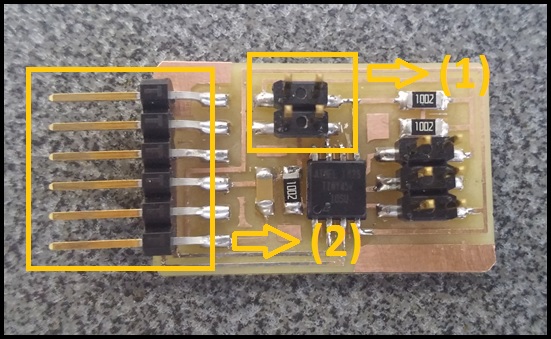
For Master PCB I consider to implement TWI communication (1) for network and RS232 communication (2) for shows data in a computer. The TWI header has four pins for communication (SDA and SCL) and polarization (VCC and GND).
You can download Master Board Cut File here and Traces File here.
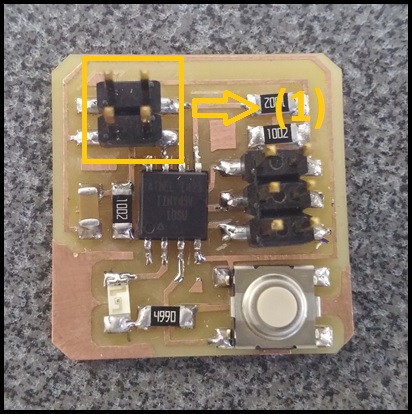
For Slave PCB I consider to implement TWI communication (1), one input (button) and one output (led).
You can download Slave Board Cut File here and Traces File here.
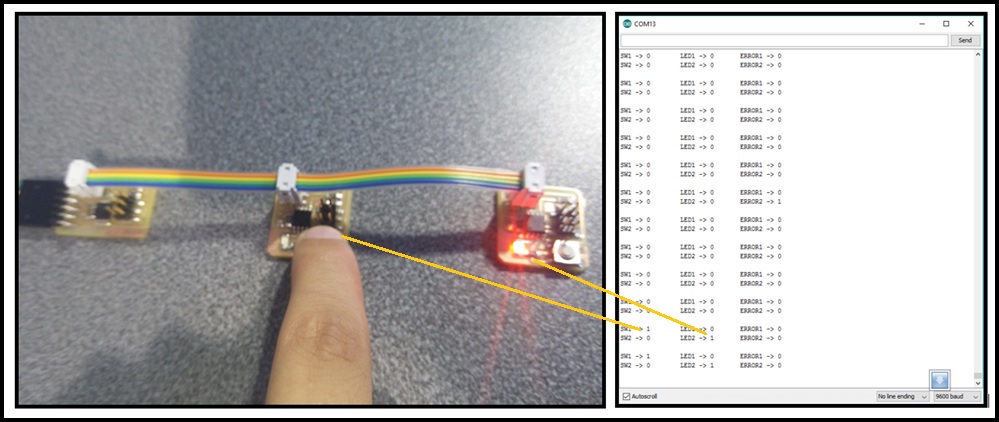
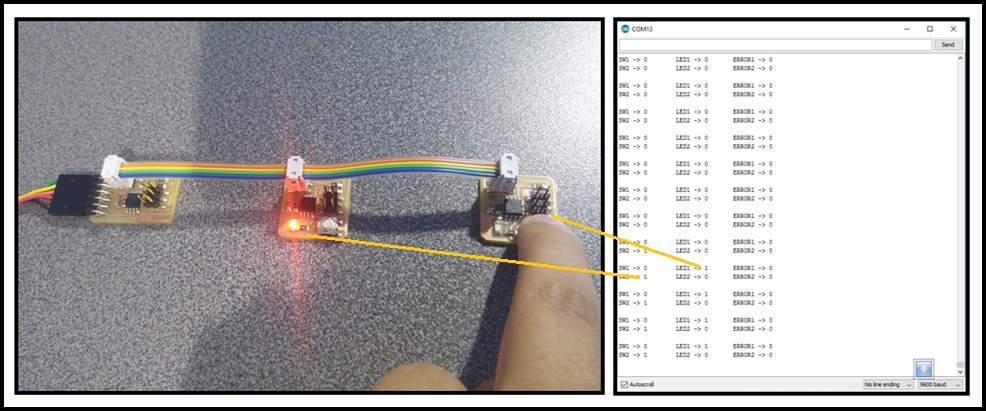
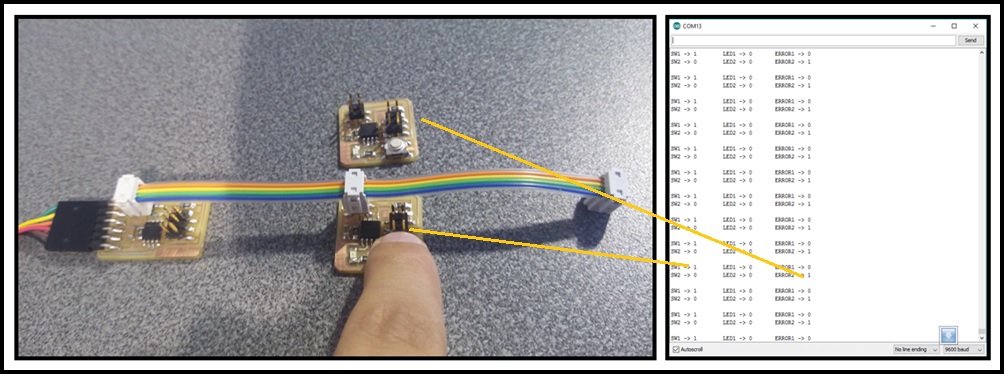
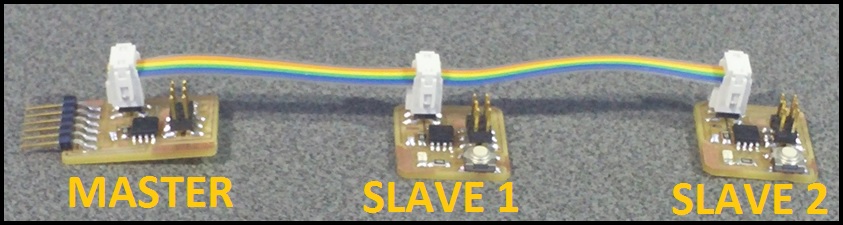
I milling one master pcb and two slave pcbs. In next picture you can see the network implemented.
Programming Master
Arduino has Wire library for implement TWI communication but this library can't be compiled with AtTinny chips. I used AtTinny45 and I downloaded TinyWireMaster library.
#include <SoftwareSerial.h>
SoftwareSerial serial(3, 4);

#include <TinyWireM.h>
#define SLAVE1 0x05
#define SLAVE2 0x06

byte error1, error2;
char data11='0', data12='0';
char data21='0', data22='0';

void setup() {
  serial.begin(9600);	// init rs232 communication

  TinyWireM.begin();	// init TWI communication as master
}

void loop() {
  TinyWireM.beginTransmission(SLAVE1);	// init data transmission with slave 1
  TinyWireM.send(data21);				// send data
  error1 = TinyWireM.endTransmission();	// finish transmission
  if(!error1){							// check errors
    TinyWireM.requestFrom(SLAVE1, 2);	// wait for receive 2 bytes from slave 1
    data11 = TinyWireM.receive();
    data12 = TinyWireM.receive();
  }
  delay(50);

  TinyWireM.beginTransmission(SLAVE2);	// init data transmission with slave 2
  TinyWireM.send(data11);				// send data
  error2 = TinyWireM.endTransmission();	// finish transmission
  if(!error2){							// check errors
    TinyWireM.requestFrom(SLAVE2, 2);	// wait for receive 2 bytes from slave 2
    data21 = TinyWireM.receive();
    data22 = TinyWireM.receive();
  }
  delay(50);

  // print all data of salves throuhgt serial rs232 interface
  serial.print("SW1 -> ");serial.print(data11);serial.print("\t");
  serial.print("LED1 -> ");serial.print(data12);serial.print("\t");
  serial.print("ERROR1 -> ");serial.print(error1, DEC);serial.println();

  serial.print("SW2 -> ");serial.print(data21);serial.print("\t");
  serial.print("LED2 -> ");serial.print(data22);serial.print("\t");
  serial.print("ERROR2 -> ");serial.print(error2, DEC);serial.println();
  serial.println();
}
By default the I2C master library (TinyWireM) is set to run at 1MHz. To run at 8MHz, #defines in USI_TWI_Master.h / .cpp must be changed. No changes are necessary for the I2C slave library (TinyWireS).
Programming Slave
For programming slaves pcbs I used TinyWireSlave library.
#define ADDRESS 0x05	// set slave direction
#include <TinyWireS.h>

#ifndef TWI_RX_BUFFER_SIZE
#define TWI_RX_BUFFER_SIZE ( 16 )
#endif

#define LED     3
#define BUTTON  4

char rx;
char led_status;

void setup() {
  TinyWireS.begin(ADDRESS);				// init TWI communication as slave
  TinyWireS.onReceive(receiveEvent);	// call receiveEvent function when master sends data
  TinyWireS.onRequest(requestEvent);	// call requestEvent function when master request data

  pinMode(LED, OUTPUT);
  pinMode(BUTTON, INPUT);
  digitalWrite(BUTTON, HIGH);			// enable pull-up resistor
}

void loop() {
  TinyWireS_stop_check();
}

// receive data and set led status
void receiveEvent(uint8_t howMany) {
  if (howMany < 1)  return;

  rx = TinyWireS.receive();

  if(rx == '1')
    digitalWrite(LED, HIGH);
  else
    digitalWrite(LED, LOW);

  howMany--;

  while(howMany--){
    rx = TinyWireS.receive();

    if(rx == '1')
      digitalWrite(LED, HIGH);
    else
      digitalWrite(LED, LOW);
  }

  led_status = rx;
}

// send button status and led status
void requestEvent() {
  if(digitalRead(BUTTON))
    TinyWireS.send('0');
  else
    TinyWireS.send('1');
  TinyWireS.send(led_status);
}
Working